How to draw anything? This is the question that many aspiring artists ask themselves, and CONDUCT.EDU.VN provides the answer with this comprehensive beginner’s guide to drawing. This article focuses on fundamental drawing techniques, art tips and basic drawing skills to help you learn how to draw easily and build a strong foundation in art.
1. Preparing for Your Drawing Journey
Before diving into the actual drawing process, it’s crucial to establish a strong foundation. This involves not only familiarizing yourself with the necessary materials but also understanding the importance of mindset and preparation.
1.1 Gathering Essential Drawing Supplies
To begin your drawing journey, you’ll need a few essential supplies. Having the right tools can significantly impact your experience and the quality of your work. Here’s a list of the basics:
- Pencils: A set of drawing pencils with varying grades (e.g., HB, 2B, 4B, 6B) will allow you to create different shades and tones.
- Eraser: A kneaded eraser is excellent for lifting graphite without damaging the paper. A plastic or rubber eraser is useful for more precise corrections.
- Paper: Start with a sketchbook or drawing pad with smooth, medium-weight paper. Avoid overly textured paper, as it can be challenging for beginners.
- Sharpener: Keep your pencils sharp to maintain precision in your lines.
- Optional Tools: A ruler, compass, and blending stumps can also be helpful as you progress.
1.2 Cultivating the Right Mindset
Drawing is as much a mental exercise as it is a physical one. Approaching your drawing with the right mindset can make the learning process more enjoyable and effective.
- Patience: Drawing takes time and practice. Don’t get discouraged if your first attempts aren’t perfect.
- Observation: Train yourself to see the world around you with a keen eye. Pay attention to shapes, lines, and proportions.
- Experimentation: Don’t be afraid to try new techniques and styles. Experimentation is key to finding your unique artistic voice.
- Enjoyment: Remember to have fun! Drawing should be a relaxing and fulfilling activity.
1.3 Warming Up for Success
Just like athletes warm up before a game, artists should warm up before starting a drawing session. Warming up helps to loosen your muscles, improve hand-eye coordination, and get your creative juices flowing.
- Line Exercises: Practice drawing straight lines, curved lines, and circles. Focus on maintaining consistent pressure and smooth strokes.
- Shape Drills: Fill a page with basic shapes like squares, triangles, and ellipses. Vary the size and orientation of the shapes to challenge yourself.
- Doodling: Engage in freeform doodling to unleash your creativity and explore different patterns and textures.
2. Understanding the Fundamentals of Drawing
Once you’ve gathered your supplies and prepared your mind, it’s time to delve into the core principles of drawing. These fundamentals will serve as the building blocks for all your future artwork.
2.1 Mastering Basic Shapes
At its core, drawing involves breaking down complex objects into simpler, more manageable shapes. Learning to recognize and draw these basic shapes is essential for creating accurate and realistic drawings.
- Circles: Practice drawing circles of various sizes and proportions. Focus on creating smooth, continuous lines.
- Squares: Draw squares with equal sides and right angles. Pay attention to maintaining consistent proportions.
- Triangles: Experiment with different types of triangles, such as equilateral, isosceles, and scalene.
- Rectangles: Draw rectangles with varying lengths and widths. Practice maintaining consistent angles.
- Ellipses: Ellipses are essential for representing circles in perspective. Practice drawing ellipses with different degrees of elongation.
2.2 Grasping Perspective
Perspective is the technique of representing three-dimensional objects on a two-dimensional surface. Understanding perspective is crucial for creating drawings that feel realistic and immersive.
- One-Point Perspective: In one-point perspective, all parallel lines converge at a single vanishing point on the horizon line.
- Two-Point Perspective: In two-point perspective, parallel lines converge at two vanishing points on the horizon line.
- Three-Point Perspective: Three-point perspective is used to represent objects viewed from above or below, with parallel lines converging at three vanishing points.
2.3 Exploring Value and Shading
Value refers to the lightness or darkness of a color or tone. Shading is the process of using value to create the illusion of depth, form, and light in a drawing.
- Value Scale: Create a value scale by gradually transitioning from pure white to pure black. Practice creating smooth gradients between each value.
- Hatching: Hatching involves drawing a series of parallel lines to create value. The closer the lines, the darker the value.
- Cross-Hatching: Cross-hatching is similar to hatching, but with lines intersecting at various angles to create darker values.
- Blending: Blending involves smoothing out the transitions between values to create a more realistic effect.
3. Step-by-Step Drawing Techniques for Beginners
Now that you have a solid understanding of the fundamentals, let’s explore some step-by-step drawing techniques that you can use to create your own artwork.
3.1 Drawing from Observation
Drawing from observation involves carefully studying a real-life object or scene and then recreating it on paper. This is an excellent way to improve your observational skills and develop your artistic abilities.
- Choose Your Subject: Select a simple object or scene to draw.
- Observe Carefully: Take your time to study the object or scene. Pay attention to its shape, proportions, and details.
- Sketch the Basic Shapes: Begin by sketching the basic shapes that make up the object or scene. Use light, loose lines to create a rough outline.
- Refine the Details: Once you’re happy with the basic shapes, begin to refine the details. Add more specific lines and shapes to create a more accurate representation.
- Add Value and Shading: Use value and shading to create the illusion of depth and form. Pay attention to the way light interacts with the object or scene.
3.2 Drawing from Reference Photos
Drawing from reference photos is similar to drawing from observation, but instead of studying a real-life object or scene, you’re studying a photograph. This can be a convenient way to practice drawing when you don’t have access to a live subject.
- Select a Reference Photo: Choose a high-quality reference photo with good lighting and clear details.
- Analyze the Photo: Take some time to analyze the photo. Pay attention to the composition, lighting, and colors.
- Sketch the Basic Shapes: Begin by sketching the basic shapes that make up the image. Use light, loose lines to create a rough outline.
- Refine the Details: Once you’re happy with the basic shapes, begin to refine the details. Add more specific lines and shapes to create a more accurate representation.
- Add Value and Shading: Use value and shading to create the illusion of depth and form. Pay attention to the way light interacts with the subject in the photo.
3.3 Drawing from Imagination
Drawing from imagination involves creating artwork based on your own thoughts, ideas, and memories. This is a great way to express your creativity and develop your unique artistic style.
- Brainstorm Ideas: Start by brainstorming ideas for your drawing. What do you want to create? What message do you want to convey?
- Create a Rough Sketch: Once you have a clear idea, create a rough sketch of your composition. Use light, loose lines to establish the basic shapes and layout.
- Refine the Details: Refine the details of your drawing. Add more specific lines and shapes to create a more polished and professional look.
- Add Value and Shading: Use value and shading to create the illusion of depth and form. Experiment with different techniques to achieve the desired effect.
- Add Color (Optional): If you want, you can add color to your drawing using colored pencils, markers, or other media.
4. Advanced Drawing Techniques
Once you’ve mastered the basics, you can start exploring more advanced drawing techniques to take your art to the next level.
4.1 Mastering Line Weight
Line weight refers to the thickness or thinness of a line. Varying line weight can add depth, contrast, and visual interest to your drawings.
- Thick Lines: Use thick lines to define the outlines of objects and to create strong focal points.
- Thin Lines: Use thin lines to add subtle details and to create a sense of distance or atmosphere.
- Varying Line Weight: Experiment with varying line weight throughout your drawing to create a dynamic and engaging composition.
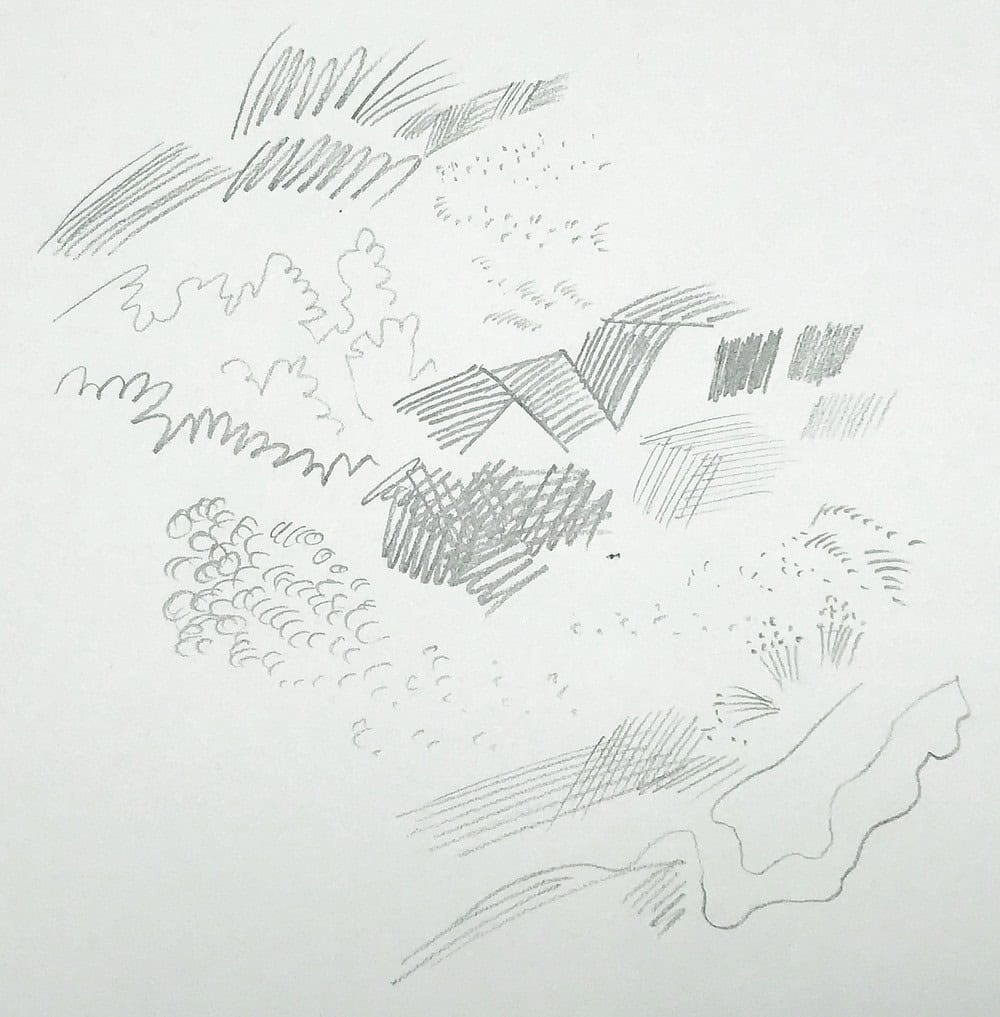
4.2 Exploring Textures
Texture refers to the surface quality of an object, such as its smoothness, roughness, or bumpiness. Adding textures to your drawings can make them feel more realistic and tactile.
- Hatching: Use hatching to create the illusion of smooth or slightly textured surfaces.
- Stippling: Use stippling (dots) to create the illusion of rough or bumpy surfaces.
- Scribbling: Use scribbling to create the illusion of chaotic or irregular textures.
4.3 Enhancing Depth
Creating a sense of depth in your drawings can make them feel more realistic and immersive. There are several techniques you can use to enhance depth, including:
- Overlapping: Overlapping objects in your drawing can create a sense of depth and perspective.
- Atmospheric Perspective: Use atmospheric perspective to create the illusion of distance by making objects in the background appear lighter and less detailed than objects in the foreground.
- Linear Perspective: Use linear perspective to create the illusion of depth by converging parallel lines at a vanishing point.
5. Practicing Regularly
The key to improving your drawing skills is to practice regularly. Set aside some time each day or week to draw, even if it’s just for a few minutes. The more you practice, the better you’ll become.
5.1 Setting Realistic Goals
When setting goals for your drawing practice, be sure to be realistic. Don’t expect to become a master artist overnight. Instead, focus on making small, incremental improvements over time.
5.2 Finding Inspiration
To stay motivated and inspired, seek out inspiration from other artists, nature, and everyday life. Visit art museums, browse art books, and spend time outdoors observing the world around you.
5.3 Seeking Feedback
Getting feedback from other artists can be invaluable for improving your drawing skills. Join an art class or workshop, share your work online, and ask for constructive criticism.
6. Overcoming Challenges
Drawing can be challenging at times, but it’s important to persevere and not give up. Here are some common challenges that beginners face, and how to overcome them:
6.1 Dealing with Frustration
It’s normal to feel frustrated when your drawings don’t turn out the way you want them to. When you feel frustrated, take a break, step away from your drawing, and do something you enjoy.
6.2 Overcoming Perfectionism
Perfectionism can be a major obstacle to artistic growth. Don’t be afraid to make mistakes. Embrace them as learning opportunities.
6.3 Staying Motivated
It can be difficult to stay motivated when you’re not seeing immediate results. Set small, achievable goals, reward yourself for your progress, and remember why you started drawing in the first place.
7. Exploring Different Mediums
As you become more comfortable with drawing, you may want to experiment with different mediums. Each medium has its own unique properties and characteristics, and exploring different mediums can help you to expand your artistic horizons.
7.1 Graphite Pencils
Graphite pencils are the most common and versatile drawing medium. They come in a variety of grades, from hard (H) to soft (B), allowing you to create a wide range of values and textures.
7.2 Charcoal
Charcoal is a dry drawing medium made from burnt wood. It is known for its rich, dark values and its ability to create dramatic effects.
7.3 Colored Pencils
Colored pencils are similar to graphite pencils, but with the addition of pigments that add color to your drawings. They are a versatile medium that can be used for a variety of techniques, such as blending, layering, and burnishing.
7.4 Pen and Ink
Pen and ink is a wet drawing medium that uses a pen to apply ink to paper. It is known for its crisp, clean lines and its ability to create detailed illustrations.
8. Connecting with the Art Community
Connecting with other artists can be a great way to learn, grow, and stay inspired. There are many ways to connect with the art community, both online and offline.
8.1 Joining Art Groups
Joining an art group or club can provide you with opportunities to meet other artists, share your work, and learn from each other.
8.2 Attending Art Workshops
Attending art workshops and classes can provide you with structured learning opportunities and personalized feedback from experienced instructors.
8.3 Sharing Your Work Online
Sharing your work online can help you to reach a wider audience, get feedback from other artists, and build a following.
9. Understanding Art Theory
Delving into art theory can greatly enhance your understanding and application of drawing principles. Key concepts include:
9.1 Color Theory
Understanding color relationships, harmonies, and contrasts is crucial for creating visually appealing and impactful drawings. Topics to explore include:
- Hue: The pure color, such as red, blue, or green.
- Saturation: The intensity or purity of a color.
- Value: The lightness or darkness of a color.
- Color Harmonies: Understanding how colors work together, such as complementary, analogous, and triadic color schemes.
9.2 Composition
Composition refers to the arrangement of elements within a drawing. A well-composed drawing will be visually balanced, engaging, and effective at conveying its intended message. Key principles of composition include:
- Rule of Thirds: Dividing the drawing into nine equal parts and placing key elements along the lines or at the intersections.
- Leading Lines: Using lines to guide the viewer’s eye through the drawing.
- Focal Point: Creating a clear focal point to draw the viewer’s attention.
- Balance: Achieving a sense of visual equilibrium in the drawing.
9.3 Anatomy
For those interested in drawing figures, understanding human anatomy is essential. Learning about the skeletal structure, muscles, and proportions will help you to create more accurate and realistic figure drawings. Resources for learning anatomy include:
- Anatomy Books: Study anatomy books specifically designed for artists.
- Online Resources: Explore online resources such as anatomy tutorials and 3D models.
- Life Drawing Classes: Attend life drawing classes to practice drawing from live models.
10. Advanced Techniques: Light and Shadow
Mastering light and shadow is crucial for creating realistic and compelling drawings. This involves understanding how light interacts with different surfaces and using shading techniques to represent form and volume.
10.1. Understanding Light Sources
Identifying the light source in your composition is the first step in accurately rendering light and shadow. Consider the following:
- Direction: Determine the direction from which the light is coming.
- Intensity: Assess the intensity of the light source (e.g., bright sunlight, soft ambient light).
- Color: Note the color of the light (e.g., warm or cool).
10.2. Rendering Form with Shading
Use shading techniques to create the illusion of three-dimensional form on a two-dimensional surface. Key concepts include:
- Highlights: The brightest areas on an object, where light is directly hitting the surface.
- Midtones: The areas between the highlights and shadows, representing the middle values.
- Shadows: The darkest areas on an object, where light is blocked.
10.3. Advanced Shading Techniques
Experiment with advanced shading techniques to achieve more nuanced and realistic effects. These include:
- Chiaroscuro: A dramatic use of light and shadow to create strong contrasts and dramatic effects.
- Sfumato: A soft, hazy shading technique that creates a sense of depth and atmosphere.
- Hatching and Cross-Hatching: Use hatching and cross-hatching to build up values gradually and create texture.
11. Deepening Your Expertise
To truly excel in drawing, you’ll want to explore more advanced techniques and concepts. This involves delving deeper into areas like perspective, composition, and anatomy, as well as studying the works of master artists and experimenting with different styles and approaches.
11.1. Advanced Perspective Techniques
Building on your understanding of one-, two-, and three-point perspective, you can explore more complex perspective systems, such as:
- Curvilinear Perspective: Used to represent scenes with extreme distortion, such as wide-angle views.
- Multiple Point Perspective: Involves using more than three vanishing points to create complex and dynamic compositions.
11.2. Mastering Compositional Elements
Take your understanding of composition to the next level by exploring more advanced compositional elements, such as:
- Symmetry and Asymmetry: Use symmetry to create a sense of balance and order, or asymmetry to create a sense of dynamism and visual interest.
- Rhythm and Repetition: Use rhythm and repetition to create visual patterns and guide the viewer’s eye through the drawing.
- Contrast: Use contrast in value, color, and texture to create focal points and add visual interest.
11.3. Anatomical Studies
For artists interested in figure drawing, continuous anatomical studies are essential. This involves:
- Studying Muscles and Bones: Learn the names, shapes, and functions of the major muscles and bones of the human body.
- Understanding Proportions: Master the proportions of the human figure and how they vary between individuals.
- Drawing from Life: Practice drawing from live models to develop your understanding of anatomy and form.
12. Tips for Sustained Improvement
Drawing is a journey that requires continuous learning and practice. Here are some tips to help you stay on track and continue improving your skills:
- Set Specific Goals: Define clear and achievable goals for your drawing practice.
- Track Your Progress: Keep a sketchbook or journal to track your progress and identify areas for improvement.
- Seek Feedback: Regularly seek feedback from other artists or instructors to get constructive criticism.
- Stay Inspired: Surround yourself with art that inspires you and keeps you motivated.
- Have Fun: Remember to enjoy the process of drawing and let your creativity flow.
13. Resources for Beginners
To further assist you on your artistic journey, here are some invaluable resources that can supplement your learning and practice:
13.1. Online Tutorials
The internet is teeming with free and premium drawing tutorials. Websites like YouTube, Skillshare, and Udemy offer a plethora of courses for beginners. Look for tutorials that cover basic techniques, shading, perspective, and figure drawing.
13.2. Books
There are numerous books available for learning how to draw. Some recommended titles include:
- “Drawing on the Right Side of the Brain” by Betty Edwards
- “Keys to Drawing” by Bert Dodson
- “The Natural Way to Draw” by Kimon Nicolaïdes
13.3. Local Art Classes
Taking a local art class can provide you with personalized instruction and feedback from an experienced teacher. Check out community centers, art schools, and local colleges for available courses.
14. Frequently Asked Questions (FAQs)
Here are some frequently asked questions about learning how to draw:
- How long does it take to learn how to draw?
- The time it takes to learn how to draw varies depending on your goals, dedication, and natural talent. However, with consistent practice, you can start seeing noticeable improvements in a few months.
- Do I need to have natural talent to learn how to draw?
- While natural talent can be helpful, it’s not essential. Drawing is a skill that can be learned and developed through practice and dedication.
- What’s the best way to practice drawing?
- The best way to practice drawing is to draw regularly, focus on the fundamentals, and seek feedback from other artists.
- What should I draw as a beginner?
- As a beginner, start by drawing simple objects, such as fruits, vegetables, or household items. Once you’re comfortable with the basics, you can move on to more complex subjects.
- How do I improve my shading skills?
- To improve your shading skills, practice creating value scales, experiment with different shading techniques, and study the way light interacts with different surfaces.
- How do I draw realistic figures?
- To draw realistic figures, study anatomy, practice drawing from life, and pay attention to proportions, gesture, and expression.
- What are some common mistakes that beginners make?
- Some common mistakes that beginners make include not paying attention to proportions, using too much pressure, and not practicing regularly.
- How do I stay motivated to draw?
- To stay motivated to draw, set realistic goals, find inspiration, and connect with other artists.
- What are the best drawing tools for beginners?
- The best drawing tools for beginners include a set of drawing pencils, a kneaded eraser, and a sketchbook or drawing pad with smooth, medium-weight paper.
- Where can I find reference photos for drawing?
- You can find reference photos for drawing on websites like Unsplash, Pixabay, and Pexels.
Drawing is a rewarding skill that can bring joy and fulfillment to your life. By following these tips and techniques, you can embark on a journey of artistic discovery and develop your unique drawing style. Remember to be patient, persistent, and most importantly, have fun along the way!
Need more guidance on how to master the art of drawing? Visit CONDUCT.EDU.VN for in-depth tutorials, expert advice, and a supportive community to help you on your artistic journey. Located at 100 Ethics Plaza, Guideline City, CA 90210, United States, or contact us via WhatsApp at +1 (707) 555-1234. Let us help you transform your passion into skill. Visit our website conduct.edu.vn today!