Guided Access simplifies device usage by restricting it to a single application and granting control over feature availability. At CONDUCT.EDU.VN, we understand the importance of focused accessibility and offer a guide on setting up this feature to ensure a streamlined user experience. This ensures enhanced device control and minimizes distractions, promoting better accessibility management and customized usability. Discover how Guided Access can transform device interaction, with advanced tips on accessibility customization and usage control.
1. Understanding Guided Access
Guided Access is an accessibility feature available on iPhones, iPads, and iPod touch devices. It allows users to lock the device into a single app and control which features are available within that app. This can be particularly useful in a variety of scenarios:
-
For Children: When allowing children to use a device, Guided Access can prevent them from accidentally navigating to other apps or making unauthorized purchases.
-
Focus Enhancement: For individuals with attention deficits or those easily distracted, it helps maintain focus on a specific task or application.
-
Accessibility Needs: For users with cognitive or motor skill challenges, it simplifies the interface and reduces the potential for unintended actions.
-
Public Kiosks: In public settings, Guided Access can ensure that devices are only used for their intended purpose, such as displaying information or running a specific application.
Enabling Guided Access enhances digital well-being and ensures usability across diverse user groups. Understanding its functionalities is crucial for optimizing the device experience.
2. Setting Up Guided Access: Step-by-Step
Before you can use Guided Access, you need to set it up in the Settings app. Here’s how:
2.1. Navigating to Guided Access Settings
-
Open Settings: Start by tapping the “Settings” icon on your device’s home screen.
-
Accessibility: Scroll down and tap on “Accessibility.” This section houses various settings designed to make your device more user-friendly.
-
Guided Access: Scroll down to the “General” section and tap “Guided Access.” This will take you to the Guided Access settings screen.
2.2. Enabling Guided Access
- Toggle Switch: On the Guided Access screen, you’ll see a toggle switch at the top. Slide this switch to the right to turn Guided Access on. The switch will turn green, indicating that Guided Access is enabled.
2.3. Configuring Passcode Settings
-
Passcode Settings: Tap on “Passcode Settings.” This is where you’ll set up a passcode that is required to exit a Guided Access session.
-
Set Guided Access Passcode: Tap “Set Guided Access Passcode.” You’ll be prompted to enter a passcode. Choose a passcode that you can remember but is difficult for others to guess.
-
Re-enter Passcode: After entering your passcode, you’ll be asked to re-enter it to confirm. Make sure the two passcodes match.
-
Face ID or Touch ID: From the Passcode Settings screen, you can also enable Face ID or Touch ID (if your device supports it) as an alternative way to end a Guided Access session. Toggle the “Face ID” or “Touch ID” switch to the right to enable this feature.
2.4. Setting a Time Limit (Optional)
-
Time Limit: Back on the main Guided Access screen, you can set a time limit for your sessions. This is useful if you want Guided Access to automatically end after a certain period.
-
Alert Sound: Tap “Time Limits” and then toggle “Alarm” to on.
-
Audio Cue: You can choose what to do before Guided Access ends, such as hear an alarm or speak.
3. Starting a Guided Access Session
Once Guided Access is set up, starting a session is quick and easy. Here’s how:
3.1. Opening the Desired App
- Choose App: Open the app that you want to lock the device into. For example, if you want to lock the device into a reading app, open that app.
3.2. Activating Guided Access
-
Triple-Click:
-
iPhone X and Later: Triple-click the side button (the power button).
-
iPhone 8 and Earlier: Triple-click the Home button.
-
-
Guided Access Menu: After triple-clicking, the Guided Access menu will appear.
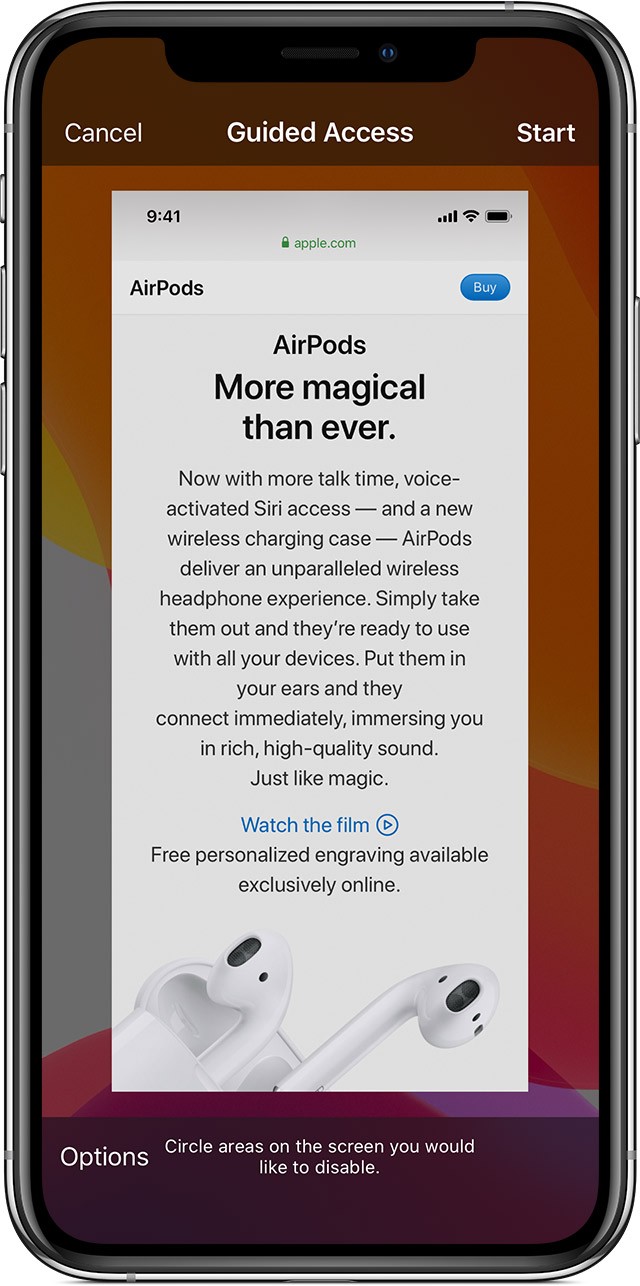
3.3. Configuring Restrictions (Optional)
-
Drawing Restrictions: If you want to disable certain areas of the screen, use one finger to draw a circle around those areas. The circled areas will become grayed out and unresponsive to touch.
-
Moving and Resizing: You can move or resize the circled areas by dragging the handles.
-
Removing Restrictions: To remove a restriction, tap the “X” inside the circle.
3.4. Starting the Session
-
Tap Start: In the Guided Access menu, tap “Start” in the upper-right corner of the screen.
-
Enter Passcode: If prompted, enter your Guided Access passcode.
-
Session Begins: Guided Access will now be active. The device will be locked into the current app, and the restrictions you configured will be in place.
4. Controlling Available Features
One of the key benefits of Guided Access is the ability to control which features are available during a session. This can be done through the Options menu:
4.1. Accessing the Options Menu
-
Triple-Click: Triple-click the side button (iPhone X and later) or the Home button (iPhone 8 and earlier) to bring up the Guided Access menu.
-
Enter Passcode: If prompted, enter your Guided Access passcode.
-
Tap Options: Tap “Options” in the lower-left corner of the screen.
4.2. Available Options
The Options menu allows you to customize the Guided Access session by toggling various features on or off:
-
Sleep/Wake Button: Disables the Sleep/Wake button, preventing the device from being turned off or put to sleep.
-
Volume Buttons: Disables the volume buttons, preventing the volume from being adjusted.
-
Motion: Limits how the device responds to motion. When turned off, the screen won’t respond to shaking, and screen rotation will be disabled.
-
Keyboards: Disables the keyboard, preventing text input.
-
Touch: Disables touch input, making the screen unresponsive to touch. This is useful for preventing accidental taps.
-
Dictionary Lookup: Enables or disables the Look Up feature when selecting text.
-
Time Limit: Allows you to set a time limit for the Guided Access session. When the time limit is reached, the session will automatically end.
4.3. Saving Your Settings
- Tap Done: After configuring the desired options, tap “Done” in the upper-right corner of the screen to save your settings.
5. Ending a Guided Access Session
Ending a Guided Access session is as simple as starting one:
5.1. Activating the Menu
- Triple-Click: Triple-click the side button (iPhone X and later) or the Home button (iPhone 8 and earlier).
5.2. Ending the Session
-
Enter Passcode: Enter your Guided Access passcode when prompted.
-
Tap End: Tap “End” in the upper-left corner of the screen.
-
Session Ends: The Guided Access session will end, and the device will return to its normal state.
5.3. Using Touch ID or Face ID
If you have enabled Touch ID or Face ID for Guided Access, you can use these biometric methods to end the session:
-
Double-Click: Double-click the side button (iPhone X and later) or the Home button (iPhone 8 and earlier).
-
Authenticate: Use Touch ID or Face ID to authenticate.
-
Session Ends: The Guided Access session will end, and the device will return to its normal state.
6. Use Cases and Scenarios
Guided Access can be used in a variety of scenarios to improve focus, accessibility, and security. Here are some common use cases:
6.1. Educational Settings
-
Classroom Use: Teachers can use Guided Access to lock students into educational apps during class, preventing them from being distracted by other apps or features.
-
Testing: During exams or quizzes, Guided Access can ensure that students only have access to the testing app, preventing cheating or unauthorized access to other resources.
-
Special Education: For students with learning disabilities or attention deficits, Guided Access can help them stay focused on the task at hand and reduce distractions.
6.2. Healthcare Environments
-
Patient Entertainment: In hospitals or clinics, Guided Access can be used to lock patients into entertainment apps, preventing them from accessing sensitive information or making unauthorized purchases.
-
Therapeutic Activities: Therapists can use Guided Access to create structured activities for patients with cognitive or motor skill challenges.
6.3. Retail and Business Applications
-
Kiosk Mode: Retailers can use Guided Access to turn iPads into interactive kiosks, allowing customers to browse products, view information, or complete transactions without accessing other apps or settings.
-
Employee Training: Businesses can use Guided Access to lock employees into training apps during onboarding or professional development, ensuring that they stay focused on the training material.
6.4. Home Use
-
Parental Control: Parents can use Guided Access to limit their children’s access to certain apps or features, preventing them from making unauthorized purchases or accessing inappropriate content.
-
Accessibility: Individuals with cognitive or motor skill challenges can use Guided Access to simplify the interface and reduce the potential for unintended actions.
7. Advanced Tips and Tricks
To get the most out of Guided Access, consider these advanced tips and tricks:
7.1. Creating Custom Configurations
- App-Specific Settings: Guided Access settings are saved on a per-app basis, allowing you to create custom configurations for different apps. For example, you might disable touch input in a video playback app to prevent accidental taps, but enable it in a drawing app.
7.2. Using Siri to Start Guided Access
- Voice Activation: You can use Siri to start a Guided Access session by saying “Turn on Guided Access.” This can be useful if you have difficulty using the side button or Home button.
7.3. Combining Guided Access with Other Accessibility Features
- Enhanced Accessibility: Guided Access can be combined with other accessibility features, such as VoiceOver, Zoom, and Switch Control, to create a customized accessibility experience.
7.4. Troubleshooting Common Issues
-
Forgetting Passcode: If you forget your Guided Access passcode, you’ll need to restore your device to factory settings. To avoid this, make sure to choose a passcode that you can remember, and consider enabling Face ID or Touch ID as an alternative way to end sessions.
-
Guided Access Not Working: If Guided Access is not working properly, make sure that it is enabled in the Settings app, and that you are triple-clicking the side button or Home button correctly.
8. The Importance of Accessibility
Accessibility features like Guided Access are essential for creating a more inclusive and user-friendly digital experience. By providing tools to customize and control device usage, accessibility features empower individuals with diverse needs and abilities to fully participate in the digital world. At CONDUCT.EDU.VN, we are committed to promoting accessibility and providing resources to help users get the most out of their devices.
9. Guided Access vs. Other Accessibility Features
While Guided Access is a powerful tool for focusing device usage, it’s important to understand how it differs from other accessibility features available on iOS devices:
| Feature | Purpose | Key Benefits | Limitations |
|---|---|---|---|
| Guided Access | Locks device into a single app and controls feature availability. | Enhances focus, limits distractions, provides a simplified interface, useful for parental control. | Primarily focuses on single-app usage, may not address broader accessibility needs like vision or hearing. |
| VoiceOver | Provides auditory descriptions of what’s on the screen. | Assists users with visual impairments by verbalizing screen content and actions. | Can be overwhelming for new users, requires learning specific gestures. |
| Zoom | Magnifies the screen for users with low vision. | Improves readability and visibility of small text and images. | Can reduce the amount of content visible on the screen, may require frequent panning. |
| Switch Control | Allows users to control the device using one or more switches. | Enables users with limited mobility to interact with the device. | Requires specialized hardware, setup can be complex. |
| AssistiveTouch | Provides an on-screen menu for performing actions. | Simplifies complex gestures, useful for users with motor skill challenges. | Can take up screen space, may require customization to be fully effective. |
| Display & Text Size | Adjusts text size, contrast, and color filters. | Improves readability and reduces eye strain. | May not be sufficient for users with severe visual impairments. |
Understanding the strengths and limitations of each feature allows users to create a comprehensive accessibility strategy tailored to their specific needs.
10. Real-World Examples of Guided Access in Action
To further illustrate the benefits of Guided Access, here are a few real-world examples:
-
A child with ADHD: A parent uses Guided Access to lock their child into a math learning app during homework time. By disabling access to other apps and features, the child is able to focus on the task at hand and complete their homework more efficiently.
-
A senior citizen with dementia: A caregiver uses Guided Access to lock a tablet into a photo album app, allowing the senior citizen to easily view family photos without accidentally navigating to other apps or settings.
-
A museum visitor: A museum provides iPads with Guided Access enabled, allowing visitors to access interactive exhibits without being able to browse the internet or access other apps.
-
A restaurant: A restaurant uses Guided Access to lock iPads into their menu app, allowing customers to browse the menu and place orders without accessing other features.
These examples demonstrate the versatility of Guided Access and its ability to improve focus, accessibility, and security in a variety of settings.
11. Addressing Common Concerns About Guided Access
While Guided Access is a valuable tool, some users may have concerns about its functionality or potential drawbacks. Here are some common concerns and how to address them:
-
Fear of being locked out: Some users may worry about accidentally locking themselves into Guided Access and being unable to exit. To alleviate this concern, it’s important to choose a Guided Access passcode that is easy to remember, and to enable Face ID or Touch ID as an alternative way to end sessions.
-
Complexity of setup: Some users may find the initial setup of Guided Access to be complex or confusing. To simplify the process, it’s helpful to follow a step-by-step guide like the one provided in this article, and to refer to Apple’s official documentation for additional assistance.
-
Limited functionality: Some users may find that Guided Access is too restrictive, limiting their ability to access other apps or features. To address this concern, it’s important to carefully consider which features to disable during a Guided Access session, and to create custom configurations for different apps as needed.
By addressing these concerns and providing clear guidance on how to use Guided Access effectively, we can help users overcome any reservations and take full advantage of this powerful accessibility feature.
12. Future of Accessibility Features on iOS
Apple is committed to continually improving the accessibility features on its devices, and we can expect to see further enhancements to Guided Access and other accessibility tools in the future. Some potential future developments include:
-
More granular control: Future versions of Guided Access may offer more granular control over which features can be enabled or disabled during a session, allowing for even more customization.
-
Integration with AI: Artificial intelligence (AI) could be used to automatically configure Guided Access settings based on the user’s needs and preferences.
-
Improved voice control: Siri could be enhanced to provide more comprehensive control over Guided Access, allowing users to start, stop, and configure sessions using voice commands.
-
Cross-device syncing: Guided Access settings could be synced across multiple devices, allowing users to easily maintain consistent accessibility settings across their iPhone, iPad, and iPod touch.
These potential developments highlight Apple’s ongoing commitment to accessibility and its dedication to creating a more inclusive and user-friendly digital experience for all.
13. CONDUCT.EDU.VN: Your Resource for Accessibility Information
At CONDUCT.EDU.VN, we are dedicated to providing comprehensive information and resources on accessibility features and best practices. Our website offers a wealth of information on Guided Access and other accessibility tools, including:
-
Detailed guides: Step-by-step guides on how to set up and use Guided Access, as well as other accessibility features.
-
Troubleshooting tips: Solutions to common issues and problems encountered when using Guided Access.
-
Use case examples: Real-world examples of how Guided Access can be used to improve focus, accessibility, and security.
-
Expert advice: Insights and recommendations from accessibility experts and professionals.
-
Community forum: A platform for users to share their experiences, ask questions, and connect with others interested in accessibility.
Whether you’re a student, teacher, parent, caregiver, or individual with accessibility needs, CONDUCT.EDU.VN is your go-to resource for all things accessibility.
14. How to Customize Guided Access for Different Scenarios
Guided Access is not a one-size-fits-all solution. To maximize its effectiveness, it’s essential to customize the settings to suit the specific scenario and user needs. Here are some examples of how to customize Guided Access for different situations:
-
For children:
- Disable the Sleep/Wake button to prevent the child from turning off the device.
- Disable the Volume buttons to prevent the child from changing the volume.
- Disable Touch in certain areas of the screen to prevent accidental taps.
- Set a Time Limit to automatically end the session after a certain period.
-
For individuals with cognitive impairments:
- Disable Keyboards to prevent accidental text input.
- Disable Motion to simplify the interface and reduce distractions.
- Enable Touch only in essential areas of the screen to minimize confusion.
-
For public kiosks:
- Disable the Sleep/Wake button to ensure that the device remains on.
- Disable the Volume buttons to prevent users from changing the volume.
- Disable Motion to prevent users from rotating the screen.
- Disable Keyboards to prevent users from entering text.
- Disable Touch in non-essential areas of the screen to prevent unauthorized access.
By carefully considering the specific needs of the user and the intended purpose of the device, you can customize Guided Access to create a truly tailored and effective accessibility experience.
15. Maximizing Focus and Productivity with Guided Access
In today’s digital age, distractions are everywhere. From social media notifications to email alerts, it can be difficult to stay focused on the task at hand. Guided Access can be a powerful tool for maximizing focus and productivity by eliminating distractions and creating a more structured and controlled digital environment. Here are some tips for using Guided Access to boost focus and productivity:
-
Identify your biggest distractions: What apps or features are most likely to derail your focus? Disable them during Guided Access sessions.
-
Create a dedicated workspace: Use Guided Access to lock your device into a single app or set of apps related to your current task.
-
Set a time limit: Use the Time Limit feature to create a sense of urgency and encourage you to complete your task within a specific timeframe.
-
Take regular breaks: Even with Guided Access enabled, it’s important to take regular breaks to avoid burnout. Use the Time Limit feature to schedule short breaks throughout the day.
-
Experiment with different settings: Don’t be afraid to experiment with different Guided Access settings to find what works best for you.
By following these tips and incorporating Guided Access into your daily routine, you can create a more focused and productive digital environment that helps you achieve your goals.
16. Understanding the Ethical Implications of Using Guided Access
While Guided Access is primarily a tool for enhancing accessibility and focus, it’s important to consider the ethical implications of using it, particularly in situations involving children or individuals with cognitive impairments. Here are some ethical considerations to keep in mind:
-
Respect for autonomy: When using Guided Access with children or individuals with cognitive impairments, it’s important to respect their autonomy and involve them in the decision-making process as much as possible.
-
Transparency and consent: Be transparent about how Guided Access is being used and obtain consent from the individual or their legal guardian.
-
Avoidance of coercion: Guided Access should not be used as a tool for coercion or control. It should be used to support and empower individuals, not to restrict their freedom or autonomy.
-
Regular review: Regularly review the Guided Access settings to ensure that they are still appropriate and aligned with the individual’s needs and preferences.
By considering these ethical implications and using Guided Access responsibly, we can ensure that it is used as a force for good, promoting accessibility, focus, and empowerment.
17. Guided Access and Digital Well-being
In an age dominated by screens and digital interactions, maintaining digital well-being is crucial. Guided Access can play a significant role in promoting healthier digital habits. By limiting access to distracting apps and features, users can:
-
Reduce screen time: By focusing on essential tasks, individuals can spend less time mindlessly scrolling through social media or other non-productive apps.
-
Improve sleep quality: Limiting screen time before bed and using Guided Access to lock devices into sleep-promoting apps (such as white noise generators or guided meditation programs) can improve sleep quality.
-
Increase mindfulness: By eliminating distractions, Guided Access can help individuals be more present and mindful in their digital interactions.
-
Reduce stress and anxiety: Constant notifications and the pressure to stay connected can contribute to stress and anxiety. Guided Access can help create a more calm and focused digital environment.
By incorporating Guided Access into a broader digital well-being strategy, individuals can take control of their technology use and create a healthier relationship with their devices.
18. Integrating Guided Access into Education
Guided Access can be a valuable tool in educational settings, helping students stay focused, engaged, and on-task. Here are some ways to integrate Guided Access into education:
-
Classroom management: Teachers can use Guided Access to lock students into educational apps during class, preventing them from being distracted by games, social media, or other non-educational content.
-
Testing and assessment: During exams or quizzes, Guided Access can ensure that students only have access to the testing app, preventing cheating or unauthorized access to other resources.
-
Special education: Guided Access can be used to create a more structured and supportive learning environment for students with learning disabilities, ADHD, or other special needs.
-
Assistive technology: Guided Access can be combined with other assistive technology tools, such as VoiceOver or Switch Control, to create a customized learning experience for students with disabilities.
-
Digital citizenship: Teaching students about Guided Access and other accessibility features can promote digital citizenship and empower them to take control of their technology use.
By integrating Guided Access into the curriculum and classroom practices, educators can create a more inclusive and effective learning environment for all students.
19. The Role of Guided Access in Corporate Training
In the corporate world, effective training is essential for employee development and organizational success. Guided Access can be a valuable tool for enhancing corporate training programs by:
-
Focusing attention: Guided Access can lock employees into training apps or websites, preventing them from being distracted by emails, social media, or other work-related tasks.
-
Ensuring compliance: Guided Access can ensure that employees complete all required training modules and assessments, preventing them from skipping or rushing through important content.
-
Creating a standardized experience: Guided Access can create a standardized training experience for all employees, regardless of their location or device.
-
Protecting sensitive information: Guided Access can prevent employees from accessing sensitive company data or unauthorized websites during training sessions.
-
Measuring engagement: By tracking the amount of time employees spend in training apps with Guided Access enabled, organizations can measure employee engagement and identify areas for improvement.
By incorporating Guided Access into corporate training programs, organizations can improve employee learning outcomes, ensure compliance, and protect sensitive information.
20. Frequently Asked Questions (FAQs) About Guided Access
Here are some frequently asked questions about Guided Access:
-
What is Guided Access? Guided Access is an accessibility feature on iOS devices that locks the device into a single app and controls which features are available.
-
How do I enable Guided Access? Go to Settings > Accessibility > Guided Access and toggle the switch to ON.
-
How do I start a Guided Access session? Open the desired app, triple-click the side button (iPhone X and later) or Home button (iPhone 8 and earlier), and tap Start.
-
How do I end a Guided Access session? Triple-click the side button or Home button, enter your passcode, and tap End.
-
What if I forget my Guided Access passcode? You will need to restore your device to factory settings.
-
Can I use Guided Access with multiple apps? No, Guided Access locks the device into a single app.
-
Can I disable certain areas of the screen during a Guided Access session? Yes, you can use your finger to draw circles around areas that you want to disable.
-
Can I set a time limit for Guided Access sessions? Yes, you can set a time limit in the Guided Access settings.
-
Does Guided Access work with Siri? Yes, you can use Siri to start a Guided Access session by saying “Turn on Guided Access.”
-
Is Guided Access only for children? No, Guided Access can be used by anyone who wants to improve focus, accessibility, or security.
CONDUCT.EDU.VN is your trusted resource for information on ethical digital conduct, accessibility features, and responsible technology use. For further assistance or to explore additional resources, please visit our website at conduct.edu.vn or contact us at 100 Ethics Plaza, Guideline City, CA 90210, United States, or via Whatsapp at +1 (707) 555-1234.
 Child playing a game on a tablet with guided access enabled
Alt text: Icon representing volume control options within the Guided Access settings on iOS, allowing customization of sound levels.
Alt text: Depiction of a keyboard icon found in the Guided Access settings, used to manage keyboard accessibility and input options.
Alt text: Symbol for Dictionary Lookup feature under Guided Access, providing quick access to definitions and enhanced learning support.