Guided Access iPad is a valuable feature for parents, educators, and anyone who wants to limit access to certain apps or features on their iPad. However, there may be times when you need to exit Guided Access mode. This comprehensive guide from CONDUCT.EDU.VN will walk you through various methods to disable Guided Access, troubleshoot common issues, and understand the best practices for using this feature. Unlock your iPad’s full potential with our expert advice.
1. Understanding Guided Access on iPad
Guided Access is an accessibility feature on iPads that allows you to restrict the device to a single app. It disables the Home button (or the swipe-up gesture on newer iPads) and lets you control which parts of the screen are active. This is particularly useful for:
- Parents: To prevent children from exiting educational apps or making unauthorized purchases.
- Educators: To keep students focused on specific learning activities during class.
- Businesses: To dedicate a device to a specific task, such as a kiosk or point-of-sale system.
1.1. How to Enable Guided Access
Before learning how to exit Guided Access, it’s essential to know how to enable it:
- Go to Settings: Open the Settings app on your iPad.
- Accessibility: Scroll down and tap on “Accessibility.”
- Guided Access: Under the “General” section, find and tap on “Guided Access.”
- Toggle On: Switch the “Guided Access” toggle to the on position.
- Passcode Settings: Tap on “Passcode Settings” to set up a passcode that you will use to exit Guided Access. You can also enable Touch ID or Face ID for exiting.
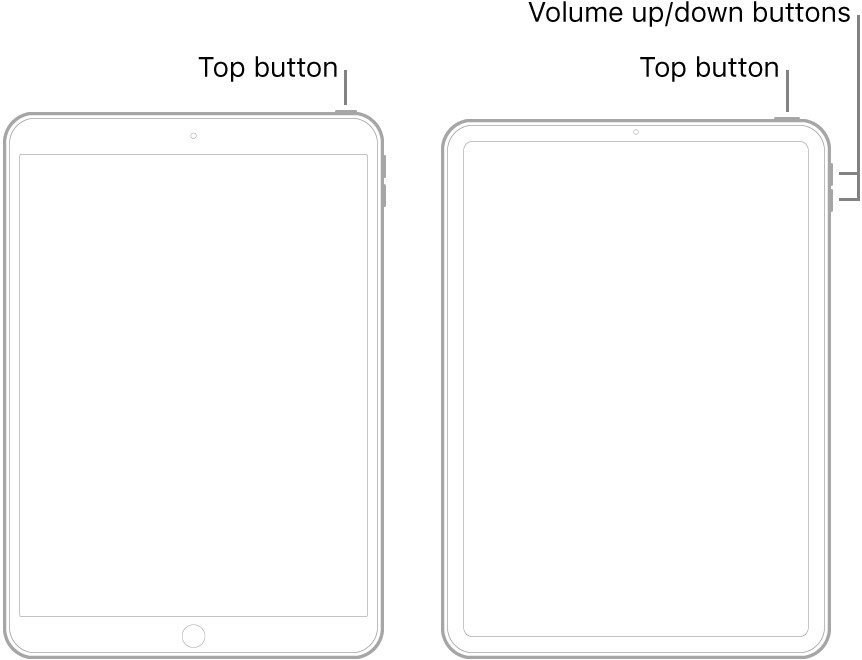
- Start Guided Access: Open the app you want to lock the iPad into, then triple-click the Home button (or the top button on newer iPads without a Home button).
- Customize Options: Before starting, you can circle areas on the screen you want to disable. Tap “Options” at the bottom to disable the Sleep/Wake button, volume buttons, keyboard, or touch.
- Tap Start: In the bottom corner, tap “Start” to begin the Guided Access session.
1.2. Common Uses of Guided Access
- Educational Settings: Teachers use Guided Access to keep students focused on specific educational apps and prevent them from wandering off to other applications or websites.
- Parental Control: Parents use Guided Access to ensure their children are only using approved apps and to prevent accidental in-app purchases.
- Public Kiosks: Businesses use Guided Access to lock iPads into specific applications, such as surveys or product catalogs, in public kiosks.
- Accessibility: Guided Access can be used to simplify the iPad interface for individuals with cognitive disabilities, allowing them to focus on a single task.
 iPad showing Guided Access settings
2. Methods to Exit Guided Access on iPad
The primary method to exit Guided Access involves using the passcode you set up during the initial configuration. However, there are several scenarios where this method might fail. Here’s a detailed breakdown of each approach:
2.1. Using the Passcode
This is the most straightforward method and should be your first attempt:
- Triple-Click the Home Button (or Top Button): Quickly press the Home button (or the top button on iPads without a Home button) three times in rapid succession.
- Enter the Passcode: A screen will appear asking for the Guided Access passcode. Enter the passcode you set up.
- Tap End: In the bottom-left corner of the screen, tap the “End” button. This will disable Guided Access and return your iPad to normal operation.
2.2. Using Touch ID or Face ID
If you enabled Touch ID or Face ID when setting up Guided Access, you can use these biometric methods to exit:
- Triple-Click the Home Button (or Top Button): As with the passcode method, triple-click the Home button (or the top button).
- Authenticate: Instead of entering a passcode, you will be prompted to use Touch ID or Face ID. Use your registered fingerprint or facial scan to authenticate.
- Tap End: Once authenticated, tap the “End” button in the bottom-left corner.
2.3. Force Restarting the iPad
If you’ve forgotten the passcode or the iPad is unresponsive, a force restart can sometimes disable Guided Access:
2.3.1. iPads with a Home Button:
- Press and Hold: Press and hold both the Home button and the Power button (located on the top or side of the iPad) simultaneously.
- Wait for the Apple Logo: Continue holding the buttons until the screen goes black and the Apple logo appears.
- Release Buttons: Release both buttons once you see the Apple logo. The iPad will restart, and Guided Access should be disabled.
2.3.2. iPads without a Home Button:
- Press and Release Volume Up: Quickly press and release the Volume Up button.
- Press and Release Volume Down: Quickly press and release the Volume Down button.
- Press and Hold Power Button: Press and hold the Power button until the screen goes black and the Apple logo appears.
- Release Button: Release the Power button once you see the Apple logo. The iPad will restart, and Guided Access should be disabled.
2.4. Using iCloud “Lost Mode”
This method requires you to have “Find My iPad” enabled on your device and access to another device (computer, smartphone, or another tablet) to log into your iCloud account:
- Go to iCloud.com: On another device, open a web browser and go to iCloud.com.
- Sign In: Sign in to your iCloud account using the Apple ID and password associated with the locked iPad.
- Find My: Click on the “Find My” icon.
- Select Your iPad: Choose the iPad that is stuck in Guided Access from the list of devices.
- Mark as Lost: Click on “Mark as Lost.” Follow the prompts to set a new passcode (even if you don’t need to use it).
- Restart iPad: After marking the iPad as lost, perform a force restart as described in section 2.3.
- Enter New Passcode (if prompted): Once the iPad restarts, it may prompt you for the new passcode you set in iCloud. Enter it to unlock the device.
- Disable Guided Access: After unlocking the iPad, go to Settings > Accessibility > Guided Access and turn off Guided Access.
2.5. Restoring the iPad via iTunes or Finder
This is the most drastic method and should only be used as a last resort, as it will erase all data on your iPad. Make sure you have a recent backup before proceeding:
- Connect to Computer: Connect your iPad to a computer using a USB cable.
- Open iTunes or Finder: On a Mac with macOS Mojave or earlier, open iTunes. On a Mac with macOS Catalina or later, open Finder. On a Windows PC, open iTunes.
- Enter Recovery Mode:
- iPads with a Home Button: Press and hold both the Home button and the Power button until you see the recovery mode screen (a cable pointing to a computer).
- iPads without a Home Button: Press and quickly release the Volume Up button, press and quickly release the Volume Down button, then press and hold the Power button until you see the recovery mode screen.
- Restore: In iTunes or Finder, you will see a message saying that there is a problem with the iPad and that it needs to be restored or updated. Click “Restore.”
- Follow Prompts: Follow the on-screen prompts to restore the iPad to its factory settings. This process will download the latest version of iOS and erase all data on the device.
- Restore from Backup (Optional): After the restore is complete, you can choose to restore your data from a recent backup.
3. Troubleshooting Common Issues
Sometimes, exiting Guided Access isn’t as simple as following the standard procedures. Here are some common issues and how to troubleshoot them:
3.1. Forgetting the Guided Access Passcode
Forgetting the passcode is a common problem. Here’s what you can do:
- Try Common Passcodes: If you tend to use the same passcodes, try some of your frequently used ones.
- iCloud Lost Mode: Use the iCloud “Lost Mode” method described in section 2.4 to set a new passcode.
- Restore the iPad: If all else fails, restore the iPad via iTunes or Finder as described in section 2.5. Remember that this will erase all data on the device.
3.2. iPad is Unresponsive
If your iPad is frozen or unresponsive, try these steps:
- Force Restart: Perform a force restart as described in section 2.3. This can often resolve temporary software glitches.
- Charge the iPad: If the battery is low, the iPad may become unresponsive. Plug it into a charger and let it charge for at least 15-20 minutes before attempting a force restart.
- Check for Hardware Issues: If the iPad remains unresponsive after trying these steps, there may be a hardware issue. Contact Apple Support or visit an authorized service provider for assistance.
3.3. Triple-Click Not Working
If triple-clicking the Home button or top button doesn’t bring up the passcode screen, try these solutions:
- Adjust Click Speed: The triple-click speed may be set too fast or too slow. Adjust the click speed in Settings > Accessibility > Side Button (or Home Button) > Click Speed.
- Ensure Button Functionality: Make sure the Home button or top button is functioning correctly. If the button is physically damaged, it may not register the clicks properly.
- Restart the iPad: A simple restart can sometimes resolve issues with button functionality.
3.4. Guided Access Restricts Wrong Areas
If Guided Access is enabled but restricts areas of the screen you didn’t intend to disable, follow these steps:
- Exit Guided Access: Use one of the methods described above to exit Guided Access.
- Start a New Session: Open the app you want to use with Guided Access, then triple-click the Home button or top button to start a new session.
- Customize Options: Before tapping “Start,” carefully circle the areas of the screen you want to disable. Make sure you are only disabling the intended areas.
- Tap Start: Tap “Start” to begin the Guided Access session with the correct restrictions.
4. Best Practices for Using Guided Access
To make the most of Guided Access and avoid common pitfalls, consider these best practices:
4.1. Set a Strong, Memorable Passcode
Choose a passcode that is easy for you to remember but difficult for others to guess. Avoid using simple passcodes like “1234” or “0000.”
4.2. Enable Touch ID or Face ID
Enabling Touch ID or Face ID provides a convenient alternative to entering the passcode. This can be especially useful if you have trouble remembering passcodes.
4.3. Keep a Record of the Passcode
Store the Guided Access passcode in a safe and secure location. You can use a password manager or write it down and keep it in a secure place.
4.4. Regularly Test the Exit Procedure
Periodically test the exit procedure to ensure that you can successfully disable Guided Access. This can help you avoid getting locked out of your iPad.
4.5. Educate Users
If you are using Guided Access in an educational or business setting, educate users about the purpose of the feature and how to request assistance if they need to exit.
5. Advanced Guided Access Features
Guided Access offers several advanced features that can enhance its functionality and make it more useful in various scenarios:
5.1. Time Limits
You can set time limits for Guided Access sessions to automatically end after a specified period. This can be useful for managing screen time or limiting the duration of specific activities.
- Enable Time Limits: In Settings > Accessibility > Guided Access, enable the “Time Limits” option.
- Set an Alarm: Choose whether you want an alarm to sound before the session ends.
- Start Guided Access: When starting a Guided Access session, you can set a time limit by tapping “Options” and selecting a duration.
5.2. App Switching
In some cases, you may want to allow users to switch between a limited set of apps while in Guided Access. This can be useful for educational activities that require multiple apps.
- Enable App Switching: When starting a Guided Access session, tap “Options” and enable the “App Switching” option.
- Select Allowed Apps: Choose the apps that you want to allow users to switch between.
- Start Guided Access: Tap “Start” to begin the Guided Access session with app switching enabled.
5.3. Volume Limit
Guided Access provides the ability to restrict the maximum volume output of the iPad.
- Volume Restriction: When you are in the Guided Access options menu, select the ‘Volume’ option and adjust the slider to your desired maximum level.
5.4. Sleep/Wake Button
Disabling the Sleep/Wake button can prevent users from turning off the screen or putting the iPad to sleep during a Guided Access session.
- Disable Sleep/Wake Button: When starting a Guided Access session, tap “Options” and disable the “Sleep/Wake Button” option.
- Start Guided Access: Tap “Start” to begin the Guided Access session with the Sleep/Wake button disabled.
6. Real-World Applications and Case Studies
Guided Access has numerous applications in various sectors. Here are a few examples:
6.1. Special Education
In special education classrooms, Guided Access can be used to create a distraction-free learning environment for students with autism or ADHD. By locking the iPad into a specific educational app, teachers can help students focus on the task at hand and minimize sensory overload.
- Case Study: A special education teacher uses Guided Access to lock an iPad into a communication app for a student with limited verbal skills. This allows the student to easily communicate their needs and participate in classroom activities without distractions.
6.2. Museums and Galleries
Museums and galleries can use Guided Access to provide interactive exhibits on iPads. By locking the device into a specific app, visitors can explore the exhibit without accidentally exiting or accessing other features.
- Case Study: A museum uses Guided Access to lock iPads into an interactive map of the museum. Visitors can use the map to navigate the museum and learn about the exhibits without getting distracted by other apps or settings.
6.3. Healthcare
Healthcare providers can use Guided Access to provide patients with access to specific medical information or entertainment apps while they are in the hospital. This can help improve patient satisfaction and reduce anxiety.
- Case Study: A hospital uses Guided Access to lock iPads into a patient education app. Patients can use the app to learn about their medical condition, treatment options, and medication instructions.
7. Ethical Considerations
While Guided Access is a powerful tool, it’s essential to use it ethically and responsibly. Here are some ethical considerations to keep in mind:
7.1. Transparency
Be transparent with users about the fact that Guided Access is enabled and why it is being used. Explain the purpose of the feature and how it benefits them.
7.2. Consent
Obtain consent from users before enabling Guided Access, especially if they are adults. Ensure that they understand the implications of the feature and have the option to decline.
7.3. Accessibility
Ensure that Guided Access does not create barriers to accessibility for users with disabilities. Provide alternative methods for accessing content and features if necessary.
7.4. Privacy
Respect users’ privacy and avoid using Guided Access to collect or monitor their personal information without their knowledge or consent.
8. The Role of CONDUCT.EDU.VN
At CONDUCT.EDU.VN, we are dedicated to providing comprehensive and reliable information about technology and its ethical applications. Our resources are designed to help you understand and use technology responsibly.
8.1. Resources and Guides
CONDUCT.EDU.VN offers a wide range of resources and guides on various technology topics, including accessibility features like Guided Access. Our guides provide step-by-step instructions, troubleshooting tips, and best practices for using these features effectively.
8.2. Ethical Technology Use
We believe that technology should be used in a way that benefits society and respects individual rights. Our content emphasizes the importance of ethical technology use and provides guidance on how to make responsible decisions.
8.3. Expert Advice
Our team of experts is committed to providing accurate and up-to-date information. We work hard to ensure that our content is reliable and trustworthy.
9. Staying Updated
Technology is constantly evolving, and it’s essential to stay updated on the latest features, best practices, and ethical considerations. Here are some tips for staying informed:
9.1. Follow Apple Support
Follow Apple Support on social media and subscribe to their email newsletters to receive updates on iOS features and security updates.
9.2. Read Technology Blogs
Read reputable technology blogs and websites to stay informed about the latest trends and developments in the tech industry.
9.3. Join Online Communities
Join online communities and forums to connect with other technology users and share your experiences and insights.
10. Frequently Asked Questions (FAQ)
Q1: What is Guided Access on iPad?
Guided Access is an accessibility feature that allows you to lock your iPad into a single app, restricting access to other apps and features.
Q2: How do I enable Guided Access?
Go to Settings > Accessibility > Guided Access and toggle the feature on. You can also set a passcode and customize options.
Q3: How do I exit Guided Access if I forgot the passcode?
Try force restarting your iPad or using iCloud “Lost Mode” to set a new passcode. As a last resort, you can restore your iPad via iTunes or Finder.
Q4: Can I use Touch ID or Face ID to exit Guided Access?
Yes, if you enabled Touch ID or Face ID when setting up Guided Access, you can use these biometric methods to exit.
Q5: What should I do if my iPad is unresponsive in Guided Access?
Try force restarting your iPad. If that doesn’t work, plug it into a charger and let it charge for at least 15-20 minutes before attempting a force restart.
Q6: How do I adjust the triple-click speed for Guided Access?
Go to Settings > Accessibility > Side Button (or Home Button) > Click Speed and adjust the click speed to your preference.
Q7: Can I set a time limit for Guided Access sessions?
Yes, you can set time limits in Settings > Accessibility > Guided Access > Time Limits.
Q8: Is it ethical to use Guided Access without the user’s consent?
No, it is important to be transparent and obtain consent from users before enabling Guided Access.
Q9: Where can I find more information about Guided Access and other accessibility features?
Visit CONDUCT.EDU.VN for comprehensive guides, troubleshooting tips, and best practices.
Q10: How do I contact Apple Support for assistance with Guided Access?
You can contact Apple Support through their website or by calling their customer service hotline.
Conclusion
Exiting Guided Access on your iPad can sometimes be challenging, but with the right knowledge and troubleshooting steps, you can resolve most issues. Remember to use Guided Access responsibly and ethically, respecting the rights and privacy of users. For more detailed information and guidance on ethical technology use, visit CONDUCT.EDU.VN.
If you’re facing difficulties finding reliable rules of conduct or ethical standards for specific situations, or if you’re confused about how to apply ethical principles in practice, CONDUCT.EDU.VN is here to help. We offer detailed information, clear explanations of ethical principles, and real-world examples to guide you. Visit conduct.edu.vn to explore our resources and find the guidance you need to navigate ethical dilemmas confidently. Contact us at 100 Ethics Plaza, Guideline City, CA 90210, United States, or reach out via Whatsapp at +1 (707) 555-1234. Your path to ethical clarity starts here. Remember, understanding how to exit a guided access session and using parental control features responsibly is crucial for maintaining both security and ethical device usage. These are very important accessibility settings that every iPad and iPhone user should know.