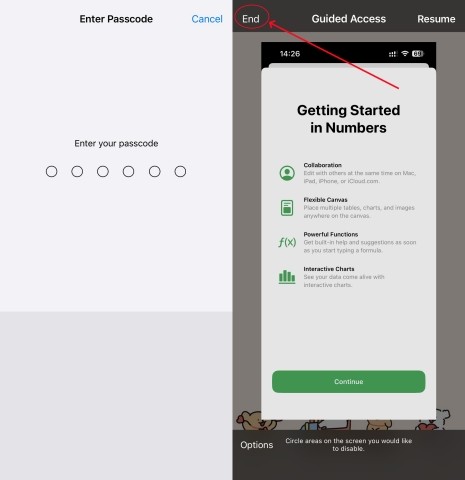
Guided Access is a useful feature on iPhones and iPads, designed to help users focus on a single task by restricting the device to a single app. This is particularly helpful for parents, educators, or in environments where a kiosk-like experience is needed. However, users sometimes find their iPhone 11 stuck in Guided Access, which can be frustrating. This guide provides multiple methods to exit Guided Access on your iPhone 11, covering everything from simple solutions to more advanced troubleshooting.
Understanding Guided Access
Guided Access is an accessibility feature that locks your iPhone or iPad into a single app. It also allows you to disable specific areas of the screen or hardware buttons. Once enabled, usually by triple-clicking the side or home button, it requires a passcode to exit. This can be a lifesaver for keeping kids focused or preventing accidental exits from important applications.
Common Reasons for Getting Stuck in Guided Access
Before diving into solutions, it’s helpful to understand why your iPhone 11 might be stuck in Guided Access:
- System Glitches: Like any software, iOS can experience glitches that cause features like Guided Access to malfunction.
- Outdated Software: Running an older version of iOS can lead to compatibility issues and unexpected behavior.
- Forgotten Passcode: The most common reason! Forgetting the Guided Access passcode makes it difficult to exit the mode normally.
Methods to Exit Guided Access on iPhone 11
Here are several methods to exit Guided Access on your iPhone 11, starting with the simplest:
Method 1: Triple-Click the Side Button
The most straightforward way to exit Guided Access is by triple-clicking the side button (the power button) on your iPhone 11.
Step 1: Quickly press the side button three times in rapid succession.
Step 2: If a passcode prompt appears, enter the Guided Access passcode.
Step 3: Tap “End” in the top-left corner of the screen.
If you have Face ID enabled for Guided Access, double-clicking the side button might prompt Face ID authentication instead of the passcode.
Method 2: Force Restart Your iPhone 11
A force restart can often resolve minor software glitches that may be causing your iPhone 11 to be stuck in Guided Access.
Step 1: Press and quickly release the Volume Up button.
Step 2: Press and quickly release the Volume Down button.
Step 3: Press and hold the Side button until you see the Apple logo appear on the screen.
Once your iPhone 11 restarts, check if Guided Access is disabled. If not, proceed to the next steps. Navigate to Settings > Accessibility > Guided Access and toggle it off.
Method 3: Using an iOS System Recovery Tool
If the above methods fail, an iOS system recovery tool can help resolve deeper software issues without data loss. MagFone iOS System Recovery is a popular option for fixing various iOS problems, including being stuck in Guided Access.
Key Features of MagFone iOS System Recovery:
- Fixes a wide range of iOS issues, including being stuck in Guided Access, recovery mode, or the Apple logo screen.
- Offers a standard repair mode that fixes issues without erasing your data.
- Supports upgrading and downgrading iOS versions.
- Provides a free way to enter and exit recovery mode.
Steps to Use MagFone iOS System Recovery:
Step 1: Download and install MagFone iOS System Recovery on your computer.
Step 2: Connect your iPhone 11 to your computer using a USB cable.
Step 3: Launch the software and select “iOS System Repair,” then choose “Standard Repair” to avoid data loss.
Step 4: Follow the on-screen instructions to put your iPhone 11 into recovery mode.
Step 5: Verify your device information and click “Download” to download the appropriate firmware package.
Step 6: Once the firmware is downloaded, click the “Repair” button to begin the repair process.
Your iPhone 11 will restart automatically after the repair process is complete.
Method 4: Restore Your iPhone 11 Using iTunes
Restoring your iPhone 11 through iTunes can resolve persistent software issues but will erase all data on your device. Make sure to back up your iPhone before proceeding with this method.
Step 1: Connect your iPhone 11 to your computer and open iTunes.
Step 2: Select your device in iTunes.
Step 3: Click “Restore iPhone.”
Step 4: Follow the on-screen prompts to restore your device to its factory settings.
Method 5: Erase Your iPhone 11 Using Find My
If you have “Find My iPhone” enabled, you can remotely erase your device from another Apple device or through iCloud. This will remove Guided Access but also erase all your data.
Step 1: Open the “Find My” app on another Apple device or go to iCloud.com and sign in with your Apple ID.
Step 2: Select your iPhone 11 from the list of devices.
Step 3: Click “Erase iPhone” and follow the prompts to confirm the action.
Method 6: Restore Your iPhone 11 in Recovery Mode
Restoring your iPhone 11 in recovery mode is a more advanced method that can resolve stubborn software issues. This will also erase your data, so back up your device if possible.
Step 1: Connect your iPhone 11 to your computer.
Step 2: Put your iPhone 11 into recovery mode (the process varies depending on your iPhone model; search online for specific instructions for iPhone 11).
Step 3: iTunes will detect your iPhone in recovery mode and prompt you to restore it.
Step 4: Follow the on-screen prompts to restore your device to its factory settings.
Conclusion
Being stuck in Guided Access on your iPhone 11 can be frustrating, but with the methods outlined in this guide, you should be able to resolve the issue. Start with the simplest solutions, like triple-clicking the side button or force restarting your device. If those don’t work, consider using an iOS system recovery tool or restoring your iPhone through iTunes or Find My. Remember to back up your data whenever possible to avoid data loss.

