Guided Access restricts your iPhone to a single app, offering controlled feature availability. Getting off Guided Access on iPhone is straightforward. At CONDUCT.EDU.VN, we provide step-by-step instructions to disable it, whether you’ve forgotten your passcode or need troubleshooting tips. Explore device restrictions and accessibility settings for a smoother iPhone experience.
1. Understanding Guided Access on iPhone
Guided Access is a feature on iPhones, iPads, and iPod touch devices that restricts the device to a single app. It also allows you to control which features are available within that app. This can be especially useful in a variety of situations.
1.1. What is Guided Access?
Guided Access is an accessibility feature designed to help individuals with attention and sensory concerns, but it has broader applications. It locks the device into a single app, preventing users from navigating to other apps or accessing certain functions. This is useful when you want to:
- Allow a child to use an educational app without accidentally exiting it.
- Prevent accidental gestures from interrupting a task.
- Create a focused environment for users with cognitive sensitivities.
1.2. Benefits of Using Guided Access
There are several benefits to using Guided Access:
- Focus Enhancement: It helps users stay focused on a specific task or app, minimizing distractions.
- Safety and Security: It prevents unauthorized access to other apps or settings on your device.
- Controlled Environment: It allows you to customize which features are available, such as disabling the volume buttons or touch input.
- Accessibility: It provides a tailored experience for users with cognitive or sensory sensitivities.
1.3. Scenarios Where Guided Access is Useful
Guided Access can be helpful in various scenarios:
- Education: Teachers can use it in classrooms to keep students focused on educational apps.
- Parental Control: Parents can use it to limit children’s access to specific apps and prevent them from making unauthorized purchases.
- Business: Businesses can use it to create kiosk-style experiences on iPads or iPhones, such as for customer surveys or product demonstrations.
- Accessibility: Caregivers can use it to provide a simplified and controlled environment for individuals with cognitive or sensory sensitivities.
1.4. Setting Up Guided Access: A Step-by-Step Guide
Before you can use Guided Access, you need to set it up in your device’s settings:
-
Open Settings: Go to the Settings app on your iPhone or iPad.
-
Accessibility: Scroll down and tap on “Accessibility.”
-
Guided Access: Scroll to the bottom and tap on “Guided Access.”
-
Toggle On: Turn the “Guided Access” switch to the on position.
 Guided Access accessibility settings on iPhone
 -
Passcode Settings: Tap on “Passcode Settings” to set a passcode for Guided Access.
-
Set Guided Access Passcode: Tap on “Set Guided Access Passcode” and enter a passcode. You’ll need to enter it twice to confirm.
-
Touch ID or Face ID (Optional): You can also enable Touch ID or Face ID to end a Guided Access session. Toggle the switch to the on position if you want to use this feature.
1.5. Starting a Guided Access Session
Once Guided Access is set up, you can start a session in any app:
- Open the App: Open the app you want to use in Guided Access mode.
- Triple-Click:
- On an iPhone X or later, triple-click the side button.
- On an iPhone 8 or earlier, triple-click the Home button.
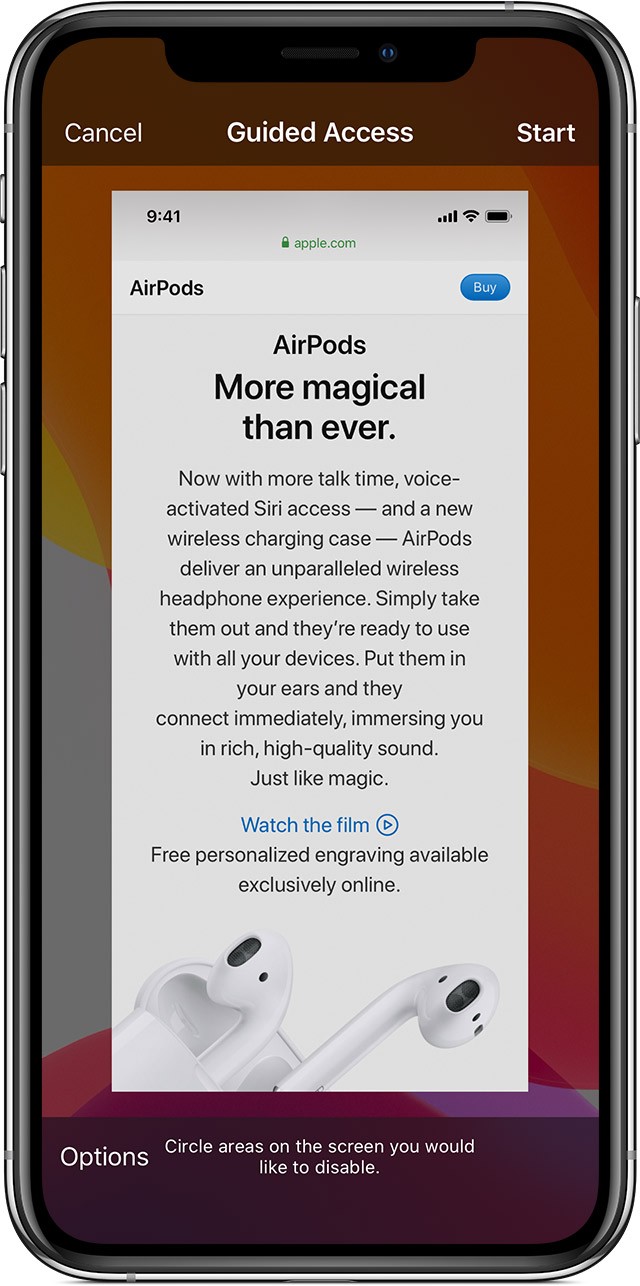
- Configure Options (Optional):
- If you want to disable certain areas of the screen, use one finger to circle those areas. You can move or resize the circles, or tap the “X” to remove them.
- Tap “Options” at the bottom of the screen to customize other features, such as disabling the Sleep/Wake button, volume buttons, motion, keyboards, touch, or dictionary lookup. You can also set a time limit for the session.
- Start Guided Access: Tap “Start” in the top right corner of the screen.
1.6. Customizing Features During a Guided Access Session
During a Guided Access session, you can control which features are available:
-
Triple-Click: Triple-click the side button (on iPhone X or later) or the Home button (on iPhone 8 or earlier).
-
Enter Passcode: If prompted, enter your Guided Access passcode.
-
Options: Tap “Options” at the bottom of the screen.
-
Toggle Features: Turn on or off the features you want to enable or disable.
- Sleep/Wake Button: Disables the Sleep/Wake button.
- Volume Buttons: Disables the volume buttons.
Alt Text: Icon representing volume control within the Guided Access options.
- Motion: Limits how your device responds to motion (e.g., screen rotation).
- Keyboards: Disables the keyboard from appearing.
Alt Text: Icon representing keyboard control options within Guided Access settings.
- Touch: Disables touch input on the screen.
- Dictionary Lookup: Enables the Look Up feature when selecting text.
Alt Text: Icon representing the Dictionary Lookup feature within the Guided Access settings.
- Time Limit: Sets a time limit for the Guided Access session.
-
Done: Tap “Done” in the top right corner of the screen to save your changes.
2. Common Issues and Troubleshooting
While Guided Access is a useful feature, it can sometimes cause issues. Here are some common problems and how to troubleshoot them.
2.1. Forgetting the Guided Access Passcode
One of the most common issues is forgetting the Guided Access passcode. If you forget your passcode, you’ll need to restore your device to factory settings to disable Guided Access.
Solution:
- Connect to Computer: Connect your iPhone or iPad to a computer that you’ve previously synced with.
- Enter Recovery Mode:
- iPhone 8 or later: Press and quickly release the Volume Up button, press and quickly release the Volume Down button, then press and hold the Side button until you see the recovery mode screen.
- iPhone 7 or iPhone 7 Plus: Press and hold both the Side (or Top) button and the Volume Down button at the same time. Keep holding them until you see the recovery mode screen.
- iPhone 6s or earlier: Press and hold both the Home button and the Side (or Top) button at the same time. Keep holding them until you see the recovery mode screen.
- Restore: When you see the option to Restore or Update, choose Restore. This will erase all data on your device, including the Guided Access passcode.
- Set Up as New: After the restore is complete, you can set up your device as new or restore from a backup (if you have one).
Note: Restoring your device will erase all data, so it’s essential to have a recent backup.
2.2. Device Frozen in Guided Access Mode
Sometimes, your device may become frozen in Guided Access mode, and you can’t exit it using the standard method.
Solution:
- Force Restart:
- iPhone 8 or later: Press and quickly release the Volume Up button, press and quickly release the Volume Down button, then press and hold the Side button until the Apple logo appears.
- iPhone 7 or iPhone 7 Plus: Press and hold both the Side (or Top) button and the Volume Down button at the same time until the Apple logo appears.
- iPhone 6s or earlier: Press and hold both the Home button and the Side (or Top) button at the same time until the Apple logo appears.
- Try Exiting Again: Once the device restarts, try triple-clicking the side or Home button and entering your Guided Access passcode to exit the mode.
2.3. Touchscreen Not Responding
If the touchscreen is not responding while in Guided Access mode, it may be because the “Touch” option has been disabled in the Guided Access settings.
Solution:
- Force Restart: Use the force restart method described above to restart your device.
- Exit Guided Access: After the restart, try exiting Guided Access by triple-clicking the side or Home button and entering your passcode.
- Check Touch Settings: Go to Settings > Accessibility > Guided Access and make sure the “Touch” option is enabled.
2.4. Volume Buttons Not Working
If the volume buttons are not working while in Guided Access mode, it’s likely because the “Volume Buttons” option has been disabled.
Solution:
- Force Restart: Use the force restart method to restart your device.
- Exit Guided Access: After the restart, exit Guided Access by triple-clicking the side or Home button and entering your passcode.
- Check Volume Button Settings: Go to Settings > Accessibility > Guided Access and make sure the “Volume Buttons” option is enabled.
2.5. Guided Access Not Starting
If Guided Access is not starting when you triple-click the side or Home button, make sure that Guided Access is enabled in the settings.
Solution:
- Check Guided Access Settings: Go to Settings > Accessibility > Guided Access and make sure the “Guided Access” switch is turned on.
- Triple-Click Speed: Make sure you are triple-clicking the side or Home button quickly enough. If you click too slowly, the device may not recognize the gesture.
- Accessibility Shortcut: Ensure Guided Access is selected under Accessibility Shortcut (Settings > Accessibility > Accessibility Shortcut)
3. Step-by-Step Guide: How to Get Off Guided Access on iPhone
If you know the passcode, disabling Guided Access is a straightforward process. Here’s how to do it:
3.1. Using the Passcode
- Triple-Click: Triple-click the side button (on iPhone X or later) or the Home button (on iPhone 8 or earlier).
- Enter Passcode: Enter your Guided Access passcode.
- End: Tap “End” in the top left corner of the screen.
3.2. Using Touch ID or Face ID
If you have enabled Touch ID or Face ID for Guided Access, you can use it to exit the mode:
- Double-Click: Double-click the side button (on iPhone X or later) or the Home button (on iPhone 8 or earlier).
- Authenticate: Use Touch ID or Face ID to authenticate.
- End: Guided Access will automatically end, and you’ll be able to use your device normally.
4. What To Do If You’ve Forgotten Your Passcode
Forgetting your Guided Access passcode can be frustrating, but there are ways to resolve it.
4.1. Restoring Your Device
If you’ve forgotten your Guided Access passcode, the only way to disable Guided Access is to restore your device to factory settings. This will erase all data on your device, so it’s essential to have a recent backup.
Steps to Restore Your Device:
- Connect to Computer: Connect your iPhone or iPad to a computer that you’ve previously synced with.
- Enter Recovery Mode:
- iPhone 8 or later: Press and quickly release the Volume Up button, press and quickly release the Volume Down button, then press and hold the Side button until you see the recovery mode screen.
- iPhone 7 or iPhone 7 Plus: Press and hold both the Side (or Top) button and the Volume Down button at the same time. Keep holding them until you see the recovery mode screen.
- iPhone 6s or earlier: Press and hold both the Home button and the Side (or Top) button at the same time. Keep holding them until you see the recovery mode screen.
- Restore: When you see the option to Restore or Update, choose Restore.
- Set Up as New: After the restore is complete, you can set up your device as new or restore from a backup.
4.2. Preventing Passcode Amnesia
To prevent forgetting your Guided Access passcode in the future, consider these tips:
- Write It Down: Keep a written record of your passcode in a secure location.
- Use a Password Manager: Store your passcode in a password manager app.
- Use Touch ID or Face ID: Enable Touch ID or Face ID for Guided Access so you don’t have to remember a passcode.
- Regularly Update Passcodes: Change your passcodes periodically to keep them fresh in your memory.
5. Advanced Tips and Tricks for Guided Access
Guided Access has several advanced features that can enhance its functionality.
5.1. Setting Time Limits
You can set a time limit for a Guided Access session to automatically end after a specified duration. This is useful if you want to limit the amount of time a child spends on an app or if you want to ensure that a task is completed within a certain timeframe.
Steps to Set a Time Limit:
- Start Guided Access: Start a Guided Access session as described earlier.
- Triple-Click: Triple-click the side or Home button and enter your passcode.
- Options: Tap “Options” at the bottom of the screen.
- Time Limit: Turn on the “Time Limit” switch.
- Set Duration: Choose the desired time limit.
- Done: Tap “Done” in the top right corner of the screen.
When the time limit expires, the Guided Access session will automatically end, and the device will be locked.
5.2. Disabling Hardware Buttons
Guided Access allows you to disable hardware buttons, such as the Sleep/Wake button and the volume buttons. This can be useful if you want to prevent users from turning off the device or adjusting the volume.
Steps to Disable Hardware Buttons:
- Start Guided Access: Start a Guided Access session.
- Triple-Click: Triple-click the side or Home button and enter your passcode.
- Options: Tap “Options” at the bottom of the screen.
- Sleep/Wake Button: Turn off the “Sleep/Wake Button” switch to disable the Sleep/Wake button.
- Volume Buttons: Turn off the “Volume Buttons” switch to disable the volume buttons.
- Done: Tap “Done” in the top right corner of the screen.
5.3. Disabling Touch Input
You can disable touch input on the screen, which can be useful if you want to prevent users from interacting with the app.
Steps to Disable Touch Input:
- Start Guided Access: Start a Guided Access session.
- Triple-Click: Triple-click the side or Home button and enter your passcode.
- Options: Tap “Options” at the bottom of the screen.
- Touch: Turn off the “Touch” switch to disable touch input.
- Done: Tap “Done” in the top right corner of the screen.
5.4. Circling Screen Areas to Disable
Guided Access allows you to circle specific areas of the screen to disable touch input in those areas. This can be useful if you want to prevent users from accidentally tapping on certain buttons or links.
Steps to Circle Screen Areas:
- Start Guided Access: Start a Guided Access session.
- Triple-Click: Triple-click the side or Home button.
- Circle Areas: Use one finger to circle the areas of the screen you want to disable. You can move or resize the circles, or tap the “X” to remove them.
- Start: Tap “Start” in the top right corner of the screen to begin the Guided Access session with the specified areas disabled.
5.5. Using Guided Access with Siri
You can use Siri to start a Guided Access session. Simply open the app you want to use and say “Turn on Guided Access.” Siri will start a Guided Access session in the current app.
6. Understanding Accessibility Settings on iPhone
Accessibility settings on iPhones are designed to make the device more user-friendly for individuals with disabilities. These settings can also be useful for anyone who wants to customize their device to better suit their needs.
6.1. Overview of Accessibility Features
iPhones offer a wide range of accessibility features, including:
- VoiceOver: A screen reader that describes what’s on the screen.
- Zoom: Magnifies the screen for users with low vision.
- Display & Text Size: Allows users to adjust text size, contrast, and color filters.
- Motion: Reduces the amount of motion on the screen to prevent dizziness or nausea.
- Spoken Content: Allows users to have text read aloud.
- Touch: Customizes how the screen responds to touch.
- Face ID & Attention: Adjusts Face ID settings for users with attention difficulties.
- Switch Control: Allows users to control the device using switches or other adaptive devices.
- Voice Control: Allows users to control the device using their voice.
- Hearing Devices: Connects to hearing aids and other hearing devices.
- Audio/Visual: Adjusts audio and visual settings for users with hearing or vision impairments.
- Subtitles & Captioning: Customizes subtitles and captions for videos.
- Guided Access: Restricts the device to a single app.
6.2. How to Access Accessibility Settings
To access accessibility settings on your iPhone:
- Open Settings: Go to the Settings app on your iPhone.
- Accessibility: Scroll down and tap on “Accessibility.”
- Explore Features: Browse the list of accessibility features and tap on the ones you want to customize.
6.3. Customizing Accessibility Settings
Each accessibility feature has its own set of customization options. Here are some examples:
- VoiceOver: You can adjust the speaking rate, pitch, and volume of VoiceOver. You can also customize the gestures used to navigate the screen.
- Zoom: You can adjust the zoom level and choose whether to follow the keyboard focus.
- Display & Text Size: You can adjust the text size, bold the text, increase contrast, reduce transparency, and choose from a variety of color filters.
- Motion: You can reduce the amount of motion on the screen to prevent dizziness or nausea.
- Spoken Content: You can choose a voice and adjust the speaking rate for spoken content.
- Touch: You can adjust the touch sensitivity and enable or disable tap assistance.
- Face ID & Attention: You can require attention for Face ID and disable attention-aware features.
- Switch Control: You can customize the switches used to control the device and adjust the scanning speed.
- Voice Control: You can create custom commands and customize the vocabulary used by Voice Control.
- Hearing Devices: You can connect to hearing aids and other hearing devices and adjust the audio settings.
- Audio/Visual: You can adjust the audio balance, enable mono audio, and customize the LED flash for alerts.
- Subtitles & Captioning: You can choose a style for subtitles and captions and customize the font, size, and color.
- Guided Access: You can set a passcode, enable Touch ID or Face ID, and customize the available features.
6.4. Accessibility Features for Different Needs
Different accessibility features are designed to address different needs:
- Vision Impairments: VoiceOver, Zoom, Display & Text Size, and Color Filters can help users with vision impairments use their iPhones more effectively.
- Hearing Impairments: Hearing Devices, Audio/Visual, and Subtitles & Captioning can help users with hearing impairments use their iPhones more effectively.
- Cognitive Disabilities: Guided Access, Reduce Motion, and Simple User Interface can help users with cognitive disabilities stay focused and avoid distractions.
- Motor Disabilities: Switch Control, Voice Control, and Touch Accommodations can help users with motor disabilities control their iPhones more easily.
7. Maintaining iPhone Security and Privacy
Maintaining the security and privacy of your iPhone is crucial to protect your personal information and prevent unauthorized access.
7.1. Setting a Strong Passcode
Setting a strong passcode is one of the most important steps you can take to protect your iPhone. A strong passcode should be at least six digits long and should not be easy to guess. Avoid using common passcodes like “123456” or “000000.”
Steps to Set a Strong Passcode:
- Open Settings: Go to the Settings app on your iPhone.
- Face ID & Passcode: Tap on “Face ID & Passcode” (or “Touch ID & Passcode” on older devices).
- Turn Passcode On: If you haven’t already set a passcode, tap “Turn Passcode On.”
- Passcode Options: Tap “Passcode Options” and choose “Custom Alphanumeric Code” or “Custom Numeric Code” for a stronger passcode.
- Enter Passcode: Enter your new passcode and tap “Verify” to confirm.
7.2. Enabling Two-Factor Authentication
Two-factor authentication adds an extra layer of security to your Apple ID. When you enable two-factor authentication, you’ll need to enter a verification code from a trusted device or phone number whenever you sign in to your Apple ID on a new device.
Steps to Enable Two-Factor Authentication:
- Open Settings: Go to the Settings app on your iPhone.
- Your Name: Tap on your name at the top of the screen.
- Password & Security: Tap on “Password & Security.”
- Turn On Two-Factor Authentication: Tap “Turn On Two-Factor Authentication” and follow the instructions.
7.3. Keeping Software Updated
Keeping your iPhone’s software updated is essential to protect against security vulnerabilities. Apple regularly releases software updates that include security patches and bug fixes.
Steps to Update Your iPhone’s Software:
- Open Settings: Go to the Settings app on your iPhone.
- General: Tap on “General.”
- Software Update: Tap on “Software Update.”
- Download and Install: If an update is available, tap “Download and Install.”
7.4. Being Cautious with App Permissions
When you install a new app, it will often ask for permission to access certain features on your iPhone, such as your location, contacts, or camera. Be cautious about granting these permissions, as some apps may misuse them.
Steps to Manage App Permissions:
- Open Settings: Go to the Settings app on your iPhone.
- Privacy: Scroll down and tap on “Privacy.”
- Choose Category: Choose the category of permissions you want to manage (e.g., Location Services, Contacts, Camera).
- Review Permissions: Review the list of apps that have access to each category and adjust the permissions as needed.
7.5. Using a VPN on Public Wi-Fi
Public Wi-Fi networks are often unsecured, which means that your data can be intercepted by hackers. Using a VPN (Virtual Private Network) can help protect your data when you’re using public Wi-Fi by encrypting your internet traffic.
Steps to Use a VPN:
- Download VPN App: Download a VPN app from the App Store.
- Subscribe to VPN Service: Subscribe to a VPN service.
- Connect to VPN: Open the VPN app and connect to a VPN server.
7.6. Regularly Reviewing Privacy Settings
It’s a good idea to regularly review your iPhone’s privacy settings to make sure that they are configured to your liking.
Steps to Review Privacy Settings:
- Open Settings: Go to the Settings app on your iPhone.
- Privacy: Scroll down and tap on “Privacy.”
- Review Settings: Review the various privacy settings and adjust them as needed.
8. Resources for Additional Help
For further assistance with Guided Access or other iPhone features, consider the following resources.
8.1. Apple Support Website
The Apple Support website is a comprehensive resource for troubleshooting and learning about Apple products. You can find articles, videos, and forums where you can ask questions and get help from other users.
8.2. Apple Support App
The Apple Support app provides personalized support for your Apple devices. You can use the app to schedule a call with an Apple Support advisor, chat with a support agent, or find a local Apple Store for in-person support.
8.3. Apple Community Forums
The Apple Community Forums are a great place to ask questions and get help from other Apple users. You can search the forums for answers to common questions or start a new thread to ask your own question.
8.4. Local Apple Store
If you need in-person support, you can visit a local Apple Store. Apple Store employees can help you troubleshoot issues, set up your devices, and learn about new features.
9. CONDUCT.EDU.VN: Your Go-To Resource for iPhone Guides
At CONDUCT.EDU.VN, we are committed to providing clear, comprehensive, and up-to-date guides for iPhone users. We understand that technology can be complex, and we strive to simplify it for you.
9.1. Why Choose CONDUCT.EDU.VN?
- Expert Advice: Our guides are written by experienced iPhone users and tech experts.
- Easy-to-Follow Instructions: We provide step-by-step instructions that are easy to understand.
- Comprehensive Coverage: We cover a wide range of iPhone topics, from basic setup to advanced features.
- Regularly Updated: We regularly update our guides to reflect the latest software updates and features.
- Free Resource: Our guides are available for free to anyone who needs them.
9.2. Topics Covered on CONDUCT.EDU.VN
At CONDUCT.EDU.VN, we cover a wide range of iPhone topics, including:
- Basic Setup: How to set up your iPhone for the first time.
- Accessibility Features: How to use accessibility features to customize your iPhone.
- Security and Privacy: How to protect your iPhone from security threats and privacy breaches.
- Troubleshooting: How to troubleshoot common iPhone issues.
- Advanced Features: How to use advanced iPhone features, such as Guided Access, Focus Mode, and Shortcuts.
- App Reviews: Reviews of popular iPhone apps.
- Tips and Tricks: Tips and tricks for getting the most out of your iPhone.
9.3. Call to Action
Are you struggling to find reliable guidelines on iPhone usage, security protocols, or accessibility features? Do you find yourself lost amidst conflicting information and unclear instructions? CONDUCT.EDU.VN is here to help.
Visit CONDUCT.EDU.VN today to explore our extensive library of easy-to-understand guides and resources. Whether you’re looking to master Guided Access, enhance your device’s security, or explore accessibility options, we provide the clear, trustworthy information you need. Let us simplify technology for you and empower you to use your iPhone with confidence.
For any inquiries, reach out to us at 100 Ethics Plaza, Guideline City, CA 90210, United States, or connect via WhatsApp at +1 (707) 555-1234. Your journey to mastering your iPhone starts at CONDUCT.EDU.VN.
10. FAQs About Guided Access
Here are some frequently asked questions about Guided Access on iPhone.
10.1. What is the purpose of Guided Access?
Guided Access restricts your device to a single app and allows you to control which features are available. It is useful for focusing attention, parental control, and creating a controlled environment.
10.2. How do I set up Guided Access?
Go to Settings > Accessibility > Guided Access and turn on the “Guided Access” switch. Then, set a passcode and customize the available features.
10.3. How do I start a Guided Access session?
Open the app you want to use, triple-click the side or Home button, configure options (if desired), and tap “Start.”
10.4. How do I end a Guided Access session?
Triple-click the side or Home button, enter your passcode, and tap “End.” Or, if you have enabled Touch ID or Face ID, double-click the side or Home button and authenticate.
10.5. What do I do if I forget my Guided Access passcode?
You will need to restore your device to factory settings. This will erase all data on your device, so make sure you have a recent backup.
10.6. Can I use Touch ID or Face ID to end a Guided Access session?
Yes, you can enable Touch ID or Face ID for Guided Access in the settings.
10.7. Can I set a time limit for a Guided Access session?
Yes, you can set a time limit in the Guided Access options.
10.8. Can I disable hardware buttons during a Guided Access session?
Yes, you can disable the Sleep/Wake button and volume buttons in the Guided Access options.
10.9. Can I disable touch input during a Guided Access session?
Yes, you can disable touch input in the Guided Access options.
10.10. Can I circle specific areas of the screen to disable touch input?
Yes, you can circle specific areas of the screen to disable touch input in those areas.
By understanding and utilizing Guided Access effectively, you can enhance your iPhone experience, whether for personal use, education, or accessibility needs. Remember to visit conduct.edu.vn for more in-depth guides and resources to help you navigate the world of technology with confidence.