Guided Access on iPhone is a powerful accessibility feature that locks your device into a single app, giving you precise control over available features. Learn how to enable and customize this mode using this comprehensive guide, ensuring a focused and secure user experience. Discover how to restrict certain areas of the screen or disable hardware buttons with Conduct.edu.vn.
1. Understanding the Essence of Guided Access on iPhone
Guided Access is an invaluable tool integrated into iOS that significantly enhances user control and focus. By restricting an iPhone to a single application, it minimizes distractions and prevents unintended navigation. This feature is particularly beneficial in numerous scenarios, from educational settings and therapeutic interventions to general device security and parental controls.
1.1. Who Benefits from Guided Access?
Guided Access is advantageous for a wide array of users:
- Parents: To limit children to specific educational apps or content, ensuring they don’t access inappropriate material or make unwanted in-app purchases.
- Educators: To keep students focused on a particular task or app during class, preventing them from wandering off to other applications or settings.
- Individuals with Cognitive Disabilities: To simplify the user interface and prevent confusion by restricting access to essential apps only.
- Therapists: To use specific apps designed for therapy sessions without the risk of the user accidentally exiting the application.
- Businesses: To set up kiosks or interactive displays where users can only interact with the designated app, such as a survey or product catalog.
- Anyone Seeking Focus: To minimize distractions when using an iPhone for a specific purpose, such as reading, writing, or watching videos.
1.2. Why Use Guided Access?
- Enhanced Focus: By limiting the device to a single app, users can concentrate on the task at hand without the temptation of other applications or features.
- Security and Control: Guided Access allows you to disable hardware buttons, restrict screen areas, and prevent users from exiting the designated app, providing a secure and controlled environment.
- Accessibility: It simplifies the iPhone interface, making it more accessible for individuals with cognitive or motor skill challenges.
- Customization: Offers various options to customize the user experience, such as setting time limits, disabling certain features, and restricting touch input to specific areas of the screen.
2. Setting Up Guided Access: A Step-by-Step Guide
Before you can harness the power of Guided Access, you need to enable it in your iPhone’s settings. Here’s a comprehensive guide to get you started:
2.1. Enabling Guided Access
- Open Settings: Navigate to the Settings app on your iPhone.
- Go to Accessibility: Scroll down and tap on “Accessibility”.
- Find Guided Access: In the Accessibility menu, scroll down to the “General” section and tap on “Guided Access.”
- Turn on Guided Access: Toggle the switch to the “on” position. The switch will turn green when enabled.
2.2. Configuring Passcode Settings
Setting a passcode is crucial to prevent unauthorized users from ending a Guided Access session.
- Tap Passcode Settings: In the Guided Access menu, tap on “Passcode Settings”.
- Set Guided Access Passcode: Tap on “Set Guided Access Passcode”.
- Enter a Passcode: Enter a six-digit passcode. You will be prompted to re-enter it to confirm.
- Enable Touch ID or Face ID (Optional): For added convenience, you can enable Touch ID or Face ID to end Guided Access sessions. Toggle the switches for “Touch ID” or “Face ID” to the “on” position.
2.3. Setting Time Limits (Optional)
Guided Access allows you to set a time limit for each session, automatically ending the session when the time expires. This is useful for managing screen time or ensuring tasks are completed within a specific timeframe.
- Enable Time Limits: In the Guided Access menu, ensure the “Time Limits” toggle is enabled.
- Choose an Action: Decide what should happen when the time limit expires. You can choose to have an audible alert or simply end the session.
3. Starting a Guided Access Session: A Detailed Walkthrough
Once Guided Access is set up, starting a session is quick and easy. Follow these steps to lock your iPhone into a single app:
3.1. Launching the Desired App
- Open the App: Open the app you want to lock into. For example, if you want to restrict access to a specific educational game, open that game.
3.2. Activating Guided Access
- Triple-Click the Side or Home Button:
- For iPhones with Face ID (iPhone X and later): Triple-click the side button (the power button).
- For iPhones with a Home Button (iPhone 8 and earlier): Triple-click the Home button.
- Guided Access Options: After triple-clicking, the Guided Access options screen will appear.
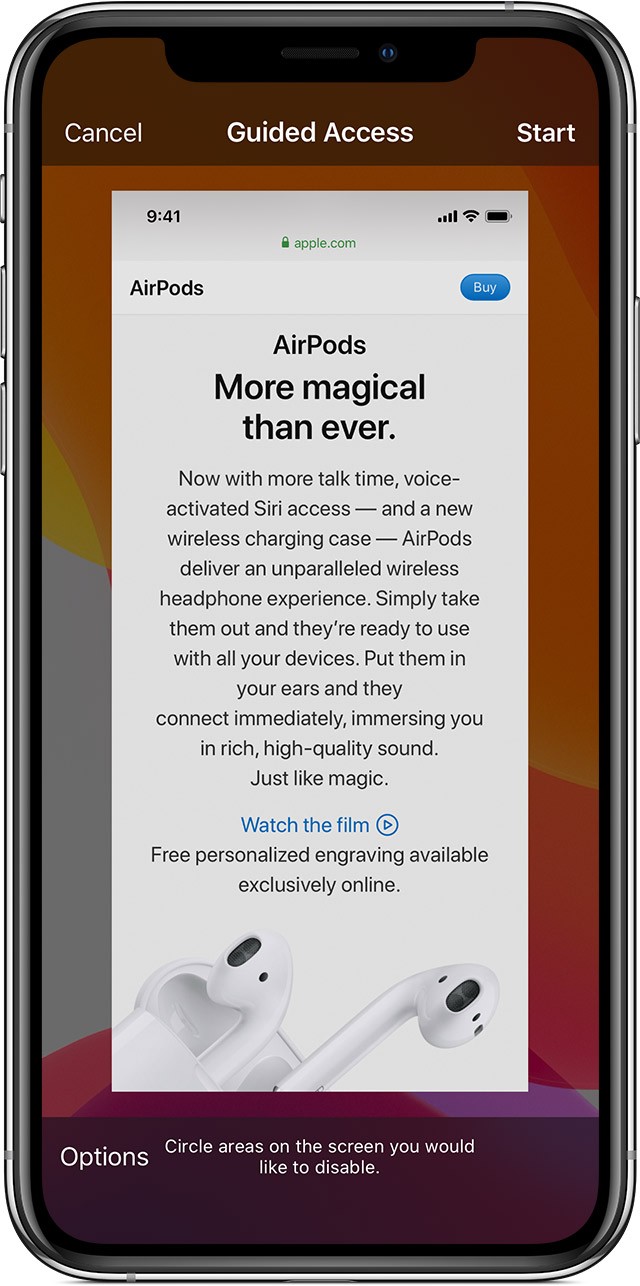
3.3. Configuring Options and Restrictions
- Circle Areas to Disable Touch: If you want to disable touch input in specific areas of the screen, use your finger to circle those areas. You can move or resize the circles by dragging the handles. To remove a circle, tap the “X” inside it.
- Tap Options: In the bottom left corner of the screen, tap “Options” to customize the Guided Access session further.
3.4. Available Options
- Sleep/Wake Button: Disable the Sleep/Wake button to prevent the device from being put to sleep.
- Volume Buttons: Disable the volume buttons to prevent volume adjustments.
- Motion: Limit how the device responds to motion. This disables features like shaking to undo and screen rotation.
- Keyboards: Disable the keyboard to prevent text input.
- Touch: Disable touch input entirely, making the screen unresponsive.
- Dictionary Lookup: Enable or disable the ability to look up words in the dictionary.
- Time Limit: Set a time limit for the Guided Access session.
3.5. Starting the Session
- Tap Start: After configuring your desired options, tap “Start” in the top right corner of the screen.
- Enter Passcode: If prompted, enter your Guided Access passcode. If you have enabled Touch ID or Face ID, you can use those instead.
 iPhone Guided Access Settings
3.6. Starting Guided Access with Siri
You can also start a Guided Access session using Siri:
- Open the App: Open the app you want to lock into.
- Activate Siri: Say “Hey Siri” or press and hold the side or Home button to activate Siri.
- Command Siri: Say “Turn on Guided Access.” Siri will start the Guided Access session with the previously configured settings.
4. Customizing Guided Access: Tailoring the Experience
Guided Access offers a range of customization options to tailor the experience to your specific needs. Here’s a detailed look at each option:
4.1. Disabling Hardware Buttons
Guided Access allows you to disable the Sleep/Wake button and the Volume buttons, preventing users from turning off the device or adjusting the volume.
- Access Options: During a Guided Access session, triple-click the side or Home button and tap “Options.”
- Toggle Buttons: Toggle the switches for “Sleep/Wake Button” and “Volume Buttons” to the “off” position to disable them.
4.2. Restricting Motion
You can limit how your iPhone responds to motion, disabling features like shaking to undo and screen rotation.
- Access Options: During a Guided Access session, triple-click the side or Home button and tap “Options.”
- Toggle Motion: Toggle the switch for “Motion” to the “off” position to disable motion-related features.
4.3. Disabling Keyboards
If you want to prevent text input, you can disable the keyboard.
- Access Options: During a Guided Access session, triple-click the side or Home button and tap “Options.”
- Toggle Keyboards: Toggle the switch for “Keyboards” to the “off” position to disable the keyboard.
4.4. Disabling Touch Input
In some cases, you may want to completely disable touch input, making the screen unresponsive.
- Access Options: During a Guided Access session, triple-click the side or Home button and tap “Options.”
- Toggle Touch: Toggle the switch for “Touch” to the “off” position to disable touch input.
4.5. Controlling Dictionary Lookup
You can control whether users can look up words in the dictionary by selecting text.
- Access Options: During a Guided Access session, triple-click the side or Home button and tap “Options.”
- Toggle Dictionary Lookup: Toggle the switch for “Dictionary Lookup” to the “on” or “off” position to enable or disable the feature.
4.6. Setting Time Limits
Guided Access allows you to set a time limit for each session, automatically ending the session when the time expires.
- Access Options: During a Guided Access session, triple-click the side or Home button and tap “Options.”
- Toggle Time Limit: Toggle the switch for “Time Limit” to the “on” position.
- Set Time: Choose a time limit from the available options or set a custom time.
5. Ending a Guided Access Session: Reclaiming Control
Ending a Guided Access session is straightforward:
5.1. Triple-Click the Side or Home Button
- For iPhones with Face ID (iPhone X and later): Triple-click the side button (the power button).
- For iPhones with a Home Button (iPhone 8 and earlier): Triple-click the Home button.
5.2. Enter the Passcode
- Enter Passcode: Enter your Guided Access passcode. If you have enabled Touch ID or Face ID, you can use those instead.
5.3. Tap End
- Tap End: In the bottom left corner of the screen, tap “End” to terminate the Guided Access session.
6. Real-World Applications of Guided Access
Guided Access is not just a theoretical feature; it has numerous practical applications across various settings.
6.1. Educational Settings
- Focus on Specific Tasks: Teachers can use Guided Access to lock students into educational apps, preventing them from accessing games or social media during class.
- Standardized Testing: During standardized tests, Guided Access can ensure students only use the testing app, preventing cheating or access to unauthorized resources.
6.2. Therapeutic Interventions
- Autism Therapy: Therapists can use Guided Access to lock individuals with autism into specific therapy apps, minimizing distractions and preventing accidental exits.
- Cognitive Training: For individuals undergoing cognitive training, Guided Access can ensure they focus on the training exercises without being distracted by other apps.
6.3. Business and Retail
- Kiosks and Interactive Displays: Businesses can use Guided Access to set up kiosks or interactive displays where users can only interact with the designated app, such as a product catalog or survey.
- Point of Sale (POS) Systems: In retail settings, Guided Access can lock the device into the POS app, preventing employees from using it for personal purposes.
6.4. Parental Controls
- Limiting Screen Time: Parents can use Guided Access to set time limits for app usage, helping to manage their children’s screen time.
- Restricting Content: Guided Access can ensure children only access age-appropriate content and prevent them from making unwanted in-app purchases.
7. Troubleshooting Common Issues with Guided Access
While Guided Access is generally reliable, you may encounter some issues. Here are some common problems and their solutions:
7.1. Forgetting the Passcode
If you forget your Guided Access passcode, you will need to restore your iPhone to factory settings. This will erase all data on your device, so it’s essential to have a backup.
- Connect to Computer: Connect your iPhone to a computer using a USB cable.
- Enter Recovery Mode:
- For iPhone 8 and later: Press and quickly release the volume up button, press and quickly release the volume down button, then press and hold the side button until you see the recovery mode screen.
- For iPhone 7 and 7 Plus: Press and hold the side button and the volume down button at the same time until you see the recovery mode screen.
- For iPhone 6s and earlier: Press and hold the Home button and the side button at the same time until you see the recovery mode screen.
- Restore iPhone: In iTunes or Finder, click “Restore” when prompted. Follow the on-screen instructions to restore your iPhone to factory settings.
7.2. Guided Access Not Starting
If Guided Access is not starting when you triple-click the side or Home button, ensure that the feature is enabled in Settings > Accessibility > Guided Access. Also, check that the triple-click speed is set correctly in Settings > Accessibility > Side Button (or Home Button).
7.3. Options Not Appearing
If the Options button is not appearing when you triple-click the side or Home button, try triple-clicking again more slowly. Ensure that you are not accidentally pressing the buttons too quickly.
8. Advanced Tips and Tricks for Guided Access
To maximize the benefits of Guided Access, consider these advanced tips and tricks:
8.1. Creating Custom Profiles
While Guided Access doesn’t offer explicit profiles, you can create a workaround by setting up different apps with pre-configured settings and switching between them as needed.
- Set Up Apps: Configure each app with the desired Guided Access settings.
- Switch Between Apps: When you need to switch to a different profile, simply end the current Guided Access session and start a new one with the desired app.
8.2. Using Guided Access with AssistiveTouch
AssistiveTouch can be used in conjunction with Guided Access to provide additional accessibility options.
- Enable AssistiveTouch: Go to Settings > Accessibility > Touch > AssistiveTouch and turn it on.
- Customize AssistiveTouch: Customize the AssistiveTouch menu to include frequently used functions, such as Home, Volume, or Screenshot.
- Use with Guided Access: During a Guided Access session, you can use the AssistiveTouch menu to access these functions without leaving the app.
8.3. Remote Management
While Guided Access itself doesn’t offer remote management capabilities, you can use Mobile Device Management (MDM) solutions to remotely configure and manage Guided Access settings on multiple devices.
- Choose an MDM Solution: Select an MDM solution that supports iOS devices, such as Jamf or Microsoft Intune.
- Enroll Devices: Enroll your devices in the MDM solution.
- Configure Guided Access: Use the MDM solution to remotely configure Guided Access settings on the enrolled devices.
9. The Importance of Staying Informed
Apple frequently updates iOS, which may include changes to Guided Access. Staying informed about these updates ensures you can take advantage of new features and address any compatibility issues.
9.1. Monitoring Apple’s Release Notes
Keep an eye on Apple’s release notes for iOS updates. These notes often contain information about changes to accessibility features, including Guided Access.
9.2. Consulting Online Forums and Communities
Online forums and communities dedicated to iOS and accessibility can provide valuable insights and troubleshooting tips. Websites like Reddit and Apple Support Communities are excellent resources.
10. Enhancing Digital Well-being with Guided Access
In today’s digital age, maintaining a healthy balance with technology is essential. Guided Access can be a valuable tool in promoting digital well-being.
10.1. Promoting Focus and Productivity
By minimizing distractions and limiting access to non-essential apps, Guided Access can help users stay focused on their tasks and improve productivity.
10.2. Managing Screen Time
Setting time limits with Guided Access can help users manage their screen time and prevent overuse of devices.
10.3. Creating a Mindful Digital Environment
Guided Access can help create a mindful digital environment by limiting access to distracting or addictive apps, promoting a more intentional and purposeful use of technology.
11. Guided Access and Compliance
In certain industries, such as healthcare and education, compliance with regulations like HIPAA and FERPA is crucial. Guided Access can help organizations meet these requirements by securing devices and limiting access to sensitive information.
11.1. Healthcare
In healthcare settings, Guided Access can ensure that devices used for patient care only access approved applications and data, helping to maintain HIPAA compliance.
11.2. Education
In educational institutions, Guided Access can help protect student data and ensure compliance with FERPA regulations by limiting access to authorized educational apps and resources.
12. How CONDUCT.EDU.VN Can Help You Master Guided Access
At CONDUCT.EDU.VN, we understand the importance of mastering accessibility features like Guided Access. Our comprehensive resources and expert guidance can help you unlock the full potential of this powerful tool.
12.1. Detailed Guides and Tutorials
We offer detailed guides and tutorials on Guided Access, covering everything from basic setup to advanced customization. Our step-by-step instructions and clear explanations make it easy to learn and implement Guided Access in your daily life.
12.2. Expert Support and Consultation
Our team of accessibility experts is available to provide personalized support and consultation. Whether you have questions about setting up Guided Access or need help troubleshooting an issue, we are here to assist you.
12.3. Community Forums and Resources
Join our community forums to connect with other Guided Access users, share tips and tricks, and get answers to your questions. Our community resources provide a wealth of information and support to help you master Guided Access.
13. Frequently Asked Questions (FAQ) About Guided Access
-
What is Guided Access?
Guided Access is an accessibility feature on iPhones that locks the device into a single app, limiting access to other features and settings.
-
How do I enable Guided Access?
Go to Settings > Accessibility > Guided Access and toggle the switch to the “on” position.
-
How do I start a Guided Access session?
Open the app you want to lock into, then triple-click the side or Home button.
-
How do I end a Guided Access session?
Triple-click the side or Home button, then enter your Guided Access passcode.
-
What if I forget my Guided Access passcode?
You will need to restore your iPhone to factory settings, which will erase all data on your device.
-
Can I use Touch ID or Face ID to end a Guided Access session?
Yes, you can enable Touch ID or Face ID in the Guided Access settings.
-
Can I set a time limit for a Guided Access session?
Yes, you can set a time limit in the Guided Access options.
-
Can I disable hardware buttons during a Guided Access session?
Yes, you can disable the Sleep/Wake button and Volume buttons in the Guided Access options.
-
Can I disable touch input during a Guided Access session?
Yes, you can disable touch input in the Guided Access options.
-
Is Guided Access available on all iPhone models?
Yes, Guided Access is available on all iPhone models running iOS 6 and later.
14. Final Thoughts: Embracing the Power of Guided Access
Guided Access is a versatile and powerful tool that can significantly enhance the user experience on your iPhone. Whether you are a parent, educator, therapist, or simply someone seeking greater focus and control over your device, Guided Access offers a range of benefits that can improve your digital life. By following the steps and tips outlined in this guide, you can master Guided Access and unlock its full potential.
Remember, CONDUCT.EDU.VN is here to support you on your journey to mastering accessibility features like Guided Access. Visit our website at CONDUCT.EDU.VN for more information, resources, and expert guidance. Contact us at 100 Ethics Plaza, Guideline City, CA 90210, United States, or call us at +1 (707) 555-1234. You can also reach us via WhatsApp for immediate assistance.
Take control of your iPhone experience today with Guided Access and conduct.edu.vn.