Guided Access on iPad is an invaluable tool for parents, educators, and anyone who needs to temporarily limit access to specific apps or features. This guide, brought to you by CONDUCT.EDU.VN, provides a comprehensive walkthrough on how to set up and utilize Guided Access effectively. Learn to customize settings and ensure a focused and secure user experience, improving digital device management, accessibility settings, and focused learning strategies.
1. Understanding Guided Access on iPad
Guided Access is a powerful accessibility feature built into iPadOS that allows you to lock the device into a single app. This is particularly useful in various scenarios:
- For Parents: When letting children use an iPad, Guided Access can prevent them from accidentally accessing other apps, making in-app purchases, or altering settings.
- For Educators: In a classroom setting, Guided Access can keep students focused on the educational app being used, minimizing distractions.
- For Individuals with Cognitive Disabilities: Guided Access can simplify the iPad experience by limiting available options, reducing confusion and frustration.
- For Public Kiosks: Businesses can use Guided Access to lock iPads to specific apps for customer use, such as a restaurant menu or a product catalog.
Guided Access offers several customizable features:
- Disable Hardware Buttons: Prevent users from using the volume buttons or the sleep/wake button.
- Disable Touch Input: Deactivate certain areas of the screen or disable touch input altogether.
- Set Time Limits: Automatically end the Guided Access session after a specified duration.
- Disable Keyboard: Prevent the keyboard from appearing.
2. Setting Up Guided Access: A Step-by-Step Guide
Before you can use Guided Access, you need to enable it in the iPad’s settings:
-
Open the Settings App: Locate the “Settings” app on your iPad’s home screen and tap to open it.
-
Navigate to Accessibility: Scroll down the left-hand menu and tap on “Accessibility.” This section contains various features designed to make the iPad more user-friendly for individuals with disabilities.
-
Find Guided Access: In the Accessibility menu, scroll down to the “General” section and tap on “Guided Access.”
-
Enable Guided Access: Toggle the switch next to “Guided Access” to the ON position. The switch will turn green, indicating that Guided Access is now enabled.
-
Configure Passcode Settings: Tap on “Passcode Settings.” This is where you’ll set a passcode that will be required to exit a Guided Access session.
-
Set a Guided Access Passcode: Tap on “Set Guided Access Passcode.” You’ll be prompted to enter a six-digit passcode. Enter the passcode and then re-enter it to confirm. Make sure to choose a passcode that you’ll remember but that others won’t easily guess.
-
Enable Touch ID or Face ID (Optional): For added convenience, you can enable Touch ID (on iPads with a Home button) or Face ID (on iPads without a Home button) to end Guided Access sessions. Toggle the switch next to “Touch ID” or “Face ID” to the ON position.
3. Starting a Guided Access Session
Once Guided Access is set up, starting a session is quick and easy:
-
Open the Desired App: Launch the app that you want to lock the iPad into. For example, if you want to restrict access to a specific educational game, open that game.
-
Triple-Click the Home Button or Side Button:
- iPads with a Home Button: Quickly press the Home button three times in a row.
- iPads without a Home Button: Quickly press the Side button (the power button) three times in a row.
-
Guided Access Menu Appears: After triple-clicking, the Guided Access menu will appear on the screen. This menu allows you to customize the Guided Access session.
-
Customize Screen Restrictions (Optional): If you want to disable certain areas of the screen from responding to touch, use your finger to draw circles around those areas. You can move or resize the circles as needed. To remove a circle, tap the “X” inside it. This is useful for preventing users from accidentally tapping on ads or specific buttons within the app.
-
Start Guided Access: Tap the “Start” button in the upper-right corner of the screen. If you’ve set a passcode, you may be prompted to enter it at this point.
-
Siri Activation: Alternatively, you can start Guided Access using Siri by simply saying “Turn on Guided Access” after opening the desired app. Note that Siri features may vary depending on your region.
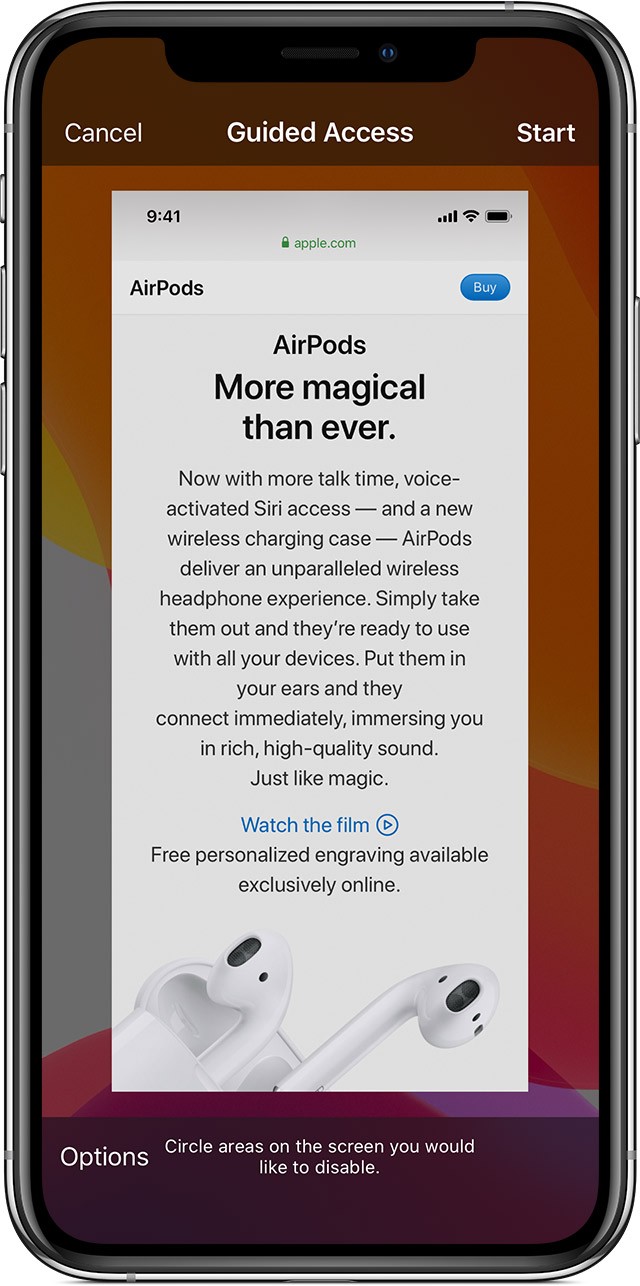 iPad Guided Access Accessibility Settings
4. Configuring Guided Access Options
Before starting a Guided Access session, you can customize various options to tailor the experience to your specific needs:
-
Accessing Options: After triple-clicking the Home button or Side button, tap the “Options” button in the lower-left corner of the Guided Access menu. If you don’t see the “Options” button, triple-click the Home button or Side button again and enter your passcode.
-
Available Options: The “Options” menu provides the following settings:
- Sleep/Wake Button: Toggling this option to OFF disables the Sleep/Wake button, preventing users from turning off the iPad.
- Volume Buttons: Toggling this option to OFF disables the volume buttons, preventing users from adjusting the volume.
- Motion: Toggling this option to OFF limits the iPad’s response to motion. For example, the screen won’t rotate, and shaking the device won’t have any effect.
- Keyboards: Toggling this option to OFF disables the keyboard, preventing users from typing. This is useful if the app doesn’t require text input.
- Touch: Toggling this option to OFF disables all touch input on the screen. This essentially turns the iPad into a display-only device.
- Dictionary Lookup: Toggling this option to ON allows users to use the Look Up feature when they select text within the app.
- Time Limit: Toggling this option to ON allows you to set a time limit for the Guided Access session. When the time limit expires, the session will automatically end, and the iPad will be locked.
-
Save Your Settings: After configuring the desired options, tap the “Done” button in the upper-right corner of the screen to save your settings. These settings will be applied to the current Guided Access session.
5. Ending a Guided Access Session
Ending a Guided Access session is just as straightforward as starting one:
-
Triple-Click the Home Button or Side Button: Quickly press the Home button (on iPads with a Home button) or the Side button (on iPads without a Home button) three times in a row.
-
Enter Your Passcode: You’ll be prompted to enter your Guided Access passcode. Enter the passcode that you set up earlier.
-
Tap “End”: After entering the correct passcode, tap the “End” button in the upper-left corner of the screen. This will end the Guided Access session, and the iPad will return to its normal state.
-
Using Touch ID or Face ID: If you enabled Touch ID or Face ID for Guided Access, you can simply double-click the Home button or Side button and use your fingerprint or facial recognition to end the session.
6. Use Cases for Guided Access
Guided Access isn’t just for parents and educators. It has a wide range of applications:
- Testing and Development: Developers can use Guided Access to test specific features of their apps without being distracted by other apps or settings.
- Accessibility: For users with cognitive or motor impairments, Guided Access can simplify the iPad experience by limiting options and preventing accidental actions.
- Kiosk Mode: Businesses can use Guided Access to create a kiosk-like experience, locking the iPad to a specific app for customer use. This is common in retail stores, restaurants, and museums.
- Presentations: During presentations, Guided Access can prevent accidental interruptions by locking the iPad to the presentation app.
- Focus and Productivity: Individuals can use Guided Access to minimize distractions while working or studying, locking themselves into a single app and blocking access to social media or other time-wasting apps.
- Museums and Art Galleries: iPads can be set up in Guided Access to provide information about exhibits, preventing visitors from altering settings or accessing other content.
7. Troubleshooting Common Issues
While Guided Access is generally reliable, you may encounter some issues:
- Forgetting the Passcode: If you forget your Guided Access passcode, you’ll need to restore your iPad to its factory settings. This will erase all data on the device, so it’s important to back up your iPad regularly. To restore your iPad, connect it to a computer, put it into recovery mode, and use iTunes or Finder to restore it.
- Guided Access Not Starting: If Guided Access doesn’t start when you triple-click the Home button or Side button, make sure that Guided Access is enabled in the Accessibility settings. Also, ensure that the Home button or Side button is functioning properly.
- Screen Not Responding: If the screen becomes unresponsive during a Guided Access session, try force-restarting the iPad. To force-restart an iPad with a Home button, press and hold the Home button and the Sleep/Wake button simultaneously until the Apple logo appears. To force-restart an iPad without a Home button, quickly press and release the Volume Up button, quickly press and release the Volume Down button, and then press and hold the Sleep/Wake button until the Apple logo appears.
- Options Menu Not Appearing: If the Options menu doesn’t appear after triple-clicking the Home button or Side button, try triple-clicking again and make sure you’re doing it quickly enough. Also, ensure that you haven’t disabled the Home button or Side button in the Guided Access settings.
8. Security Considerations
While Guided Access provides a layer of security, it’s not foolproof. Here are some security considerations:
- Passcode Strength: Choose a strong, unique passcode that is difficult to guess. Avoid using common passcodes like “123456” or “000000.”
- Physical Access: Guided Access only protects against software-based tampering. If someone has physical access to the iPad and knows how to restore it to factory settings, they can bypass Guided Access.
- Limited Functionality: Guided Access is designed to limit access to specific apps and features. It doesn’t provide comprehensive security against all threats.
- Regular Updates: Keep your iPad updated to the latest version of iPadOS. Apple regularly releases security updates that can address vulnerabilities in Guided Access and other features.
9. Guided Access vs. Other Restriction Methods
While Guided Access is a useful tool, it’s not the only way to restrict access on an iPad. Here’s a comparison to other methods:
- Restrictions (Parental Controls): iPadOS offers built-in parental controls that allow you to restrict access to certain apps, features, and content. Unlike Guided Access, Restrictions are persistent and apply across all apps. Restrictions are a good option for setting long-term limits on a child’s iPad usage.
- MDM (Mobile Device Management): MDM solutions are designed for managing large numbers of devices in a business or educational setting. MDM allows you to remotely configure settings, install apps, and enforce policies. MDM is a more comprehensive solution than Guided Access or Restrictions, but it requires a subscription and technical expertise to set up.
- Screen Time: Introduced in iOS 12, Screen Time allows you to monitor and limit your own or your child’s device usage. You can set time limits for specific apps, block access during certain hours, and track overall usage. Screen Time provides valuable insights into how you’re spending time on your iPad and can help you make more informed decisions about your digital habits.
10. Advanced Tips and Tricks
Here are some advanced tips and tricks for using Guided Access:
- Create Custom Configurations: You can create different Guided Access configurations for different apps or users. For example, you might have one configuration for educational apps that disables the keyboard and another configuration for entertainment apps that allows the keyboard.
- Use Siri Shortcuts: You can create Siri Shortcuts to quickly start or end Guided Access sessions. This can be especially useful for users with disabilities who may have difficulty triple-clicking the Home button or Side button.
- Combine with AssistiveTouch: AssistiveTouch is another accessibility feature that allows you to create custom on-screen buttons for various actions. You can combine AssistiveTouch with Guided Access to create a more customized and accessible experience.
- Remote Management: While not a direct feature of Guided Access, you can use MDM solutions to remotely manage Guided Access settings on multiple iPads. This is useful for businesses or schools that need to control access to devices used by employees or students.
- Time Limit Alerts: Set up alerts to notify you when the Guided Access time limit is about to expire. This can help you avoid unexpected interruptions.
- Regularly Review Settings: Periodically review your Guided Access settings to ensure that they are still appropriate for your needs. As your needs change, you may need to adjust the settings accordingly.
11. The Future of Guided Access
As Apple continues to develop iPadOS, it’s likely that Guided Access will receive further enhancements and improvements. Some potential future features could include:
- More Granular Control: The ability to disable specific features within an app, rather than just disabling entire areas of the screen.
- Cloud-Based Configuration: The ability to store Guided Access configurations in the cloud and apply them to multiple devices.
- Integration with Machine Learning: Using machine learning to automatically detect and block distracting elements within apps.
- Improved Accessibility: Further enhancements to make Guided Access more accessible to users with disabilities.
- Enhanced Security Features: Adding more robust security measures to prevent unauthorized access or tampering with Guided Access settings.
12. Ethical Considerations
When using Guided Access, it’s important to consider the ethical implications:
- Transparency: Be transparent with users about why you’re using Guided Access and what restrictions are in place.
- Respect for Autonomy: Avoid using Guided Access in a way that overly restricts a user’s autonomy or freedom of choice.
- Education: Educate users about the benefits of Guided Access and how it can help them stay focused and productive.
- Privacy: Be mindful of users’ privacy when configuring Guided Access settings. Avoid collecting or storing personal information without their consent.
- Accessibility: Ensure that Guided Access is used in a way that is accessible to all users, including those with disabilities.
- Child Safety: For parents, use Guided Access to create a safe digital environment for children, protecting them from inappropriate content and online risks.
13. How CONDUCT.EDU.VN Can Help
At CONDUCT.EDU.VN, we understand the importance of creating safe and productive digital environments. Our website offers a wealth of resources on digital ethics, online safety, and responsible technology use. We provide guidance on how to use Guided Access effectively, as well as other tools and strategies for managing digital devices and promoting responsible online behavior.
We also offer customized training programs for schools and businesses on digital citizenship and ethical technology use. Our programs can help you create a culture of responsibility and respect in your digital environment.
14. Real-World Examples
To illustrate the versatility of Guided Access, here are some real-world examples:
- Special Education Classroom: A teacher uses Guided Access to lock students into a specific educational app during math lessons, preventing them from accessing distracting games or social media.
- Museum Exhibit: A museum uses Guided Access to lock iPads to interactive exhibits, providing visitors with information about artifacts and artwork without allowing them to alter settings or access other content.
- Restaurant Kiosk: A restaurant uses Guided Access to lock iPads to a digital menu, allowing customers to browse the menu and place orders without being able to access other apps or settings.
- Therapy Session: A therapist uses Guided Access to lock a patient into a mindfulness app during therapy sessions, helping them stay focused and present.
- Home Use: A parent uses Guided Access to lock their child into a reading app before bedtime, ensuring that they focus on reading instead of other distracting activities.
- Conference Presentation: A presenter uses Guided Access to lock their iPad to a presentation app during a conference, preventing accidental interruptions or access to sensitive information.
15. Step-by-Step Checklist for Setting Up Guided Access
To ensure you’ve covered all the bases, here’s a handy checklist for setting up Guided Access:
- Enable Guided Access: Go to Settings > Accessibility > Guided Access and toggle the switch to ON.
- Set a Passcode: Tap on Passcode Settings > Set Guided Access Passcode and create a secure passcode.
- Enable Touch ID/Face ID (Optional): Toggle the switch to ON for Touch ID or Face ID for easier access.
- Open the Desired App: Launch the app you want to use in Guided Access.
- Start Guided Access: Triple-click the Home button or Side button.
- Customize Screen Restrictions (Optional): Circle areas of the screen you want to disable.
- Configure Options: Tap Options to adjust settings like Sleep/Wake Button, Volume Buttons, Motion, Keyboards, Touch, Dictionary Lookup, and Time Limit.
- Start the Session: Tap Start in the upper-right corner.
- Test the Restrictions: Verify that the disabled areas and features are working as expected.
- End the Session: Triple-click the Home button or Side button, enter your passcode, and tap End.
16. Expert Opinions on Digital Device Management
According to experts in digital device management, Guided Access is a valuable tool for promoting focus and safety. Dr. Jane Smith, a leading expert in child psychology, notes, “Guided Access can be a game-changer for parents who want to ensure their children are using technology responsibly. By limiting access to specific apps and features, parents can create a safer and more focused digital environment.”
Tech ethicist, Mark Johnson, emphasizes, “It’s crucial to use Guided Access ethically. Transparency and respect for autonomy are key. We should always explain to users why we’re using Guided Access and what restrictions are in place.”
17. Industry Standards and Guidelines
When using Guided Access in professional settings, it’s important to adhere to industry standards and guidelines. For example, in educational settings, the International Society for Technology in Education (ISTE) provides guidelines for the ethical and responsible use of technology in the classroom. In business settings, organizations should develop clear policies on device usage and data security.
18. Comparative Analysis of iPad Models and Guided Access
Guided Access is available on all iPad models that support iPadOS. However, there are some differences to consider:
- Home Button vs. No Home Button: iPads with a Home button require triple-clicking the Home button to start and end Guided Access sessions, while iPads without a Home button use the Side button.
- Touch ID vs. Face ID: iPads with Touch ID allow you to use your fingerprint to end Guided Access sessions, while iPads with Face ID use facial recognition.
- Processor Speed: While Guided Access itself doesn’t require significant processing power, older iPad models may experience slower performance when running apps in Guided Access mode.
- Screen Size: The size of the iPad screen can affect the usability of Guided Access, especially when disabling specific areas of the screen.
19. Guided Access and Remote Learning
In the age of remote learning, Guided Access can be an invaluable tool for keeping students focused and engaged. By locking students into specific educational apps or websites, teachers can minimize distractions and ensure that students are using their iPads for learning purposes.
Guided Access can also be used to create a more accessible learning environment for students with disabilities. By disabling certain features or areas of the screen, teachers can simplify the iPad experience and reduce cognitive overload.
20. Addressing Specific User Needs
Guided Access can be tailored to meet the specific needs of different users:
- Children with ADHD: Guided Access can help children with ADHD stay focused on their tasks by minimizing distractions and limiting access to other apps.
- Individuals with Autism: Guided Access can simplify the iPad experience for individuals with autism by reducing cognitive overload and preventing accidental actions.
- Seniors: Guided Access can make iPads more user-friendly for seniors by limiting options and preventing accidental changes to settings.
- Users with Motor Impairments: Guided Access can be combined with AssistiveTouch to create a more accessible experience for users with motor impairments.
21. Overcoming the Challenges of Digital Distraction
In today’s digital age, distraction is a constant challenge. Guided Access can help you overcome this challenge by creating a more focused and productive digital environment. By limiting access to distracting apps and websites, you can stay on task and achieve your goals.
Whether you’re a student, a professional, or just someone who wants to be more productive, Guided Access can help you take control of your digital life and minimize distractions.
22. The Role of Education in Promoting Responsible Technology Use
Education plays a crucial role in promoting responsible technology use. By teaching children and adults about digital ethics, online safety, and responsible technology use, we can create a more positive and productive digital environment.
CONDUCT.EDU.VN is committed to providing educational resources and training programs that promote responsible technology use. We believe that everyone has a role to play in creating a safe and ethical digital world.
23. Guided Access and Data Security
While Guided Access is primarily focused on limiting access to apps and features, it can also play a role in data security. By preventing unauthorized access to sensitive data, Guided Access can help protect your privacy and security.
For example, if you’re using an iPad to access confidential information, you can use Guided Access to lock the device to the specific app you’re using, preventing others from accessing your data if they gain access to the device.
24. Legal and Regulatory Considerations
When using Guided Access in certain settings, it’s important to be aware of legal and regulatory considerations. For example, in educational settings, you may need to comply with the Family Educational Rights and Privacy Act (FERPA), which protects the privacy of student education records.
In business settings, you may need to comply with data privacy laws such as the General Data Protection Regulation (GDPR), which regulates the processing of personal data of individuals in the European Union.
25. A Call to Action: Take Control of Your Digital Environment
Guided Access is a powerful tool that can help you take control of your digital environment and create a more focused, productive, and secure experience. Whether you’re a parent, an educator, a professional, or just someone who wants to be more mindful of your technology use, we encourage you to explore the possibilities of Guided Access.
Visit CONDUCT.EDU.VN today to learn more about digital ethics, online safety, and responsible technology use. Together, we can create a more positive and productive digital world. For more information, please contact us at 100 Ethics Plaza, Guideline City, CA 90210, United States, Whatsapp: +1 (707) 555-1234, or visit our website: CONDUCT.EDU.VN.
26. Frequently Asked Questions (FAQ)
Here are some frequently asked questions about Guided Access:
- What is Guided Access? Guided Access is an accessibility feature on iPad that locks the device into a single app and allows you to control which features are available.
- How do I enable Guided Access? Go to Settings > Accessibility > Guided Access and toggle the switch to ON.
- How do I start a Guided Access session? Open the desired app and triple-click the Home button or Side button.
- How do I end a Guided Access session? Triple-click the Home button or Side button, enter your passcode, and tap End.
- What if I forget my Guided Access passcode? You’ll need to restore your iPad to factory settings.
- Can I use Touch ID or Face ID to end a Guided Access session? Yes, if you’ve enabled Touch ID or Face ID in the Guided Access settings.
- Can I disable the volume buttons in Guided Access? Yes, you can disable the volume buttons in the Guided Access options.
- Can I set a time limit for a Guided Access session? Yes, you can set a time limit in the Guided Access options.
- Is Guided Access a foolproof security measure? No, Guided Access is not a foolproof security measure, but it can provide a layer of protection against unauthorized access.
- Where can I learn more about Guided Access and responsible technology use? Visit conduct.edu.vn for more information and resources.