Dovetail joints are renowned for their strength and aesthetic appeal, making them a staple in woodworking. Achieving precise dovetails often relies on a reliable guide. This guide will walk you through creating your own dovetail guide, offering a method proven over decades.
This dovetail guide isn’t about fancy, new tools; it’s about using implements that consistently deliver high-quality results. It’s a tool that becomes an extension of your skill, helping you create perfect dovetails time and time again. While many templates exist, this one has been a favorite for many years, offering unparalleled accuracy and ease of use.
Here’s how to make your own dovetail guide.
Tools and Materials:
- Wood blank (3 ½ – 4” long x 1 1/4″ x 3/4- 7/8″ thick): Hardwood is durable, but even softwood like pine can last for years.
- Square
- Marking gauge
- Sliding bevel
- Knife
- 1” wide chisel
- Dovetail saw
- Pencil
Step-by-Step Instructions:
-
Prepare the Blank: Ensure all faces of the wood blank are square to each other and the sides are parallel. Mark two points 1 ½” from each end of the blank.
-
Establish Shoulder Lines: Using a square, draw a line around the entire blank at one of the 1 ½” marks. This line will serve as the shoulder line for your dovetails.
-
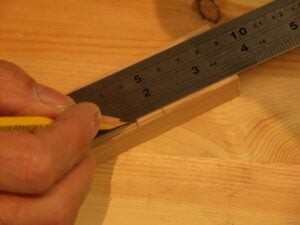
Lay Out the Dovetail Angle: The ideal dovetail angle is a 1:7 ratio. To achieve this, square a line from one straight edge of the blank. Measure 7” up this line and 1” along the corner edge. Connect these points. Use a sliding bevel to transfer this 1:7 angle.
-
Transfer the Angle: Use the sliding bevel to mark the 1:7 angle on the blank. Ensure the angled line faces the same direction on both the top and bottom sides of the blank. This allows you to flip the template for each side of the dovetail joint.
-
Mark the Gauge Line: Set your marking gauge to ¼” (6mm). Run parallel lines from the shoulder lines along the length of the blank on both wide faces. These lines will indicate the depth of your dovetail cuts.
-
Create a Knife Wall: Use a knife, square, and sliding bevel to create a “knife wall” on the penciled shoulder lines. This provides a precise guide for your chisel and saw.
-
Define the Shoulder with a Chisel: Further define the knife wall with a 1” wide chisel. Chisel into the knife wall from the waste side (the part you are about to cut away). This creates a step-down to receive the saw, ensuring a tight fit against the knife wall.
-
Saw the Dovetail Cheeks: Place the dovetail saw into the recess and carefully cut against the knife wall down to the gauge line. Focus on precision to ensure a clean, accurate cut.
-
Complete the Cuts: Saw across the end grain first, then lower your hand to cut along the grain. Repeat this process from the other side to ensure a smooth, even cut along the cheeks of the template.
-
Refine the Shoulders: Pare the shoulders clean with a 1” chisel. Also, clean up the faces of the cheeks with the chisel to create a smooth and accurate surface.
-
Alternative Method: Splitting the Cheeks: If you are comfortable, you can split the cheeks using a chisel. This method can be faster, especially when you are experienced.
-
Final Result: Your dovetail guide is now complete. It should look similar to the image below, ready to help you create accurate and strong dovetail joints.
Conclusion:
Creating your own dovetail guide is a rewarding project that enhances your woodworking precision. This guide, tested and refined over years, provides a reliable and effective method for achieving perfect dovetail joints. While this method provides one approach, remember that the best methods are those that feel right and produce great results for your individual working style. With practice, you’ll find this tool becomes an indispensable part of your woodworking arsenal.