How To Make A Grid Guide In Photoshop is a crucial skill for photographers, designers, and digital artists looking to enhance precision and alignment in their work. At CONDUCT.EDU.VN, we provide detailed instructions and insights to help you master this technique, ensuring your designs are balanced and visually appealing. Learn the ropes of grid creation, snapping options, and preference settings for a streamlined workflow. Unlock advanced techniques like shape creation, image linking, and guide customization, all while improving your design precision.
1. Understanding the Basics of Grids in Photoshop
1.1. What is a Grid in Photoshop?
A grid in Photoshop is a non-printing set of lines or dots overlaid on an image, serving as a visual aid for aligning elements, maintaining symmetry, and ensuring consistent spacing. Grids are essential tools for graphic designers, photographers, and digital artists who need precision in their work. According to Adobe’s official documentation, grids help in “positioning elements accurately” during editing. They are flexible and customizable, allowing users to adapt them to various project requirements.
1.2. Why Use Grids? The Benefits
Using grids offers several advantages:
- Precision: Grids help align objects and elements with pixel-perfect accuracy.
- Symmetry: They ensure symmetrical arrangements, which are pleasing to the eye.
- Consistency: Grids maintain consistent spacing and proportions across the design.
- Efficiency: They speed up the design process by providing a framework to follow.
- Professionalism: Using grids leads to more polished and professional-looking results.
According to research by the Nielsen Norman Group, designs that use grids are perceived as more organized and trustworthy. This underscores the importance of grids in creating credible and effective visual content.
1.3. Key Terminology
Understanding these terms will help you navigate grid creation and usage more effectively:
- Grid Lines: The primary horizontal and vertical lines that form the grid.
- Subdivisions: Smaller divisions within the grid that provide finer alignment points.
- Snap To Grid: A feature that makes objects automatically align to the nearest grid line.
- Guides: Custom lines that can be placed manually for specific alignment needs.
- Preferences: Settings that allow you to customize the grid’s appearance and behavior.
The official Adobe Photoshop User Guide offers detailed explanations of these terms, ensuring users have a solid foundation for working with grids.
2. Step-by-Step Guide to Creating a Basic Grid
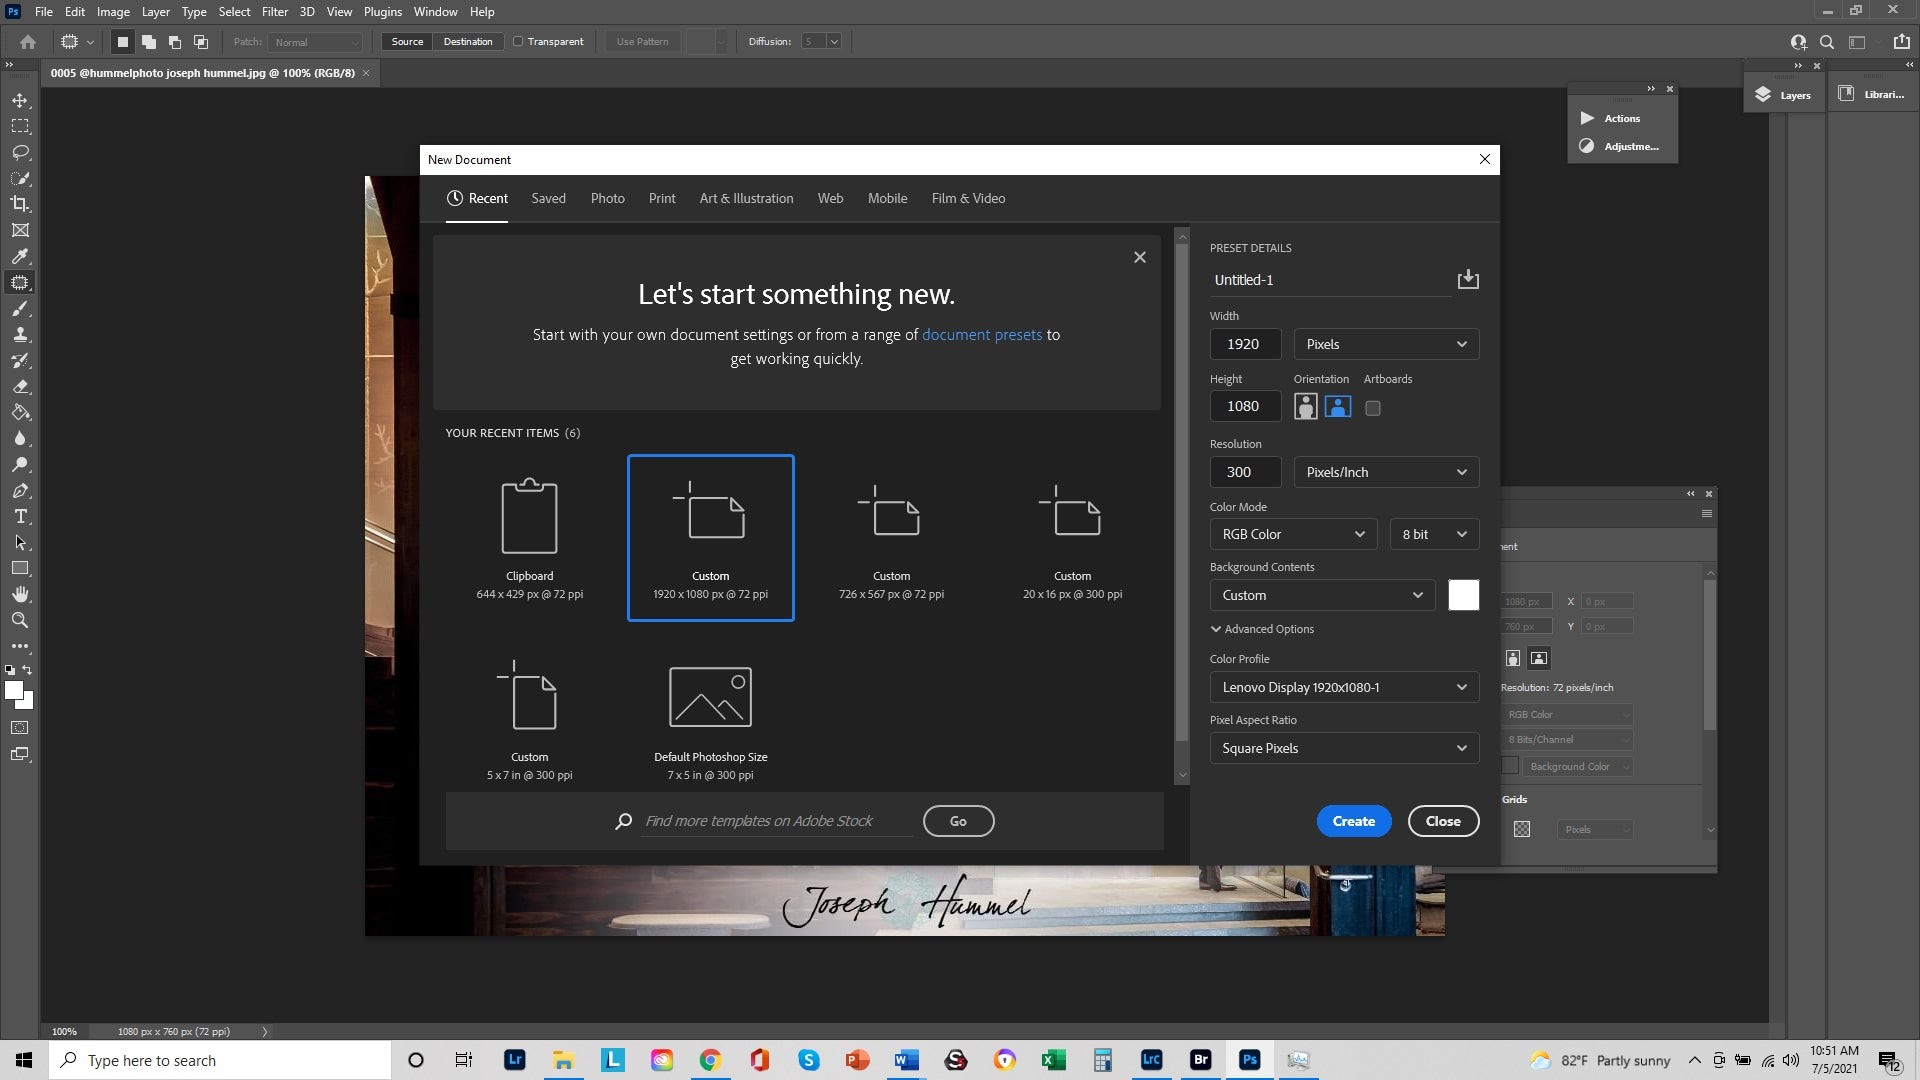
2.1. Step 1: Creating a New Document
Start by opening Photoshop and creating a new document.
- Go to File > New or press Ctrl+N (Windows) or Cmd+N (Mac).
- Set the Width and Height according to your project needs.
- Set the Resolution to 300 PPI for high-quality images or 72 PPI for web use.
- Click Create.
2.2. Step 2: Displaying the Grid
To display the grid:
- Go to View in the top menu.
- Select Show.
- Choose Grid.
This will display a default grid on your document. If you don’t see the grid, ensure that the “Grid” option is checked.
2.3. Step 3: Customizing Grid Preferences
To customize the grid’s appearance:
- Go to Edit > Preferences > Guides, Grid & Slices (Windows) or Photoshop > Preferences > Guides, Grid & Slices (Mac).
- In the Grid section, you can adjust:
- Color: Choose a color that is easily visible against your image.
- Style: Select whether the grid lines are solid, dashed, or dotted.
- Gridline Every: Set the spacing between the main grid lines (e.g., 1 inch, 50 pixels).
- Subdivisions: Determine the number of subdivisions between the main grid lines.
Adjusting these settings allows you to create a grid that suits your specific design requirements.
2.4. Step 4: Enabling Snap to Grid
To enable the “Snap to Grid” feature:
- Go to View.
- Select Snap To.
- Ensure Grid is checked.
With “Snap to Grid” enabled, objects will automatically align to the nearest grid line, making precise placement easier.
3. Advanced Grid Techniques for Precision Design
3.1. Creating Shapes with Grids
Grids can be used to create perfectly aligned shapes:
- Select the Shape Tool from the toolbar (e.g., Rectangle Tool, Ellipse Tool).
- Drag the shape within the grid area, and it will snap to the grid lines.
- Adjust the shape’s size and position as needed, using the grid for alignment.
This technique is particularly useful for creating icons, logos, and other graphic elements that require precision.
3.2. Linking Images to Grid Shapes
To link an image to a shape using a grid:
- Create a shape using the Shape Tool and the grid for alignment.
- Place the image on a layer above the shape layer.
- Right-click on the image layer and select Create Clipping Mask.
The image will now be clipped to the shape, and you can adjust its position within the shape as needed.
3.3. Saving and Reusing Grid Templates
To save your customized grid settings for future use:
- Go to Edit > Presets > Preset Manager.
- Select Preset Type as Grids.
- Click Save Set and name your grid template.
You can load your saved grid template in future projects by going to the Preset Manager and selecting Load Set.
4. Utilizing Guides for Flexible Alignment
4.1. Displaying Rulers
Guides are flexible lines that you can position manually. To display rulers:
- Go to View in the top menu.
- Select Rulers or press Ctrl+R (Windows) or Cmd+R (Mac).
Rulers will appear along the top and left edges of your document.
4.2. Creating Guides
To create a guide:
- Click and drag from either the horizontal or vertical ruler onto your canvas.
- Release the mouse button to place the guide.
You can create as many guides as you need, positioning them precisely to align with specific elements in your design.
4.3. Moving and Locking Guides
To move a guide:
- Select the Move Tool from the toolbar.
- Hover over the guide until the cursor changes to a double-headed arrow.
- Click and drag the guide to its new position.
To lock guides in place:
- Go to View.
- Select Lock Guides.
Locking guides prevents accidental movement, ensuring your alignment remains consistent.
4.4. Clearing Guides
To clear all guides from your document:
- Go to View.
- Select Clear Guides.
This will remove all guides, giving you a clean canvas to work with.
5. Real-World Applications of Grids and Guides
5.1. Web Design Layouts
In web design, grids and guides are essential for creating organized and user-friendly layouts. By using a grid system, designers can ensure that elements are consistently spaced and aligned, improving the overall visual appeal and usability of the website. According to a study by Google, websites with well-structured layouts have a lower bounce rate and higher user engagement.
5.2. Photo Editing and Retouching
Grids and guides help photographers align and crop images precisely. They are particularly useful for correcting perspective issues and ensuring that elements are level and symmetrical. Professional retouchers use grids to maintain proportions and alignment when making adjustments to portraits and landscapes.
5.3. Graphic Design and Illustration
In graphic design, grids provide a framework for creating logos, posters, and other visual materials. They help designers maintain consistency and balance, resulting in more professional and visually appealing designs. Illustrators use grids to create precise and symmetrical artwork, ensuring that their illustrations are technically sound.
6. Troubleshooting Common Grid Issues
6.1. Grid Not Visible
If the grid is not visible, ensure that you have selected View > Show > Grid. Also, check your grid preferences to ensure that the grid color is not the same as your background color.
6.2. Snap to Grid Not Working
If “Snap to Grid” is not working, make sure that you have selected View > Snap To > Grid. Also, check that the object you are trying to snap is close enough to a grid line.
6.3. Guides Not Moving
If guides are not moving, ensure that you have selected the Move Tool and that the guides are not locked. Go to View and uncheck Lock Guides if necessary.
7. Advanced Customization Techniques for Grids
7.1. Creating Isometric Grids
Isometric grids are useful for creating 3D-style illustrations and designs. Here’s how to set one up:
Step-by-Step Guide
- Create a New Document: Open Photoshop and create a new document with your desired dimensions.
- Enable the Grid: Go to
View > Show > Gridto display the default grid. - Adjust Grid Preferences:
- Go to
Edit > Preferences > Guides, Grid & Slices(orPhotoshop > Preferenceson macOS). - Set
Gridline Everyto a suitable value, such as 50 pixels. - Set
Subdivisionsto 1.
- Go to
- Create a New Layer: Create a new layer for your isometric grid lines.
- Use the Line Tool:
- Select the
Line Toolfrom the toolbar. - Set the
Weightto 1 pixel for thin lines. - Hold
Shiftto draw straight lines.
- Select the
- Draw the First Set of Lines:
- Draw a line at a 30-degree angle. You can use guides to help with the angle.
- Duplicate this line and move it along the grid to create parallel lines.
- Draw the Second Set of Lines:
- Draw another set of lines at a 150-degree angle (or -30 degrees).
- Duplicate and move these lines to create a complete isometric grid.
- Adjust Opacity: Lower the opacity of the grid lines so they don’t interfere with your design.
7.2. Using Perspective Grids
Perspective grids help create realistic depth and perspective in your designs.
Step-by-Step Guide
- Create a New Document: Open Photoshop and create a new document.
- Enable Perspective Grid: Go to
View > Perspective Grid > Default. - Adjust the Grid:
- Use the controls to adjust the vanishing points, grid size, and plane positions.
- The Perspective Grid tool allows you to manipulate the grid directly on the canvas.
- Draw in Perspective:
- Select a drawing tool, such as the
Rectangle ToolorBrush Tool. - As you draw, Photoshop will automatically adjust your strokes to follow the perspective of the grid.
- Select a drawing tool, such as the
- Customize Vanishing Points:
- Move the vanishing points to change the perspective.
- Add additional vanishing points for more complex perspectives.
7.3. Creating Circular Grids
Circular grids are useful for creating radial designs, mandalas, and other circular patterns.
Step-by-Step Guide
- Create a New Document: Open Photoshop and create a new document.
- Enable the Standard Grid: Go to
View > Show > Grid. - Adjust Grid Preferences:
- Set
Gridline Everyto a suitable value, such as 50 pixels. - Set
Subdivisionsto 1.
- Set
- Create a New Layer: Create a new layer for your circular grid.
- Use the Ellipse Tool:
- Select the
Ellipse Toolfrom the toolbar. - Hold
Shiftto draw perfect circles.
- Select the
- Draw Concentric Circles:
- Draw multiple concentric circles, using the grid to ensure they are centered and evenly spaced.
- Draw Radial Lines:
- Use the
Line Toolto draw lines from the center of the circles outward, dividing the circle into segments. - Use the grid to ensure the lines are evenly spaced.
- Use the
- Adjust Opacity: Lower the opacity of the grid lines so they don’t interfere with your design.
7.4. Saving Custom Grid Presets
Saving custom grid presets allows you to quickly apply your favorite grid settings to new projects.
Step-by-Step Guide
- Set Up Your Grid: Configure your grid with the desired
Gridline Every,Subdivisions, andColorsettings inEdit > Preferences > Guides, Grid & Slices. - Save the Preset:
- Go to
Edit > Presets > Preset Manager. - Choose
Gridsfrom thePreset Typedropdown menu. - Click
Save Set. - Name your preset and save it to a location where you can easily find it.
- Go to
- Load the Preset:
- To load your saved preset, go to
Edit > Presets > Preset Manager. - Choose
Gridsfrom thePreset Typedropdown menu. - Click
Load Set. - Select your saved preset file.
- To load your saved preset, go to
8. Best Practices for Using Grids and Guides
8.1. Maintain Consistency
Use the same grid and guide settings across all your projects to maintain a consistent visual style.
8.2. Use Non-Destructive Methods
When possible, use non-destructive editing techniques, such as Smart Objects and Adjustment Layers, to preserve the original image data.
8.3. Organize Your Layers
Keep your layers organized and labeled to make it easier to work with complex designs. Use layer groups to group related elements together.
8.4. Regularly Back Up Your Work
Save your work frequently and create backups to prevent data loss. Use version control to track changes and revert to previous versions if necessary.
8.5. Seek Feedback
Share your designs with others and ask for feedback. Constructive criticism can help you identify areas for improvement and refine your skills.
9. The Importance of Ethical Considerations
9.1. Respecting Copyright
Always respect copyright laws when using images, fonts, and other design elements. Obtain permission or licenses for any copyrighted material you use in your designs.
9.2. Avoiding Misleading Designs
Ensure that your designs are not misleading or deceptive. Accurately represent the products or services you are promoting, and avoid making false claims.
9.3. Promoting Inclusivity
Create designs that are inclusive and accessible to people of all backgrounds and abilities. Use inclusive language and imagery, and ensure that your designs are accessible to people with disabilities.
9.4. Protecting Privacy
Protect the privacy of individuals in your designs. Obtain consent before using personal information or images, and avoid sharing sensitive information without permission.
10. Resources for Further Learning
10.1. Online Courses
- Adobe Photoshop Tutorials: Offers a wide range of tutorials for all skill levels.
- Coursera: Provides courses on graphic design and photo editing.
- Udemy: Offers courses on Photoshop and digital art.
- Skillshare: Provides creative courses on various design topics.
10.2. Books
- “Adobe Photoshop Classroom in a Book”: A comprehensive guide to using Photoshop.
- “The Non-Designer’s Design Book” by Robin Williams: A beginner-friendly guide to design principles.
- “Grid Systems in Graphic Design” by Josef Müller-Brockmann: An in-depth look at grid systems.
10.3. Websites and Blogs
- CONDUCT.EDU.VN: Provides articles and tutorials on ethical conduct and best practices in various fields.
- Adobe Creative Cloud Blog: Offers articles and tutorials on using Adobe software.
- Smashing Magazine: Provides articles on web design and development.
- Creative Bloq: Offers news, reviews, and tutorials on graphic design.
11. Incorporating Best Practices for Accessibility
11.1. Ensuring Visual Clarity
- Color Contrast: Ensure sufficient color contrast between text and background. According to the Web Content Accessibility Guidelines (WCAG), the contrast ratio should be at least 4.5:1 for normal text and 3:1 for large text.
- Font Size: Use legible font sizes. A minimum font size of 16 pixels is recommended for body text.
- Clear Typography: Choose clear and readable fonts. Avoid overly decorative or stylized fonts that can be difficult to read.
11.2. Providing Alternative Text for Images
- Descriptive Alt Text: Add descriptive alternative text (alt text) to all images. Alt text should accurately describe the content and function of the image.
- Avoid Redundancy: Do not include phrases like “image of” or “graphic of” in alt text. Screen readers automatically announce images as images.
- Keep it Concise: Keep alt text concise and to the point. Aim for fewer than 125 characters.
11.3. Structuring Content Logically
- Heading Levels: Use heading levels (H1, H2, H3, etc.) to structure content logically. Headings should be used to introduce sections and subsections of content.
- Lists: Use bulleted and numbered lists to organize related items. Lists should be properly formatted with HTML list elements.
- Semantic HTML: Use semantic HTML elements to convey the meaning and structure of content. Examples include
<article>,<aside>,<nav>, and<footer>.
11.4. Designing for Keyboard Navigation
- Logical Tab Order: Ensure that elements can be navigated in a logical order using the keyboard. The tab order should follow the visual flow of the content.
- Visible Focus Indicators: Provide visible focus indicators for interactive elements. Focus indicators should be clear and easy to see.
- Keyboard Accessibility: Ensure that all interactive elements can be accessed and operated using the keyboard.
12. The Role of CONDUCT.EDU.VN in Promoting Ethical Design
12.1. Providing Resources and Guidelines
CONDUCT.EDU.VN offers a wealth of resources and guidelines on ethical conduct and best practices in various fields, including design. Our articles and tutorials cover topics such as respecting copyright, avoiding misleading designs, promoting inclusivity, and protecting privacy.
12.2. Advocating for Ethical Standards
We advocate for ethical standards in design and encourage designers to adhere to these standards in their work. We believe that ethical design is essential for building trust, promoting social responsibility, and creating a better world.
12.3. Educating the Public
We educate the public about the importance of ethical design and encourage consumers to support companies and organizations that prioritize ethical practices. We believe that informed consumers can play a vital role in promoting ethical design.
13. Frequently Asked Questions (FAQ) About Grids in Photoshop
13.1. What is the purpose of using a grid in Photoshop?
A grid helps align elements, maintain symmetry, and ensure consistent spacing in designs.
13.2. How do I show the grid in Photoshop?
Go to View > Show > Grid.
13.3. How do I change the grid settings in Photoshop?
Go to Edit > Preferences > Guides, Grid & Slices (Windows) or Photoshop > Preferences > Guides, Grid & Slices (Mac).
13.4. How do I enable “Snap to Grid” in Photoshop?
Go to View > Snap To > Grid.
13.5. Can I save my custom grid settings for future use?
Yes, you can save your custom grid settings as a preset in the Preset Manager.
13.6. What is the difference between grids and guides in Photoshop?
Grids are a set of predefined lines, while guides are custom lines that you can position manually.
13.7. How do I create a guide in Photoshop?
Click and drag from either the horizontal or vertical ruler onto your canvas.
13.8. How do I lock guides in Photoshop?
Go to View > Lock Guides.
13.9. How do I clear all guides from my document?
Go to View > Clear Guides.
13.10. Are grids and guides only useful for graphic design?
No, grids and guides are useful for web design, photo editing, illustration, and any other field that requires precision and alignment.
14. Conclusion: Mastering Grids for Enhanced Design Precision
Mastering how to make a grid guide in Photoshop is essential for achieving precision and professionalism in your design work. By understanding the basics of grids, customizing grid preferences, utilizing advanced techniques, and following best practices, you can create visually appealing and technically sound designs. Remember to incorporate ethical considerations and accessibility best practices into your workflow to ensure that your designs are inclusive and responsible.
For more detailed information and guidance, visit CONDUCT.EDU.VN, where you can find a wealth of resources on ethical conduct and best practices in design. If you need further assistance, contact us at 100 Ethics Plaza, Guideline City, CA 90210, United States, or reach out via WhatsApp at +1 (707) 555-1234. Our team is here to help you navigate the complexities of ethical design and create impactful, responsible work. Visit conduct.edu.vn today to explore our comprehensive resources and elevate your design skills.