Creating a pocket guide can be a rewarding project, whether it’s for an event, a travel companion, or a special interest topic. Using software like Microsoft Word, you can easily format your document for printing as a booklet, ready for folding and binding. This guide will walk you through the steps on How To Make A Pocket Guide that is both informative and visually appealing.
Setting Up Your Document for a Pocket Guide
Before you start writing, configuring the document layout is essential. This minimizes adjustments later on. Here’s how to set up your document for booklet printing in Microsoft Word:
-
Navigate to Layout and click the Page Setup dialog launch icon, typically found in the bottom-right corner of the Layout group.
-
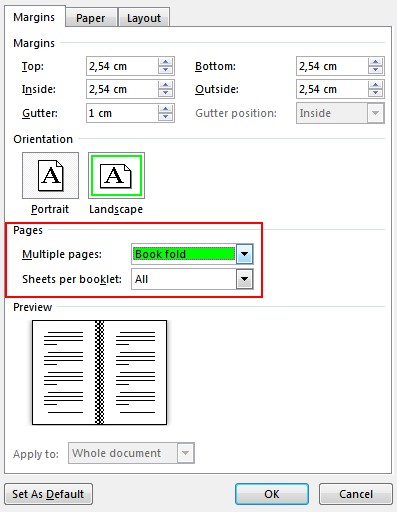
In the Margins tab, locate the Multiple pages setting and select Book fold. The page orientation will automatically switch to Landscape, which is necessary for creating a booklet format.
-
For larger documents, consider splitting the content into multiple smaller booklets for easier handling. You can specify the number of pages per booklet under the Sheets per booklet option. This is especially helpful when learning how to make a pocket guide with many sections.
-
Increase the Gutter value to create extra space along the inside fold for binding. This ensures that your text isn’t lost in the fold and the booklet is easy to read.
-
Go to the Paper tab and verify that the Paper size is appropriate. Remember, the final size of your pocket guide will be half the width of the selected paper size. This step is crucial when deciding how to make a pocket guide that is truly pocket-sized.
Tip: Enhance the visual appeal of your pocket guide by adding borders to each page. This can be done in the Layout tab of the Page Setup window by selecting Borders.
-
Click OK to apply the settings. If your document already contains text and images, Word will automatically reformat it. However, you may need to manually adjust the position of objects like images and tables to fit the new layout.
Printing Your Pocket Guide
Once your document is formatted, the next step is to print it. Properly configuring the print settings is crucial to ensure the pages are printed on both sides correctly and in the correct order. Here’s how to manage the print settings:
-
Go to File and select Print.
-
If your printer supports automatic duplex printing (printing on both sides), change the Print One Sided setting to Print on Both Sides. Select the Flip pages on short edge option to ensure the second side of each sheet is not printed upside down.
-
If your printer doesn’t support automatic duplex printing, choose Manually Print on Both Sides. You will be prompted to feed the pages back into the printer after the first side has been printed. To avoid printing the second side upside down, follow your printer’s instructions on how to flip the sheets, usually along the short edge.
Tip: For a professional touch, include page numbers in the header or footer of your pocket guide. This helps readers navigate the content easily. See Add page numbers for more information.
Alternative Method: Custom Margins
An alternative approach to setting up your pocket guide involves using custom margins. Here’s how:
-
Go to Layout > Margins > Custom Margins.
-
Change the Multiple pages setting to Book fold. The orientation will automatically change to Landscape.
-
To create space for binding, increase the width of the Gutter.
-
Enhance the appearance of your booklet by adding borders to each page. In the Layout tab of the Custom Margins window, select Borders.
-
Click OK to save your settings.
-
Go to File > Page Setup to check the paper size. Keep in mind that the final size of the booklet is one half of the paper size.
When you’re ready to print, go to File > Print. If your printer supports automatic printing on both sides, select Booklet under Two-sided options.
Additional Resources
Here are some helpful resources for creating booklets and pocket guides:
- Create a booklet using a Word template
- Booklet: Page numbering tips
- Create different headers or footers for odd and even pages
- Get free Microsoft publishing templates
By following these steps, you can learn how to make a pocket guide that is functional, visually appealing, and easy to produce. Whether for personal use or professional distribution, a well-crafted pocket guide can be a valuable tool.