Moving a picture using smart guides in PowerPoint is a fundamental skill for creating visually appealing and well-organized presentations. This guide will explore various techniques and best practices for precisely positioning images, ensuring your slides are professional and engaging. CONDUCT.EDU.VN is your go-to resource for mastering presentation design and slide composition. Learn effective picture placement, object alignment, and smart guide utilization to enhance your PowerPoint skills.
1. Understanding Smart Guides in PowerPoint
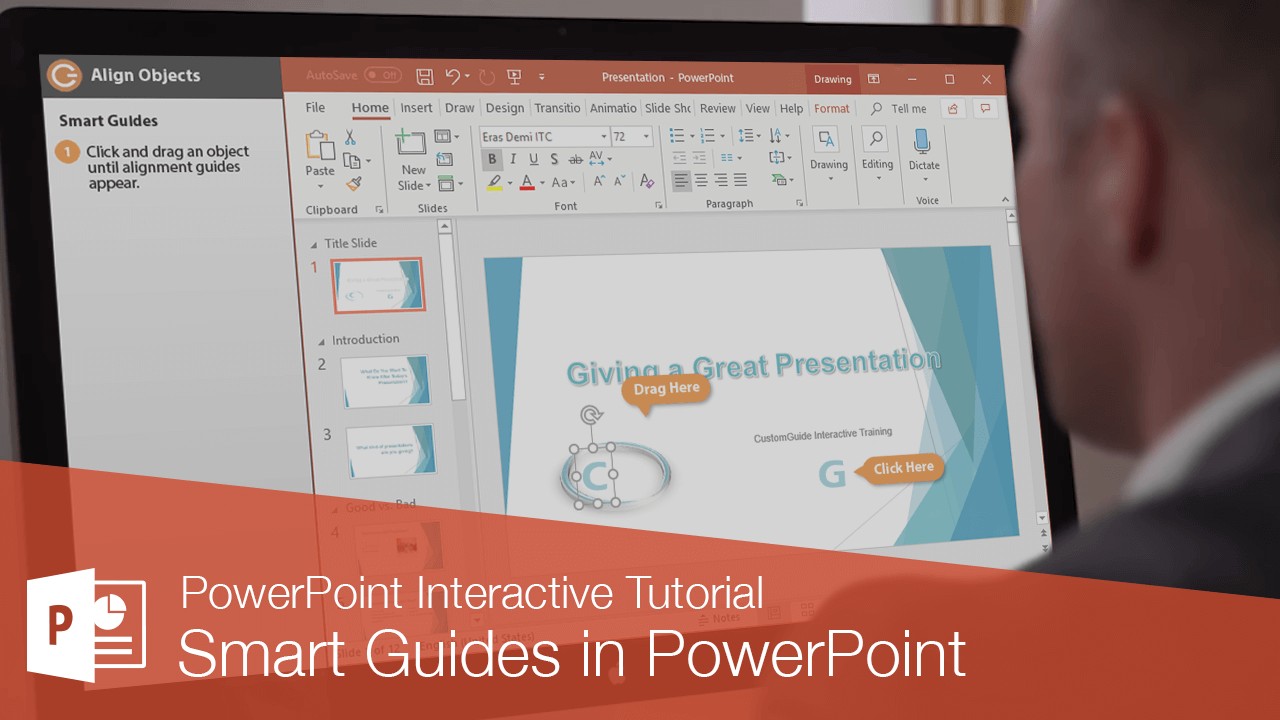
Smart Guides are visual aids in PowerPoint that appear automatically as you move objects around a slide. They help you align objects with each other and with the slide itself. By understanding how Smart Guides work, you can ensure that your pictures are perfectly positioned and aligned, creating a polished and professional look for your presentations.
1.1 What are Smart Guides?
Smart Guides are non-printing lines that appear when you drag an object close to another object or the edges of the slide. They indicate when the objects are aligned horizontally, vertically, or at equal distances. This feature simplifies the process of creating balanced and symmetrical slide layouts.
1.2 How Smart Guides Enhance Alignment
Smart Guides enhance alignment by providing real-time visual feedback. As you move an image, the guides appear, showing you exactly when the image is aligned with other elements on the slide. This eliminates guesswork and ensures that your designs are precise.
1.3 Turning Smart Guides On or Off
By default, Smart Guides are turned on in PowerPoint. However, you can toggle them on or off as needed. To do this:
- Click the View tab on the Ribbon.
- In the Show group, check or uncheck the Smart Guides box.
Turning Smart Guides off can be useful when you need to move an object without being constrained by automatic alignment suggestions.
2. Step-by-Step Guide to Moving a Picture with Smart Guides
Moving a picture with Smart Guides in PowerPoint is straightforward. Follow these steps to achieve precise placement and alignment.
2.1 Inserting a Picture into Your Slide
Before you can move a picture, you need to insert it into your slide. Here’s how:
- Click the Insert tab on the Ribbon.
- In the Images group, click Pictures.
- Choose This Device to insert a picture from your computer, or Online Pictures to find an image online.
- Select the picture and click Insert.
2.2 Selecting the Picture
Once the picture is inserted, click on it to select it. You’ll see small circles (handles) appear around the edges of the picture, indicating that it’s selected.
2.3 Moving the Picture Using Smart Guides
With the picture selected, follow these steps to move it using Smart Guides:
- Click and drag the picture to the desired location on the slide.
- As you move the picture, watch for the Smart Guides to appear. These are dotted lines that indicate alignment with other objects or the edges of the slide.
- When the Smart Guides show that the picture is aligned as desired, release the mouse button to drop the picture into place.
2.4 Fine-Tuning the Picture’s Position
Sometimes, even with Smart Guides, you might need to make minor adjustments to the picture’s position. Here are a couple of methods for fine-tuning:
- Using Arrow Keys: Select the picture and use the arrow keys on your keyboard to nudge it in small increments.
- Holding Alt Key: While dragging the picture, hold down the Alt key to disable Smart Guides temporarily, giving you more freedom to position the picture exactly where you want it.
3. Advanced Techniques for Picture Alignment
Beyond basic Smart Guide usage, PowerPoint offers several advanced techniques to align pictures and other objects precisely.
3.1 Using the Align Tools
The Align tools in PowerPoint provide a way to align multiple objects relative to each other or to the slide itself. Here’s how to use them:
- Select the objects you want to align. You can do this by holding down the Shift key and clicking on each object.
- Click the Format tab on the Ribbon (this tab appears when you have objects selected).
- In the Arrange group, click the Align button.
- Choose an alignment option:
- Align Left: Aligns the objects along their left edges.
- Align Center: Aligns the objects along their centers.
- Align Right: Aligns the objects along their right edges.
- Align Top: Aligns the objects along their top edges.
- Align Middle: Aligns the objects along their vertical middles.
- Align Bottom: Aligns the objects along their bottom edges.
- Distribute Horizontally: Spaces the objects equally between the leftmost and rightmost objects.
- Distribute Vertically: Spaces the objects equally between the topmost and bottommost objects.
- Align to Slide: Aligns the objects relative to the slide edges rather than each other.
3.2 Utilizing Gridlines for Precise Placement
Gridlines are another visual aid that can help you position objects accurately. They create a grid of horizontal and vertical lines on the slide.
- Click the View tab.
- In the Show group, check the Gridlines box to turn them on.
- Align your picture with the gridlines for precise placement.
- Uncheck the Gridlines box to turn them off when you’re done.
3.3 Employing Drawing Guides for Custom Alignment
Drawing Guides are similar to gridlines but offer more flexibility. You can move them around to create custom alignment points.
- Click the View tab.
- In the Show group, check the Guides box to turn them on. Horizontal and vertical guides appear.
- Click and drag the guides to position them where you need them.
- Align your picture with the guides for precise placement.
- Hold the Ctrl key and click and drag a guide to duplicate it.
- Uncheck the Guides box to turn them off when you’re done.
4. Practical Examples of Using Smart Guides
To illustrate the usefulness of Smart Guides, let’s look at some practical examples.
4.1 Creating a Photo Collage
Smart Guides are invaluable when creating a photo collage in PowerPoint. Follow these steps:
- Insert multiple pictures onto the slide.
- Resize the pictures as needed.
- Use Smart Guides to align the pictures along their edges, centers, or at equal distances.
- Experiment with different arrangements until you achieve the desired look.
4.2 Aligning Images with Text
When incorporating images with text, Smart Guides help ensure a clean and professional layout.
- Insert a picture and a text box onto the slide.
- Use Smart Guides to align the picture with the text box, either vertically or horizontally.
- Adjust the size and position of the picture and text box until they complement each other.
4.3 Building Infographics with Visual Consistency
Infographics rely on visual consistency to convey information effectively. Smart Guides can help you maintain this consistency.
- Insert multiple shapes, icons, and images onto the slide.
- Use Smart Guides to align these elements consistently, ensuring that they are evenly spaced and aligned.
- Group related elements together to maintain their alignment as you move them around.
5. Best Practices for Picture Placement in PowerPoint
Effective picture placement is crucial for creating engaging and informative presentations. Here are some best practices to keep in mind.
5.1 Rule of Thirds
The Rule of Thirds is a compositional guideline that suggests dividing an image into nine equal parts with two horizontal and two vertical lines. Placing key elements along these lines or at their intersections can create a more visually appealing and balanced composition.
5.2 Visual Hierarchy
Visual hierarchy refers to the arrangement of elements in a way that guides the viewer’s eye through the slide. Use size, color, and placement to emphasize important information and create a clear flow.
5.3 Balance and Symmetry
Strive for balance and symmetry in your slide layouts. This doesn’t necessarily mean that the slide has to be perfectly symmetrical, but the visual weight of the elements should be distributed evenly.
5.4 Using Negative Space
Negative space, also known as white space, is the empty space around and between elements. It helps to create a clean and uncluttered look, making the slide easier to read and understand.
5.5 Consistency Across Slides
Maintain consistency in picture placement and overall design across all slides in your presentation. This helps to create a cohesive and professional look.
6. Troubleshooting Common Alignment Issues
Even with Smart Guides and other alignment tools, you may encounter some common issues. Here’s how to troubleshoot them.
6.1 Pictures Not Aligning Properly
If your pictures are not aligning properly, make sure that Smart Guides are turned on and that you are dragging the pictures close enough to the alignment points. Also, check that the pictures are not obstructed by other objects.
6.2 Smart Guides Not Appearing
If Smart Guides are not appearing, ensure that the Smart Guides box is checked in the View tab. If they still don’t appear, try restarting PowerPoint or your computer.
6.3 Objects Shifting Unexpectedly
Sometimes, objects may shift unexpectedly when you move them. This can be caused by the Snap to Grid feature. To disable it:
- Right-click on the slide.
- Select Grid and Guides.
- Uncheck the Snap objects to grid box.
6.4 Difficulty Aligning Small Objects
Aligning small objects can be challenging. Try zooming in on the slide to get a closer view and more precise control. You can also use the arrow keys to nudge the objects into place.
7. Integrating Picture Movement with PowerPoint Animations
Enhance your presentations by combining precise picture placement with PowerPoint animations. This can create dynamic and engaging slides.
7.1 Adding Entrance Animations
Entrance animations control how a picture appears on the slide. To add an entrance animation:
- Select the picture.
- Click the Animations tab on the Ribbon.
- Choose an entrance animation from the gallery, such as Fade, Fly In, or Zoom.
- Adjust the animation settings in the Effect Options menu.
7.2 Applying Exit Animations
Exit animations control how a picture disappears from the slide. To add an exit animation:
- Select the picture.
- Click the Animations tab on the Ribbon.
- Click the Add Animation button and choose an exit animation, such as Fade, Fly Out, or Disappear.
- Adjust the animation settings in the Effect Options menu.
7.3 Using Motion Paths
Motion paths allow you to move a picture along a custom path on the slide. To add a motion path:
- Select the picture.
- Click the Animations tab on the Ribbon.
- Click the Add Animation button and choose a motion path from the Motion Paths section.
- Adjust the path by dragging the handles on the motion path line.
7.4 Sequencing Animations
Control the order and timing of animations using the Animation Pane. To open the Animation Pane:
- Click the Animations tab on the Ribbon.
- Click the Animation Pane button.
In the Animation Pane, you can drag animations to change their order, set their start times, and adjust their durations.
8. Advanced Design Principles for PowerPoint Presentations
Mastering advanced design principles can elevate your PowerPoint presentations to the next level.
8.1 Typography
Typography plays a crucial role in the overall look and feel of your presentation. Choose fonts that are easy to read and that complement your content. Limit the number of fonts you use to two or three per presentation.
8.2 Color Theory
Understanding color theory can help you create visually appealing and effective slides. Use a limited color palette of complementary or analogous colors. Avoid using too many bright or contrasting colors, as this can be distracting.
8.3 Visual Storytelling
Use visuals to tell a story and engage your audience. Choose images that are relevant to your content and that evoke emotion. Use charts and graphs to present data in a clear and compelling way.
8.4 Data Visualization
Data visualization is the art of presenting data in a visual format, such as charts, graphs, and maps. Effective data visualization can help your audience understand complex information quickly and easily.
8.5 Accessibility
Ensure that your presentations are accessible to everyone, including people with disabilities. Use high contrast colors, provide alternative text for images, and use clear and concise language.
9. Case Studies: Effective Use of Picture Placement
Let’s examine some case studies to see how effective picture placement can enhance PowerPoint presentations.
9.1 Corporate Presentation
In a corporate presentation, a company used Smart Guides and alignment tools to create a clean and professional slide layout. They aligned images of their products with corresponding text descriptions, creating a visually appealing and informative slide.
9.2 Educational Presentation
In an educational presentation, a teacher used the Rule of Thirds to place images of historical figures on the slide. This created a balanced and engaging composition that captured the students’ attention.
9.3 Marketing Presentation
In a marketing presentation, a company used data visualization techniques to present sales data in a clear and compelling way. They used charts and graphs to illustrate trends and patterns, making the data easier to understand.
9.4 Non-Profit Presentation
In a non-profit presentation, an organization used powerful images to evoke emotion and connect with their audience. They carefully placed these images on the slide to maximize their impact.
10. Resources for Further Learning
To continue improving your PowerPoint skills, here are some valuable resources.
10.1 Online Courses
- Microsoft Office Training Center: Offers a variety of courses on PowerPoint and other Office applications.
- LinkedIn Learning: Provides courses on presentation design and visual communication.
- Coursera: Features courses on graphic design and data visualization.
10.2 Books
- “Presentation Zen” by Garr Reynolds: A guide to creating simple and effective presentations.
- “Slide:ology” by Nancy Duarte: A comprehensive guide to visual storytelling.
- “The Visual Display of Quantitative Information” by Edward Tufte: A classic book on data visualization.
10.3 Websites and Blogs
- CONDUCT.EDU.VN: Your go-to resource for mastering presentation design and slide composition.
- Microsoft Office Support: Provides articles and tutorials on using PowerPoint.
- HubSpot: Offers articles and templates for creating marketing presentations.
11. The Importance of Ethical Considerations in Visual Presentations
Creating impactful presentations goes beyond aesthetics; it also requires ethical considerations to ensure honesty, respect, and fairness.
11.1 Avoiding Misleading Visuals
It’s crucial to avoid manipulating images or data to mislead your audience. Ensure that all visuals accurately represent the information being presented. This includes avoiding distorted graphs, altered images, or out-of-context visuals that could misrepresent the facts.
11.2 Respecting Copyright Laws
Always respect copyright laws when using images and other visual elements in your presentations. Obtain proper permission or licenses for any copyrighted material. Utilize royalty-free image resources or create original visuals whenever possible.
11.3 Giving Proper Attribution
Give proper attribution to the sources of your images, data, and other visual content. This not only respects the creators of the content but also adds credibility to your presentation. Clearly cite your sources using footnotes, endnotes, or a dedicated slide at the end of your presentation.
11.4 Ensuring Inclusive Representation
Strive for inclusive representation in your visuals. Use images that reflect the diversity of your audience and avoid perpetuating stereotypes or biases. Ensure that your visuals are accessible to people of all backgrounds and abilities.
11.5 Maintaining Transparency
Maintain transparency in your presentation by clearly disclosing any conflicts of interest or biases that may influence your content. Be open and honest about your perspective and acknowledge any limitations in your data or analysis.
12. Future Trends in PowerPoint Presentation Design
Stay ahead of the curve by keeping up with the latest trends in PowerPoint presentation design.
12.1 Immersive Experiences
Expect to see more presentations that incorporate immersive technologies such as virtual reality (VR) and augmented reality (AR). These technologies can create engaging and interactive experiences for your audience.
12.2 Interactive Elements
Interactive elements such as quizzes, polls, and surveys are becoming increasingly popular in PowerPoint presentations. These elements can help to keep your audience engaged and provide valuable feedback.
12.3 Data-Driven Storytelling
Data-driven storytelling is the art of using data to tell a compelling story. Expect to see more presentations that incorporate data visualization and narrative techniques to engage and inform their audience.
12.4 Minimalist Design
Minimalist design is characterized by simplicity, clean lines, and a focus on essential elements. This trend is gaining popularity in PowerPoint presentation design, as it can help to create a clean and uncluttered look.
12.5 Motion Graphics
Motion graphics are animated graphics that can add visual interest and engagement to your presentations. Expect to see more presentations that incorporate motion graphics to illustrate concepts and tell stories.
13. Crafting Compelling Narratives Through Visuals
The art of crafting compelling narratives through visuals involves using images, charts, and other visual elements to tell a story that resonates with your audience.
13.1 Understanding Your Audience
Before you start creating your visuals, take the time to understand your audience. What are their interests, needs, and expectations? Tailor your visuals to appeal to their specific interests and needs.
13.2 Identifying Key Messages
Identify the key messages that you want to convey in your presentation. Use visuals to reinforce these messages and make them more memorable.
13.3 Creating a Visual Theme
Create a visual theme that ties all of your visuals together. This could be a consistent color palette, font selection, or design style. A visual theme can help to create a cohesive and professional look for your presentation.
13.4 Using Visual Metaphors
Visual metaphors can be a powerful way to communicate complex ideas. Use images or symbols that represent abstract concepts to make them more relatable and understandable.
13.5 Structuring Your Visuals
Structure your visuals in a way that tells a clear and compelling story. Use a logical flow to guide your audience through your presentation and keep them engaged.
14. Accessibility and Inclusivity in PowerPoint Design
Ensuring accessibility and inclusivity in PowerPoint design is crucial for reaching a wider audience and creating presentations that are usable by everyone.
14.1 Using Alt Text for Images
Provide alternative text (alt text) for all images in your presentation. Alt text is a short description of the image that is read aloud by screen readers for people with visual impairments.
14.2 Choosing High Contrast Colors
Use high contrast colors for text and background to make your slides easier to read for people with low vision. Avoid using colors that are too similar or that clash with each other.
14.3 Using Clear and Concise Language
Use clear and concise language in your presentations. Avoid using jargon or technical terms that your audience may not understand.
14.4 Providing Captions for Videos
Provide captions for all videos in your presentation. Captions are text transcripts of the audio that are displayed on the screen. They are essential for people who are deaf or hard of hearing.
14.5 Using Accessible Templates
Use accessible PowerPoint templates that are designed to be usable by people with disabilities. These templates typically include features such as alt text, high contrast colors, and clear layouts.
15. Mastering Animation and Transitions for Visual Impact
Animation and transitions can add visual interest and engagement to your PowerPoint presentations, but they should be used sparingly and effectively.
15.1 Choosing Appropriate Animations
Choose animations that are appropriate for your content and audience. Avoid using animations that are too distracting or that detract from your message.
15.2 Using Subtle Transitions
Use subtle transitions between slides to create a smooth and seamless flow. Avoid using transitions that are too flashy or that draw attention to themselves.
15.3 Avoiding Overuse of Animations
Avoid overuse of animations. Too many animations can be distracting and overwhelming for your audience. Use animations sparingly and only when they add value to your presentation.
15.4 Maintaining Consistency
Maintain consistency in your use of animations and transitions throughout your presentation. This can help to create a cohesive and professional look.
15.5 Testing Your Animations
Test your animations to ensure that they work properly and that they don’t cause any issues with accessibility.
16. Leveraging PowerPoint’s Morph Transition for Dynamic Movement
PowerPoint’s Morph transition is a powerful tool for creating dynamic movement and visual effects in your presentations.
16.1 Understanding the Morph Transition
The Morph transition allows you to seamlessly animate objects between slides. It works by identifying objects with the same name on two consecutive slides and then smoothly transforming them from one position to another.
16.2 Creating a Morph Transition
To create a Morph transition:
- Duplicate a slide that contains the object you want to morph.
- On the second slide, move, resize, or change the object.
- Select the second slide and click the Transitions tab.
- Choose the Morph transition.
16.3 Using Morph for Text and Images
Morph can be used for both text and images. You can use it to animate text changes, image transformations, and object movements.
16.4 Controlling the Morph Effect
You can control the Morph effect by adjusting the settings in the Effect Options menu. You can choose to morph objects, words, or characters.
16.5 Best Practices for Morph Transitions
- Use Morph sparingly and only when it adds value to your presentation.
- Keep your slides simple and uncluttered.
- Use consistent object names on both slides.
- Test your Morph transitions to ensure that they work properly.
17. Integrating External Visuals: Videos and GIFs
Integrating external visuals such as videos and GIFs can significantly enhance the engagement and impact of your PowerPoint presentations.
17.1 Inserting Videos
To insert a video into your PowerPoint presentation:
- Click the Insert tab.
- Click the Video button.
- Choose to insert a video from a file, from YouTube, or from an embed code.
- Adjust the video settings in the Playback tab.
17.2 Inserting GIFs
To insert a GIF into your PowerPoint presentation:
- Click the Insert tab.
- Click the Pictures button.
- Choose to insert a GIF from a file or from online sources.
- Adjust the GIF settings in the Format tab.
17.3 Optimizing Videos and GIFs
- Optimize your videos and GIFs for playback in PowerPoint.
- Use compressed video formats to reduce file size.
- Use GIFs that are small and loop seamlessly.
17.4 Best Practices for Videos and GIFs
- Use videos and GIFs that are relevant to your content.
- Keep your videos and GIFs short and engaging.
- Use captions for videos to improve accessibility.
- Test your videos and GIFs to ensure that they work properly.
18. Remote Presentation Tips: Visuals for Virtual Audiences
With the rise of remote work, it’s essential to optimize your visuals for virtual audiences.
18.1 Designing for Smaller Screens
Design your visuals for smaller screens, such as laptops and tablets. Use larger fonts and simpler layouts to make your slides easier to read.
18.2 Optimizing for Bandwidth
Optimize your visuals for bandwidth limitations. Use compressed images and videos to reduce file size.
18.3 Using High-Quality Visuals
Use high-quality visuals that are clear and crisp. Avoid using blurry or pixelated images.
18.4 Engaging Your Virtual Audience
Engage your virtual audience by using interactive elements such as polls, quizzes, and Q&A sessions.
18.5 Practicing Your Presentation
Practice your presentation to ensure that you are comfortable presenting remotely.
19. Real-World Examples: PowerPoint in Various Industries
PowerPoint is used in a wide range of industries for various purposes. Let’s look at some real-world examples.
19.1 Business:
Businesses use PowerPoint for sales presentations, marketing campaigns, training materials, and internal communications.
19.2 Education:
Educators use PowerPoint for lectures, presentations, and student projects.
19.3 Healthcare:
Healthcare professionals use PowerPoint for patient education, medical presentations, and research reports.
19.4 Government:
Government agencies use PowerPoint for public presentations, policy briefings, and internal training.
19.5 Non-Profit:
Non-profit organizations use PowerPoint for fundraising campaigns, community outreach, and advocacy presentations.
20. PowerPoint and Collaboration: Working with Teams on Visuals
PowerPoint offers several features for collaborating with teams on visuals.
20.1 Sharing Presentations
Share your presentations with your team members using OneDrive, SharePoint, or email.
20.2 Co-Authoring
Co-author presentations in real-time with your team members using PowerPoint Online or the desktop app.
20.3 Adding Comments
Add comments to slides to provide feedback and suggestions to your team members.
20.4 Tracking Changes
Track changes to your presentations to see what edits have been made by your team members.
20.5 Resolving Conflicts
Resolve conflicts when multiple team members make changes to the same slide.
21. Essential Keyboard Shortcuts for Picture Manipulation
Mastering keyboard shortcuts can significantly speed up your workflow when manipulating pictures in PowerPoint.
21.1 Basic Movement
- Arrow Keys: Nudge selected object(s) by small increments.
- Ctrl + Arrow Keys: Nudge selected object(s) by larger increments.
- Shift + Arrow Keys: Move selected object(s) horizontally or vertically.
21.2 Resizing and Scaling
- Shift + Drag Corner Handle: Resize the object proportionally.
- Ctrl + Shift + Drag Corner Handle: Resize the object proportionally from the center.
21.3 Copying and Pasting
- Ctrl + C: Copy selected object(s).
- Ctrl + V: Paste copied object(s).
- Ctrl + Shift + V: Paste copied object(s) with the same formatting.
21.4 Grouping and Ungrouping
- Ctrl + G: Group selected object(s).
- Ctrl + Shift + G: Ungroup selected object(s).
21.5 Selection and Arrangement
- Ctrl + A: Select all objects on the slide.
- Ctrl + [: Send selected object(s) backward.
- Ctrl + ]: Bring selected object(s) forward.
22. Understanding Image Resolution and Its Impact
Image resolution plays a crucial role in the quality and clarity of your PowerPoint presentations.
22.1 What is Image Resolution?
Image resolution refers to the number of pixels in an image. Higher resolution images have more pixels, resulting in greater detail and clarity.
22.2 Types of Image Resolution
- Low Resolution: Images with low resolution may appear blurry or pixelated, especially when enlarged.
- High Resolution: Images with high resolution are sharp and detailed, even when enlarged.
22.3 Impact on PowerPoint
Using low-resolution images in your PowerPoint presentations can detract from their overall quality. High-resolution images ensure that your visuals look professional and polished.
22.4 Optimizing Image Resolution
- Choose images with a resolution of at least 300 DPI (dots per inch) for print presentations.
- For screen presentations, a resolution of 150 DPI is usually sufficient.
- Compress images to reduce file size without sacrificing too much quality.
22.5 Avoiding Pixelation
Avoid pixelation by using images with sufficient resolution and by not enlarging them too much.
23. The Art of Cropping and Editing Pictures Within PowerPoint
PowerPoint offers several tools for cropping and editing pictures directly within the application.
23.1 Cropping Pictures
To crop a picture in PowerPoint:
- Select the picture.
- Click the Format tab.
- Click the Crop button.
- Drag the crop handles to adjust the cropping area.
- Click the Crop button again to apply the changes.
23.2 Applying Corrections
To apply corrections to a picture in PowerPoint:
- Select the picture.
- Click the Format tab.
- Click the Corrections button.
- Choose a preset correction or adjust the brightness and contrast manually.
23.3 Adding Color Effects
To add color effects to a picture in PowerPoint:
- Select the picture.
- Click the Format tab.
- Click the Color button.
- Choose a preset color effect or adjust the color saturation and tone manually.
23.4 Applying Artistic Effects
To apply artistic effects to a picture in PowerPoint:
- Select the picture.
- Click the Format tab.
- Click the Artistic Effects button.
- Choose an artistic effect from the gallery.
23.5 Removing Backgrounds
To remove the background from a picture in PowerPoint:
- Select the picture.
- Click the Format tab.
- Click the Remove Background button.
- Mark areas to keep or remove.
- Click Keep Changes to apply the changes.
24. Exploring 3D Models and Icons for Enhanced Visuals
PowerPoint allows you to insert 3D models and icons to enhance your visuals.
24.1 Inserting 3D Models
To insert a 3D model into your PowerPoint presentation:
- Click the Insert tab.
- Click the 3D Models button.
- Choose a 3D model from a file or from the online library.
- Adjust the 3D model settings in the Format tab.
24.2 Inserting Icons
To insert an icon into your PowerPoint presentation:
- Click the Insert tab.
- Click the Icons button.
- Choose an icon from the online library.
- Adjust the icon settings in the Format tab.
24.3 Best Practices for 3D Models and Icons
- Use 3D models and icons that are relevant to your content.
- Keep your 3D models and icons simple and uncluttered.
- Use consistent styles for your 3D models and icons.
- Test your 3D models and icons to ensure that they work properly.
25. Creating Custom Templates for Visual Consistency
Creating custom templates ensures visual consistency across all your PowerPoint presentations.
25.1 Designing a Template
To design a custom template:
- Open a new PowerPoint presentation.
- Click the View tab.
- Click the Slide Master button.
- Design the master slides and layouts with your desired fonts, colors, and logos.
- Click the Slide Master tab.
- Click the Close Master View button.
25.2 Saving a Template
To save your custom template:
- Click the File tab.
- Click the Save As button.
- Choose *PowerPoint Template (.potx)** as the file type.
- Save the template in the default templates folder.
25.3 Using a Template
To use your custom template:
- Click the File tab.
- Click the New button.
- Choose your custom template from the templates gallery.
25.4 Best Practices for Templates
- Keep your templates simple and uncluttered.
- Use consistent fonts and colors throughout your templates.
- Include placeholders for text and images.
- Test your templates to ensure that they work properly.
By mastering the art of moving pictures using Smart Guides in PowerPoint, and adhering to best practices for visual design, you can create presentations that are both visually appealing and highly effective. Remember to visit CONDUCT.EDU.VN for more tips and resources on creating impactful presentations.
Are you struggling to create visually appealing and well-organized PowerPoint presentations? Do you find it challenging to align images perfectly and maintain a consistent design across your slides? CONDUCT.EDU.VN can help. Visit our website at CONDUCT.EDU.VN today to discover a wealth of information and resources on mastering PowerPoint design. Our expert guidance will help you create presentations that captivate your audience and deliver your message with clarity and impact. For personalized assistance, contact us at 100 Ethics Plaza, Guideline City, CA 90210, United States, or reach out via WhatsApp at +1 (707) 555-1234. Let conduct.edu.vn be your partner in creating exceptional presentations.