Guided Access restricts your device to a single app and allows you to manage feature availability. This comprehensive guide, brought to you by CONDUCT.EDU.VN, explains How To Put Phone On Guided Access, offering control and security. Learn about setup, usage, and best practices for implementing controlled environments on your device while ensuring responsible digital device usage.
1. Understanding Guided Access: A Detailed Introduction
Guided Access is a powerful accessibility feature available on iPhones, iPads, and iPod Touch devices. It allows users to lock the device into a single application, preventing the user from navigating away from the app without a predefined passcode or biometric authentication. This feature is beneficial in numerous scenarios, from parental control to creating focused learning environments. Understanding how to use Guided Access effectively can significantly enhance device security, focus, and usability for various user groups. This feature can improve digital wellness in a technologically saturated environment.
1.1. What is Guided Access?
Guided Access is an iOS and iPadOS feature that restricts a device to running a single application. When enabled, the user cannot exit the app or access other functions of the device unless the Guided Access session is ended using a passcode, Touch ID, or Face ID. Guided Access also allows you to disable hardware buttons (like volume or sleep/wake buttons) and touch input in specific areas of the screen, offering a customizable and secure environment. This ensures the user stays within the intended app, enhancing focus and limiting distractions. Digital responsibility starts with control and awareness.
1.2. Why Use Guided Access?
Guided Access has several applications, making it a versatile tool for different needs:
- Parental Control: Parents can lock their children into educational apps or specific games, preventing them from accessing other potentially inappropriate content or making unauthorized in-app purchases.
- Educational Settings: Teachers can use Guided Access to keep students focused on a particular learning app during class, minimizing distractions and encouraging engagement.
- Accessibility: Guided Access can assist individuals with cognitive disabilities by simplifying device interaction and preventing accidental navigation.
- Kiosk Mode: Businesses can use Guided Access to turn an iPad into a kiosk for specific tasks, such as displaying product information or collecting customer feedback.
- Focus and Productivity: Individuals can use Guided Access to lock themselves into a productivity app, reducing the temptation to switch to social media or other distracting apps.
1.3. Who Benefits from Guided Access?
- Parents: To monitor and control children’s device usage.
- Educators: To create a focused learning environment in classrooms.
- Individuals with Disabilities: To simplify device interaction.
- Businesses: To use devices as kiosks for specific purposes.
- Anyone Seeking Focus: To improve productivity by limiting distractions.
2. Setting Up Guided Access: A Step-by-Step Guide
Before using Guided Access, you must set it up in the device settings. This involves enabling the feature and configuring a passcode or biometric authentication method. Here’s how to set up Guided Access:
2.1. Enabling Guided Access
- Open Settings: On your iPhone, iPad, or iPod Touch, open the “Settings” app.
- Go to Accessibility: Scroll down and tap on “Accessibility”.
- Find Guided Access: Scroll down to the “General” section and tap on “Guided Access”.
- Turn on Guided Access: Toggle the switch to the “on” position to enable Guided Access.
 Turning On Guided Access in Accessibility Settings
2.2. Configuring Passcode Settings
After enabling Guided Access, setting up a passcode is essential to prevent unauthorized termination of the session.
- Tap Passcode Settings: In the Guided Access settings, tap on “Passcode Settings”.
- Set Guided Access Passcode: Tap on “Set Guided Access Passcode”.
- Enter a Passcode: Enter a new six-digit passcode.
- Re-enter the Passcode: Re-enter the passcode to confirm.
- Enable Touch ID or Face ID (Optional): You can also enable Touch ID or Face ID to end Guided Access sessions, providing a convenient alternative to the passcode. Toggle the switches next to “Touch ID” or “Face ID” to enable these options.
2.3. Setting a Time Limit (Optional)
Guided Access allows you to set a time limit for each session. This can be useful for managing device usage time, especially for children.
- Return to Guided Access Settings: If you’re not already there, go back to the Guided Access settings in the Accessibility menu.
- Enable Time Limits: Turn on the “Time Limits” option.
- Choose an Alert Sound: Select an alert sound to notify the user when the time limit is approaching.
2.4. Accessibility Shortcut
The Accessibility Shortcut allows you to quickly enable Guided Access by triple-clicking the side button (on iPhone X and later) or the Home button (on iPhone 8 and earlier).
- Return to Accessibility Settings: If you’re not already there, go back to the Accessibility settings.
- Accessibility Shortcut: Scroll to the bottom and tap on “Accessibility Shortcut”.
- Select Guided Access: Choose “Guided Access” from the list of options. Now, triple-clicking the side or Home button will activate Guided Access.
3. Starting a Guided Access Session: A Practical Guide
Once Guided Access is set up, starting a session is straightforward. Follow these steps to initiate Guided Access within an app:
3.1. Launching the Desired App
- Open the App: Launch the app you want to use in Guided Access mode. For example, if you want to lock the device into a specific educational game, open that game.
3.2. Activating Guided Access
- Triple-Click the Side or Home Button:
- On iPhone X and later, triple-click the side button (the power button).
- On iPhone 8 and earlier, triple-click the Home button.
- Guided Access Interface: The Guided Access interface will appear, allowing you to configure the session.
3.3. Configuring Session Options
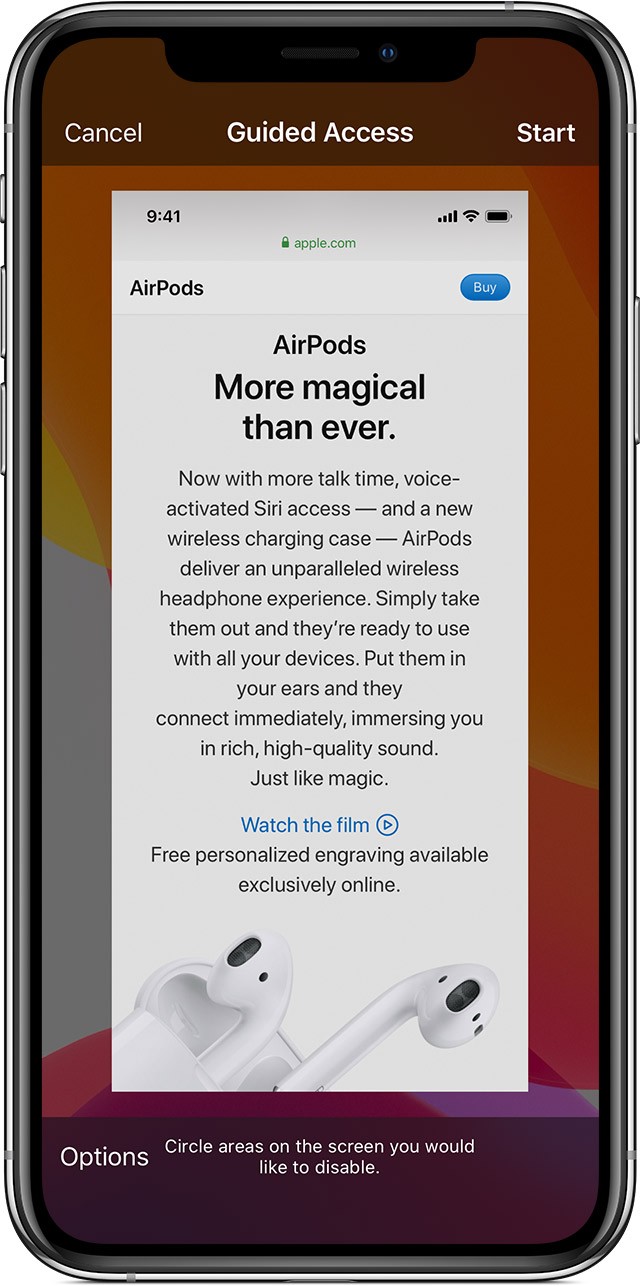
- Disable Areas of the Screen: If you want to disable certain areas of the screen from responding to touch, use your finger to draw a circle around those areas. You can adjust the size and position of the circle as needed. To remove a disabled area, tap the “X” inside the circle.
- Accessing Options: Tap the “Options” button at the bottom-left corner of the screen to configure additional settings.
3.4. Available Options
- Sleep/Wake Button: Disable the Sleep/Wake button to prevent the device from being turned off.
- Volume Buttons: Disable the volume buttons to prevent volume adjustments.
- Motion: Limit the device’s response to motion, such as shaking or rotating.
- Keyboards: Disable the keyboard to prevent text input.
- Touch: Disable touch input entirely, making the screen unresponsive.
- Dictionary Lookup: Enable or disable the Look Up feature for selected text.
- Time Limit: Set a time limit for the Guided Access session.
3.5. Starting the Session
- Tap Start: After configuring the options, tap the “Start” button at the top-right corner of the screen.
- Enter Passcode (if required): If you have a passcode set, you will be prompted to enter it to start the session.
- Guided Access Active: The Guided Access session will begin, and the device will be locked into the selected app.
4. Controlling Available Features: Customizing the User Experience
One of the key benefits of Guided Access is the ability to customize which features are available during a session. This allows you to tailor the device experience to the specific needs of the user, whether it’s disabling certain buttons, restricting touch input, or setting time limits.
4.1. Accessing Options During a Session
- Triple-Click the Side or Home Button: During an active Guided Access session, triple-click the side button (on iPhone X and later) or the Home button (on iPhone 8 and earlier) to access the options.
- Enter Passcode (if required): If you have a passcode set, you will be prompted to enter it to access the options.
4.2. Disabling Hardware Buttons
-
Sleep/Wake Button: Turning off the Sleep/Wake button prevents the user from turning off the device during the session. This can be useful in kiosk mode or when you want to ensure continuous operation.
-
Volume Buttons: Disabling the volume buttons prevents the user from adjusting the volume. This can be useful in educational settings where you want to maintain a consistent audio level.
4.3. Restricting Motion and Input
-
Motion: Turning off motion limits how the device responds to movement. For example, the screen will not rotate, and shaking the device will not trigger any actions. This can be useful for users with sensitivity to motion or when you want to prevent accidental input.
-
Keyboards: Turning off the keyboard prevents text input. This can be useful when the app does not require text input or when you want to prevent the user from entering text.
-
Touch: Turning off touch input disables the entire screen from responding to touch. This can be useful when you want to display information without allowing any interaction, such as in a museum exhibit or a digital sign.
4.4. Enabling Dictionary Lookup
- Dictionary Lookup: Turning on the Dictionary Lookup feature allows the user to select text and use the Look Up function to find definitions and other information. This can be useful in educational settings or when the user needs to quickly access definitions.
4.5. Setting a Time Limit
- Time Limit: Turning on the Time Limit feature allows you to set a specific duration for the Guided Access session. When the time limit is reached, the session will automatically end, and the device will be locked. This can be useful for managing device usage time, especially for children.
4.6. Saving Settings
After configuring the options, tap “Done” to save the settings. The Guided Access session will continue with the selected options enabled.
5. Ending a Guided Access Session: Securely Exiting the Mode
Ending a Guided Access session requires either the correct passcode, Touch ID, or Face ID, ensuring that only authorized users can exit the mode. Here’s how to end a Guided Access session:
5.1. Accessing the End Session Screen
- Triple-Click the Side or Home Button: During an active Guided Access session, triple-click the side button (on iPhone X and later) or the Home button (on iPhone 8 and earlier).
- Enter Passcode: You will be prompted to enter the Guided Access passcode.
5.2. Using Touch ID or Face ID
If you have enabled Touch ID or Face ID for Guided Access, you can use these biometric methods instead of the passcode:
- Double-Click the Side or Home Button: After triple-clicking, double-click the side button (on iPhone X and later) or the Home button (on iPhone 8 and earlier).
- Authenticate: Use Touch ID or Face ID to authenticate and access the end session screen.
5.3. Ending the Session
- Tap End: On the end session screen, tap the “End” button at the top-left corner.
- Guided Access Ended: The Guided Access session will end, and the device will return to its normal mode of operation.
6. Guided Access and Siri: Hands-Free Control
Siri can be used to start a Guided Access session, offering a hands-free method for enabling the feature. This can be particularly useful for users with disabilities or in situations where physical interaction with the device is limited.
6.1. Enabling Siri for Guided Access
- Enable Siri: Ensure that Siri is enabled on your device by going to Settings > Siri & Search and turning on “Listen for ‘Hey Siri'” or “Press Side Button for Siri”.
- Configure Guided Access: Set up Guided Access as described in Section 2, including setting a passcode and enabling the Accessibility Shortcut.
6.2. Starting a Session with Siri
- Open the App: Launch the app you want to use in Guided Access mode.
- Activate Siri: Say “Hey Siri” or press the side button (or Home button) to activate Siri.
- Command Siri: Say “Turn on Guided Access”.
- Guided Access Starts: Siri will enable Guided Access, and the device will be locked into the selected app.
6.3. Important Considerations
- Siri Availability: Siri features may vary by country or region. Ensure that Siri is available in your location and that your device supports the necessary Siri features.
- Passcode Requirement: Siri can start a Guided Access session, but ending the session will still require the passcode, Touch ID, or Face ID.
7. Advanced Guided Access Tips and Tricks
To maximize the benefits of Guided Access, consider these advanced tips and tricks:
7.1. Creating Custom Configurations
- App-Specific Settings: Guided Access settings are not app-specific. However, you can create a routine where you adjust settings each time you start a new session.
- Documenting Settings: Keep a list of settings you use for different apps to quickly configure Guided Access for each use case.
7.2. Using Guided Access for Testing
- Usability Testing: Developers and testers can use Guided Access to lock users into specific parts of an app during usability testing, preventing them from accidentally navigating away from the test area.
- Focus on Specific Features: By disabling certain features, testers can focus on specific functionalities without distractions.
7.3. Guided Access in Business Settings
- Kiosk Mode: Set up an iPad as a kiosk by locking it into a specific app, such as a survey tool or a product catalog. Disable all hardware buttons and touch input in unnecessary areas to create a seamless kiosk experience.
- Employee Training: Use Guided Access to lock employees into training apps, ensuring they focus on the training material without distractions.
7.4. Combining Guided Access with Other Accessibility Features
- VoiceOver: Use Guided Access in combination with VoiceOver for users with visual impairments, providing a controlled and accessible environment.
- Switch Control: Combine Guided Access with Switch Control for users with motor impairments, allowing them to interact with the device using alternative input methods.
8. Troubleshooting Common Guided Access Issues
While Guided Access is generally reliable, users may encounter occasional issues. Here are some common problems and their solutions:
8.1. Forgetting the Passcode
- Recovery Mode: If you forget the Guided Access passcode, you will need to restore your device to factory settings using iTunes or Finder. This will erase all data on your device, so it’s important to have a backup.
- Connect to Computer: Connect your iPhone, iPad, or iPod Touch to a computer.
- Enter Recovery Mode:
- iPhone 8 or later: Press and quickly release the Volume Up button, press and quickly release the Volume Down button, then press and hold the Side button until you see the recovery mode screen.
- iPhone 7/7 Plus: Press and hold the Side (or Top) button and the Volume Down button at the same time until you see the recovery mode screen.
- iPhone 6s or earlier: Press and hold the Home button and the Top (or Side) button at the same time until you see the recovery mode screen.
- Restore Device: In iTunes or Finder, choose “Restore” when prompted.
- Prevention: To prevent forgetting the passcode, store it in a secure password manager or use Touch ID or Face ID as an alternative.
8.2. Guided Access Not Starting
- Accessibility Shortcut: Ensure that Guided Access is selected as the Accessibility Shortcut (Settings > Accessibility > Accessibility Shortcut).
- Restart Device: Sometimes, a simple restart can resolve issues with Guided Access. Turn off your device, wait a few seconds, and then turn it back on.
- Update iOS: Make sure your device is running the latest version of iOS or iPadOS. Go to Settings > General > Software Update to check for updates.
8.3. Screen Not Responding
- Touch Input Disabled: Check if touch input is disabled in the Guided Access options. Triple-click the side or Home button, enter the passcode, and ensure that “Touch” is enabled.
- Hardware Issues: If the screen is still not responding, there may be a hardware issue. Contact Apple Support for assistance.
8.4. Time Limit Issues
- Incorrect Time Zone: Ensure that your device’s time zone is set correctly (Settings > General > Date & Time).
- Conflicting Settings: Check for any conflicting settings that may be interfering with the time limit.
9. The Importance of Digital Responsibility
Digital responsibility is the ethical and responsible use of technology, including devices and the internet. It involves understanding the impact of technology on individuals and society and making choices that promote well-being, privacy, and security.
9.1. Understanding the Impact of Technology
- Awareness: Recognizing how technology affects mental health, social interactions, and productivity.
- Balanced Usage: Promoting a healthy balance between technology use and other activities.
9.2. Promoting Well-being
- Mental Health: Encouraging mindful technology use to reduce stress and anxiety.
- Physical Health: Promoting physical activity and reducing sedentary behavior associated with excessive screen time.
9.3. Protecting Privacy and Security
- Data Protection: Understanding and managing personal data to protect privacy.
- Online Safety: Promoting safe online practices to avoid cyberbullying, scams, and other online threats.
9.4. Fostering Ethical Behavior
- Respect: Encouraging respectful online interactions and discouraging harassment.
- Integrity: Promoting honesty and ethical behavior in digital environments.
10. Resources and Further Reading from CONDUCT.EDU.VN
For more information on digital responsibility, ethical behavior, and related topics, visit CONDUCT.EDU.VN. Here are some recommended resources:
10.1. Articles on Ethical Conduct
- “The Importance of Ethical Conduct in the Digital Age”: Discusses the ethical challenges posed by technology and provides guidelines for responsible behavior.
- “Promoting Ethical Behavior in Online Communities”: Offers strategies for creating and maintaining ethical online communities.
10.2. Guides on Digital Responsibility
- “A Parent’s Guide to Digital Responsibility”: Provides parents with practical tips for teaching their children about digital responsibility.
- “Digital Responsibility in the Workplace”: Offers guidance for employees and employers on promoting ethical technology use in the workplace.
10.3. Tools and Resources
- “Digital Responsibility Checklist”: A checklist to help individuals assess and improve their digital responsibility practices.
- “Ethical Decision-Making Framework”: A framework for making ethical decisions in digital environments.
10.4. Contact Information
For further assistance and information, please contact us:
- Address: 100 Ethics Plaza, Guideline City, CA 90210, United States
- WhatsApp: +1 (707) 555-1234
- Website: CONDUCT.EDU.VN
By following the guidelines and tips provided in this article, you can effectively use Guided Access to create controlled and focused environments on your iPhone, iPad, or iPod Touch, promoting digital responsibility and enhancing user experience.
FAQ: Guided Access
1. What is Guided Access?
Guided Access is an accessibility feature on iOS devices that locks the device into a single app, restricting access to other features.
2. How do I enable Guided Access?
Go to Settings > Accessibility > Guided Access and toggle the switch to the “on” position.
3. How do I set a passcode for Guided Access?
In Guided Access settings, tap “Passcode Settings” > “Set Guided Access Passcode” and enter a new passcode.
4. Can I use Touch ID or Face ID instead of a passcode?
Yes, you can enable Touch ID or Face ID in the Passcode Settings for Guided Access.
5. How do I start a Guided Access session?
Open the app you want to use, then triple-click the side button (or Home button) and tap “Start”.
6. How do I disable certain areas of the screen?
Use your finger to draw circles around the areas you want to disable during the Guided Access setup.
7. How do I set a time limit for Guided Access?
Enable the “Time Limit” option in Guided Access settings and choose an alert sound.
8. How do I end a Guided Access session?
Triple-click the side button (or Home button), enter your passcode, and tap “End”.
9. What if I forget my Guided Access passcode?
You will need to restore your device to factory settings using iTunes or Finder.
10. Can I use Siri to start Guided Access?
Yes, you can say “Hey Siri, turn on Guided Access” to start a session.
At CONDUCT.EDU.VN, we understand the challenges in finding reliable rules of conduct and ethical standards. We’re here to provide detailed, easy-to-understand information and practical guidance. If you’re looking to build an ethical and professional environment, visit conduct.edu.vn for clear and accessible resources that help you navigate the complexities of conduct and behavior.