Removing drawer guides effectively involves understanding the various types of disconnect mechanisms available. This comprehensive guide, brought to you by CONDUCT.EDU.VN, will help you identify these mechanisms and safely remove drawers, ensuring your furniture and fixtures remain in optimal condition. Master drawer removal techniques and explore practical solutions for maintaining your furniture’s functionality with our expert insights and guidelines.
1. Understanding Drawer Guide Mechanisms
Drawer guides, also known as drawer slides or drawer runners, are essential components that allow drawers to open and close smoothly. Knowing how to remove these guides is crucial for maintenance, repair, or replacement. Different types of drawer guides have unique disconnect mechanisms designed for easy removal.
1.1. Types of Drawer Guides
Understanding the different types of drawer guides is essential before attempting removal. Here are some common types:
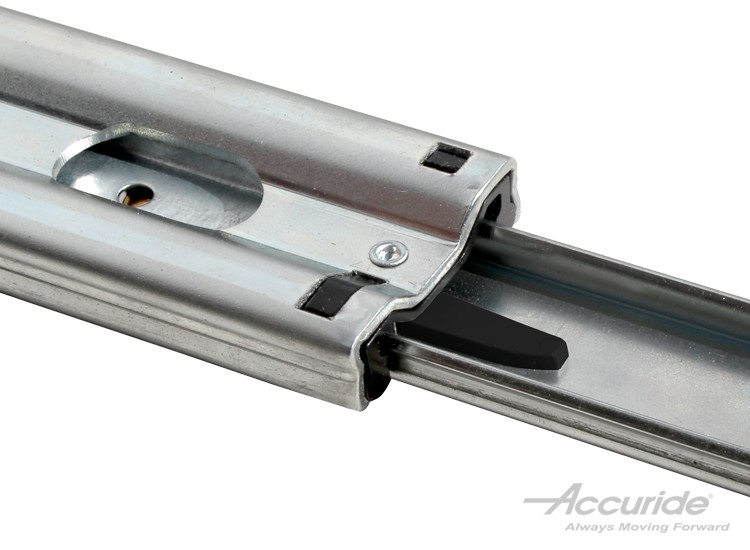
- Ball-Bearing Slides: These slides use ball bearings for smooth operation and often feature a lever or push-button release.
- Roller Slides: Simpler and less expensive, roller slides typically use a friction disconnect or a simple release mechanism.
- Friction Slides: These slides rely on friction to stay in place and usually disconnect by simply pulling the drawer hard enough.
- Rail Slides: Rail slides may have a latch or simply detach all slide members for removal.
1.2. Common Disconnect Methods
Each type of drawer guide uses a specific method to disconnect the drawer from the cabinet. Identifying the correct method is key to preventing damage during removal. Here are the four most common disconnect methods:
- Friction Disconnect: Pull the drawer with force until the slide members separate.
- Lever Disconnect: Push up or down on a lever located on the slide to release the drawer.
- Push-Latch Disconnect: Press a button or latch to disengage the drawer from the slide.
- Rail Disconnect: Detach all slide members, often with or without a latch, providing full access to the drawer’s contents.
2. Preparing for Drawer Guide Removal
Before you start, gather the necessary tools and prepare the area to ensure a smooth and safe removal process.
2.1. Gathering the Right Tools
Having the right tools on hand can make the removal process easier and prevent damage to the drawer or cabinet. Essential tools include:
- Screwdriver Set: Both Phillips head and flathead screwdrivers are useful for various types of screws.
- Padded Pry Bar: For gently prying if the drawer is stuck.
- Work Gloves: To protect your hands.
- Safety Glasses: To protect your eyes from debris.
- Flashlight: To help you see clearly inside the cabinet.
2.2. Preparing the Work Area
A well-prepared work area is essential for safety and efficiency. Follow these steps:
- Clear the Area: Remove any obstacles around the drawer and cabinet.
- Protect the Floor: Place a drop cloth or blanket on the floor to prevent scratches or damage.
- Ensure Good Lighting: Use a work light or flashlight to illuminate the area inside the cabinet.
- Empty the Drawer: Remove all contents from the drawer to reduce its weight and make it easier to handle.
3. Step-by-Step Guide: Removing Drawer Guides
This section provides detailed instructions on How To Remove Drawer Guides using each of the common disconnect methods.
3.1. Removing Drawers with Friction Disconnect
Friction disconnects are the simplest to manage, often found in lighter-duty applications.
3.1.1. Identifying Friction Disconnects
Friction disconnects are typically found on small, light-duty slides. They do not have levers, latches, or buttons. The drawer is held in place by the friction between the slide members.
3.1.2. Step-by-Step Removal Process
- Pull the Drawer Out: Gently pull the drawer out as far as it will go.
- Apply Firm Pressure: Apply firm, even pressure to overcome the resistance from the ball retainers.
- Separate the Slides: The slide members should separate, allowing you to lift the drawer free.
3.2. Removing Drawers with Lever Disconnect
Lever disconnects are more resilient and commonly used in medium-duty slides.
3.2.1. Identifying Lever Disconnects
Lever disconnects feature a spring-loaded lever on the inner member of the slide. This lever can be pushed up or down to release the drawer.
3.2.2. Step-by-Step Removal Process
- Locate the Levers: Pull the drawer out as far as it will go and locate the levers on both sides of the slide.
- Engage the Levers: Push the levers either up or down simultaneously, depending on the design.
- Pull the Drawer Free: While holding the levers in the released position, gently pull the drawer out of the cabinet.
3.2.3. Tips for Lever Disconnects
- If the drawer is stuck, try wiggling it slightly while holding the levers.
- Ensure both levers are fully engaged before attempting to pull the drawer.
3.3. Removing Drawers with Push-Latch Disconnect
Push-latch disconnects offer a simple, button-activated release mechanism.
3.3.1. Identifying Push-Latch Disconnects
Push-latch disconnects have a button or latch that, when pressed, disengages the drawer member from the cabinet member.
3.3.2. Step-by-Step Removal Process
- Locate the Push Latch: Pull the drawer out as far as it will go and find the push latch on the slide.
- Press the Latch: Press the button or latch to release the locking mechanism.
- Pull the Drawer Free: While holding the latch, gently pull the drawer out of the cabinet.
3.3.3. Troubleshooting Push-Latch Disconnects
- If the latch is difficult to press, ensure there is no obstruction preventing its movement.
- Try applying slight pressure to the drawer while pressing the latch to help release the mechanism.
3.4. Removing Drawers with Rail Disconnect
Rail disconnects allow for the detachment of all slide members, providing complete access.
3.4.1. Identifying Rail Disconnects
Rail disconnects may or may not have a latch. These slides typically feature over-travel, allowing full access to the drawer’s contents.
3.4.2. Step-by-Step Removal Process
- Pull the Drawer Out: Extend the drawer fully to expose the rail disconnect mechanism.
- Locate the Latch (if applicable): If there is a latch, locate it on the rail.
- Release the Rail: Activate the latch or simply pull the rail to detach all slide members.
- Remove the Drawer: Lift the drawer and rail assembly out of the cabinet.
3.4.3. Special Considerations for Rail Disconnects
- Be prepared for all slide members to come out with the drawer.
- Take note of how the rails are aligned for reinstallation.
4. Troubleshooting Common Issues
Sometimes, removing drawer guides can be challenging due to various issues. Here are some common problems and how to address them.
4.1. Drawer is Stuck
If the drawer is stuck, do not force it, as this can damage the slides or the cabinet. Here are some steps to try:
- Check for Obstructions: Ensure there are no items blocking the drawer from the inside or outside.
- Lubricate the Slides: Apply a silicone-based lubricant to the slides to reduce friction.
- Use a Padded Pry Bar: Gently pry the drawer open, using a padded pry bar to protect the surrounding surfaces.
4.2. Levers or Latches are Difficult to Engage
If the levers or latches are hard to engage, try these solutions:
- Clean the Slides: Dirt and debris can accumulate and prevent the levers or latches from moving freely. Clean the slides with a brush or cloth.
- Apply Lubricant: Lubricate the levers or latches with a silicone-based lubricant.
- Check for Damage: Inspect the levers or latches for any signs of damage or wear. If damaged, consider replacing the slides.
4.3. Drawer Slides are Rusty or Corroded
Rust and corrosion can make it difficult to remove the drawer and can damage the slides. Here’s how to address this:
- Remove Rust: Use a wire brush or sandpaper to remove rust from the slides.
- Apply Rust Remover: Apply a rust remover product to dissolve stubborn rust.
- Lubricate the Slides: After removing the rust, lubricate the slides to prevent future corrosion.
5. Maintaining and Replacing Drawer Guides
Proper maintenance can extend the life of your drawer guides and ensure smooth operation. When maintenance is no longer sufficient, replacement may be necessary.
5.1. Regular Maintenance Tips
- Clean Regularly: Clean the drawer slides every few months to remove dirt and debris.
- Lubricate: Apply a silicone-based lubricant to keep the slides moving smoothly.
- Inspect: Regularly inspect the slides for signs of wear, damage, or corrosion.
- Adjust: If the drawer is not aligned properly, adjust the slides to ensure smooth operation.
5.2. When to Replace Drawer Guides
Consider replacing drawer guides if you notice any of the following:
- Significant Wear or Damage: If the slides are visibly worn, bent, or damaged.
- Rust or Corrosion: If rust or corrosion is severe and cannot be removed.
- Difficulty Operating: If the drawer is consistently difficult to open or close, even after cleaning and lubricating the slides.
5.3. Choosing Replacement Drawer Guides
When replacing drawer guides, consider the following factors:
- Type: Choose the same type of slide as the original, unless you want to upgrade to a different type.
- Load Capacity: Ensure the new slides can support the weight of the drawer and its contents.
- Length: Measure the length of the existing slides to ensure the new ones will fit properly.
- Features: Consider features such as soft-close, full-extension, or over-travel, depending on your needs.
6. The Importance of Following Safety Guidelines
When removing drawer guides, it’s crucial to follow safety guidelines to prevent injuries and damage.
6.1. Personal Protective Equipment (PPE)
Always wear appropriate PPE, including:
- Safety Glasses: To protect your eyes from dust and debris.
- Work Gloves: To protect your hands from sharp edges and splinters.
6.2. Safe Lifting Practices
- Lift with Your Legs: Bend your knees and keep your back straight when lifting heavy drawers.
- Get Help: If the drawer is too heavy, ask someone to help you lift it.
6.3. Avoiding Damage
- Do Not Force: Never force a drawer open or closed.
- Use Proper Tools: Use the correct tools for the job to avoid damaging the drawer or cabinet.
- Protect Surfaces: Use a drop cloth or blanket to protect the floor and surrounding surfaces.
7. Real-World Examples and Case Studies
To illustrate the principles of removing drawer guides, let’s examine some real-world examples and case studies. Note that these scenarios are anonymized to protect privacy.
7.1. Case Study 1: Removing a Stuck Drawer in an Old Dresser
Problem: A homeowner had a drawer in an old dresser that was stuck and would not open.
Solution:
- Assessment: The homeowner determined that the drawer was likely stuck due to old, dry slides.
- Lubrication: They applied a generous amount of silicone-based lubricant to the slides.
- Gentle Prying: Using a padded pry bar, they gently pried the drawer open, being careful not to damage the surrounding wood.
- Cleaning and Maintenance: Once the drawer was open, they cleaned the slides and applied fresh lubricant.
Outcome: The drawer was successfully removed, and the slides were restored to smooth operation.
7.2. Case Study 2: Replacing Damaged Drawer Slides in a Kitchen Cabinet
Problem: A kitchen cabinet drawer had slides that were severely rusted and difficult to operate.
Solution:
- Identification: The homeowner identified the type and size of the existing slides.
- Purchase: They purchased new slides with the same dimensions and load capacity.
- Removal: They removed the old slides by unscrewing them from the drawer and cabinet.
- Installation: They installed the new slides, ensuring they were properly aligned.
Outcome: The kitchen cabinet drawer now operates smoothly with the new slides.
7.3. Case Study 3: Removing a Drawer with a Broken Lever Disconnect
Problem: A drawer with a lever disconnect had a broken lever, making it impossible to release the drawer.
Solution:
- Assessment: The homeowner assessed that the lever was broken and could not be repaired.
- Alternative Release: They used a small screwdriver to manually disengage the locking mechanism inside the slide.
- Removal: With the locking mechanism disengaged, they were able to pull the drawer free.
- Replacement: They replaced the entire slide assembly to ensure proper operation in the future.
Outcome: The drawer was successfully removed, and the broken slide was replaced.
8. Regulations and Standards
While there are no specific regulations governing the removal of drawer guides, it’s important to adhere to general safety standards and best practices.
8.1. ANSI Standards
The American National Standards Institute (ANSI) sets standards for various aspects of furniture safety. While not specific to drawer guide removal, these standards provide guidelines for safe furniture design and construction.
8.2. OSHA Guidelines
The Occupational Safety and Health Administration (OSHA) provides guidelines for workplace safety. If you are removing drawer guides in a commercial setting, it’s important to follow OSHA guidelines for safe work practices.
8.3. Industry Best Practices
- Follow Manufacturer Instructions: Always follow the manufacturer’s instructions for removing and installing drawer guides.
- Use Proper Tools: Use the correct tools for the job to avoid damaging the drawer or cabinet.
- Prioritize Safety: Always prioritize safety when working with tools and equipment.
9. Advanced Techniques for Difficult Drawer Removals
Sometimes, standard methods may not suffice. Here are some advanced techniques for particularly challenging drawer removals.
9.1. Using Heat to Loosen Stuck Slides
In cases where rust or adhesive is causing the drawer to stick, applying heat can help loosen the materials.
- Apply Heat: Use a heat gun or hairdryer to gently heat the drawer slides.
- Test Movement: After heating, try moving the drawer to see if it has loosened.
- Repeat as Necessary: Repeat the heating process as needed until the drawer moves more freely.
- Lubricate: Once the drawer is partially open, apply lubricant to further ease the removal process.
9.2. Cutting Away Obstructions
If there are obstructions preventing the drawer from being removed, carefully cutting them away may be necessary.
- Identify Obstructions: Locate any nails, screws, or other obstructions that are blocking the drawer.
- Use Appropriate Tools: Use a hacksaw, oscillating tool, or other appropriate tool to carefully cut away the obstructions.
- Protect Surrounding Areas: Protect the surrounding areas with masking tape or cardboard to prevent damage.
- Remove Obstructions: Once the obstructions are cut, try removing the drawer again.
9.3. Disassembling the Drawer
In extreme cases, it may be necessary to disassemble the drawer to remove it.
- Remove Fasteners: Locate and remove any screws, nails, or other fasteners holding the drawer together.
- Separate Components: Carefully separate the drawer components.
- Remove Slides: With the drawer disassembled, remove the slides from each component.
- Reassemble: After removing the drawer, reassemble it using new fasteners if necessary.
10. Frequently Asked Questions (FAQ)
Here are some frequently asked questions about removing drawer guides:
-
What is the best lubricant for drawer slides?
- Silicone-based lubricants are generally recommended for drawer slides. They reduce friction and do not attract dust or dirt.
-
How do I know what type of drawer slide I have?
- Examine the slide for levers, latches, or buttons. If there are none, it is likely a friction disconnect.
-
Can I replace drawer slides with a different type?
- Yes, but ensure the new slides have the same dimensions and load capacity as the originals.
-
What should I do if the screws are stripped when removing drawer slides?
- Use a screw extractor or a rubber band between the screwdriver and the screw head for better grip.
-
How do I prevent drawer slides from rusting?
- Keep the slides clean and lubricated, and avoid exposing them to moisture.
-
Is it safe to use WD-40 on drawer slides?
- WD-40 can be used for cleaning, but it is not a long-term lubricant. Follow up with a silicone-based lubricant.
-
How often should I maintain my drawer slides?
- Regular maintenance should be performed every few months, or as needed.
-
What tools do I need to remove drawer guides?
- Essential tools include a screwdriver set, padded pry bar, work gloves, safety glasses, and a flashlight.
-
What are the signs that my drawer slides need to be replaced?
- Signs include significant wear, rust, difficulty operating, and visible damage.
-
How do I align drawer slides properly?
- Ensure the slides are level and aligned with the cabinet frame and drawer. Use shims if necessary.
Conclusion: Mastering Drawer Guide Removal
Knowing how to remove drawer guides is a valuable skill for anyone who wants to maintain their furniture and fixtures. By understanding the different types of disconnect mechanisms, preparing the work area, and following safety guidelines, you can safely and effectively remove drawer guides for maintenance, repair, or replacement. For more detailed guides and expert advice, visit CONDUCT.EDU.VN.
Navigating the complexities of drawer guide removal can be challenging, but you don’t have to do it alone. At CONDUCT.EDU.VN, we understand the difficulties in finding reliable information and clear instructions for various tasks around the home and office. That’s why we’re dedicated to providing you with comprehensive guides and expert advice to make these tasks easier and more manageable.
If you’re struggling with a stubborn drawer or unsure about the best way to maintain your furniture, we invite you to explore our website. At CONDUCT.EDU.VN, you’ll find a wealth of articles, tutorials, and resources designed to help you tackle any project with confidence.
Need more guidance? Contact us at 100 Ethics Plaza, Guideline City, CA 90210, United States, or reach out via Whatsapp at +1 (707) 555-1234. Our team is here to support you every step of the way. Visit conduct.edu.vn today and discover the knowledge you need to succeed.