At CONDUCT.EDU.VN, we understand the frustration of being locked out of your iPhone 11 due to Guided Access. Guided Access is a fantastic feature, but it can be a hassle when you can’t disable it. This guide provides comprehensive solutions to help you regain control of your device, offering step-by-step instructions and troubleshooting tips to ensure a smooth process. Whether you’re a student, a professional, or anyone in between, our goal is to empower you with the knowledge and confidence to manage your device effectively. Learn about accessibility settings, assistive technology, and device management for seamless iPhone control.
1. Understanding Guided Access on iPhone 11
1.1. What is Guided Access?
Guided Access is an accessibility feature on iPhones, including the iPhone 11, designed to help users with attention and sensory challenges stay focused on a single task. It restricts the device to a single app, disabling the Home button (or swipe-up gesture on newer models) and other functionalities. This is particularly useful for:
- Educational settings: Allowing students to focus on a specific educational app without distractions.
- Therapeutic environments: Helping individuals with autism or other sensory sensitivities stay calm and engaged.
- Parental control: Limiting children to specific apps to prevent them from accessing inappropriate content or making unauthorized purchases.
- Public kiosks: Securing devices in public settings, like museums or information centers, to prevent tampering.
1.2. How Guided Access Works
When Guided Access is enabled, the iPhone 11 becomes locked into a single app. The user cannot exit the app, access the Home screen, or use other apps until Guided Access is disabled. You can also disable certain areas of the screen from user interaction. To activate Guided Access:
- Go to Settings > Accessibility > Guided Access.
- Toggle the Guided Access switch to the “on” position.
- Set a passcode that will be required to exit Guided Access.
Once enabled, you can start a Guided Access session by triple-clicking the Side button (or Home button on older models) within the desired app.
1.3. Common Scenarios Leading to Being Stuck in Guided Access
Several situations can lead to users getting stuck in Guided Access:
- Forgetting the Passcode: This is one of the most common reasons. If you’ve set up a passcode and forgotten it, you’ll need alternative methods to exit Guided Access.
- Malfunctioning Buttons: If the Side button (or Home button) is not working properly, triple-clicking to exit Guided Access won’t work.
- Software Glitches: Sometimes, a software bug can cause Guided Access to malfunction, preventing you from exiting the mode even with the correct passcode.
- Accidental Activation: Especially with children using the device, Guided Access can be accidentally activated without a clear understanding of how to disable it.
- Disabled Touch: In some cases, the touch functionality may be disabled within Guided Access settings, making it impossible to interact with the screen to enter the passcode.
2. Preliminary Steps Before Troubleshooting
Before diving into more complex solutions, consider these preliminary steps:
2.1. Ensure Buttons are Functional
Make sure that the Side button (or Home button) is working correctly. Press it a few times to see if it responds. If the button is physically damaged, you may need to seek professional repair.
2.2. Check Accessibility Settings
Sometimes, other accessibility settings can interfere with Guided Access. Go to Settings > Accessibility and check if any other settings, such as Voice Control or Switch Control, are enabled and might be causing conflicts. Try disabling them temporarily to see if it resolves the issue.
2.3. Clean the Screen
A dirty or wet screen can sometimes cause touch input issues. Clean the screen thoroughly with a microfiber cloth to ensure that there are no obstructions affecting touch sensitivity.
2.4. Try a Simple Restart
A simple restart can often resolve minor software glitches. Turn off your iPhone 11 and then turn it back on. This can sometimes reset the Guided Access state and allow you to exit normally.
3. Methods to Remove Guided Access on iPhone 11
If you’re stuck in Guided Access on your iPhone 11, here are several methods you can try:
3.1. Using the Correct Passcode
This is the most straightforward method, assuming you remember the passcode:
- Triple-Click the Side Button (or Home Button): Quickly press the Side button (or Home button) three times.
- Enter the Guided Access Passcode: A passcode screen should appear. Enter the passcode you set when you enabled Guided Access.
- Tap “End”: Once the correct passcode is entered, tap the “End” button in the top-left corner of the screen.
If you’ve entered the correct passcode, Guided Access will be disabled, and you’ll be able to use your iPhone 11 normally.
3.2. Using Touch ID or Face ID (If Enabled)
If you enabled Touch ID or Face ID for Guided Access, you can use these biometric methods instead of the passcode:
- Triple-Click the Side Button (or Home Button): Quickly press the Side button (or Home button) three times.
- Authenticate with Touch ID or Face ID: If prompted, use your registered fingerprint or facial recognition to authenticate.
- Tap “End”: After successful authentication, tap the “End” button.
This method can be quicker and more convenient if you have biometric authentication set up.
3.3. Force Restarting the iPhone 11
If the Side button (or Home button) is unresponsive or you’re unable to enter the passcode, a force restart can help:
- Press and Quickly Release the Volume Up Button.
- Press and Quickly Release the Volume Down Button.
- Press and Hold the Side Button: Continue holding the Side button until the Apple logo appears on the screen. This may take about 20-30 seconds.
- Release the Side Button: Once you see the Apple logo, release the Side button.
- Wait for the iPhone to Restart: The iPhone 11 will restart, and Guided Access should be disabled.
A force restart interrupts the current state of the iPhone’s software, often resolving glitches that prevent normal operation.
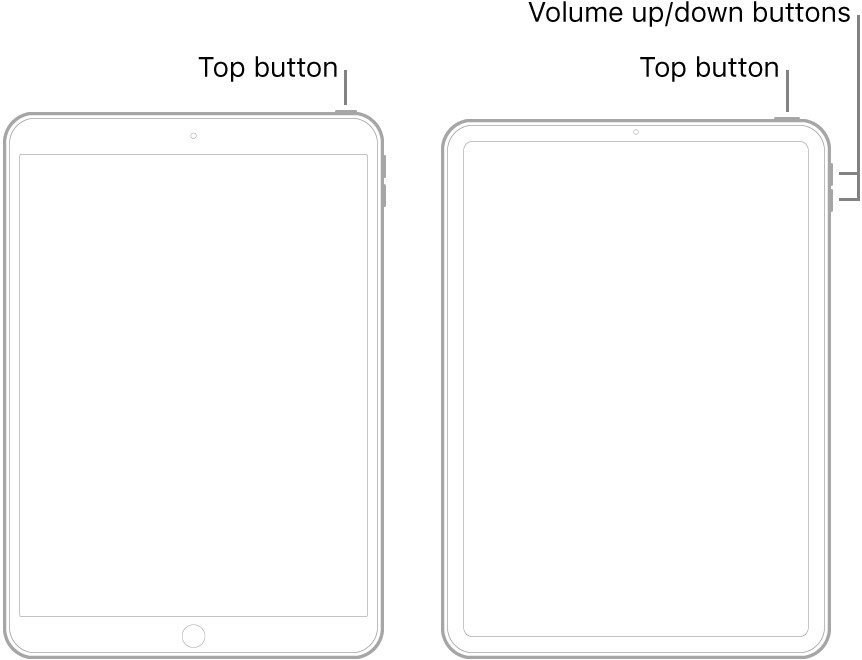 Force Restart iPhone 11
3.4. Using “Find My” to Mark as Lost
This method requires you to have “Find My iPhone” enabled on your device and access to another device (computer, tablet, or another phone) to log into your iCloud account:
- Go to iCloud.com: On another device, open a web browser and go to iCloud.com.
- Log in with Your Apple ID: Enter the Apple ID and password associated with the iPhone 11 that’s stuck in Guided Access.
- Click “Find iPhone”: In the iCloud menu, select “Find iPhone.”
- Select Your iPhone 11: From the list of devices, choose your iPhone 11.
- Mark as Lost: Click on “Mark As Lost”.
- Enter a Passcode (If Required): Follow the prompts to enter a passcode.
- Send a Message (Optional): You can choose to display a message on the screen of your iPhone 11.
- Restart Your iPhone 11: After marking the device as lost, perform a force restart by following the instructions in section 3.3. When the iPhone restarts, it should prompt you for the passcode you set when marking it as lost, bypassing Guided Access.
This method leverages the “Find My” feature to remotely reset the device’s state, effectively disabling Guided Access.
3.5. Letting the Battery Die
This is a last resort method, as it can take a significant amount of time:
- Allow the Battery to Drain Completely: Leave your iPhone 11 on and running in Guided Access mode until the battery is completely drained and the device turns off.
- Charge the iPhone: Once the battery is completely dead, plug the iPhone into a power source and let it charge for at least 15-20 minutes.
- Turn On the iPhone: After charging, turn on the iPhone. It should restart without Guided Access enabled.
When the battery dies, the iPhone loses its current state, including the Guided Access session. This can sometimes clear the issue and allow the device to restart normally.
3.6. Using iTunes or Finder to Restore the iPhone 11
If none of the above methods work, you can try restoring your iPhone 11 using iTunes (on Windows or older macOS versions) or Finder (on newer macOS versions):
- Connect Your iPhone to a Computer: Use a USB cable to connect your iPhone 11 to a computer with iTunes or Finder installed.
- Put Your iPhone in Recovery Mode: The process for entering Recovery Mode varies depending on your iPhone model. For iPhone 11:
- Press and quickly release the Volume Up button.
- Press and quickly release the Volume Down button.
- Press and hold the Side button until you see the Recovery Mode screen. This screen shows a cable pointing to a computer icon.
- Open iTunes or Finder: On your computer, iTunes or Finder should detect that your iPhone is in Recovery Mode and display a message asking if you want to restore or update.
- Click “Restore”: Choose the “Restore” option. This will erase all data on your iPhone and install the latest version of iOS.
- Follow the On-Screen Instructions: Follow the prompts to complete the restore process. This may take some time, as iTunes or Finder needs to download the iOS software and install it on your iPhone.
- Set Up Your iPhone: Once the restore process is complete, your iPhone will restart, and you’ll need to set it up as a new device or restore from a backup.
Restoring your iPhone using iTunes or Finder will remove Guided Access, but it will also erase all your data. Make sure you have a recent backup before proceeding with this method.
4. Advanced Troubleshooting
If the standard methods fail, here are some advanced troubleshooting steps:
4.1. DFU (Device Firmware Update) Restore
DFU mode is a deeper restore process than Recovery Mode. It allows you to restore your iPhone without loading the operating system, which can be helpful if there’s a software issue preventing you from exiting Guided Access.
- Connect Your iPhone to a Computer: Use a USB cable to connect your iPhone 11 to a computer with iTunes or Finder installed.
- Put Your iPhone in DFU Mode:
- Press and quickly release the Volume Up button.
- Press and quickly release the Volume Down button.
- Press and hold the Side button for about 10 seconds until the screen turns black.
- Continue holding the Side button and press and hold the Volume Down button for 5 seconds.
- Release the Side button but continue holding the Volume Down button for another 10 seconds. If you see the Apple logo, you’ve held the Side button for too long, and you’ll need to start over.
- If the screen remains black, your iPhone is likely in DFU mode.
- Open iTunes or Finder: On your computer, iTunes or Finder should detect that your iPhone is in Recovery Mode (even though the screen is black) and display a message asking if you want to restore or update.
- Click “Restore”: Choose the “Restore” option. This will erase all data on your iPhone and install the latest version of iOS.
- Follow the On-Screen Instructions: Follow the prompts to complete the restore process. This may take some time, as iTunes or Finder needs to download the iOS software and install it on your iPhone.
- Set Up Your iPhone: Once the restore process is complete, your iPhone will restart, and you’ll need to set it up as a new device or restore from a backup.
DFU mode is a more thorough restore process that can resolve deeper software issues.
4.2. Contacting Apple Support
If you’ve tried all the above methods and are still unable to remove Guided Access from your iPhone 11, it’s time to contact Apple Support. They may be able to provide further assistance or diagnose a hardware issue that’s preventing you from exiting Guided Access.
You can contact Apple Support through their website, by phone, or by visiting an Apple Store. Be sure to have your iPhone’s serial number and proof of purchase handy when you contact them.
4.3. Third-Party iOS System Repair Tools
Several third-party software tools claim to be able to fix various iOS issues, including being stuck in Guided Access. These tools often offer a user-friendly interface and can sometimes resolve issues without requiring a full restore. However, it’s important to exercise caution when using such tools:
- Research the Tool: Before using a third-party iOS system repair tool, research it thoroughly to ensure it’s reputable and doesn’t contain malware.
- Read Reviews: Look for reviews from other users to see if the tool has a good track record of resolving issues without causing further problems.
- Back Up Your Data: As with any major software change, back up your iPhone’s data before using a third-party repair tool.
- Understand the Risks: Be aware that using a third-party tool can void your iPhone’s warranty, and there’s always a risk of data loss or further damage to your device.
Some popular iOS system repair tools include Dr.Fone, iMyFone Fixppo, and Tenorshare ReiBoot. However, CONDUCT.EDU.VN recommends proceeding with caution and only using these tools as a last resort.
5. Preventing Future Issues with Guided Access
To avoid getting stuck in Guided Access in the future, consider these tips:
5.1. Memorize or Store the Passcode Securely
The most common reason for being unable to exit Guided Access is forgetting the passcode. Make sure you memorize the passcode or store it in a secure password manager. You can also use a passcode that’s easy to remember but difficult for others to guess.
5.2. Enable Touch ID or Face ID for Guided Access
If your iPhone 11 supports Touch ID or Face ID, enable it for Guided Access. This will allow you to exit Guided Access using your fingerprint or facial recognition, even if you forget the passcode.
5.3. Teach Users How to Exit Guided Access
If you’re using Guided Access for children or other users who may not be familiar with the feature, teach them how to exit Guided Access using the passcode or Touch ID/Face ID. Make sure they understand the triple-click gesture and how to enter the passcode.
5.4. Periodically Test the Exit Procedure
To ensure that you can always exit Guided Access, periodically test the exit procedure. Enable Guided Access in an app and then try to exit using the passcode or Touch ID/Face ID. This will help you identify any issues before they become a problem.
5.5. Keep Your iPhone Software Updated
Software updates often include bug fixes and improvements that can resolve issues with Guided Access. Make sure your iPhone is running the latest version of iOS to minimize the risk of encountering problems.
5.6. Be Cautious When Enabling New Settings
When enabling new settings in Guided Access, such as disabling the Side button or touch input, be cautious and make sure you understand the implications. Disabling essential functions can make it difficult to exit Guided Access if something goes wrong.
6. Guided Access Settings Explained
Understanding the settings within Guided Access can help you customize the feature to your needs and prevent future issues. Here’s a breakdown of the key settings:
6.1. Guided Access
This is the main switch that enables or disables Guided Access. When enabled, you can start a Guided Access session by triple-clicking the Side button (or Home button) in any app.
6.2. Passcode Settings
This section allows you to set a passcode for Guided Access. You can also enable Touch ID or Face ID to be used instead of the passcode.
- Set Guided Access Passcode: This option allows you to create a passcode that will be required to exit Guided Access.
- Use Touch ID/Face ID: Enable this option to use Touch ID or Face ID instead of the passcode.
6.3. Time Limits
This setting allows you to set a time limit for Guided Access sessions. When the time limit expires, the iPhone will automatically exit Guided Access.
- Sound: Choose a sound to play when the time limit is about to expire.
- Speak: Enable this option to have the iPhone speak a warning when the time limit is about to expire.
6.4. Accessibility Shortcut
This option allows you to enable or disable the Accessibility Shortcut for Guided Access. When enabled, you can start a Guided Access session by triple-clicking the Side button (or Home button) in any app.
6.5. Display Auto-Lock
This setting allows you to control whether the iPhone’s screen automatically locks during a Guided Access session. You can choose to disable auto-lock or set a specific time limit.
7. Case Studies: Real-World Scenarios
Here are a few anonymized case studies illustrating how Guided Access can be both helpful and problematic:
7.1. Case Study 1: Educational Use
Scenario: A teacher uses Guided Access to lock students into a math learning app on iPads during class. This prevents students from browsing the internet or using other apps, helping them stay focused on the lesson.
Problem: One student forgets the Guided Access passcode, and the teacher is unable to exit Guided Access on the student’s iPad.
Solution: The teacher uses the force restart method to exit Guided Access. She then resets the Guided Access passcode and makes sure to write it down in a secure location.
7.2. Case Study 2: Parental Control
Scenario: A parent uses Guided Access to lock their child into a reading app on their iPhone during bedtime. This prevents the child from using other apps or browsing the internet, helping them wind down for the night.
Problem: The child accidentally disables touch input in the Guided Access settings, making it impossible to enter the passcode or interact with the screen.
Solution: The parent connects the iPhone to a computer and uses iTunes to restore the device. They then set up Guided Access again, being careful not to disable essential functions.
7.3. Case Study 3: Therapeutic Environment
Scenario: A therapist uses Guided Access to lock a patient with autism into a calming sensory app on their iPhone. This helps the patient stay calm and focused during therapy sessions.
Problem: A software glitch causes Guided Access to malfunction, preventing the therapist from exiting the mode even with the correct passcode.
Solution: The therapist contacts Apple Support, who advises them to perform a DFU restore. This resolves the issue, and the therapist is able to use Guided Access again.
8. The Importance of Ethical Device Usage
While Guided Access is a valuable tool, it’s important to use it ethically and responsibly. Here are some considerations:
8.1. Transparency and Consent
When using Guided Access on another person’s device, be transparent about what you’re doing and obtain their consent whenever possible. Explain the purpose of Guided Access and how it works, and make sure they understand how to exit the mode.
8.2. Respect for Autonomy
Avoid using Guided Access in a way that restricts a person’s autonomy or freedom of choice. Only use it when it’s necessary and in the person’s best interest.
8.3. Avoiding Coercion
Never use Guided Access to coerce or manipulate someone into doing something they don’t want to do. This is unethical and can be harmful.
8.4. Data Privacy
Be mindful of data privacy when using Guided Access. Avoid accessing or sharing personal information without the person’s consent.
8.5. Compliance with Laws and Regulations
Make sure your use of Guided Access complies with all applicable laws and regulations, such as those related to privacy and accessibility.
9. FAQ: Frequently Asked Questions about Guided Access
Here are some frequently asked questions about Guided Access on iPhone 11:
-
What is Guided Access?
Guided Access is an accessibility feature that locks the iPhone into a single app. -
How do I enable Guided Access?
Go to Settings > Accessibility > Guided Access and toggle the switch to the “on” position. -
How do I start a Guided Access session?
Triple-click the Side button (or Home button) in the desired app. -
How do I exit Guided Access?
Triple-click the Side button (or Home button) and enter the passcode, or use Touch ID/Face ID if enabled. -
What if I forget the Guided Access passcode?
Try force restarting the iPhone, using “Find My” to mark as lost, or restoring the device using iTunes or Finder. -
Can I use Touch ID or Face ID instead of the passcode?
Yes, enable the “Use Touch ID/Face ID” option in the Guided Access settings. -
What if the Side button (or Home button) is not working?
Try force restarting the iPhone or contacting Apple Support. -
Does Guided Access work on all apps?
Yes, Guided Access can be used with any app on the iPhone. -
Can I disable certain areas of the screen in Guided Access?
Yes, you can use the drawing tool to circle areas of the screen that you want to disable. -
Is Guided Access the same as parental control?
Guided Access can be used for parental control, but it’s primarily an accessibility feature designed to help users with attention and sensory challenges.
10. Conclusion: Regaining Control and Preventing Future Lockouts
Being locked out of your iPhone 11 due to Guided Access can be a frustrating experience. However, by understanding how Guided Access works and following the troubleshooting steps outlined in this guide, you can regain control of your device and prevent future lockouts.
Remember to:
- Memorize or store the passcode securely.
- Enable Touch ID or Face ID for Guided Access.
- Teach users how to exit Guided Access.
- Periodically test the exit procedure.
- Keep your iPhone software updated.
- Be cautious when enabling new settings.
At CONDUCT.EDU.VN, we’re committed to providing you with the information and resources you need to use your devices safely and effectively. We believe that technology should empower you, not frustrate you. By following the guidelines in this article, you can make the most of Guided Access while avoiding common pitfalls.
If you’re still struggling with Guided Access or other iPhone issues, don’t hesitate to contact Apple Support or seek professional assistance. And remember, ethical device usage is essential for creating a safe and responsible digital environment.
For more information on ethical device usage, accessibility settings, and other helpful tips, visit CONDUCT.EDU.VN today. Our goal is to provide reliable and easy-to-understand guidance for navigating the digital world. We cover topics ranging from digital citizenship to data privacy, ensuring that you have the knowledge you need to make informed decisions about technology. Contact us at 100 Ethics Plaza, Guideline City, CA 90210, United States or Whatsapp: +1 (707) 555-1234.
Discover the difference that informed guidance can make. Visit conduct.edu.vn to explore our resources and empower yourself with the knowledge to thrive in today’s digital landscape.