Removing iPhone from Guided Access can be a straightforward process when you know the right steps. This article from CONDUCT.EDU.VN provides a comprehensive guide on exiting Guided Access, troubleshooting common issues, and understanding the importance of digital device management. Learn techniques to regain control of your device and discover reliable solutions for locked devices with Guided Access. Explore effective methods for iPhone accessibility and resolve screen lock efficiently.
1. Understanding Guided Access on iPhone
Guided Access is a powerful accessibility feature on iPhones, iPads, and iPod touch devices. It helps you stay focused on a specific task by restricting the device to a single app. This is particularly useful for educational purposes, such as when a student needs to focus on a particular learning app without distractions, or for individuals with cognitive disabilities who may benefit from a simplified user experience. Understanding how Guided Access works is the first step in learning how to effectively manage and, when necessary, remove it.
1.1. What is Guided Access?
Guided Access limits your device to a single app and allows you to control which features are available. You can disable the hardware buttons, touch input, and even specific areas of the screen. To enable it, go to Settings > Accessibility > Guided Access.
1.2. Why Use Guided Access?
There are several reasons why someone might use Guided Access:
- Focus Enhancement: It helps individuals, especially children or those with attention deficits, concentrate on a single task or app.
- Security: In public settings or when lending your device to someone, Guided Access prevents unauthorized access to other apps or settings.
- Accessibility: It can simplify the device interface for users with cognitive impairments or those who find multiple options overwhelming.
- Parental Control: Parents can use it to ensure their children are only using specific educational apps or games.
1.3. Common Scenarios for Guided Access Usage
Guided Access is used in a variety of settings:
- Educational Institutions: Teachers use it to lock students into educational apps during class.
- Therapeutic Settings: Therapists use it to focus patients on specific tasks or activities.
- Retail Environments: Businesses use it to display specific information or run customer surveys on tablets without allowing access to other functions.
- Home Use: Parents use it to control their children’s device usage or to simplify the interface for elderly family members.
2. Standard Methods to Exit Guided Access
The most common method for exiting Guided Access involves using the passcode or Touch ID/Face ID that was set up when enabling the feature. However, there are alternative methods if you encounter difficulties with the standard approach.
2.1. Using the Passcode
If you know the Guided Access passcode, exiting is simple:
- Triple-Click the Side or Home Button: Depending on your iPhone model, quickly press the side button (for iPhone X and later) or the Home button (for older models) three times.
- Enter the Passcode: A screen will appear asking for the Guided Access passcode. Enter the correct passcode.
- End Guided Access: Once the passcode is entered, you will see an “End” button in the bottom-left corner of the screen. Tap “End” to exit Guided Access.
This method is quick and easy if you remember the passcode. It’s also applicable in numerous scenarios, making it a reliable first step.
2.2. Using Touch ID or Face ID
If you enabled Touch ID or Face ID for Guided Access, you can use biometric authentication:
- Triple-Click the Side or Home Button: As with the passcode method, triple-click the side or Home button to bring up the Guided Access exit screen.
- Authenticate with Touch ID or Face ID: Instead of entering a passcode, use your registered fingerprint or facial recognition to authenticate.
- End Guided Access: After successful authentication, tap “End” to exit Guided Access.
Using Touch ID or Face ID can be faster than entering a passcode, particularly if you use these authentication methods regularly.
2.3. Force Restarting the iPhone
If the standard methods fail, force restarting your iPhone can often resolve the issue:
- For iPhone 8 and later:
- Press and quickly release the Volume Up button.
- Press and quickly release the Volume Down button.
- Press and hold the Side button until the Apple logo appears.
- For iPhone 7 and 7 Plus:
- Press and hold both the Side button and the Volume Down button until the Apple logo appears.
- For iPhone 6s and earlier:
- Press and hold both the Home button and the Side button until the Apple logo appears.
Force restarting the iPhone closes all running processes and reboots the device, which can bypass Guided Access if it’s malfunctioning.
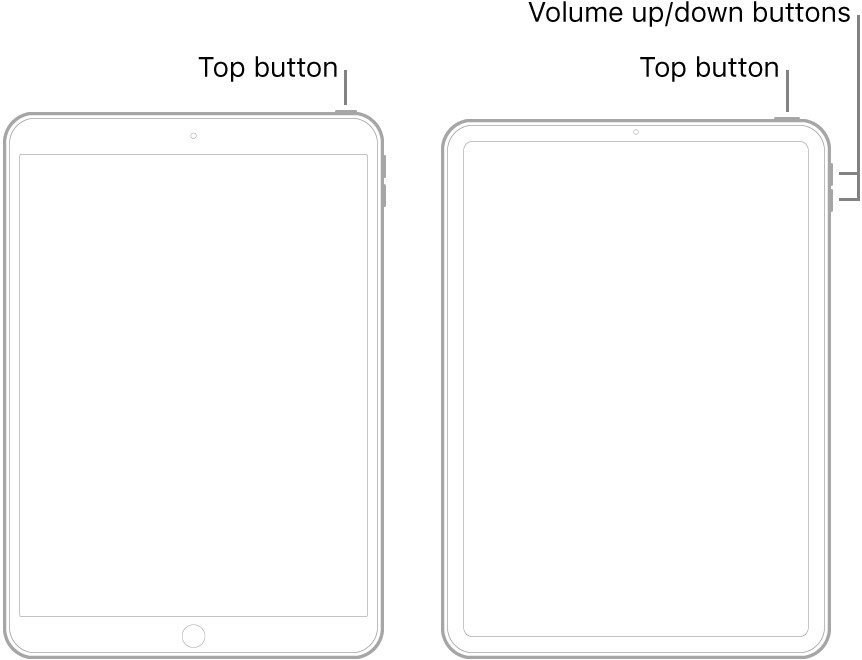 Force restart iPhone to exit Guided Access
2.4. Disabling Guided Access from Settings
You can also disable Guided Access from the Settings app, which is helpful for preventing accidental activation:
- Open Settings: Navigate to the Settings app on your iPhone.
- Go to Accessibility: Scroll down and tap on “Accessibility.”
- Find Guided Access: Scroll to the bottom and tap on “Guided Access.”
- Toggle Off: Switch the “Guided Access” toggle to the off position.
This prevents future accidental activations, ensuring your device operates normally.
3. Troubleshooting When You Can’t Exit Guided Access
Sometimes, you may find yourself in a situation where the standard methods don’t work. This can be due to various reasons, such as a forgotten passcode or a malfunctioning device. In such cases, you’ll need to explore more advanced troubleshooting steps.
3.1. Forgotten Passcode
If you’ve forgotten your Guided Access passcode, you’ll need to erase your device using iTunes or Finder on a computer:
- Connect to a Computer: Connect your iPhone to a computer you’ve previously synced with.
- Open iTunes or Finder: Open iTunes (on older macOS versions or Windows) or Finder (on newer macOS versions).
- Enter Recovery Mode: The steps to enter recovery mode vary depending on your iPhone model:
- For iPhone 8 and later:
- Press and quickly release the Volume Up button.
- Press and quickly release the Volume Down button.
- Press and hold the Side button until you see the recovery mode screen.
- For iPhone 7 and 7 Plus:
- Press and hold both the Side button and the Volume Down button until you see the recovery mode screen.
- For iPhone 6s and earlier:
- Press and hold both the Home button and the Side button until you see the recovery mode screen.
- For iPhone 8 and later:
- Restore iPhone: In iTunes or Finder, you’ll see an option to “Restore.” Click “Restore” to erase your device and install the latest version of iOS.
- Set Up as New: After the restore process, you can set up your iPhone as new or restore from a recent backup.
This method will remove all data from your iPhone, so it’s essential to have a recent backup if possible.
3.2. iPhone is Frozen or Unresponsive
If your iPhone is frozen or unresponsive, a force restart is usually the best solution:
- Perform a Force Restart: Follow the steps outlined in Section 2.3 to force restart your iPhone.
- Try Exiting Guided Access Again: Once the iPhone restarts, try exiting Guided Access using the passcode or Touch ID/Face ID method.
Force restarting can often resolve temporary software glitches that prevent Guided Access from functioning correctly.
3.3. Triple-Click Not Working
If the triple-click gesture isn’t working, ensure the accessibility shortcut is properly configured:
- Open Settings: Go to the Settings app on your iPhone.
- Go to Accessibility: Scroll down and tap on “Accessibility.”
- Accessibility Shortcut: Scroll to the bottom and tap on “Accessibility Shortcut.”
- Select Guided Access: Make sure “Guided Access” is checked in the list of accessibility shortcuts.
- Try Again: Try the triple-click gesture again to see if it now brings up the Guided Access exit screen.
Properly configuring the accessibility shortcut ensures that the triple-click gesture activates Guided Access correctly.
3.4. Battery Drain
In some cases, Guided Access might cause excessive battery drain, especially if the device is stuck. Here’s how to address it:
- Force Restart: Perform a force restart to close unnecessary processes and potentially resolve the battery drain issue.
- Check Battery Health: Go to Settings > Battery > Battery Health to ensure the battery is in good condition.
- Optimize Battery Usage: Adjust settings like screen brightness and background app refresh to conserve battery.
Optimizing battery usage can prevent excessive drain and extend the lifespan of your device.
4. Advanced Techniques for Removing Guided Access
If the standard and troubleshooting methods don’t work, you might need to resort to more advanced techniques. These methods are generally more technical and should be used as a last resort.
4.1. Using iCloud to Mark as Lost
One method involves using iCloud to mark the device as lost, which can sometimes bypass Guided Access:
- Access iCloud: From another device (computer, tablet, or smartphone), go to iCloud.com and sign in with your Apple ID.
- Find My iPhone: Click on “Find My iPhone.”
- Select Device: Select the iPhone that is stuck in Guided Access.
- Mark as Lost: Choose the “Mark as Lost” option.
- Follow Prompts: Follow the on-screen prompts to mark the device as lost. This may involve setting a new passcode.
- Restart iPhone: After marking the device as lost, restart the iPhone to see if it bypasses Guided Access.
This method can be effective if the device is connected to the internet and iCloud is properly configured.
4.2. DFU Restore
A DFU (Device Firmware Update) restore is the most comprehensive type of restore you can perform on an iPhone. It can resolve deep-seated software issues that prevent Guided Access from being removed:
- Connect to a Computer: Connect your iPhone to a computer with iTunes or Finder.
- Enter DFU Mode: The steps to enter DFU mode vary depending on your iPhone model:
- For iPhone 8 and later:
- Press and quickly release the Volume Up button.
- Press and quickly release the Volume Down button.
- Press and hold the Side button until the screen goes black.
- Immediately press and hold both the Side button and the Volume Down button for 5 seconds.
- Release the Side button but continue holding the Volume Down button until iTunes or Finder detects the iPhone in recovery mode.
- For iPhone 7 and 7 Plus:
- Press and hold both the Side button and the Volume Down button for 8 seconds.
- Release the Side button but continue holding the Volume Down button until iTunes or Finder detects the iPhone in recovery mode.
- For iPhone 6s and earlier:
- Press and hold both the Home button and the Side button for 8 seconds.
- Release the Side button but continue holding the Home button until iTunes or Finder detects the iPhone in recovery mode.
- For iPhone 8 and later:
- Restore iPhone: In iTunes or Finder, you’ll see an option to “Restore.” Click “Restore” to erase your device and install the latest version of iOS.
- Set Up as New: After the restore process, set up your iPhone as new.
A DFU restore completely erases the device and reinstalls the firmware, resolving most software-related issues.
4.3. Third-Party Software
There are third-party software solutions that claim to remove Guided Access without data loss. However, use these with caution, as they may pose security risks:
- Research Software: Look for reputable software with positive reviews and a proven track record.
- Download and Install: Download and install the software on your computer.
- Connect iPhone: Connect your iPhone to the computer.
- Follow Instructions: Follow the software’s instructions to remove Guided Access.
Always exercise caution when using third-party software, and ensure you download from trusted sources to avoid malware or other security threats.
5. Preventing Future Issues with Guided Access
To avoid future problems with Guided Access, it’s essential to understand best practices for its use and management. Proper setup and awareness can prevent many common issues.
5.1. Setting a Memorable Passcode
Choose a passcode that is easy for you to remember but difficult for others to guess. Avoid using common passcodes like “1234” or “0000.” Consider using a combination of numbers that is personally significant.
5.2. Enabling Touch ID or Face ID
Enabling Touch ID or Face ID for Guided Access provides a convenient and secure way to exit the mode without needing to remember a passcode. Make sure Touch ID or Face ID is properly configured in your iPhone settings.
5.3. Keeping iOS Updated
Regularly update your iPhone to the latest version of iOS. Software updates often include bug fixes and security enhancements that can improve the stability and reliability of Guided Access.
5.4. Documenting the Passcode
Keep a written record of the Guided Access passcode in a secure location. This can be a physical note stored in a safe place or a digital note stored in a password-protected app.
5.5. Regular Testing
Periodically test the Guided Access feature to ensure it is working correctly and that you can exit the mode without any issues. This can help you identify and address any potential problems before they become major inconveniences.
6. The Importance of Digital Device Management
Effective digital device management is crucial for ensuring devices are used safely and efficiently, whether in educational, professional, or personal settings.
6.1. Establishing Clear Guidelines
Establish clear guidelines for device usage, including rules about appropriate content, screen time limits, and responsible online behavior. These guidelines should be communicated to all users, whether they are students, employees, or family members.
6.2. Implementing Parental Controls
Utilize parental control features to monitor and restrict children’s access to certain apps, websites, and content. These controls can help protect children from inappropriate material and ensure they are using their devices responsibly.
6.3. Educating Users
Educate users about the potential risks associated with digital device usage, such as cyberbullying, online predators, and malware. Provide resources and training to help them stay safe online and make informed decisions.
6.4. Monitoring Device Usage
Regularly monitor device usage to ensure users are following established guidelines and policies. This can involve reviewing browsing history, app usage, and other relevant data.
6.5. Maintaining Device Security
Implement security measures to protect devices from unauthorized access and malware. This can include using strong passwords, enabling two-factor authentication, and installing antivirus software.
7. Real-World Scenarios and Solutions
Understanding how to apply these methods in different real-world scenarios can provide additional clarity and confidence.
7.1. Scenario 1: Classroom Setting
Scenario: A teacher uses Guided Access to lock students into a math app during class. A student accidentally disables the triple-click shortcut and cannot exit Guided Access.
Solution:
- The teacher connects the iPhone to a computer with iTunes.
- The teacher enters recovery mode and restores the iPhone.
- The iPhone is set up as new, and Guided Access is re-enabled with a documented passcode.
7.2. Scenario 2: Home Use
Scenario: A parent uses Guided Access to limit their child to educational apps. The child forgets the passcode, and the parent cannot exit Guided Access.
Solution:
- The parent tries force restarting the iPhone.
- If force restarting doesn’t work, the parent uses iCloud to mark the device as lost.
- The parent follows the prompts to set a new passcode and restart the iPhone.
7.3. Scenario 3: Retail Environment
Scenario: A retail store uses an iPad in Guided Access to display a customer survey. The iPad freezes, and the staff cannot exit Guided Access.
Solution:
- The staff performs a DFU restore on the iPad.
- The iPad is set up as new, and the survey app is reinstalled.
- Guided Access is re-enabled with a documented passcode, and the accessibility shortcut is verified.
8. Legal and Ethical Considerations
When managing digital devices, it’s crucial to consider the legal and ethical implications, especially regarding privacy and consent.
8.1. Privacy
Respect users’ privacy by only monitoring device usage when necessary and with their knowledge and consent. Avoid accessing personal information without permission.
8.2. Consent
Obtain informed consent from users before implementing any monitoring or restriction policies. Explain the reasons for the policies and how they will be enforced.
8.3. Compliance
Ensure that your device management policies comply with all applicable laws and regulations, including privacy laws and child protection laws.
8.4. Transparency
Be transparent about your device management practices and provide users with access to information about their rights and responsibilities.
8.5. Ethical Use
Use device management tools and features ethically and responsibly, with the goal of promoting safe and productive device usage. Avoid using these tools to control or manipulate users.
9. Expert Insights on Guided Access and Device Management
Experts in the fields of education, technology, and security offer valuable insights on Guided Access and digital device management.
9.1. Educational Perspective
Educators emphasize the importance of using Guided Access to create focused learning environments. They recommend setting clear expectations and providing students with the necessary support to use the feature effectively.
9.2. Technology Perspective
Technology experts highlight the importance of keeping devices updated and implementing security measures to protect against malware and unauthorized access. They also recommend using strong passwords and enabling two-factor authentication.
9.3. Security Perspective
Security experts caution against the risks associated with third-party software and recommend only downloading apps from trusted sources. They also advise users to be cautious about sharing personal information online and to be aware of the potential for phishing and other scams.
10. CONDUCT.EDU.VN: Your Resource for Digital Ethics and Compliance
Navigating the complexities of digital device management requires a comprehensive understanding of ethical guidelines, legal compliance, and best practices. At CONDUCT.EDU.VN, we offer a wealth of resources to help you establish and maintain a safe and productive digital environment.
10.1. Comprehensive Guides
Our website features detailed guides on various aspects of digital ethics, including privacy, consent, and responsible device usage. These guides provide practical advice and actionable steps to help you navigate challenging situations.
10.2. Expert Insights
We bring together insights from leading experts in education, technology, and security to offer you a well-rounded perspective on digital device management. Our experts share their knowledge and experience to help you make informed decisions.
10.3. Customizable Policies
We provide customizable policy templates that you can adapt to your specific needs and circumstances. These templates cover a range of topics, including acceptable use policies, privacy policies, and child protection policies.
10.4. Training Resources
We offer a variety of training resources to help you educate users about digital ethics and responsible device usage. These resources include videos, articles, and interactive modules.
10.5. Ongoing Support
Our team of experts is available to provide ongoing support and guidance as you navigate the ever-changing landscape of digital ethics and compliance. We are committed to helping you create a safe and productive digital environment for all users.
If you’re struggling to implement ethical guidelines or need assistance with digital device management, visit CONDUCT.EDU.VN for more information. Our comprehensive resources can provide the clarity and support you need to foster a responsible and secure digital environment.
For more information, contact us at:
- Address: 100 Ethics Plaza, Guideline City, CA 90210, United States
- WhatsApp: +1 (707) 555-1234
- Website: CONDUCT.EDU.VN
11. FAQs About Removing iPhone from Guided Access
Here are some frequently asked questions about removing iPhone from Guided Access:
- What is Guided Access, and why is it used?
- Guided Access is an accessibility feature that restricts an iPhone to a single app, enhancing focus and security. It’s used in education, therapy, retail, and home settings.
- How do I exit Guided Access using the passcode?
- Triple-click the side or Home button, enter the Guided Access passcode, and tap “End.”
- Can I use Touch ID or Face ID to exit Guided Access?
- Yes, if enabled, triple-click the side or Home button and authenticate with your fingerprint or facial recognition.
- What should I do if my iPhone is frozen in Guided Access?
- Perform a force restart: Press and quickly release the Volume Up button, press and quickly release the Volume Down button, then press and hold the Side button until the Apple logo appears.
- What if I’ve forgotten my Guided Access passcode?
- Connect your iPhone to a computer, enter recovery mode, and restore the device using iTunes or Finder.
- Why is the triple-click gesture not working to exit Guided Access?
- Ensure the accessibility shortcut is properly configured by going to Settings > Accessibility > Accessibility Shortcut and selecting “Guided Access.”
- Is there a way to disable Guided Access from settings?
- Yes, go to Settings > Accessibility > Guided Access and toggle the “Guided Access” switch to the off position.
- Can I use iCloud to remove Guided Access?
- Yes, by marking the device as lost in iCloud, you can sometimes bypass Guided Access after restarting the iPhone.
- What is a DFU restore, and how does it help?
- A DFU (Device Firmware Update) restore is the most comprehensive type of restore, which can resolve deep-seated software issues by completely erasing and reinstalling the firmware.
- Are there third-party software options to remove Guided Access?
- Yes, but use them with caution, as they may pose security risks. Research the software and download from trusted sources.
12. Staying Informed About iPhone Accessibility Features
Keeping up-to-date with the latest iPhone accessibility features can help you make the most of your device and provide support to others who may benefit from these tools.
12.1. Apple Support Website
The Apple Support website is a valuable resource for learning about iPhone accessibility features. You can find detailed articles, tutorials, and troubleshooting tips.
12.2. Apple Accessibility Events
Attend Apple accessibility events to learn about new features and hear from experts in the field. These events often include demonstrations and hands-on workshops.
12.3. Online Forums and Communities
Join online forums and communities dedicated to iPhone accessibility. These platforms provide a space for users to share tips, ask questions, and offer support to one another.
12.4. Social Media
Follow Apple and accessibility advocates on social media to stay informed about the latest news and updates. Social media can be a quick and easy way to learn about new features and events.
12.5. Accessibility Blogs and Newsletters
Subscribe to accessibility blogs and newsletters to receive regular updates on iPhone accessibility features. These resources often provide in-depth analysis and practical tips.
By staying informed about iPhone accessibility features, you can help create a more inclusive and accessible digital world for everyone. Remember, conduct.edu.vn is here to support you with resources and guidance to navigate these topics effectively.