Resetting Guided Access on your iPad can be a lifesaver when you’re locked out or the feature malfunctions. Guided Access, a powerful tool for focusing attention on a single app, can sometimes become a source of frustration if you forget the passcode or encounter unexpected issues. At CONDUCT.EDU.VN, we provide clear, step-by-step instructions to help you regain control of your device, ensuring a smooth and hassle-free experience. Learn how to reset your iPad, disable Guided Access, and troubleshoot common problems with our detailed guides, including accessibility settings and parental controls.
1. Understanding Guided Access on iPad
Guided Access is a feature on iPads, iPhones, and iPod Touches designed to help users stay focused on a specific task or app. It’s particularly useful for individuals with attention and sensory challenges, as well as for parents who want to limit their child’s access to certain apps or features. By enabling Guided Access, you can disable the Home button (or gestures on devices without a Home button) and restrict access to certain areas of the screen. This prevents users from navigating away from the intended app or making unintended changes.
1.1 What is Guided Access?
Guided Access is an accessibility feature that restricts an iOS device to a single app. It allows you to disable hardware buttons, touch input on specific screen areas, and set time limits for usage. This feature is beneficial in various scenarios:
- For children: Parents can use Guided Access to lock their children into educational apps or games, preventing them from accessing other apps or making in-app purchases unintentionally.
- For individuals with cognitive disabilities: Caregivers can use Guided Access to simplify the iPad experience for individuals with cognitive disabilities, reducing distractions and promoting focus.
- For public kiosks: Businesses can use Guided Access to turn iPads into dedicated kiosks for specific tasks, such as displaying product information or collecting customer feedback.
- For presentations: Speakers can use Guided Access to prevent accidental interruptions during presentations or demonstrations.
1.2 Benefits of Using Guided Access
Guided Access offers several benefits, making it a valuable tool for various users:
- Improved focus: By restricting access to a single app, Guided Access helps users stay focused on the task at hand, minimizing distractions and improving productivity.
- Enhanced security: Guided Access can prevent unauthorized access to sensitive information or settings, protecting your privacy and security.
- Simplified user experience: For individuals with cognitive disabilities or limited technical skills, Guided Access can simplify the iPad experience, making it more accessible and user-friendly.
- Parental control: Parents can use Guided Access to limit their children’s access to inappropriate content or prevent them from making unintended purchases.
- Customizable restrictions: Guided Access allows you to customize the restrictions based on your specific needs, such as disabling certain hardware buttons or touch input on specific screen areas.
1.3 Common Scenarios Where Guided Access is Useful
Guided Access can be particularly useful in the following scenarios:
- Educational settings: Teachers can use Guided Access to lock students into educational apps during class time, ensuring that they stay focused on their lessons.
- Therapeutic settings: Therapists can use Guided Access to help individuals with autism or ADHD stay focused during therapy sessions.
- Museums and exhibitions: Museums can use Guided Access to provide interactive exhibits on iPads, preventing visitors from accessing other apps or settings.
- Restaurants and cafes: Restaurants can use Guided Access to display menus or collect orders on iPads, preventing customers from accessing other apps or browsing the internet.
- Retail stores: Retailers can use Guided Access to create interactive product displays on iPads, preventing customers from accessing other apps or changing settings.
 An iPad displaying a restricted access message, indicating Guided Access is enabled and limiting functionality.
2. Reasons for Resetting Guided Access
There are several reasons why you might need to reset Guided Access on your iPad:
- Forgotten Passcode: The most common reason is forgetting the Guided Access passcode. If you enter the wrong passcode too many times, the device may become temporarily disabled.
- Malfunctioning Feature: Sometimes, Guided Access may malfunction due to software glitches or bugs. This can result in the device being stuck in Guided Access mode, even after entering the correct passcode.
- Incorrect Settings: If you accidentally configure Guided Access with restrictive settings, such as disabling all hardware buttons or touch input, you may need to reset the feature to regain control of your device.
- Third-Party Interference: In rare cases, third-party apps or jailbreak tweaks may interfere with Guided Access, causing it to malfunction or become unresponsive.
- Device Reset: If you’re selling or giving away your iPad, you may want to reset Guided Access to ensure that the new owner doesn’t encounter any issues with the feature.
2.1 Forgetting the Guided Access Passcode
One of the most common reasons for needing to reset Guided Access is forgetting the passcode. This can happen if you don’t use the feature frequently or if you set a complex passcode that’s difficult to remember. When you forget the passcode, you’ll be locked out of Guided Access and unable to exit the single-app mode.
2.2 Device Stuck in Guided Access Mode
Another frustrating situation is when your iPad gets stuck in Guided Access mode, even if you know the passcode. This can occur due to software glitches, bugs, or incorrect settings. When this happens, you may be unable to exit Guided Access, even after entering the correct passcode multiple times.
2.3 Unexpected Errors and Glitches
Like any software feature, Guided Access is susceptible to unexpected errors and glitches. These can manifest in various ways, such as the feature not activating properly, restrictions not working as expected, or the device becoming unresponsive. In such cases, resetting Guided Access may be necessary to resolve the issue.
3. Preliminary Steps Before Resetting
Before attempting to reset Guided Access, try these preliminary steps to see if they resolve the issue:
- Triple-Click the Side or Home Button: The standard method to exit Guided Access is to triple-click the Side button (on iPads without a Home button) or the Home button (on iPads with a Home button). If this works, you’ll be prompted to enter the Guided Access passcode.
- Enter the Correct Passcode: Make sure you’re entering the correct Guided Access passcode. If you’ve forgotten the passcode, try any passcodes you might have used in the past.
- Restart Your iPad: A simple restart can often resolve minor software glitches. To restart your iPad, press and hold the power button until the power-off slider appears. Drag the slider to turn off your device, then press and hold the power button again to turn it back on.
- Check Accessibility Settings: Ensure that Guided Access is enabled in the Accessibility settings. Go to Settings > Accessibility > Guided Access and make sure the toggle is turned on.
- Check Hardware Buttons: If you’ve disabled hardware buttons in Guided Access settings, try re-enabling them to see if that resolves the issue.
3.1 Trying the Triple-Click Method
The first and simplest method to try is the triple-click method. This involves quickly pressing the Side button (on iPads without a Home button) or the Home button (on iPads with a Home button) three times in rapid succession. This should bring up the Guided Access passcode screen, allowing you to enter the passcode and exit Guided Access.
3.2 Ensuring the Correct Passcode is Entered
Before resorting to more drastic measures, double-check that you’re entering the correct Guided Access passcode. It’s easy to make mistakes when entering passcodes, especially if you’re stressed or frustrated. Make sure you’re entering the passcode accurately and that Caps Lock is turned off if you’re using a keyboard.
3.3 Basic Troubleshooting: Restarting Your iPad
A simple restart can often resolve minor software glitches that may be causing issues with Guided Access. To restart your iPad, follow these steps:
- Press and hold the power button (located on the top or side of the device) until the power-off slider appears.
- Drag the slider to turn off your device.
- Wait for a few seconds, then press and hold the power button again until the Apple logo appears.
- Your iPad will now restart, and you can try exiting Guided Access again.
4. Hard Reset Methods for iPad
If the preliminary steps don’t work, you may need to perform a hard reset on your iPad. A hard reset forces the device to restart, which can sometimes resolve more stubborn software issues. There are different methods for performing a hard reset, depending on whether your iPad has a Home button or not.
4.1 For iPads With a Home Button
If your iPad has a Home button, follow these steps to perform a hard reset:
- Press and hold both the Home button and the Power button (located on the top or side of the device) simultaneously.
- Continue holding both buttons until the Apple logo appears on the screen.
- Release both buttons.
- Your iPad will now restart, and you can try exiting Guided Access again.
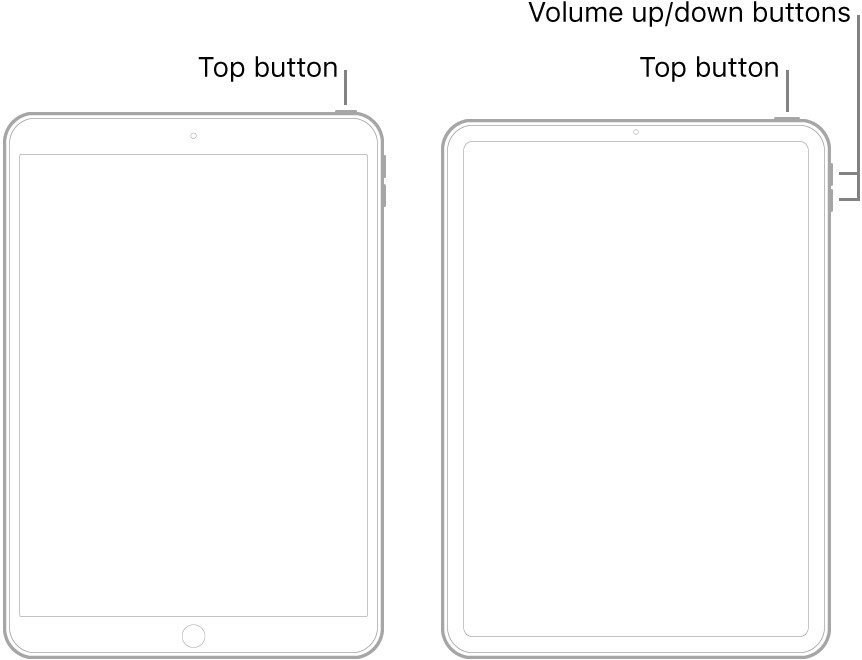
4.2 For iPads Without a Home Button
If your iPad doesn’t have a Home button, follow these steps to perform a hard reset:
- Press and quickly release the Volume Up button.
- Press and quickly release the Volume Down button.
- Press and hold the Power button (located on the top or side of the device) until the Apple logo appears on the screen.
- Release the Power button.
- Your iPad will now restart, and you can try exiting Guided Access again.
4.3 Step-by-Step Guide to Force Restart
Here’s a more detailed step-by-step guide to force restart your iPad, regardless of whether it has a Home button or not:
- Identify Your iPad Model: Determine whether your iPad has a Home button or not. This will determine the specific button combination you need to use.
- Prepare for the Restart: Make sure your iPad is charged or connected to a power source. A hard reset can drain the battery, so it’s best to have your device plugged in.
- Press the Correct Buttons:
- For iPads with a Home button: Press and hold both the Home button and the Power button simultaneously.
- For iPads without a Home button: Press and quickly release the Volume Up button, press and quickly release the Volume Down button, then press and hold the Power button.
- Wait for the Apple Logo: Continue holding the button(s) until the Apple logo appears on the screen. This may take several seconds.
- Release the Button(s): Once the Apple logo appears, release the button(s).
- Wait for the iPad to Restart: Your iPad will now restart automatically. This may take a few minutes.
- Try Exiting Guided Access: Once your iPad has restarted, try exiting Guided Access using the triple-click method or by entering the passcode.
5. Using iTunes or Finder to Restore Your iPad
If a hard reset doesn’t resolve the issue, you may need to restore your iPad using iTunes (on older macOS versions) or Finder (on newer macOS versions). This process will erase all data on your iPad and restore it to its factory settings. Therefore, it’s essential to back up your iPad before proceeding with this method.
5.1 Backing Up Your iPad Before Restoring
Before restoring your iPad, create a backup of your data to avoid losing any important information. You can back up your iPad using iCloud or iTunes/Finder.
Backing Up with iCloud:
- Connect your iPad to a Wi-Fi network.
- Go to Settings > [Your Name] > iCloud > iCloud Backup.
- Tap Back Up Now.
- Make sure the iCloud Backup toggle is turned on.
Backing Up with iTunes/Finder:
- Connect your iPad to your computer using a USB cable.
- Open iTunes (on older macOS versions) or Finder (on newer macOS versions).
- Select your iPad from the list of devices.
- Click Back Up Now.
- Choose whether to encrypt your backup.
5.2 Steps to Restore Your iPad via iTunes or Finder
Once you’ve backed up your iPad, follow these steps to restore it using iTunes or Finder:
- Connect your iPad to your computer using a USB cable.
- Open iTunes (on older macOS versions) or Finder (on newer macOS versions).
- Put your iPad into recovery mode:
- For iPads with a Home button: Press and hold both the Home button and the Power button simultaneously until the recovery mode screen appears.
- For iPads without a Home button: Press and quickly release the Volume Up button, press and quickly release the Volume Down button, then press and hold the Power button until the recovery mode screen appears.
- In iTunes/Finder, you’ll see a message saying that there’s a problem with your iPad and that it needs to be updated or restored.
- Click Restore.
- Follow the on-screen instructions to restore your iPad to its factory settings.
- Once the restoration is complete, you can restore your data from the backup you created earlier.
5.3 Restoring from a Backup After Reset
After restoring your iPad to its factory settings, you’ll be prompted to set it up as a new device or restore it from a backup. Choose the option to restore from a backup and select the backup you created earlier. This will restore your data, settings, and apps to your iPad.
6. Using iCloud to Mark Your Device as Lost
If you’ve tried all the above methods and your iPad is still stuck in Guided Access, you can try using iCloud to mark your device as lost. This will remotely lock your iPad and may help you regain control.
6.1 Accessing iCloud Find My iPhone Feature
To use iCloud to mark your device as lost, follow these steps:
- Go to the iCloud website (www.icloud.com) on a computer or another device.
- Sign in with your Apple ID and password.
- Click Find iPhone.
- Select your iPad from the list of devices.
6.2 Marking the iPad as Lost and Erasing Data Remotely
Once you’ve selected your iPad in Find iPhone, you’ll see several options:
- Play Sound: This will make your iPad play a loud sound, which can be helpful if you’ve misplaced it nearby.
- Mark as Lost: This will remotely lock your iPad with a passcode and display a custom message on the screen.
- Erase iPad: This will remotely erase all data on your iPad, including your personal information and settings.
To try and resolve the Guided Access issue, try marking your iPad as lost first. This will lock the device and may force it to exit Guided Access mode. If that doesn’t work, you can try erasing the iPad remotely. However, keep in mind that this will erase all data on your device.
7. Preventing Guided Access Issues in the Future
To prevent Guided Access issues from recurring in the future, consider the following tips:
- Set a Memorable Passcode: Choose a Guided Access passcode that you can easily remember, but that is also secure enough to prevent unauthorized access.
- Write Down the Passcode: Keep a written record of your Guided Access passcode in a safe place.
- Use Touch ID or Face ID: If your iPad supports Touch ID or Face ID, enable these features for Guided Access to avoid having to enter the passcode manually.
- Keep Your iPad Updated: Install the latest iOS updates to ensure that you have the latest bug fixes and security patches.
- Avoid Third-Party Apps That Interfere with Guided Access: Be cautious when installing third-party apps that may interfere with Guided Access functionality.
7.1 Setting a Memorable and Secure Passcode
One of the best ways to prevent Guided Access issues is to set a passcode that’s both memorable and secure. Avoid using simple passcodes like “1234” or “0000,” as these are easy to guess. Instead, choose a passcode that’s at least six digits long and includes a combination of numbers, letters, and symbols.
7.2 Regularly Updating Your iPad’s Software
Keeping your iPad’s software up to date is crucial for maintaining its stability and security. Apple regularly releases iOS updates that include bug fixes, security patches, and performance improvements. These updates can help prevent Guided Access issues and other software glitches.
7.3 Disabling Guided Access When Not in Use
When you’re not actively using Guided Access, it’s a good idea to disable the feature. This can prevent accidental activation and reduce the risk of getting locked out. To disable Guided Access, go to Settings > Accessibility > Guided Access and turn the toggle off.
8. Understanding Guided Access Settings
Familiarizing yourself with the Guided Access settings can help you customize the feature to your specific needs and prevent potential issues.
8.1 Configuring Time Limits and Restrictions
Guided Access allows you to set time limits for how long the feature can be used. This can be useful for parents who want to limit their children’s screen time or for individuals who want to stay focused on a task for a specific period. You can also configure restrictions, such as disabling hardware buttons or touch input on specific screen areas.
8.2 Enabling and Disabling Hardware Buttons
In Guided Access settings, you can choose to enable or disable various hardware buttons, such as the Volume buttons, the Sleep/Wake button, and the Home button (on iPads with a Home button). Disabling these buttons can prevent users from accidentally exiting Guided Access or changing the volume.
8.3 Setting Specific Screen Areas as Inactive
Guided Access also allows you to set specific screen areas as inactive. This can be useful for preventing users from accidentally tapping on certain buttons or links. To set a screen area as inactive, simply draw a circle or rectangle around the area you want to disable.
9. Advanced Troubleshooting Tips
If you’ve tried all the above methods and your iPad is still stuck in Guided Access, here are some advanced troubleshooting tips:
- Try a Different Apple ID: If you have multiple Apple IDs, try signing in with a different one to see if that resolves the issue.
- Contact Apple Support: If all else fails, contact Apple Support for assistance. They may be able to provide additional troubleshooting steps or offer a repair solution.
- Visit an Apple Store: If you have an Apple Store nearby, you can bring your iPad in for a diagnostic assessment. An Apple technician may be able to identify and resolve the issue.
9.1 When to Seek Professional Help
If you’ve exhausted all troubleshooting options and your iPad is still stuck in Guided Access, it may be time to seek professional help. Contact Apple Support or visit an Apple Store for assistance. They have specialized tools and expertise to diagnose and resolve complex issues.
9.2 Understanding Apple’s Support Options
Apple offers various support options, including online chat, phone support, and in-person service at Apple Stores. You can find more information about Apple’s support options on the Apple Support website.
10. Guided Access and Accessibility
Guided Access is an important accessibility feature that can benefit individuals with a variety of needs.
10.1 How Guided Access Aids Users with Special Needs
Guided Access can be particularly helpful for individuals with cognitive disabilities, autism, or ADHD. By restricting access to a single app and disabling distractions, Guided Access can help these users stay focused and engaged.
10.2 Integrating Guided Access with Other Accessibility Features
Guided Access can be used in conjunction with other accessibility features, such as VoiceOver, Zoom, and Switch Control, to create a customized and accessible iPad experience.
11. Guided Access in Educational Settings
Guided Access is a valuable tool in educational settings, allowing teachers to create a focused and distraction-free learning environment.
11.1 Using Guided Access to Focus Students’ Attention
Teachers can use Guided Access to lock students into educational apps during class time, ensuring that they stay focused on their lessons and don’t get distracted by other apps or websites.
11.2 Creating a Distraction-Free Testing Environment
Guided Access can also be used to create a distraction-free testing environment. By disabling access to the internet, email, and other apps, teachers can ensure that students are only using the resources provided for the test.
12. Guided Access for Business and Retail
Guided Access can be used in business and retail settings to create interactive kiosks or product displays.
12.1 Setting Up Interactive Kiosks with Guided Access
Businesses can use Guided Access to turn iPads into dedicated kiosks for specific tasks, such as displaying product information, collecting customer feedback, or processing transactions.
12.2 Enhancing Customer Experience with Focused Apps
By using Guided Access to focus customers on specific apps or tasks, businesses can enhance the customer experience and improve efficiency.
13. Guided Access Alternatives
While Guided Access is a useful feature, there are alternative methods to consider based on your specific needs.
13.1 Exploring Parental Control Apps
Parental control apps offer a wider range of features for monitoring and limiting device usage, including web filtering, app blocking, and time limits. These apps can provide more comprehensive control over your child’s iPad usage compared to Guided Access. Examples include:
- Qustodio: Offers web filtering, app blocking, time limits, and location tracking.
- Net Nanny: Features web filtering, app blocking, social media monitoring, and screen time management.
- Norton Family: Provides web filtering, app blocking, time limits, location tracking, and activity reports.
13.2 Utilizing Screen Time for Device Management
Screen Time, a built-in feature on iOS devices, allows you to monitor and manage your own or your child’s device usage. It offers features such as:
- App Limits: Set daily time limits for specific apps or categories of apps.
- Downtime: Schedule periods of time when certain apps are unavailable.
- Content & Privacy Restrictions: Block access to specific websites, apps, or content.
Screen Time can be a useful alternative to Guided Access for managing overall device usage and setting healthy digital habits.
13.3 Comparing Features and Limitations
When choosing between Guided Access, parental control apps, and Screen Time, consider the following factors:
| Feature | Guided Access | Parental Control Apps | Screen Time |
|---|---|---|---|
| Single-app restriction | Yes | Yes (in some apps) | No |
| Web filtering | No | Yes | Yes |
| App blocking | No | Yes | Yes |
| Time limits | Yes | Yes | Yes |
| Location tracking | No | Yes | No |
| Activity reports | No | Yes | Yes |
| Ease of use | Simple | Moderate | Moderate |
| Cost | Free | Paid | Free |
Based on your specific needs and priorities, you can choose the most appropriate method for managing device usage on your iPad.
14. Real-World Examples and Case Studies
To illustrate the practical applications of Guided Access, here are some real-world examples and case studies:
- Case Study 1: A Child with Autism: A parent uses Guided Access to lock their child with autism into a educational app, preventing them from getting distracted by other apps or websites. This helps the child stay focused and engaged with the learning material.
- Case Study 2: A Museum Exhibit: A museum uses Guided Access to create an interactive exhibit on an iPad. Visitors can explore the exhibit without accidentally accessing other apps or settings on the device.
- Case Study 3: A Retail Store Kiosk: A retail store uses Guided Access to turn an iPad into a product information kiosk. Customers can browse product details and place orders without accessing other apps or browsing the internet.
15. Staying Informed About iOS Updates
Apple regularly releases iOS updates that include bug fixes, security patches, and new features. Staying informed about these updates is crucial for maintaining the stability and security of your iPad.
15.1 How to Check for and Install Updates
To check for and install iOS updates, follow these steps:
- Go to Settings > General > Software Update.
- Your iPad will automatically check for available updates.
- If an update is available, tap Download and Install.
- Follow the on-screen instructions to install the update.
15.2 Understanding Update Release Notes
Before installing an iOS update, it’s a good idea to read the release notes. These notes provide information about the changes included in the update, such as bug fixes, security patches, and new features. You can find the release notes on Apple’s website or in the Software Update settings.
16. The Importance of Following Security Best Practices
In addition to using Guided Access and keeping your iPad updated, it’s essential to follow general security best practices to protect your device and your personal information.
16.1 Using Strong Passwords and Two-Factor Authentication
Use strong, unique passwords for all your online accounts. A strong password should be at least 12 characters long and include a combination of numbers, letters, and symbols. Enable two-factor authentication whenever possible to add an extra layer of security to your accounts.
16.2 Being Cautious of Phishing Attempts
Be cautious of phishing attempts, which are emails or messages that try to trick you into giving up your personal information. Never click on links or open attachments from unknown senders.
17. Frequently Asked Questions (FAQ)
1. What is Guided Access on iPad?
Guided Access is an accessibility feature that restricts an iOS device to a single app, allowing you to disable hardware buttons and touch input on specific screen areas.
2. How do I enable Guided Access?
Go to Settings > Accessibility > Guided Access and turn the toggle on.
3. How do I start a Guided Access session?
Open the app you want to use in Guided Access, then triple-click the Side button (on iPads without a Home button) or the Home button (on iPads with a Home button).
4. How do I exit Guided Access?
Triple-click the Side button or Home button, then enter the Guided Access passcode.
5. What if I forget the Guided Access passcode?
Try the hard reset methods described in this article. If that doesn’t work, you may need to restore your iPad using iTunes or Finder.
6. Can I use Guided Access with other accessibility features?
Yes, Guided Access can be used in conjunction with other accessibility features, such as VoiceOver, Zoom, and Switch Control.
7. Is Guided Access available on all iPads?
Yes, Guided Access is available on all iPads running iOS 6 or later.
8. Can I set a time limit for Guided Access?
Yes, you can set a time limit for how long Guided Access can be used.
9. How do I disable hardware buttons in Guided Access?
In Guided Access settings, you can choose to enable or disable various hardware buttons, such as the Volume buttons, the Sleep/Wake button, and the Home button.
10. Can I set specific screen areas as inactive in Guided Access?
Yes, you can set specific screen areas as inactive by drawing a circle or rectangle around the area you want to disable.
18. Conclusion: Mastering Guided Access on Your iPad
Guided Access is a powerful feature that can enhance focus, security, and accessibility on your iPad. By understanding its settings, troubleshooting common issues, and following security best practices, you can master Guided Access and use it to its full potential. Remember, if you ever encounter difficulties, CONDUCT.EDU.VN is here to provide clear, step-by-step guidance. Whether you’re dealing with a forgotten passcode or a malfunctioning feature, our resources are designed to help you regain control and optimize your iPad experience. For more detailed information and additional support, visit CONDUCT.EDU.VN or contact us at 100 Ethics Plaza, Guideline City, CA 90210, United States. You can also reach us via Whatsapp at +1 (707) 555-1234.
Navigating the world of digital devices and ensuring they serve our needs effectively requires knowledge and understanding. At conduct.edu.vn, we’re committed to providing you with the information you need to make the most of your technology while adhering to the highest standards of ethical conduct.