Guided Access on iPhone can be a helpful feature, but How To Shut Off Guided Access On Iphone becomes crucial when you need to regain full control of your device. This comprehensive guide from CONDUCT.EDU.VN will walk you through the process of disabling Guided Access, covering various scenarios and providing troubleshooting tips. Master this feature to enhance your iPhone experience, ensuring smooth operation and accessibility settings tailored to your needs.
1. Understanding Guided Access on iPhone
Guided Access is a built-in accessibility feature on iPhones, iPads, and iPod touch devices. It allows you to lock your device into a single app, disabling the Home button (or gestures on newer iPhones), volume buttons, and other features. This is particularly useful in situations where you want to:
- Limit a child’s access: If you’re letting a child use your iPhone to play a game or watch a video, Guided Access prevents them from accidentally navigating to other apps or making unwanted changes to your settings.
- Focus on a specific task: When you need to concentrate on a single app, such as reading an article or giving a presentation, Guided Access can minimize distractions by preventing accidental gestures or button presses.
- Create a kiosk mode: In retail environments or at events, Guided Access can lock an iPhone or iPad to a specific app, turning it into a dedicated kiosk for displaying information or collecting data.
However, there are times when you need to disable Guided Access, and knowing how to do so quickly and easily is essential. Let’s explore the different methods for turning off Guided Access on your iPhone.
2. Step-by-Step Guide: How to Shut Off Guided Access on iPhone Using Passcode
The most common method for disabling Guided Access involves using the passcode you set up when you first enabled the feature. Here’s how to do it:
2.1. The Triple-Click Method
- Triple-click the Side or Home button: Depending on your iPhone model, you’ll need to triple-click either the Side button (on iPhone X and later) or the Home button (on iPhone 8 and earlier). The Side button is the elongated button on the right side of your iPhone, while the Home button is the circular button at the bottom center of your device.
- Enter your Guided Access passcode: After triple-clicking the button, a screen will appear prompting you to enter your Guided Access passcode. This is the passcode you set up specifically for Guided Access, which may or may not be the same as your iPhone’s regular passcode.
- Tap “End”: Once you’ve entered the correct passcode, you’ll see the Guided Access options menu. Tap the “End” button in the upper-left corner of the screen to disable Guided Access and return to normal iPhone operation.
2.2. What if I Forgot My Guided Access Passcode?
Forgetting your Guided Access passcode can be frustrating, but there are ways to recover access to your device.
-
Try Default Passcodes: Before attempting more complex solutions, try entering common or default passcodes. Some users set their Guided Access passcode to “0000” or “1234.” If you’ve ever used a similar simple passcode, it’s worth trying those first.
-
Attempt Passcode Combinations: If you have a general idea of what your passcode might be (e.g., a familiar number or date), try various combinations. However, avoid excessive guessing to prevent your device from being disabled for too long.
-
Restore Your iPhone: If you cannot recall your Guided Access passcode, the most reliable method is to restore your iPhone to its factory settings. This process will erase all data on your device, including the Guided Access settings. To restore your iPhone:
- Connect your iPhone to a computer with iTunes (or Finder on macOS Catalina and later).
- Put your iPhone into recovery mode. The process varies depending on your iPhone model:
- iPhone 8 or later: Press and quickly release the Volume Up button, press and quickly release the Volume Down button, then press and hold the Side button until you see the recovery mode screen.
- iPhone 7 and iPhone 7 Plus: Press and hold both the Side button and the Volume Down button at the same time. Keep holding them until you see the recovery mode screen.
- iPhone 6s and earlier: Press and hold both the Home button and the Side button at the same time. Keep holding them until you see the recovery mode screen.
- In iTunes or Finder, you’ll see a message saying there’s a problem with your iPhone that requires it to be updated or restored. Choose “Restore.”
- Follow the on-screen instructions to restore your iPhone to its factory settings.
- Once the restoration is complete, you can set up your iPhone as new or restore it from a backup (if you have one).
-
Prevent Future Lockouts: To avoid forgetting your Guided Access passcode in the future, consider these tips:
- Store the Passcode Securely: Use a password manager or a secure note app to store your Guided Access passcode. Ensure the app is protected with a strong password or biometric authentication.
- Use a Memorable Passcode: Choose a passcode that is easy for you to remember but difficult for others to guess. Avoid using obvious numbers like your birthdate or the last four digits of your phone number.
- Write It Down (and Store Securely): If you prefer to write down your passcode, keep it in a safe place away from your iPhone. Ensure that others cannot easily access it.
- Consider Face ID/Touch ID: If your iPhone supports Face ID or Touch ID, enable these options for Guided Access. This will allow you to bypass the passcode entirely.
3. Step-by-Step Guide: How to Shut Off Guided Access on iPhone Using Touch ID or Face ID
If you’ve enabled Touch ID or Face ID for Guided Access, you can use these biometric methods to disable the feature instead of entering a passcode.
3.1. Using Touch ID (iPhone 8 and earlier)
- Triple-click the Home button: As with the passcode method, start by triple-clicking the Home button on your iPhone.
- Authenticate with Touch ID: Instead of being prompted for a passcode, your iPhone will ask you to authenticate using Touch ID. Place your finger on the Home button, ensuring that your fingerprint is recognized.
- Tap “End”: Once your fingerprint is authenticated, the Guided Access options menu will appear. Tap the “End” button to disable Guided Access.
3.2. Using Face ID (iPhone X and later)
- Triple-click the Side button: Triple-click the Side button on your iPhone to bring up the Guided Access options.
- Authenticate with Face ID: Your iPhone will automatically attempt to recognize your face. Make sure you’re looking at the screen and that your face is clearly visible.
- Tap “End”: Once Face ID recognizes you, the Guided Access options menu will appear. Tap the “End” button to turn off Guided Access.
4. What to Do If Your iPhone Is Stuck in Guided Access Mode
In some cases, your iPhone may become stuck in Guided Access mode, and the triple-click method may not work. This can be caused by software glitches or hardware issues. Here are some troubleshooting steps you can try:
4.1. Force Restart Your iPhone
Force restarting your iPhone can often resolve minor software glitches that may be causing the issue. The process for force restarting varies depending on your iPhone model:
- iPhone 8 or later: Press and quickly release the Volume Up button, press and quickly release the Volume Down button, then press and hold the Side button until you see the Apple logo.
- iPhone 7 and iPhone 7 Plus: Press and hold both the Side button and the Volume Down button at the same time. Keep holding them until you see the Apple logo.
- iPhone 6s and earlier: Press and hold both the Home button and the Side button at the same time. Keep holding them until you see the Apple logo.
4.2. Try Entering the Passcode Blindly
If the screen is not responding properly, you can try entering your Guided Access passcode blindly. Here’s how:
- Triple-click the Side or Home button: Attempt to bring up the passcode screen by triple-clicking the appropriate button.
- Tap the Passcode Digits: Carefully tap the area where the passcode digits would normally appear on the screen. Try to remember the location of each digit and tap them in the correct order.
- Tap “End”: After entering the passcode, tap the area where the “End” button would normally be located.
4.3. Connect to iTunes or Finder and Restore Your iPhone
If all other methods fail, you may need to connect your iPhone to a computer and restore it using iTunes (or Finder on macOS Catalina and later). This process will erase all data on your device, so it should be used as a last resort.
- Connect your iPhone to a computer: Use a USB cable to connect your iPhone to a computer with iTunes or Finder installed.
- Put your iPhone into recovery mode: Follow the steps outlined earlier in this guide to put your iPhone into recovery mode.
- Restore Your iPhone: In iTunes or Finder, you’ll see a message saying there’s a problem with your iPhone that requires it to be updated or restored. Choose “Restore” and follow the on-screen instructions.
5. Configuring Guided Access Settings for Optimal Use
To get the most out of Guided Access, it’s important to configure the settings to suit your specific needs. Here are some key settings you should be aware of:
5.1. Setting a Guided Access Passcode
As mentioned earlier, setting a Guided Access passcode is essential for securing the feature and preventing unauthorized access. To set or change your Guided Access passcode:
- Go to Settings > Accessibility > Guided Access.
- Tap “Passcode Settings” > “Set Guided Access Passcode.”
- Enter a passcode, then re-enter it to confirm.
5.2. Enabling Touch ID or Face ID for Guided Access
For added convenience, you can enable Touch ID or Face ID for Guided Access. This allows you to disable Guided Access using your fingerprint or facial recognition instead of entering a passcode. To enable this feature:
- Go to Settings > Accessibility > Guided Access > Passcode Settings.
- Toggle the “Touch ID” or “Face ID” switch to the “on” position.
5.3. Setting a Time Limit
Guided Access allows you to set a time limit for each session. This is useful if you want to automatically end the session after a certain period, such as when you’re letting a child use your iPhone for a limited time. To set a time limit:
- Start a Guided Access session in the app you want to use.
- Triple-click the Side or Home button to bring up the Guided Access options.
- Tap “Options” (if you don’t see Options, triple-click the Side or Home button again and enter your passcode).
- Turn on the “Time Limit” switch and choose a time limit from the list.
- Tap “Done” > “Start.”
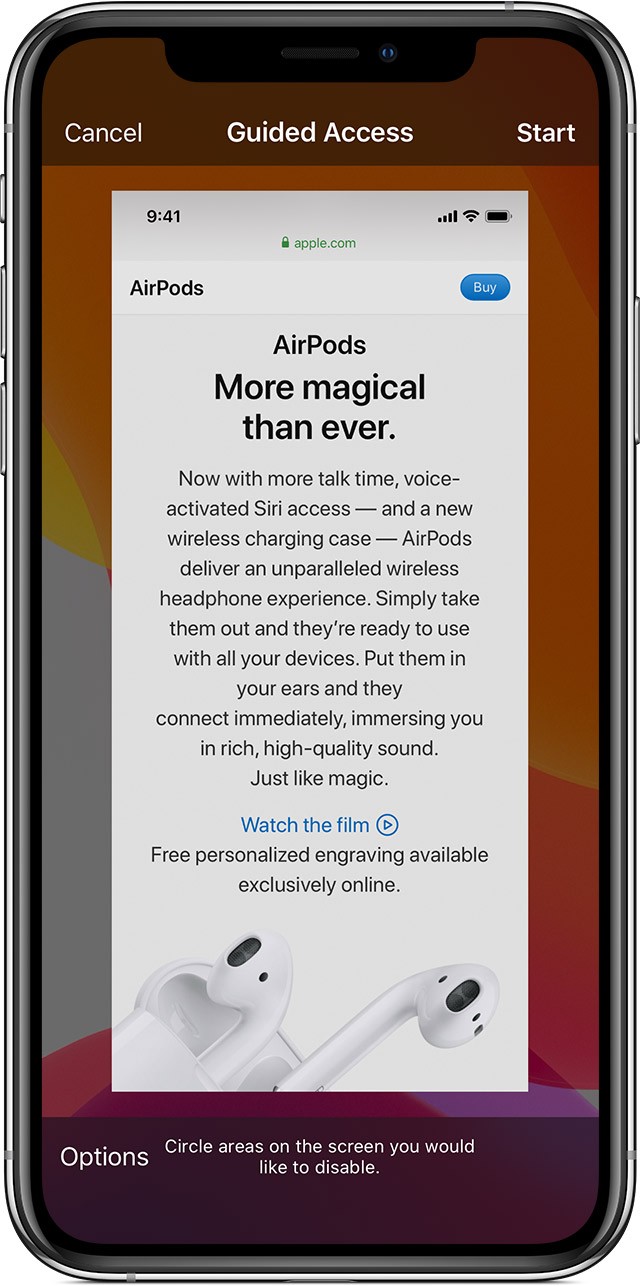
5.4. Disabling Hardware Buttons and Screen Areas
One of the most powerful features of Guided Access is the ability to disable hardware buttons (such as the volume buttons and Sleep/Wake button) and specific areas of the screen. This can prevent users from accidentally changing settings or accessing unwanted content. To disable these features:
- Start a Guided Access session in the app you want to use.
- Triple-click the Side or Home button to bring up the Guided Access options.
- Tap “Options.”
- Turn off the switches for the features you want to disable, such as “Volume Buttons,” “Sleep/Wake Button,” “Motion,” “Keyboards,” and “Touch.”
- To disable specific areas of the screen, use one finger to circle those areas. You can move or resize the circles, or tap the X to remove them.
- Tap “Done” > “Start.”
6. Use Cases for Guided Access
Guided Access is a versatile tool that can be used in a variety of situations. Here are some common use cases:
6.1. Parental Control
As mentioned earlier, Guided Access is an excellent tool for parental control. It allows you to limit a child’s access to specific apps and features, preventing them from accidentally making unwanted changes to your iPhone or accessing inappropriate content.
Scenario: A parent wants to allow their child to use a learning app but doesn’t want them to access other apps or make in-app purchases.
Implementation:
- Enable Guided Access on the learning app.
- Disable the Home button to prevent the child from exiting the app.
- Disable touch inputs on areas of the screen where in-app purchase options are located.
- Set a time limit to ensure the child doesn’t use the app for too long.
6.2. Focus and Productivity
Guided Access can help you stay focused and productive by minimizing distractions. By locking your iPhone to a single app, you can prevent yourself from getting sidetracked by notifications, social media, or other temptations.
Scenario: A student needs to focus on writing a paper using a word processing app on their iPhone.
Implementation:
- Enable Guided Access on the word processing app.
- Disable notifications to prevent distractions.
- Disable the Home button to avoid switching to other apps.
- Use Focus Modes in conjunction with Guided Access to further minimize interruptions.
6.3. Kiosk Mode
Guided Access can turn an iPhone or iPad into a dedicated kiosk for displaying information or collecting data. This is useful in retail environments, at events, or in museums.
Scenario: A museum wants to provide interactive exhibits on iPads, but they need to prevent visitors from tampering with the devices.
Implementation:
- Enable Guided Access on the exhibit app.
- Disable the Home button to prevent visitors from exiting the app.
- Disable all hardware buttons to prevent visitors from changing settings.
- Secure the iPad in a tamper-proof enclosure.
6.4. Accessibility
Guided Access can be used to simplify the iPhone experience for users with cognitive or motor impairments. By locking the device to a single app and disabling unnecessary features, you can make it easier for these users to navigate and interact with the device.
Scenario: A person with cognitive impairments needs to use a communication app but struggles with navigating the iPhone’s interface.
Implementation:
- Enable Guided Access on the communication app.
- Disable the Home button to prevent accidental app switching.
- Disable gestures and other complex interactions to simplify the experience.
- Adjust the app’s settings to use larger fonts and simpler layouts.
7. Advanced Tips and Tricks for Guided Access
Here are some advanced tips and tricks to enhance your experience with Guided Access:
7.1. Using Siri to Start and End Guided Access
You can use Siri to start and end Guided Access sessions hands-free. To start a session, simply say “Hey Siri, turn on Guided Access” while in the app you want to lock. To end a session, say “Hey Siri, turn off Guided Access.” Note that you’ll still need to authenticate with Touch ID, Face ID, or your passcode to end the session.
7.2. Creating Custom Guided Access Profiles
While Guided Access doesn’t offer built-in support for profiles, you can create custom profiles by using a combination of Guided Access settings and other iPhone features, such as Focus Modes and Accessibility Shortcuts.
Scenario: A user needs different Guided Access settings for work and personal use.
Implementation:
- Work Profile:
- Enable Guided Access on work-related apps.
- Disable distracting features like notifications and social media access.
- Set a time limit for focused work sessions.
- Personal Profile:
- Enable Guided Access on entertainment or relaxation apps.
- Allow access to music or podcast apps.
- Disable work-related notifications.
7.3. Combining Guided Access with Focus Modes
Focus Modes, introduced in iOS 15, allow you to filter notifications and customize your iPhone’s behavior based on what you’re doing. You can combine Guided Access with Focus Modes to create an even more focused and distraction-free environment.
7.4. Using Accessibility Shortcuts with Guided Access
Accessibility Shortcuts allow you to quickly access accessibility features by triple-clicking the Side or Home button. You can configure Accessibility Shortcuts to include Guided Access, making it even easier to start and end sessions.
8. Troubleshooting Common Guided Access Issues
Even with careful configuration, you may encounter issues with Guided Access from time to time. Here are some common issues and how to troubleshoot them:
8.1. Guided Access Won’t Start
If Guided Access won’t start, try the following:
- Make sure Guided Access is enabled in Settings > Accessibility.
- Ensure that you’re triple-clicking the Side or Home button correctly.
- Restart your iPhone.
- Check for software updates.
8.2. Screen Is Unresponsive in Guided Access
If the screen is unresponsive in Guided Access, try the following:
- Make sure you haven’t accidentally disabled touch input in the Guided Access options.
- Force restart your iPhone.
- Check for hardware issues with the screen.
8.3. Guided Access Passcode Is Not Working
If your Guided Access passcode is not working, try the following:
- Make sure you’re entering the correct passcode.
- Try entering the passcode slowly and deliberately.
- If you’ve forgotten your passcode, follow the steps outlined earlier in this guide to reset it.
8.4. Guided Access Ends Unexpectedly
If Guided Access ends unexpectedly, try the following:
- Make sure you haven’t set a time limit that is expiring.
- Check for software updates.
- Restore your iPhone to its factory settings (as a last resort).
9. Why Choose CONDUCT.EDU.VN for Your iPhone Accessibility Needs?
At CONDUCT.EDU.VN, we understand the importance of accessibility and providing clear, reliable information to help you get the most out of your iPhone. Our team of experts is dedicated to researching and testing the latest accessibility features, providing comprehensive guides and troubleshooting tips to ensure that everyone can use their devices with ease.
We provide detailed explanations and step-by-step instructions, making it easy for you to understand and implement these features. We also offer personalized support to help you with any specific issues you may be facing.
Whether you’re a student, professional, or senior citizen, we have the resources and expertise to help you make your iPhone more accessible and user-friendly.
We believe that technology should be accessible to everyone, and we’re committed to making that a reality. Visit our website at CONDUCT.EDU.VN to explore our extensive library of accessibility resources and learn how we can help you enhance your iPhone experience. For immediate assistance, you can reach us at 100 Ethics Plaza, Guideline City, CA 90210, United States or via WhatsApp at +1 (707) 555-1234.
10. The Importance of Ethical Digital Conduct
While understanding how to shut off Guided Access on iPhone and utilizing accessibility features is crucial, it’s equally important to promote ethical digital conduct. At CONDUCT.EDU.VN, we advocate for responsible technology use, emphasizing integrity, respect, and compliance with established guidelines.
10.1. Ethical Considerations in Using Guided Access
Using Guided Access ethically involves respecting the privacy and autonomy of others. Misusing this feature to monitor or restrict device usage without consent is a violation of ethical standards.
Examples of Ethical Use:
- Enabling Guided Access on a child’s device with their knowledge to help them focus on educational apps.
- Using Guided Access in public kiosks to prevent unauthorized access to device settings.
Examples of Unethical Use:
- Secretly enabling Guided Access on someone’s device to track their app usage.
- Restricting access to essential apps without a valid reason.
10.2. Respecting Privacy and Autonomy
Ethical digital conduct includes respecting the privacy and autonomy of individuals. This means obtaining consent before implementing any restrictions on device usage and being transparent about the reasons for doing so.
Key Principles:
- Transparency: Clearly communicate why Guided Access is being used.
- Consent: Obtain informed consent from the user or their guardian.
- Respect: Respect the user’s autonomy and right to access information.
10.3. Compliance with Guidelines and Regulations
Adhering to established guidelines and regulations is essential for ethical digital conduct. This includes complying with privacy laws, data protection regulations, and industry standards.
Relevant Regulations:
- GDPR (General Data Protection Regulation): Protects the privacy and personal data of individuals within the EU.
- CCPA (California Consumer Privacy Act): Enhances privacy rights and consumer protection for California residents.
10.4. Promoting Responsible Technology Use
Promoting responsible technology use involves educating individuals about the ethical implications of their digital actions and encouraging them to use technology in a way that benefits society.
Strategies for Promoting Responsible Use:
- Education: Provide resources and training on ethical digital conduct.
- Awareness: Raise awareness about the potential consequences of unethical behavior.
- Policy Development: Create clear policies and guidelines for technology use within organizations.
11. Practical Examples of Ethical Digital Conduct
Here are some practical examples illustrating how to apply ethical principles in digital environments:
11.1. Case Study: Educational Settings
In educational settings, Guided Access can be used to create a focused learning environment. However, it is essential to balance the benefits of this feature with the need to respect students’ autonomy and privacy.
Ethical Implementation:
- Teachers should explain to students why Guided Access is being used and obtain their consent.
- Students should have the opportunity to provide feedback and express any concerns.
- Restrictions should be limited to educational apps and activities.
Unethical Implementation:
- Restricting access to essential resources without a valid reason.
- Monitoring students’ app usage without their knowledge or consent.
11.2. Case Study: Workplace Environments
In workplace environments, Guided Access can be used to ensure that employees are focused on their work and that company devices are used appropriately. However, it is essential to respect employees’ privacy and autonomy.
Ethical Implementation:
- Employers should clearly communicate their policies on technology use and obtain employees’ consent.
- Employees should have the opportunity to provide feedback and express any concerns.
- Restrictions should be limited to work-related apps and activities.
Unethical Implementation:
- Monitoring employees’ app usage without their knowledge or consent.
- Restricting access to essential resources without a valid reason.
11.3. Case Study: Public Kiosks
In public kiosks, Guided Access can be used to prevent unauthorized access to device settings and ensure that the device is used for its intended purpose. However, it is essential to provide users with clear instructions and assistance.
Ethical Implementation:
- Kiosks should be easy to use and navigate.
- Users should have access to clear instructions and support.
- Privacy should be protected by not storing or sharing personal data.
Unethical Implementation:
- Creating kiosks that are difficult to use or navigate.
- Collecting personal data without users’ consent.
12. Frequently Asked Questions (FAQs) About Guided Access
12.1. What is Guided Access on iPhone?
Guided Access is an accessibility feature on iPhones that locks the device into a single app, restricting access to other features and settings.
12.2. How do I enable Guided Access on my iPhone?
Go to Settings > Accessibility > Guided Access, then turn on the Guided Access switch.
12.3. How do I disable Guided Access on my iPhone?
Triple-click the Side or Home button, enter your Guided Access passcode, then tap End. Alternatively, use Touch ID or Face ID if enabled.
12.4. What if I forgot my Guided Access passcode?
You can restore your iPhone to its factory settings using iTunes or Finder. This will erase all data on your device, including the Guided Access settings.
12.5. Can I use Guided Access with Siri?
Yes, you can use Siri to start and end Guided Access sessions. Say “Hey Siri, turn on Guided Access” or “Hey Siri, turn off Guided Access.”
12.6. How do I set a time limit for Guided Access?
Start a Guided Access session, triple-click the Side or Home button, tap Options, turn on the Time Limit switch, and choose a time limit.
12.7. Can I disable hardware buttons in Guided Access?
Yes, you can disable hardware buttons such as the volume buttons and Sleep/Wake button in the Guided Access options.
12.8. Can I disable specific areas of the screen in Guided Access?
Yes, you can circle specific areas of the screen to disable touch input in those areas.
12.9. Is Guided Access secure?
Guided Access is relatively secure, but it’s important to set a strong passcode and enable Touch ID or Face ID for added security.
12.10. Where can I find more information about Guided Access?
Visit CONDUCT.EDU.VN for comprehensive guides, troubleshooting tips, and personalized support for Guided Access and other iPhone accessibility features.
13. Final Thoughts: Mastering Guided Access for Enhanced iPhone Control
Understanding how to shut off Guided Access on iPhone is essential for maintaining control over your device and ensuring a smooth user experience. By following the steps outlined in this guide, you can easily disable Guided Access using a passcode, Touch ID, or Face ID. Additionally, you can troubleshoot common issues and configure Guided Access settings to suit your specific needs.
Remember, Guided Access is a powerful tool that can be used in a variety of situations, from parental control to focus and productivity. By mastering this feature, you can enhance your iPhone experience and make it more accessible and user-friendly.
At CONDUCT.EDU.VN, we’re committed to providing you with the resources and expertise you need to get the most out of your iPhone. Visit our website today to explore our extensive library of accessibility resources and learn how we can help you enhance your iPhone experience.
 ios13-iphone-xs-settings-accessibility-guided-access-safari
14. Call to Action
Are you struggling to navigate the complexities of iPhone accessibility features? Do you need clear, reliable information and personalized support? Visit CONDUCT.EDU.VN today to explore our extensive library of accessibility resources and learn how we can help you enhance your iPhone experience. Our team of experts is dedicated to providing you with the knowledge and tools you need to get the most out of your device.
For immediate assistance, you can reach us at 100 Ethics Plaza, Guideline City, CA 90210, United States or via WhatsApp at +1 (707) 555-1234. Let conduct.edu.vn be your trusted guide to mastering iPhone accessibility.