Guided Access is a helpful feature on iPhones and iPads that allows you to lock your device into a single app. This can be useful for various reasons, such as preventing children from accessing other apps or focusing on a specific task. However, sometimes you might find yourself stuck in Guided Access mode and unsure how to turn off Guided Access. This guide provides several methods to exit Guided Access and regain full control of your device.
Understanding Guided Access
Before diving into the solutions, let’s quickly recap what Guided Access is and why it might be enabled. As mentioned above, it restricts your device to a single app and allows you to disable certain hardware buttons and screen areas. This is particularly useful for:
- Educational settings: Teachers can use Guided Access to keep students focused on a specific learning app.
- Accessibility: Individuals with cognitive or motor impairments can benefit from a simplified, distraction-free experience.
- Parental control: Parents can limit children’s access to approved apps.
Method 1: Using the Triple-Click (or Triple-Press) Method
The most common way to turn off Guided Access is by using the triple-click (or triple-press) method. The action depends on your device model:
- For iPhones/iPads with a Home Button: Quickly press the Home button three times in a row.
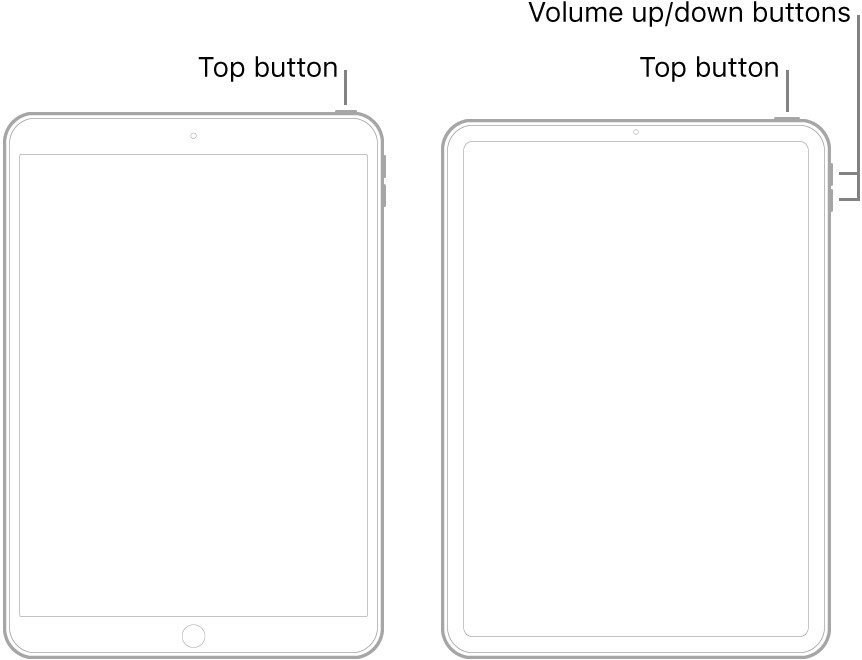
- For iPhones/iPads without a Home Button: Quickly press the Side button (power button) three times in a row.
After the triple-click/press, you should be prompted to enter your Guided Access passcode. Enter the passcode, and then tap “End” in the top-left corner of the screen.
 iPhone home screen with the word Guided Access highlighted to show how to turn it off
Troubleshooting:
- If the triple-click/press doesn’t work: Ensure Guided Access is enabled in Settings > Accessibility > Guided Access. Also, double-check that the “Accessibility Shortcut” for Guided Access is enabled (Settings > Accessibility > Accessibility Shortcut).
- If you forgot your passcode: If you can’t remember your Guided Access passcode, you’ll need to restore your device. See Method 4 for more details.
Method 2: Force Restarting Your iPhone or iPad
If the triple-click/press method fails, a force restart is another effective way to turn off Guided Access. The process varies depending on your device model:
- iPhone 8 or later, iPad Pro 11-inch or 12.9-inch (3rd generation and later):
- Press and quickly release the Volume Up button.
- Press and quickly release the Volume Down button.
- Press and hold the Side (power) button.
- Continue holding the Side button until the Apple logo appears.
- iPhone 7, iPhone 7 Plus, iPad (6th generation) and later: Press and hold both the Side (or Top) button and the Volume Down button until you see the Apple logo.
- iPhone 6s and earlier, iPad (5th generation) and earlier: Press and hold both the Home button and the Side (or Top) button until you see the Apple logo.
Method 3: Using iCloud to Mark Your Device as Lost
In some cases, a simple restart might not be enough to turn off Guided Access. Some users have reported success using iCloud’s “Mark as Lost” feature. Here’s how:
- On another device (computer, phone, or tablet), go to iCloud.com and sign in with your Apple ID.
- Click on “Find iPhone” (or “Find My”).
- Select the device that is stuck in Guided Access.
- Click on “Mark as Lost.”
- Follow the on-screen instructions.
This method essentially locks your device remotely, which can sometimes interrupt Guided Access and allow you to regain control.
Method 4: Restoring Your Device
If all other methods fail, restoring your device may be the only option to turn off Guided Access, especially if you have forgotten your passcode.
Important: Restoring your device will erase all data on it unless you have a recent backup.
Here are the steps:
- Connect your iPhone or iPad to a computer.
- Open iTunes (or Finder on macOS Catalina or later).
- Put your device into recovery mode:
- iPhone 8 or later, iPad Pro 11-inch or 12.9-inch (3rd generation and later): Press and quickly release the Volume Up button, press and quickly release the Volume Down button, then press and hold the Side button until you see the recovery mode screen.
- iPhone 7, iPhone 7 Plus: Press and hold both the Side button and the Volume Down button until you see the recovery mode screen.
- iPhone 6s and earlier, iPad (5th generation) and earlier: Press and hold both the Home button and the Side button until you see the recovery mode screen.
- In iTunes or Finder, you’ll see a prompt to “Restore” or “Update.” Choose “Restore.”
- Follow the on-screen instructions to restore your device to its factory settings.
After the restore is complete, you can set up your device as new or restore it from a backup (if available).
Preventing Guided Access Issues in the Future
To avoid getting stuck in Guided Access again, consider these tips:
- Remember your passcode: Store your Guided Access passcode in a safe place.
- Regularly test the triple-click/press method: Ensure that the triple-click/press method works correctly on your device.
- Keep your software updated: Regularly update your iOS or iPadOS software to ensure you have the latest bug fixes and security updates.
By following these steps, you can effectively turn off Guided Access and prevent future issues. Remember to choose the method that best suits your situation and device model.