Turning on alignment guides in PowerPoint enhances slide design. CONDUCT.EDU.VN offers comprehensive guidance on enabling and utilizing these features for polished presentations. Mastering alignment tools is key to creating visually appealing and impactful slides.
1. Introduction: Precision with PowerPoint Alignment Guides
PowerPoint alignment guides are essential for creating visually consistent and professional presentations. This guide from CONDUCT.EDU.VN will show you How To Turn On Alignment Guides In Powerpoint, use smart guides, and align objects with precision. Correct alignment is crucial for impactful presentations, and understanding these tools will significantly improve your design workflow. Learn how to improve PowerPoint layouts, object alignment, and slide design with CONDUCT.EDU.VN.
2. Understanding Alignment Guides in PowerPoint
Alignment guides in PowerPoint are visual aids that help you position objects accurately on your slides. They appear as dotted lines, indicating alignment with other objects or slide elements, ensuring a neat and organized layout.
2.1. What are Alignment Guides?
Alignment guides are non-printing lines that appear when you move or resize objects in PowerPoint. They dynamically adjust to show when an object is aligned with another object, the center of the slide, or the edges of the slide.
2.2. Why Use Alignment Guides?
Using alignment guides offers several benefits:
- Precision: Achieve accurate placement of objects, eliminating guesswork.
- Consistency: Maintain a uniform look across all slides.
- Efficiency: Speed up the design process by quickly aligning elements.
- Professionalism: Create polished and visually appealing presentations.
2.3. Types of Alignment Guides
PowerPoint offers several types of alignment guides:
- Smart Guides: Appear dynamically as you move objects, showing alignment with other objects.
- Gridlines: A set of horizontal and vertical lines that provide a visual grid for precise placement.
- Rulers: Horizontal and vertical rulers along the top and side of the slide, allowing you to measure and position objects accurately.
3. Step-by-Step Guide: How to Turn On Alignment Guides in PowerPoint
Turning on alignment guides in PowerPoint is a straightforward process. Follow these steps to enable this feature and enhance your slide design.
3.1. Launch PowerPoint
First, open the PowerPoint application on your computer. Ensure you have a presentation open or create a new one to practice with the alignment guides.
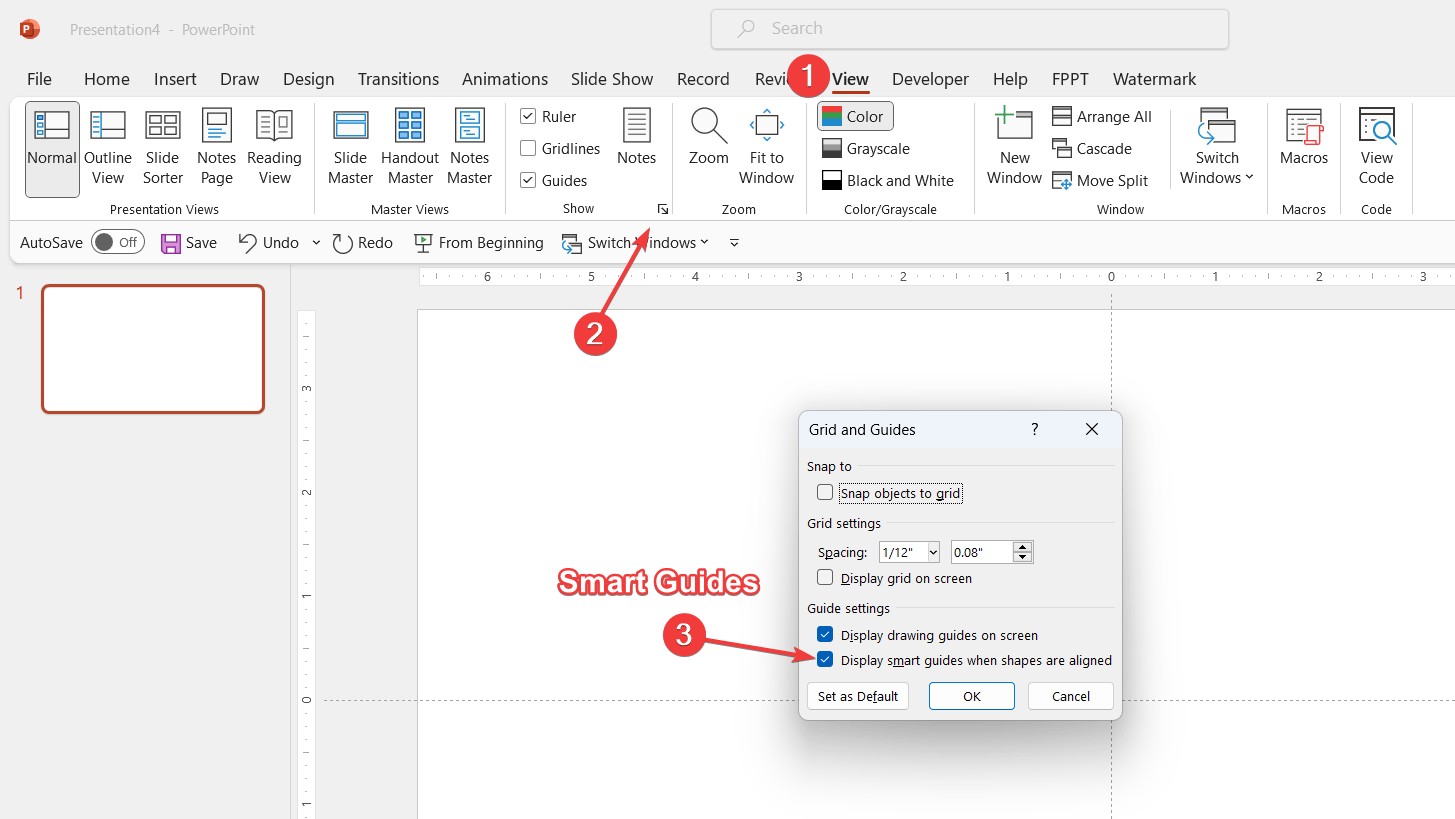
3.2. Navigate to the ‘View’ Tab
In the PowerPoint ribbon at the top of the screen, click on the ‘View’ tab. This tab contains various options for controlling the display of your presentation.
3.3. Access the ‘Grid and Guides’ Dialog Box
In the ‘Show’ group within the ‘View’ tab, locate and click on the small dialog box launcher in the bottom-right corner. This action opens the ‘Grid and Guides’ dialog box, where you can customize the alignment settings.
3.4. Enable Smart Guides
In the ‘Grid and Guides’ dialog box, ensure the checkbox labeled Display smart guides when shapes are aligned is ticked. If it is not, click on it to enable this feature. This ensures that smart guides appear when you move objects, helping you align them precisely.
3.5. Customize Grid Settings (Optional)
While in the ‘Grid and Guides’ dialog box, you can also customize grid settings. You can choose to display gridlines, adjust the spacing between gridlines, and specify whether objects should snap to the grid. These settings can further enhance your ability to align objects accurately.
3.6. Confirm Your Settings
After enabling smart guides and customizing grid settings, click ‘OK’ to confirm your settings and close the dialog box. The alignment guides are now active in your PowerPoint presentation.
4. Utilizing Smart Guides for Precise Alignment
Once alignment guides are enabled, you can leverage them to achieve precise alignment of objects on your slides. Smart guides dynamically appear as you move objects, providing real-time feedback on alignment.
4.1. Moving Objects with Precision
To move an object with precision, click and drag it on your slide. As you move the object, you’ll notice dotted lines appearing. These lines indicate alignment with other objects on the slide. When the object aligns perfectly with another object, the dotted lines turn solid, indicating precise alignment.
4.2. Aligning Objects to Slide Elements
Smart guides also help align objects with key slide elements, such as:
- Slide edges: Align objects to the left, right, top, or bottom edges of the slide.
- Center of the slide: Position objects in the exact center of the slide, both horizontally and vertically.
- Other fixed elements: Align objects with other fixed elements, such as headers, footers, or logos.
As you move an object, smart guides will show alignment lines corresponding to these elements, making it easy to achieve perfect alignment.
4.3. Spacing Objects Evenly
Equally spacing objects is a common design requirement. Smart guides make this task effortless. Start by aligning two objects as a reference point. Then, drag a third object between them. Smart guides will display when this object is equidistant from the two reference objects, ensuring even spacing.
4.4. Using Smart Guides with Multiple Objects
When working with multiple objects, smart guides can help you align and space them consistently. Group the objects together and then move the group as a whole. Smart guides will help you align the group with other objects or slide elements, maintaining the relative spacing between the objects within the group.
5. Advanced Techniques for Alignment in PowerPoint
Beyond the basics, several advanced techniques can further enhance your alignment capabilities in PowerPoint.
5.1. Using the ‘Align’ Tools
PowerPoint provides a set of ‘Align’ tools that allow you to align selected objects relative to each other or to the slide. To access these tools, select the objects you want to align, go to the ‘Format’ tab, and click on ‘Align’ in the ‘Arrange’ group. You can choose from options like ‘Align Left,’ ‘Align Center,’ ‘Align Right,’ ‘Align Top,’ ‘Align Middle,’ and ‘Align Bottom.’
5.2. Distributing Objects Evenly
In addition to aligning objects, PowerPoint also allows you to distribute them evenly. This ensures that the spacing between objects is consistent. To distribute objects, select them, go to the ‘Format’ tab, click on ‘Align,’ and choose either ‘Distribute Horizontally’ or ‘Distribute Vertically.’
5.3. Using Guides and Gridlines Together
For maximum precision, use guides and gridlines together. Guides provide visual references for aligning objects, while gridlines create a structured grid that you can snap objects to. This combination ensures that your objects are perfectly aligned and spaced.
5.4. Customizing Default Guides
PowerPoint allows you to customize the default guides to suit your specific needs. You can add, remove, or reposition guides to create a custom alignment framework. To customize guides, right-click on the slide, select ‘Grid and Guides,’ and then click on ‘Add Vertical Guide’ or ‘Add Horizontal Guide.’ You can then drag the guides to the desired positions.
5.5. Snapping to Grid
The ‘Snap to Grid’ feature forces objects to align with the nearest gridline, ensuring precise placement. To enable this feature, go to the ‘View’ tab, click on the dialog box launcher in the ‘Show’ group, and check the ‘Snap objects to grid’ box.
6. Troubleshooting: What to Do if PowerPoint Smart Guides Are Not Showing
Sometimes, PowerPoint smart guides may not appear even when they are enabled. Here are some troubleshooting steps to resolve this issue.
6.1. Check Smart Guides Setting
First, verify that the Display smart guides when shapes are aligned checkbox is checked in the ‘Grid and Guides’ dialog box. If it is unchecked, click on it to enable smart guides.
6.2. Restart PowerPoint
Sometimes, a simple restart can resolve the issue. Close PowerPoint completely and then reopen it to see if smart guides are now working.
6.3. Update PowerPoint
Ensure that you are using the latest version of PowerPoint. Updates often include bug fixes and improvements that can resolve issues with smart guides.
6.4. Check Display Settings
In some cases, display settings can interfere with the appearance of smart guides. Try adjusting your display resolution or color settings to see if this resolves the issue.
6.5. Reset PowerPoint Settings
If none of the above steps work, you may need to reset PowerPoint settings to their default values. This can be done by deleting the PowerPoint preferences file. However, be aware that this will also reset any other customizations you have made to PowerPoint.
7. Real-Life Applications of Smart Guides
Smart guides are not just for aesthetic purposes; they have practical applications that enhance visual communication and professionalism in presentations.
7.1. Business Presentations
In business presentations, smart guides ensure that charts, graphs, and text boxes are aligned and spaced consistently. This creates a professional and organized look that enhances credibility and clarity.
7.2. Educational Slides
For educational slides, smart guides help align text, images, and diagrams, making the content easier to understand and visually appealing. This is especially important for engaging students and conveying information effectively.
7.3. Marketing Materials
When creating marketing materials, such as flyers or brochures, smart guides ensure that logos, text, and images are aligned and balanced. This creates a visually appealing and professional design that attracts attention and conveys the brand message effectively.
7.4. Training Sessions
In training sessions, smart guides help align instructions, examples, and exercises, making the content easy to follow and visually engaging. This enhances the learning experience and ensures that participants can easily understand and apply the information.
7.5. Design Consistency
Smart Guides are crucial for maintaining design consistency across all slides, providing a unified and professional appearance to the entire presentation.
8. Tips and Tricks for Mastering Alignment Guides
To become a pro at using alignment guides in PowerPoint, consider these tips and tricks.
8.1. Use Keyboard Shortcuts
Learn and use keyboard shortcuts to quickly access alignment tools. For example, Alt + H + A + L aligns selected objects to the left.
8.2. Group Objects
Group related objects together to move and align them as a single unit. This ensures that their relative positions remain consistent.
8.3. Zoom In
Zoom in on the slide to get a closer view of the alignment guides and ensure precise placement.
8.4. Practice Regularly
The more you use alignment guides, the more proficient you will become. Practice regularly to develop your skills and become comfortable with the tools.
8.5. Experiment with Different Settings
Experiment with different grid and guide settings to find what works best for your specific design needs.
9. Common Mistakes to Avoid When Using Alignment Guides
While alignment guides are a valuable tool, it’s important to avoid common mistakes that can undermine their effectiveness.
9.1. Ignoring Smart Guides
One of the most common mistakes is ignoring smart guides altogether. Pay attention to the alignment lines that appear as you move objects and use them to achieve precise alignment.
9.2. Over-Reliance on Visual Estimation
Avoid relying solely on visual estimation to align objects. Use alignment guides to ensure accuracy and consistency.
9.3. Inconsistent Spacing
Ensure that the spacing between objects is consistent. Use smart guides or the ‘Distribute’ tools to achieve even spacing.
9.4. Misalignment with Slide Elements
Pay attention to the alignment of objects with key slide elements, such as slide edges and the center of the slide. This ensures a balanced and professional look.
9.5. Neglecting Gridlines
Don’t neglect gridlines, especially when working with complex layouts. Gridlines provide a structured framework that can help you align objects accurately.
10. The Importance of Visual Hierarchy in Presentations
Visual hierarchy refers to the arrangement of elements in a way that indicates their relative importance. Proper alignment plays a crucial role in establishing visual hierarchy in presentations.
10.1. Creating a Focal Point
Use alignment to create a focal point on the slide. Align key elements, such as headings and images, to draw the viewer’s eye to the most important information.
10.2. Establishing a Clear Structure
Use alignment to establish a clear structure on the slide. Align related elements together to create visual groupings that help the viewer understand the content.
10.3. Enhancing Readability
Proper alignment enhances readability by creating a clean and organized layout. Align text consistently to make it easy for the viewer to read and understand the information.
10.4. Guiding the Viewer’s Eye
Use alignment to guide the viewer’s eye through the slide. Align elements in a way that directs the viewer’s attention from one element to the next, creating a logical flow of information.
10.5. Maintaining Balance
Use alignment to maintain balance on the slide. Align elements symmetrically or asymmetrically to create a visually pleasing composition.
11. How Alignment Impacts Audience Perception
Alignment directly influences how your audience perceives your presentation. Well-aligned slides convey professionalism, credibility, and attention to detail, while poorly aligned slides can create a negative impression.
11.1. Credibility
Professionally aligned slides enhance your credibility as a presenter. They demonstrate that you have taken the time and effort to create a polished and organized presentation.
11.2. Clarity
Well-aligned slides enhance clarity by making the content easy to understand and visually appealing. This helps the audience focus on the message you are conveying.
11.3. Engagement
Visually appealing and well-aligned slides are more engaging for the audience. They capture attention and maintain interest, making the presentation more effective.
11.4. Memorability
Well-designed and aligned slides are more memorable for the audience. They create a lasting impression that helps the audience retain the information.
11.5. Professionalism
Overall, proper alignment contributes to a sense of professionalism that enhances the impact of your presentation. It shows that you are serious about your message and committed to delivering a high-quality presentation.
12. Alignment Guides and Accessibility
Alignment guides also play a role in creating accessible presentations. Proper alignment can improve readability and make the content more accessible to people with disabilities.
12.1. Readability for People with Visual Impairments
Proper alignment can improve readability for people with visual impairments. Align text consistently to make it easier to read and understand.
12.2. Screen Reader Compatibility
Well-aligned slides are more compatible with screen readers, which are used by people with visual impairments to access digital content. Ensure that objects are logically aligned to facilitate screen reader navigation.
12.3. Color Contrast
Use alignment to enhance color contrast. Align text and background elements in a way that maximizes contrast and makes the content easier to see.
12.4. Alternative Text for Images
Provide alternative text for images and other visual elements. This helps people with visual impairments understand the content of the image even if they cannot see it.
12.5. Consistent Layout
Maintain a consistent layout throughout the presentation. This makes it easier for people with disabilities to navigate and understand the content.
13. Integrating Alignment Guides into Your Design Workflow
To maximize the benefits of alignment guides, integrate them into your design workflow. This ensures that you consistently create well-aligned and visually appealing presentations.
13.1. Start with a Template
Start with a professionally designed template that already incorporates proper alignment. This provides a solid foundation for your presentation and ensures that you maintain a consistent look and feel.
13.2. Plan Your Layout
Plan your layout before you start adding content. Sketch out the arrangement of elements on each slide to ensure that they are aligned and balanced.
13.3. Use a Grid System
Use a grid system to guide your design. Gridlines provide a structured framework that can help you align objects accurately and create a visually appealing layout.
13.4. Align as You Go
Align objects as you add them to the slide. This prevents you from having to realign everything later and ensures that your presentation remains well-aligned throughout the design process.
13.5. Review Your Alignment
Review your alignment before you finalize your presentation. Zoom in on each slide to check for any misalignments and make any necessary adjustments.
14. Case Studies: Successful Presentations Using Alignment Guides
Examining case studies of successful presentations can illustrate the impact of alignment guides on visual communication.
14.1. Corporate Pitch Deck
A corporate pitch deck used alignment guides to create a professional and organized look. The slides featured consistent alignment of text, images, and charts, enhancing the credibility and clarity of the presentation.
14.2. Academic Research Presentation
An academic research presentation used alignment guides to align text, diagrams, and data visualizations. This made the complex information easier to understand and visually engaging for the audience.
14.3. Marketing Campaign Presentation
A marketing campaign presentation used alignment guides to align logos, taglines, and product images. This created a visually appealing and memorable presentation that effectively conveyed the brand message.
14.4. Training Workshop Slides
Training workshop slides used alignment guides to align instructions, examples, and exercises. This made the content easy to follow and visually engaging for the participants, enhancing the learning experience.
14.5. Non-Profit Organization Presentation
A non-profit organization’s presentation used alignment guides to align compelling images and impactful statistics, helping to convey their mission and impact effectively.
15. The Future of Alignment Tools in Presentation Software
As presentation software continues to evolve, alignment tools are likely to become even more sophisticated and user-friendly.
15.1. AI-Powered Alignment
AI-powered alignment tools could automatically align objects based on their content and context. This would further streamline the design process and ensure that presentations are visually appealing and effective.
15.2. Real-Time Collaboration
Real-time collaboration features could allow multiple users to work on the same presentation simultaneously, with alignment tools automatically adjusting to maintain consistency.
15.3. Integration with Design Software
Integration with design software could allow users to import and export designs seamlessly, with alignment tools automatically adjusting to the specific requirements of each platform.
15.4. Enhanced Customization
Enhanced customization options could allow users to create custom alignment grids and guides that are tailored to their specific design needs.
15.5. Mobile-Friendly Alignment
Mobile-friendly alignment tools could allow users to create and edit presentations on their mobile devices, with alignment tools automatically adjusting to the smaller screen size.
16. Conclusion: Mastering Alignment for Presentation Excellence
Mastering alignment is essential for creating presentations that are visually appealing, professional, and effective. By understanding how to turn on alignment guides in PowerPoint and using them effectively, you can significantly enhance the impact of your presentations and communicate your message with clarity and credibility. Remember, CONDUCT.EDU.VN is here to guide you through every step of the process, ensuring that your presentations stand out from the crowd. Visit CONDUCT.EDU.VN for more tips, tricks, and resources on creating exceptional presentations.
For further assistance or inquiries, please contact us at 100 Ethics Plaza, Guideline City, CA 90210, United States. You can also reach us via Whatsapp at +1 (707) 555-1234 or visit our website at CONDUCT.EDU.VN.
17. FAQ: Frequently Asked Questions About Alignment Guides
Here are some frequently asked questions about alignment guides in PowerPoint.
17.1. How do I turn on smart guides in PowerPoint?
To turn on smart guides, go to the ‘View’ tab, click on the dialog box launcher in the ‘Show’ group, and check the Display smart guides when shapes are aligned box.
17.2. What are gridlines in PowerPoint?
Gridlines are a set of horizontal and vertical lines that provide a visual grid for precise placement of objects.
17.3. How do I use the ‘Align’ tools in PowerPoint?
To use the ‘Align’ tools, select the objects you want to align, go to the ‘Format’ tab, click on ‘Align’ in the ‘Arrange’ group, and choose the desired alignment option.
17.4. How do I distribute objects evenly in PowerPoint?
To distribute objects evenly, select them, go to the ‘Format’ tab, click on ‘Align,’ and choose either ‘Distribute Horizontally’ or ‘Distribute Vertically.’
17.5. What should I do if smart guides are not showing in PowerPoint?
If smart guides are not showing, first verify that the Display smart guides when shapes are aligned checkbox is checked. If it is, try restarting PowerPoint or updating to the latest version.
17.6. Can I customize the default guides in PowerPoint?
Yes, you can customize the default guides by right-clicking on the slide, selecting ‘Grid and Guides,’ and then clicking on ‘Add Vertical Guide’ or ‘Add Horizontal Guide.’
17.7. What is the ‘Snap to Grid’ feature in PowerPoint?
The ‘Snap to Grid’ feature forces objects to align with the nearest gridline, ensuring precise placement.
17.8. How do alignment guides contribute to accessibility in presentations?
Alignment guides improve readability and make content more accessible to people with disabilities by ensuring consistent and logical layout.
17.9. What are some common mistakes to avoid when using alignment guides?
Common mistakes include ignoring smart guides, over-reliance on visual estimation, inconsistent spacing, misalignment with slide elements, and neglecting gridlines.
17.10. How can I integrate alignment guides into my design workflow?
Integrate alignment guides by starting with a template, planning your layout, using a grid system, aligning as you go, and reviewing your alignment before finalizing your presentation.
By mastering the use of alignment guides, you can create presentations that are not only visually appealing but also professional and effective in communicating your message. Remember to visit conduct.edu.vn for more resources and guidance on presentation design.