Creating visually appealing and well-organized documents in Microsoft Word often involves aligning objects precisely. Whether you’re working with shapes, images, or text boxes, proper alignment can significantly enhance the professionalism and readability of your work. Fortunately, Word provides powerful tools to assist with this process: Alignment Guides and Gridlines. This guide will walk you through How To Turn On Alignment Guides In Word and effectively use them to create polished documents.
Understanding Alignment Guides and Gridlines
Before diving into the steps, let’s clarify the difference between Alignment Guides and Gridlines.
- Alignment Guides: These are dynamic, temporary lines that appear as you drag an object on the page. They help you align the object with margins, the center of the page, or other objects.
- Gridlines: These are a set of horizontal and vertical lines that create a grid overlay on your document. They provide a visual framework for precise placement and alignment of objects.
Enabling Alignment Guides in Word
Here’s how to turn on alignment guides in Word:
-
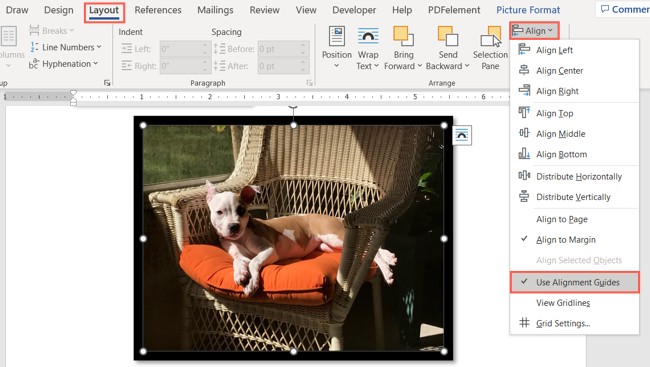
Navigate to the Layout Tab: Open your Microsoft Word document and click on the “Layout” tab in the ribbon at the top of the screen.
-
Access the Align Drop-down Menu: In the “Arrange” group on the Layout tab, locate the “Align” button. Click the drop-down arrow next to it.
-
Turn On Alignment Guides: From the Align menu, select “Alignment Guides.” A checkmark will appear next to it, indicating that the feature is enabled.
-
Using Alignment Guides: Now, when you drag an object (like an image or shape) around your document, you’ll see dotted lines appear as it aligns with the margins, center, or other objects. Release the mouse button when the object is aligned as desired.
-
Turning Off Alignment Guides: To disable Alignment Guides, simply repeat the steps above. Clicking “Alignment Guides” again will remove the checkmark and turn off the feature.
Enabling Gridlines in Word
Here’s how to turn on Gridlines in Word:
-
Navigate to the Layout Tab: As with Alignment Guides, start by clicking the “Layout” tab in the ribbon.
-
Access the Align Drop-down Menu: In the “Arrange” group, find the “Align” button and click the drop-down arrow.
-
Turn On Gridlines: Select “View Gridlines” from the Align menu. A checkmark will appear, and gridlines will now be visible on your document.
-
Using Gridlines: With gridlines enabled, you can precisely position objects by aligning them with the grid intersections. This is particularly useful for creating layouts with consistent spacing and alignment.
-
Turning Off Gridlines: To disable Gridlines, repeat the steps and deselect “View Gridlines.”
Customizing Grid Settings in Word
Word allows you to customize both Alignment Guides and Gridlines to suit your specific needs. Here’s how:
-
Access Grid Settings: Go to the “Layout” tab, click the “Align” drop-down menu, and select “Grid Settings.”
-
Alignment Guide Settings: In the “Grid and Guides” dialog box, you can control the visibility of Alignment Guides. Check the “Display alignment guides” box to enable them. You can also choose to display guides relative to page margins, the page itself, or paragraphs.
-
Object Snapping: The “Object Snapping” feature lets objects “snap” to the nearest gridline or other object as you move them. This can be extremely helpful for precise alignment. Enable it by checking the “Snap objects to other objects” box.
-
Gridline Settings: Adjust the spacing between gridlines using the “Horizontal spacing” and “Vertical spacing” boxes. Smaller spacing allows for finer control over object placement.
-
Grid Origin: By default, the grid origin is based on the page margins. You can change this by unchecking “Use margins” and specifying custom horizontal and vertical origin points.
-
Display Gridlines: To control whether gridlines are displayed, check or uncheck the “Display gridlines on screen” box. You can also choose to snap objects to the grid even when the gridlines are not visible by checking the “Snap objects to grid when the gridlines are not displayed” box.
-
Apply Settings: Once you’ve adjusted the settings to your liking, click “OK” to apply them. To use these settings as the default for all new Word documents, click “Set As Default” before clicking “OK”.
Important Considerations
- Exclusivity: Remember that you cannot use Alignment Guides and Gridlines simultaneously. Enabling one will automatically disable the other.
- Purpose: Use Alignment Guides for quick, dynamic alignment with margins and other objects. Use Gridlines for precise, consistent placement based on a grid framework.
- Experimentation: Don’t be afraid to experiment with the different settings to find what works best for your specific document and workflow.
Conclusion
By understanding how to turn on alignment guides in Word and effectively using both Alignment Guides and Gridlines, you can significantly improve the visual appeal and professionalism of your documents. These tools provide the control and precision needed to create well-organized layouts, ensuring that your content is presented in the best possible way. Whether you’re creating reports, brochures, or presentations, mastering these alignment techniques will elevate the quality of your work.