Guided Access is a powerful accessibility feature on iPhone, iPad, and iPod touch that allows you to focus on a single task by temporarily restricting your device to one app. It’s incredibly useful in various situations, whether you want to let a child use your device without wandering into other apps, or you need to minimize distractions and stay focused on a specific application. This guide will walk you through How To Turn On Guided Access and customize it to fit your needs.
Setting Up Guided Access: Step-by-Step
Before you can start using Guided Access, you need to set it up in your device’s settings. Here’s how to enable Guided Access:
- Begin by opening the Settings app on your iPhone, iPad, or iPod touch. This is the grey app with the gear icon, usually found on your home screen.
- Scroll down and tap on Accessibility. This section groups together features designed to help users customize their experience to their individual needs.
- In the Accessibility menu, look for and select Guided Access, usually located under the “General” or “Vision” section.
- Toggle the Guided Access switch to the green “on” position. This activates the feature on your device.
- Tap on Passcode Settings. This is where you’ll set up a passcode that will be required to exit Guided Access mode.
- Select Set Guided Access Passcode. You will be prompted to enter a passcode. Choose a passcode that is memorable for you but not easily guessable by others, especially if you are using Guided Access to limit a child’s device use.
- Enter your chosen passcode, and then re-enter it to confirm.
- Optionally, you can enable Face ID or Touch ID as an alternative way to end a Guided Access session. This provides a quick and convenient way for you to exit Guided Access without needing to enter your passcode each time. Simply toggle the Face ID or Touch ID switch to the “on” position if you wish to use this feature.
Starting a Guided Access Session: Quick and Easy
Once Guided Access is set up, starting a session is straightforward. Here’s how to turn on Guided Access when you need it:
- Open the app that you intend to use in Guided Access. For instance, if you want to lock your device to a reading app, open that app.
- To initiate Guided Access, you need to triple-click a specific button on your device:
- On an iPhone X or later and most newer iPad models (without a Home button), triple-click the Side button (the power button).
- On an iPhone 8 or earlier, iPad models with a Home button, and iPod touch, triple-click the Home button.
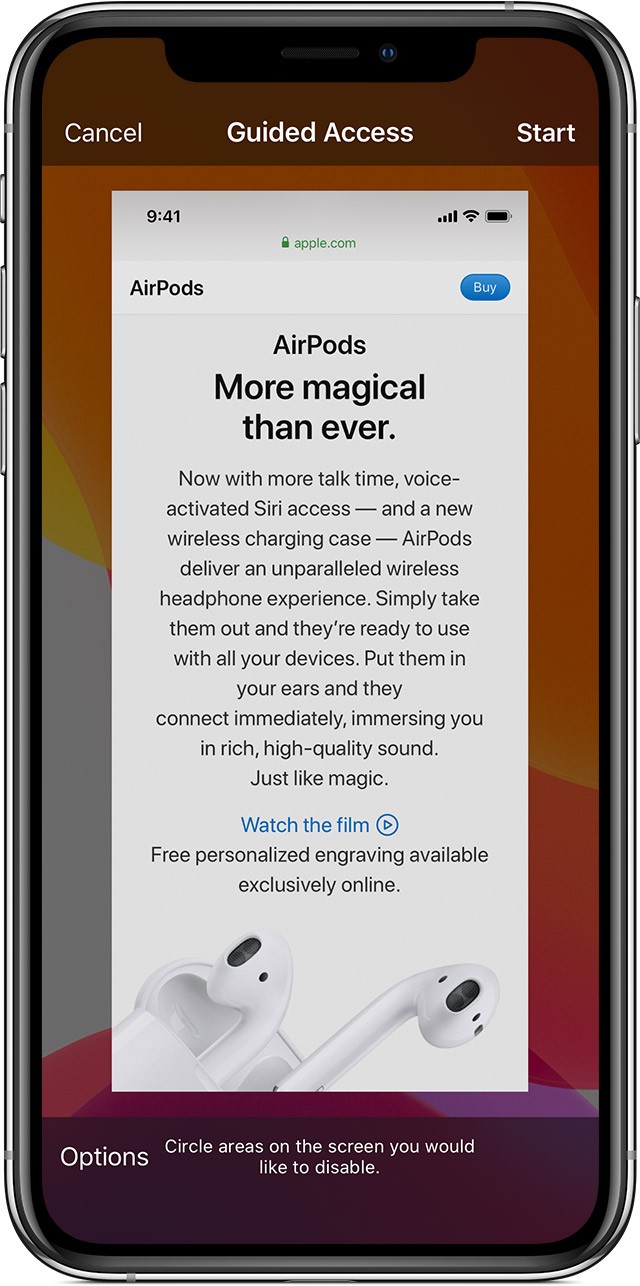
- After triple-clicking, the Guided Access screen will appear. Here, you have the option to disable certain areas of the screen to prevent touch input in those zones. If you want to disable touch in specific areas:
- Use one finger to circle the areas of the screen you want to disable. A grey overlay will appear over the selected area.
- You can move or resize the circled areas by dragging the handles.
- To remove a disabled area, tap the X button within the circle.
- Tap the Options button at the bottom left if you want to customize which hardware buttons and screen functionalities are available during the Guided Access session. These options allow you to control features like the Sleep/Wake button, Volume buttons, Motion, Keyboards, Touch, Dictionary Lookup, and set a Time Limit. (More on these options in the next section).
- Finally, tap Start in the top right corner to begin the Guided Access session. Your device is now locked to the current app, and the features you’ve chosen to disable are deactivated.
 ios13-iphone-xs-settings-accessibility-guided-access-safari
Alternatively, you can use Siri to start Guided Access. Open the desired app and simply say “Turn on Guided Access.” Siri will activate Guided Access for the app you are currently using.
Customizing Guided Access: Control Features
Guided Access offers a range of options to tailor the experience further. To access and modify these features during an active session:
- Triple-click the Side button or Home button (depending on your device) to bring up the Guided Access options screen.
- If you have set a Guided Access passcode, you may be prompted to enter your passcode at this stage.
- Tap Options on the bottom left of the screen. This will display a menu of customizable features.
- Here are the options you can control:
Sleep/Wake Button: Turn this option off to disable the Sleep/Wake button, preventing the device from being put to sleep or woken up using the button.
Volume Buttons: Disabling this option will prevent users from adjusting the volume using the physical volume buttons on the device.
Motion: When turned off, this restricts the device’s response to motion. For instance, the screen will not react to shaking, and screen rotation will be disabled regardless of how the device is held.
Keyboards: Disable this to prevent the keyboard from appearing on the screen. This is useful if the session is intended for viewing content only, without text input.
Touch: Turning off Touch completely disables screen touch input within the defined Guided Access area or the entire screen if no area is defined.
Dictionary Lookup: Enable this to allow the use of the Look Up feature when text is selected, even within Guided Access.
Time Limit: Set a time limit for the Guided Access session. Once the time expires, the session will automatically end, and the device will be locked until Guided Access is exited with the passcode.
- Toggle the switches next to each feature to turn them on or off according to your preferences.
- Tap Done in the top right corner to save your selected options and return to the Guided Access session.
Ending a Guided Access Session: Regain Control
To exit Guided Access and regain full control of your device:
- Triple-click the Side button or Home button.
- Enter your Guided Access passcode when prompted.
- Tap End in the top left corner of the screen.
If you enabled Face ID or Touch ID for Guided Access, you can also double-click the Side button or Home button and use Face ID or Touch ID to end the session quickly.
Guided Access is a versatile tool that enhances focus and accessibility on iOS devices. By understanding how to turn on Guided Access and customize its features, you can create a more controlled and focused user experience for yourself or others using your device.