Guided Access iPhone: Unlock its potential for focused usage and enhanced accessibility. CONDUCT.EDU.VN provides you with a comprehensive guide on how to turn on and effectively use Guided Access on your iPhone, ensuring a tailored and secure experience. Discover the power of single app mode, accessibility settings, and parental control features.
1. Understanding Guided Access on Your iPhone
Guided Access is a powerful accessibility feature built into iPhones and other Apple devices. It allows you to lock your device into a single app and control which features are available, effectively creating a customized and distraction-free environment. This feature is beneficial in a multitude of scenarios.
- For Parents: It’s perfect for when you let a child use your device, preventing them from accidentally accessing other apps or making unwanted purchases.
- For Focus: It is suitable for individuals who want to minimize distractions and focus on a specific task, such as reading or working on a document.
- For Accessibility: It is a tool for individuals with cognitive or motor impairments, providing a simplified and controlled interface.
Guided Access offers features beyond a simple screen lock. It enables you to disable hardware buttons, restrict screen areas from touch input, and set time limits for usage. By understanding the full potential of Guided Access, you can tailor your iPhone experience to meet specific needs and preferences, enhancing usability and peace of mind. For more information and other helpful articles, visit CONDUCT.EDU.VN, a leading resource for ethical conduct and responsible technology use.
2. Setting Up Guided Access: A Step-by-Step Guide
Before you can use Guided Access, you need to set it up in your iPhone settings. Here’s a detailed, step-by-step guide:
- Open the Settings App: Locate the Settings app on your iPhone’s home screen (it’s the one with the gear icon) and tap to open it.
- Navigate to Accessibility: Scroll down within the Settings menu and tap on “Accessibility.” This section houses all of the iPhone’s accessibility features.
- Find Guided Access: Scroll down in the Accessibility menu until you find “Guided Access.” Tap on it to enter the Guided Access settings.
- Turn on Guided Access: At the top of the Guided Access settings screen, you’ll see a toggle switch. Flip this switch to the “on” position (it will turn green).
- Passcode Settings: Tap on “Passcode Settings.” This allows you to set a passcode that will be required to exit a Guided Access session.
- Set Guided Access Passcode: Tap on “Set Guided Access Passcode.” You’ll be prompted to enter a six-digit passcode. Enter your desired passcode, and then re-enter it to confirm.
- Face ID or Touch ID (Optional): In the Passcode Settings menu, you’ll see options to enable Face ID or Touch ID for Guided Access. If you enable either of these, you can use facial recognition or your fingerprint to end a Guided Access session instead of entering the passcode.
- Time Limits (Optional): Return to the main Guided Access menu and tap on “Time Limits.” Here, you can choose to have an alarm sound when a Guided Access session is about to end.
Once you’ve completed these steps, Guided Access is set up and ready to use. You can now launch a Guided Access session in any app.
3. Launching a Guided Access Session
After completing the setup process, launching a Guided Access session is quick and straightforward. Here’s how:
- Open the Desired App: Navigate to the app you want to use in Guided Access. This could be a game, a video streaming app, an educational tool, or any other app.
- Initiate Guided Access:
- On iPhones with Face ID (iPhone X and later): Triple-click the side button (the power button).
- On iPhones with a Home Button (iPhone 8 and earlier): Triple-click the Home button.
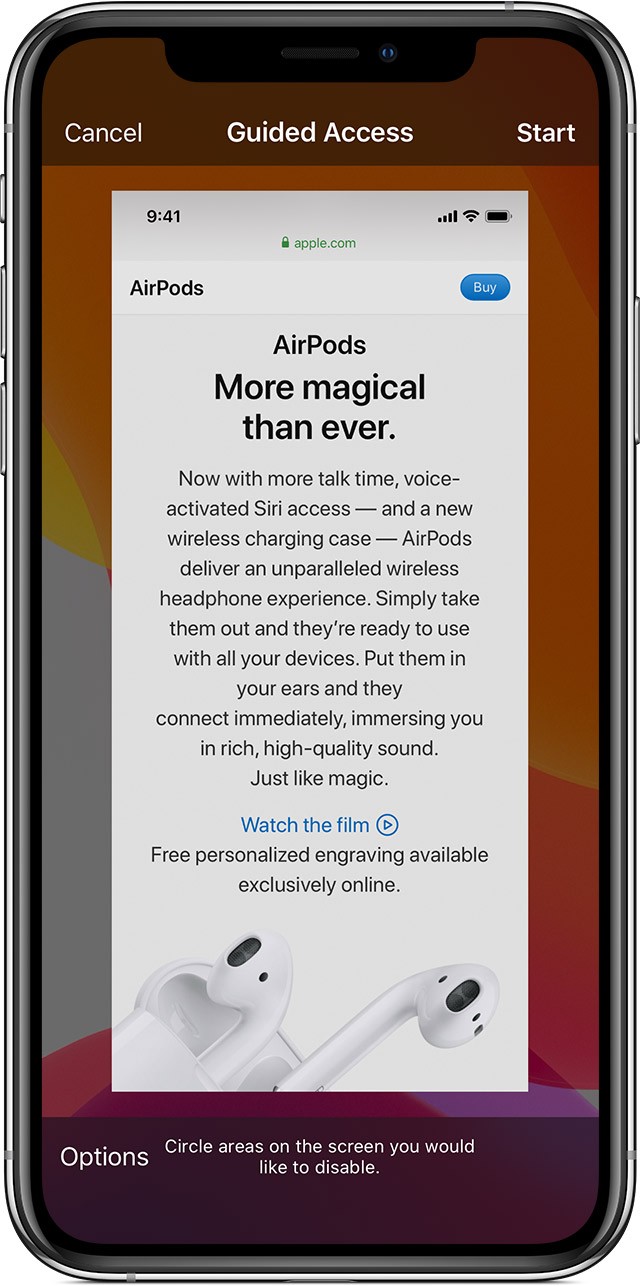
- Configure Restrictions (Optional): After triple-clicking, the Guided Access interface will appear. Here, you can customize the restrictions for the session:
- Disable Screen Areas: Use your finger to draw circles around any areas of the screen that you want to disable. This prevents accidental touches in those areas. You can move or resize the circles, or tap the “X” to remove them.
- Access Options: Tap the “Options” button at the bottom of the screen. This will open a menu where you can disable hardware buttons (like the volume buttons or sleep/wake button), disable touch input, disable keyboard input, set a time limit, and more.
- Start Guided Access: Once you’ve configured the desired restrictions, tap the “Start” button in the upper-right corner of the screen. If you set a passcode, you’ll be prompted to enter it at this time.
The iPhone is now locked into the selected app with the specified restrictions. The user will not be able to exit the app or access the disabled features until Guided Access is ended.
4. Understanding Guided Access Options
The Options menu within Guided Access provides a wide range of customization possibilities, allowing you to fine-tune the user experience. Here’s a breakdown of each option:
4.1. Sleep/Wake Button
- Function: Disables the Sleep/Wake button (also known as the power button) on your iPhone.
- Use Case: Prevents the user from turning off the screen or putting the device to sleep during the Guided Access session. This is useful in situations where you want to ensure uninterrupted use of the app.
4.2. Volume Buttons
- Function: Disables the volume buttons on your iPhone.
- Use Case: Prevents the user from adjusting the volume during the Guided Access session. This can be useful to maintain a consistent audio level or prevent distractions.
4.3. Motion
- Function: Limits how your device responds to motion.
- Use Case: When disabled, the screen won’t respond to shaking, and the screen won’t rotate regardless of how the device is held. This can be helpful to prevent accidental screen rotations or unwanted interactions triggered by motion.
4.4. Keyboards
- Function: Disables the keyboard from appearing on the screen.
- Use Case: Prevents the user from typing any text during the Guided Access session. This is useful when you want to restrict text input or prevent access to search functions.
4.5. Touch
- Function: Disables all touch input on the screen.
- Use Case: Makes the screen completely unresponsive to touch. This is useful when you want to display information on the screen without allowing any interaction.
4.6. Dictionary Lookup
- Function: Enables or disables the Look Up feature when text is selected.
- Use Case: Allows or prevents the user from using the dictionary lookup function when they select text in the app.
4.7. Time Limit
- Function: Sets a time limit for the Guided Access session.
- Use Case: Automatically ends the Guided Access session after a specified duration. This is useful for limiting screen time or ensuring that the device is not used for too long.
5. Ending a Guided Access Session
To end a Guided Access session, follow these steps:
- Triple-Click:
- On iPhones with Face ID (iPhone X and later): Triple-click the side button (the power button).
- On iPhones with a Home Button (iPhone 8 and earlier): Triple-click the Home button.
- Enter Passcode: If you set a passcode for Guided Access, you’ll be prompted to enter it.
- Use Face ID or Touch ID (If Enabled): If you enabled Face ID or Touch ID for Guided Access, you can use facial recognition or your fingerprint instead of entering the passcode.
- Tap End: Once you’ve entered the passcode or used Face ID/Touch ID, tap the “End” button in the upper-left corner of the screen.
The Guided Access session will end, and the iPhone will return to its normal state. You can now access all apps and features as usual.
6. Guided Access: Use Cases and Applications
Guided Access is more than just a simple locking feature; it’s a versatile tool with numerous applications in various scenarios.
6.1. Parental Control and Child Safety
- Scenario: Parents lending their iPhone to a child for educational apps or games.
- Benefits: Prevents children from accidentally accessing other apps, making in-app purchases, or navigating to inappropriate content. Parents can set time limits for usage and disable certain features to create a safe and controlled environment.
6.2. Focus and Productivity
- Scenario: Individuals working on a specific task on their iPhone, such as writing, reading, or studying.
- Benefits: Eliminates distractions by locking the device into the relevant app and disabling notifications, internet access, or other potential interruptions. This helps users stay focused and improve productivity.
6.3. Accessibility for Individuals with Cognitive Impairments
- Scenario: Individuals with cognitive impairments who may have difficulty navigating complex interfaces or accidentally triggering unwanted actions.
- Benefits: Simplifies the user experience by locking the device into a single app and disabling unnecessary features. This can reduce confusion and frustration, making the device more accessible and user-friendly.
6.4. Trade Shows and Kiosks
- Scenario: Businesses using iPhones as interactive displays or kiosks at trade shows or in retail settings.
- Benefits: Prevents unauthorized access to other apps or settings, ensuring that users can only interact with the intended content. This protects the device from tampering and maintains a consistent user experience.
6.5. Testing and Development
- Scenario: App developers testing specific features or functionalities of their apps.
- Benefits: Isolates the app being tested and prevents interference from other apps or system settings. This ensures a controlled testing environment and helps developers identify and fix bugs more efficiently.
7. Troubleshooting Common Guided Access Issues
While Guided Access is generally reliable, you may encounter some issues from time to time. Here are some common problems and how to troubleshoot them:
7.1. Forgetting the Guided Access Passcode
- Solution: If you forget your Guided Access passcode, you’ll need to erase your iPhone and restore it from a backup. This will remove the Guided Access passcode along with all other data on your device. To prevent this, make sure to choose a passcode that you can easily remember, or enable Face ID or Touch ID for Guided Access.
7.2. Guided Access Not Starting
- Solution: Ensure that Guided Access is enabled in Settings > Accessibility > Guided Access. Also, make sure you’re triple-clicking the side button or Home button correctly. If Guided Access still doesn’t start, try restarting your iPhone.
7.3. Unable to Disable Screen Areas
- Solution: Make sure you’re using one finger to draw the circles around the screen areas you want to disable. If the circles are not appearing, try cleaning the screen of your iPhone.
7.4. Guided Access Ending Unexpectedly
- Solution: Check the Time Limit setting in Guided Access. If a time limit is set, the session will automatically end when the time expires. Also, ensure that the side button or Home button is not being accidentally triple-clicked, as this will also end the session.
7.5. Options Menu Not Appearing
- Solution: If the Options menu is not appearing when you triple-click the side button or Home button, try triple-clicking again. If it still doesn’t appear, restart your iPhone.
By following these troubleshooting tips, you can resolve most common Guided Access issues and ensure a smooth and reliable experience. If you’re still experiencing problems, you can contact Apple Support for further assistance.
8. Optimizing Guided Access for Specific Needs
Guided Access offers flexibility for tailoring the experience to specific needs. Here’s how to optimize it for different situations:
8.1. Creating a Distraction-Free Reading Environment
- Scenario: You want to read an ebook or online article without distractions.
- Optimizations:
- Lock the iPhone into the reading app (e.g., Kindle, iBooks, Safari).
- Disable notifications.
- Disable the volume buttons.
- Disable touch input on the status bar to prevent accidental access to Control Center.
8.2. Setting Up a Safe Gaming Environment for Children
- Scenario: You want to let your child play a game without worrying about accidental purchases or access to inappropriate content.
- Optimizations:
- Lock the iPhone into the game app.
- Disable in-app purchases.
- Disable internet access (if the game doesn’t require it).
- Set a time limit for the session.
8.3. Creating a Simplified Interface for Seniors
- Scenario: You want to make an iPhone easier for a senior to use.
- Optimizations:
- Lock the iPhone into the most frequently used app (e.g., phone, messaging).
- Disable unnecessary features.
- Increase the font size for better readability.
- Enable AssistiveTouch for easier navigation.
By considering the specific needs of the user and tailoring the Guided Access settings accordingly, you can create a more effective and user-friendly experience.
9. Guided Access vs. Other Accessibility Features
Guided Access is just one of many accessibility features available on iPhones. It’s essential to understand how it differs from other features and when to use it.
9.1. Guided Access vs. Screen Time
- Guided Access: Locks the device into a single app and provides granular control over features within that app. It’s ideal for short-term, focused usage.
- Screen Time: Provides broader parental control features, such as setting time limits for app categories, blocking specific websites, and monitoring usage. It’s ideal for long-term parental control and managing overall device usage.
9.2. Guided Access vs. Assistive Access
- Guided Access: Locks the device into a single app and provides granular control over features within that app. It’s ideal for short-term, focused usage.
- Assistive Access: Provides an alternative user interface, making the iPhone simpler and more accessible.
9.3. Guided Access vs. Restrictions (Parental Controls)
- Guided Access: A temporary, single-app locking feature with customizable restrictions.
- Restrictions (Parental Controls): A permanent setting that restricts access to certain apps, features, and content.
The best feature depends on the specific needs and goals. Guided Access is excellent for temporary, focused usage, while Screen Time and Restrictions are better for long-term parental control and device management.
10. Tips and Tricks for Advanced Guided Access Users
Once you’re familiar with the basics of Guided Access, you can explore some advanced tips and tricks to further enhance its functionality:
10.1. Using Siri to Start Guided Access
You can use Siri to start a Guided Access session by saying “Turn on Guided Access” while in the desired app. However, you must first enable Siri in Settings and grant it permission to access Guided Access.
10.2. Creating Custom Guided Access Profiles
While Guided Access doesn’t offer built-in profile support, you can create custom profiles by documenting the settings you use for different scenarios. This allows you to quickly configure Guided Access for specific tasks.
10.3. Combining Guided Access with Other Accessibility Features
Guided Access can be combined with other accessibility features to create a more comprehensive and customized experience. For example, you can use Guided Access with VoiceOver to provide auditory feedback, or with Switch Control to enable alternative input methods.
10.4. Using Guided Access for Remote Support
Guided Access can be used to provide remote support to individuals who are having difficulty using their iPhones. By remotely guiding the user through the steps, you can help them troubleshoot problems and learn how to use the device more effectively.
10.5. Exploring Third-Party Guided Access Apps
While the built-in Guided Access feature is powerful, some third-party apps offer additional functionality and customization options. Explore the App Store to find apps that meet your specific needs.
11. The Future of Guided Access
Apple continuously updates and improves its accessibility features, including Guided Access. While it’s impossible to predict the future with certainty, here are some potential developments we might see:
11.1. Enhanced Profile Support
Future versions of Guided Access may include built-in profile support, allowing users to create and save custom configurations for different scenarios.
11.2. Integration with Family Sharing
Guided Access may be integrated with Family Sharing, allowing parents to remotely configure and manage Guided Access settings on their children’s devices.
11.3. Improved Siri Integration
Siri integration may be expanded, allowing users to control more Guided Access settings with voice commands.
11.4. Advanced Analytics and Reporting
Future versions of Guided Access may provide more detailed analytics and reporting on device usage, helping parents and educators track progress and identify areas for improvement.
11.5. AI-Powered Customization
AI-powered algorithms may be used to automatically customize Guided Access settings based on the user’s behavior and preferences.
12. Ethical Considerations When Using Guided Access
While Guided Access is a valuable tool, it’s important to use it ethically and responsibly. Here are some ethical considerations to keep in mind:
12.1. Respecting User Autonomy
Avoid using Guided Access to restrict a user’s freedom or autonomy without their consent. Always explain the purpose of Guided Access and obtain permission before enabling it.
12.2. Protecting Privacy
Be mindful of the user’s privacy when using Guided Access. Avoid accessing or monitoring their personal information without their knowledge or consent.
12.3. Avoiding Coercion
Do not use Guided Access to coerce or manipulate users into performing actions they don’t want to do.
12.4. Ensuring Accessibility
When using Guided Access, make sure to maintain accessibility for users with disabilities. Use other accessibility features, such as VoiceOver and Switch Control, to ensure that everyone can use the device effectively.
12.5. Following Legal Guidelines
Be aware of and comply with all applicable laws and regulations when using Guided Access.
By adhering to these ethical guidelines, you can ensure that Guided Access is used in a responsible and beneficial manner.
13. Resources for Further Learning
To deepen your understanding of Guided Access and accessibility features, consider the following resources:
- Apple’s Accessibility Website: Provides comprehensive information on all of Apple’s accessibility features.
- Apple Support: Offers troubleshooting tips and assistance with Guided Access and other Apple products.
- Accessibility Conferences: Attend accessibility conferences to learn from experts and network with other professionals in the field.
- Online Accessibility Courses: Enroll in online courses to gain a deeper understanding of accessibility principles and best practices.
- Accessibility Blogs and Forums: Follow accessibility blogs and participate in online forums to stay up-to-date on the latest news and trends.
By utilizing these resources, you can continue to expand your knowledge and skills in the field of accessibility.
14. Guided Access and the Law
The use of Guided Access, like any technology feature, is subject to legal considerations. While Guided Access itself is not inherently illegal, its misuse can lead to legal issues. Here’s a brief overview of some relevant legal aspects:
14.1. Privacy Laws
Using Guided Access to monitor or access a user’s personal information without their consent may violate privacy laws, such as the General Data Protection Regulation (GDPR) in Europe or the California Consumer Privacy Act (CCPA) in the United States.
14.2. Child Protection Laws
Using Guided Access to protect children from inappropriate content is generally legal and encouraged. However, it’s essential to comply with child protection laws and regulations, such as the Children’s Online Privacy Protection Act (COPPA) in the United States.
14.3. Accessibility Laws
In some cases, using Guided Access may be necessary to comply with accessibility laws, such as the Americans with Disabilities Act (ADA) in the United States.
14.4. Contract Law
Using Guided Access to restrict access to certain features or content may violate contract law if it conflicts with the terms of service or user agreements.
It’s essential to consult with legal counsel to ensure that your use of Guided Access complies with all applicable laws and regulations.
15. Common Misconceptions About Guided Access
There are several common misconceptions about Guided Access that can lead to confusion or misuse. Here are some of the most prevalent misconceptions:
- Misconception: Guided Access is only for parents.
- Reality: Guided Access is a versatile tool that can be used by anyone who wants to focus on a specific task or create a simplified interface.
- Misconception: Guided Access is a substitute for parental control apps.
- Reality: Guided Access is a temporary, single-app locking feature, while parental control apps offer broader device management capabilities.
- Misconception: Guided Access is foolproof.
- Reality: Guided Access can be bypassed if the user knows the passcode or has access to the device’s settings.
- Misconception: Guided Access is only useful for accessibility purposes.
- Reality: Guided Access has many applications beyond accessibility, such as focus and productivity, trade shows and kiosks, and testing and development.
- Misconception: Guided Access is difficult to use.
- Reality: Guided Access is easy to set up and use, thanks to its intuitive interface and step-by-step instructions.
By dispelling these misconceptions, we can promote a more accurate and informed understanding of Guided Access.
16. Real-World Examples of Guided Access in Action
To illustrate the practical applications of Guided Access, here are some real-world examples of how it’s being used:
- Example 1: A teacher uses Guided Access to lock students into a educational app during class, preventing them from accessing social media or games.
- Example 2: A museum uses Guided Access to create interactive exhibits, allowing visitors to explore information without accidentally accessing other apps or settings.
- Example 3: A restaurant uses Guided Access to create a self-ordering kiosk, allowing customers to place orders without the need for staff assistance.
- Example 4: A caregiver uses Guided Access to simplify an iPhone for a senior with cognitive impairments, making it easier for them to make calls and send messages.
- Example 5: A business uses Guided Access to secure iPhones used by employees in the field, preventing them from accessing sensitive data or installing unauthorized apps.
These examples demonstrate the diverse and innovative ways that Guided Access is being used to enhance productivity, accessibility, and security.
17. Addressing Concerns About Over-Reliance on Technology
While technology offers many benefits, it’s important to be mindful of the potential downsides of over-reliance on technology. Here are some concerns and how to address them:
- Concern: Reduced face-to-face interaction.
- Solution: Encourage real-world interactions and activities, such as family dinners, outdoor adventures, and community events.
- Concern: Sedentary lifestyle.
- Solution: Promote physical activity and exercise, such as walking, running, swimming, or playing sports.
- Concern: Digital eye strain.
- Solution: Follow the 20-20-20 rule: every 20 minutes, look at something 20 feet away for 20 seconds.
- Concern: Sleep disturbances.
- Solution: Avoid using electronic devices before bed and create a relaxing bedtime routine.
- Concern: Addiction.
- Solution: Set limits on technology usage and seek professional help if needed.
By addressing these concerns and promoting a balanced lifestyle, we can reap the benefits of technology without sacrificing our physical, mental, and social well-being.
18. Resources Available at CONDUCT.EDU.VN
CONDUCT.EDU.VN offers a wealth of resources to help you understand and apply ethical conduct in various aspects of life, including technology use. Here’s a glimpse of what you can find on our website:
- Articles: Explore a library of articles on topics such as digital ethics, online safety, and responsible technology use.
- Guides: Download practical guides on how to navigate ethical dilemmas in the digital world.
- Case Studies: Analyze real-world case studies to learn from past mistakes and make informed decisions.
- Training Materials: Access training materials for educators and organizations to promote ethical conduct and responsible technology use.
- Community Forum: Participate in discussions and share your insights with other members of the CONDUCT.EDU.VN community.
Visit CONDUCT.EDU.VN today to discover a world of resources that can help you navigate the ethical challenges of the digital age.
19. Staying Up-to-Date with Apple’s Accessibility Updates
Apple is committed to improving the accessibility of its products and services, and it regularly releases updates with new features and enhancements. To stay up-to-date with the latest accessibility updates, follow these tips:
- Subscribe to Apple’s Accessibility Newsletter: Sign up for Apple’s Accessibility Newsletter to receive email updates on new features and events.
- Follow Apple’s Accessibility Social Media Accounts: Follow Apple’s Accessibility social media accounts on Twitter, Facebook, and other platforms.
- Attend Apple’s Accessibility Events: Attend Apple’s Accessibility events to learn from experts and network with other professionals in the field.
- Read Apple’s Accessibility Documentation: Read Apple’s Accessibility documentation to learn about the latest features and how to use them.
- Participate in Apple’s Accessibility Beta Program: Participate in Apple’s Accessibility beta program to test new features before they are released to the public.
By staying informed about Apple’s accessibility updates, you can ensure that you’re using the latest tools and techniques to create a more accessible and inclusive world.
20. Conclusion: Empowering Users with Guided Access
Guided Access is a powerful and versatile accessibility feature that can enhance productivity, safety, and user experience on iPhones. By understanding its capabilities and limitations, and by using it ethically and responsibly, you can empower users of all ages and abilities to get the most out of their devices.
From parental control to focus and productivity, from accessibility for individuals with cognitive impairments to trade shows and kiosks, Guided Access has a wide range of applications in various scenarios.
As Apple continues to improve its accessibility features, Guided Access will likely become even more powerful and user-friendly in the future.
Remember to visit CONDUCT.EDU.VN for more information on ethical conduct and responsible technology use. Our resources can help you navigate the complex ethical challenges of the digital age and make informed decisions about technology use.
Contact Us:
- Address: 100 Ethics Plaza, Guideline City, CA 90210, United States
- WhatsApp: +1 (707) 555-1234
- Website: conduct.edu.vn
Take control of your iPhone experience with Guided Access, and discover the many ways it can improve your life and the lives of others.
 ios13-iphone-xs-settings-accessibility-guided-access-safari
Alt: iPhone XS Accessibility settings displaying Guided Access in Safari
Frequently Asked Questions (FAQ) About Guided Access
1. What is Guided Access on iPhone?
Guided Access is an accessibility feature on iPhones that locks the device into a single app and allows you to control which features are available, such as disabling the volume buttons or certain areas of the screen.
2. How do I turn on Guided Access on my iPhone?
Go to Settings > Accessibility > Guided Access, then turn on the Guided Access toggle. You will also need to set a passcode to exit Guided Access.
3. How do I start a Guided Access session?
Open the app you want to use, then triple-click the side button (on iPhones with Face ID) or the Home button (on iPhones with a Home button). Configure any desired restrictions, then tap “Start.”
4. How do I end a Guided Access session?
Triple-click the side button or Home button, enter your Guided Access passcode, then tap “End.” If you enabled Face ID or Touch ID, you can use those instead of the passcode.
5. What can I do if I forget my Guided Access passcode?
If you forget your Guided Access passcode, you will need to erase your iPhone and restore it from a backup.
6. Can I use Guided Access with any app?
Yes, you can use Guided Access with any app on your iPhone.
7. Can I set a time limit for a Guided Access session?
Yes, you can set a time limit in the Guided Access options. The session will automatically end when the time expires.
8. Can I disable the volume buttons during a Guided Access session?
Yes, you can disable the volume buttons in the Guided Access options.
9. Can I disable touch input on certain areas of the screen during a Guided Access session?
Yes, you can draw circles around areas of the screen to disable touch input in those areas.
10. Is Guided Access the same as Screen Time?
No, Guided Access is a single-app locking feature, while Screen Time provides broader parental control features, such as setting time limits for app categories and blocking specific websites.
By understanding these frequently asked questions, you can effectively use Guided Access on your iPhone and tailor the experience to meet your specific needs.
Alt: Accessibility Icon for Guided Access Volume Controls
Alt: Accessibility Icon for Guided Access Keyboard Settings
Alt: Accessibility Icon for Guided Access Dictionary Lookup