Guided Access is a powerful feature on your iPad 10th generation that lets you temporarily lock the device to a single app. This is incredibly useful for various situations, whether you’re lending your iPad to a child, need to focus on a specific task without distractions, or want to create a controlled kiosk-like experience. This guide provides a comprehensive walkthrough on How To Turn On Guided Access On Ipad 10th Generation and customize it to your specific needs.
Setting Up Guided Access on Your iPad 10th Generation
Before you can start using Guided Access, you’ll need to enable and configure it in your iPad’s settings. Here’s how:
-
Open the Settings App: Locate and tap the “Settings” app icon on your iPad’s home screen.
-
Navigate to Accessibility: In the Settings menu, scroll down and tap on “Accessibility”.
-
Find Guided Access: Under the “General” section of the Accessibility settings, scroll down and tap on “Guided Access.”
-
Turn on Guided Access: Toggle the switch next to “Guided Access” to the ON position. It will turn green, indicating that Guided Access is now enabled.
 iPad Guided Access settings showing the Guided Access toggle turned on.
Configuring Guided Access Settings
Once Guided Access is enabled, you can customize its settings to suit your specific requirements:
-
Passcode Settings: This allows you to set a passcode that will be required to exit Guided Access. Tap “Passcode Settings,” then “Set Guided Access Passcode.” Enter a passcode and confirm it. For added convenience, you can also enable Face ID or Touch ID (if your iPad model supports it) to end Guided Access sessions. This offers a quick and secure way to disable the feature.
-
Time Limits: This option lets you set a time limit for Guided Access sessions. You can choose to have a sound play or have Siri speak the time remaining before the session ends. This is perfect for limiting screen time for children or ensuring you stay on task.
-
Accessibility Shortcut: This allows you to use the Accessibility Shortcut (triple-clicking the top button) during Guided Access sessions. This can be useful for quickly accessing other accessibility features if needed.
-
Display Auto-Lock: Here, you can set how long it takes for your iPad to automatically lock during a Guided Access session. This can help conserve battery life.
Starting a Guided Access Session
Now that you’ve set up Guided Access, you’re ready to start a session:
-
Open the Desired App: Launch the app you want to lock your iPad to. For example, if you want to lock the iPad to a specific educational game for your child, open that game.
-
Activate Guided Access:
- Triple-click the top button on your iPad 10th generation. This will bring up the Guided Access menu.
- Alternatively, you can use Siri by saying “Turn on Guided Access.” Make sure Siri is enabled on your iPad.
-
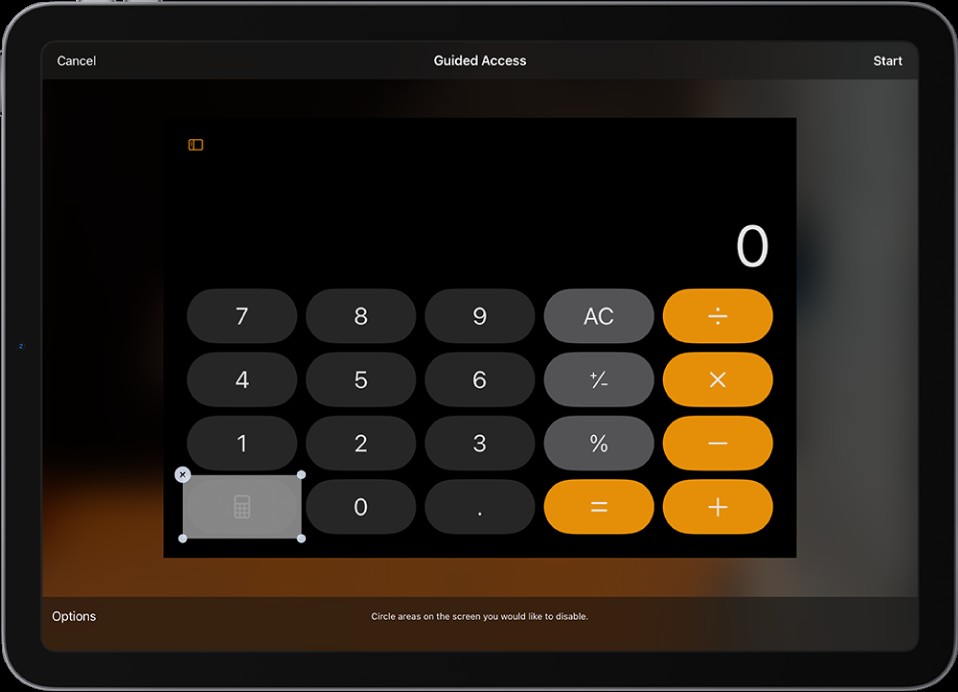
Customize Restrictions (Optional): In the Guided Access menu, you can circle any areas of the screen you want to disable. For example, you might want to disable the home button or certain in-app purchase buttons. Simply draw a circle around the area you want to disable. You can also drag the mask into position or use the handles to adjust its size.
-
Configure Options: Tap “Options” at the bottom of the screen. Here, you can enable or disable the following:
- Top Button: Disable the top button (power button).
- Volume Buttons: Disable the volume buttons.
- Motion: Prevent the iPad from switching between portrait and landscape orientation or responding to other motions.
- Software Keyboards: Disable the software keyboard.
- Touch: Disable touch input completely for specific areas or the entire screen.
- Time Limit: Set a specific time limit for the Guided Access session.
-
Start Guided Access: Once you’ve configured all the settings, tap “Start” in the upper-right corner of the screen. Guided Access is now active, and your iPad is locked to the current app with the specified restrictions.
Ending a Guided Access Session
To exit Guided Access, follow these steps:
-
Triple-Click the Top Button: Triple-click the top button on your iPad 10th generation.
-
Enter Passcode or Use Face ID/Touch ID:
- If you set a Guided Access passcode, enter it now. If you didn’t set a Guided Access passcode, you may be prompted to enter your iPad’s regular passcode.
- If you enabled Face ID or Touch ID for Guided Access, double-click the top button and use Face ID or Touch ID to unlock the device.
-
Tap “End”: After successfully entering your passcode or using biometric authentication, tap “End” in the upper-left corner of the screen to exit Guided Access.
Tips for Using Guided Access Effectively
- Plan Ahead: Before starting a Guided Access session, consider what restrictions you need to set. This will save you time and ensure the session is properly configured.
- Test Your Settings: Always test your Guided Access settings before entrusting your iPad to someone else, especially children. Make sure the restrictions are working as intended.
- Remember Your Passcode: It’s crucial to remember your Guided Access passcode. If you forget it, you may need to restore your iPad to factory settings, which will erase all your data.
- Explore Accessibility Features: Guided Access is just one of many accessibility features available on your iPad. Explore other features like VoiceOver, Zoom, and AssistiveTouch to further customize your iPad experience.
Guided Access is a valuable tool for anyone who wants to control how their iPad is used. By following these steps, you can easily turn on Guided Access on iPad 10th generation and customize it to your specific needs, creating a safer and more focused iPad experience.