The Guides feature in Cricut Design Space is a fantastic tool for crafting enthusiasts, allowing you to turn shapes, text, and images into non-printing guides. This provides the flexibility to perfectly plan your projects on the canvas, visualize the final layout, and even leave yourself helpful reminders. Let’s dive into how to access and use this feature.
First, ensure you have the updated Design Space version. This feature is available for:
- Design Space for Desktop on version 7.6
- Design Space for iOS on version 5.5
Android users, don’t worry! Cricut is actively working to bring this feature to your devices soon.
Once you’ve confirmed you have the correct version, follow these steps to turn on and use Smart Guides:
-
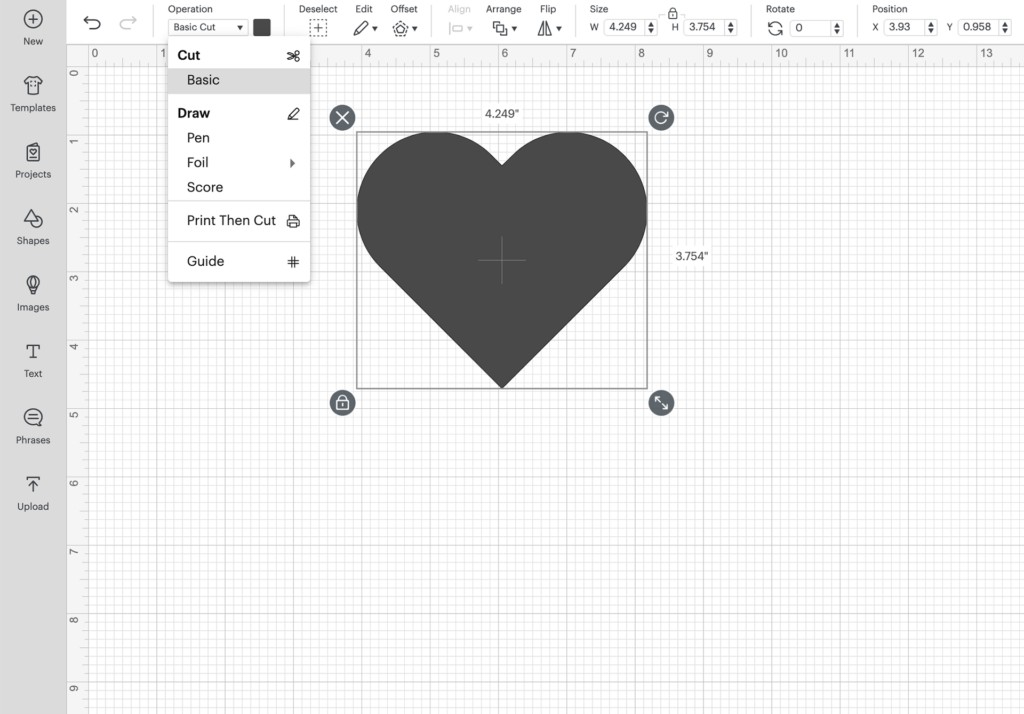
Select your design: Open Cricut Design Space and choose the design you’d like to work with.
-
Navigate to “Operation”: Locate the “Operation” dropdown menu, usually found in the top left corner of your screen, depending on your Design Space interface.
-
Change “Basic Cut” to “Guide”: Click the “Operation” dropdown menu. Initially, it will likely display “Basic Cut” (or another operation type). Select “Guide” from the list.
Now your selected shape, text, or image will act as a guide. These guides will not be cut, drawn, scored, or perform any other function when you proceed to “Make It” and view your mat preview. This offers a multitude of creative possibilities.
Unleashing the Power of Guides: Creative Applications
Let’s explore some practical ways you can leverage the Guides feature to enhance your Cricut projects:
1. Creating Accurate Templates
Guides are invaluable for creating templates to visualize your designs on specific surfaces. For example, if you’re customizing a doormat, measure the doormat’s dimensions and create a rectangle in Design Space matching those measurements. Then, convert the rectangle into a Guide. You can now arrange your design elements within the Guide, ensuring perfect sizing and placement before you cut your materials. This eliminates guesswork and prevents wasted material.
2. Precise Card Embellishments
Personalized cards are even more special when embellished with care. Use Guides to plan your embellishment layout before committing to adhesives. Create a rectangle representing your card, turn it into a Guide, and then experiment with the placement of different elements like stickers, drawings, or layered cardstock pieces.
3. Leaving Helpful Assembly Notes
Forget messy sticky notes! Now you can leave yourself reminders directly on your Design Space canvas. Simply add a text box, type your note (e.g., “Assemble flower layers in this order”), and convert the text box into a Guide. The note will be visible as you design, but it won’t be cut or drawn when you send the project to your Cricut machine.
Conclusion
The Guides feature in Cricut Design Space is a valuable addition to your crafting toolkit. It empowers you to design with greater precision, visualize your projects before cutting, and stay organized throughout the creative process. By understanding how to turn on Smart Guides and exploring their diverse applications, you can unlock new levels of creativity and efficiency in your Cricut projects. Remember to keep your Design Space software up-to-date to enjoy the latest features and enhancements. Happy crafting!