PowerPoint Smart Guides offer an efficient approach to precisely align objects, and CONDUCT.EDU.VN is here to guide you on how to enable and effectively use this feature. Understanding these guides can elevate your presentation design, ensuring a polished and professional look with alignment accuracy. Smart alignment contributes to professional presentations, improving visual communication and slide design.
1. Accessing Smart Guides in PowerPoint
The initial step involves accessing the Smart Guides feature within PowerPoint. This is a straightforward process designed to enhance the precision of your slide design.
1.1. Launching PowerPoint
Begin by opening the PowerPoint application on your computer. Ensure that you have a presentation open or create a new one to proceed with enabling Smart Guides. This initial step is crucial for accessing the necessary features.
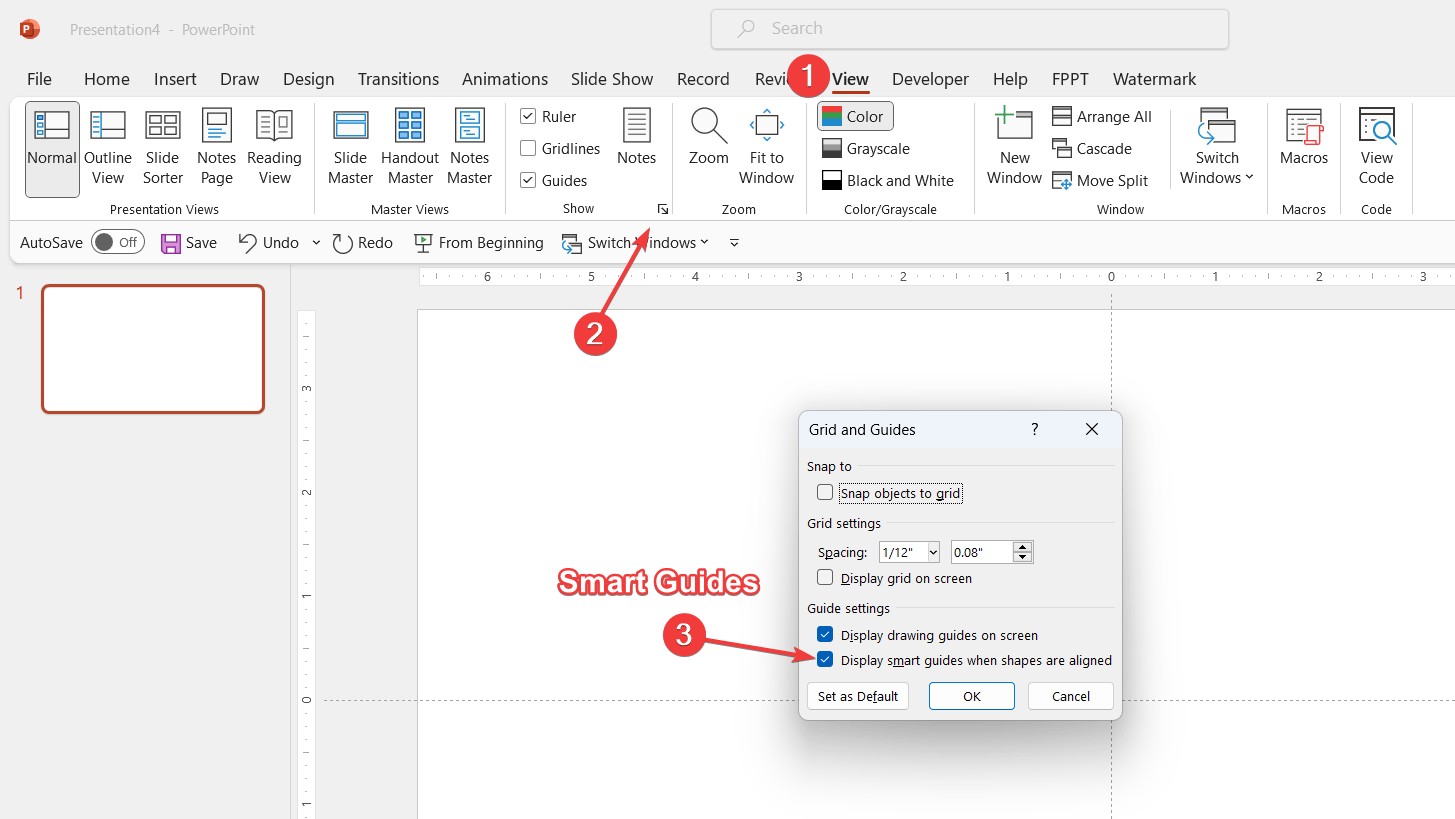
1.2. Navigating to the ‘View’ Tab
Once PowerPoint is open, locate the Ribbon at the top of the screen. Click on the ‘View’ tab. This tab contains various options for customizing the presentation view, including access to Smart Guides.
1.3. Locating the ‘Show’ Group
Within the ‘View’ tab, find the ‘Show’ group. This section houses several options related to how elements are displayed on your slides.
1.4. Opening the Grid and Guides Dialog Box
In the ‘Show’ group, look for a small square icon, often indicated with an arrow or label. Clicking this icon opens the ‘Grid and Guides’ dialog box. This box contains settings for grids, guides, and Smart Guides.
2. Enabling Smart Guides
Once you’ve accessed the ‘Grid and Guides’ dialog box, the next step is to enable the Smart Guides feature. This will allow you to align objects with precision as you design your slides.
2.1. Locating the Smart Guides Checkbox
Within the ‘Grid and Guides’ dialog box, find the checkbox labeled Display smart guides when shapes are aligned. This checkbox controls whether Smart Guides are active during your work.
2.2. Ticking the Checkbox to Enable Smart Guides
If the checkbox is not already ticked, click on it to enable Smart Guides. A checkmark should appear in the box, indicating that the feature is now active.
2.3. Confirming Activation
After ticking the checkbox, ensure that the setting is saved by closing the dialog box. Smart Guides should now be enabled, and you’ll see them appear as you move objects around on your slides.
 Open Grid and Guides dialog
3. Utilizing Smart Guides for Precise Object Movement
With Smart Guides activated, you can now move objects with enhanced precision. This feature ensures your slides are visually balanced and professionally aligned.
3.1. Selecting an Object to Move
Begin by clicking on the object you wish to move on your slide. This could be a shape, text box, image, or any other element.
3.2. Dragging the Object
Click and drag the selected object to its new position. As you move it, keep an eye out for the appearance of dotted lines.
3.3. Interpreting Dotted Lines
These dotted lines are Smart Guides in action. They appear as the object approaches alignment with other objects on the slide.
3.4. Achieving Perfect Alignment
When the object aligns perfectly with another object, the dotted lines will turn solid. This indicates precise alignment, ensuring your objects are perfectly positioned.
4. Aligning Objects Across Slides
Smart Guides are not limited to a single slide; they can also assist in aligning objects across multiple slides in your presentation. This ensures consistency and a professional look throughout your entire presentation.
4.1. Copying or Moving Objects Between Slides
Start by copying or moving the object you want to align from one slide to another. You can do this by using the copy and paste functions or by dragging the object to a new slide in the slide sorter view.
4.2. Using Smart Guides for Alignment
As you move the object on the new slide, Smart Guides will appear, helping you align it with other objects on that slide. These guides work the same way as they do within a single slide, providing visual cues for perfect alignment.
4.3. Maintaining Consistency
By using Smart Guides across slides, you can ensure that your objects are consistently aligned throughout your presentation. This is particularly useful for logos, headers, and other elements that appear on multiple slides.
5. Evenly Spacing Objects with Smart Guides
Achieving equal spacing between objects is a common design requirement. Smart Guides make this task simple and efficient.
5.1. Establishing a Reference Point
Begin by aligning two objects to serve as a reference point for your spacing. Ensure these objects are positioned where you want the outer boundaries of your evenly spaced objects to be.
5.2. Dragging a Third Object
Drag a third object between the two reference objects. As you move it, Smart Guides will appear when this object is equidistant from the two reference objects.
5.3. Confirming Equal Spacing
The Smart Guides will display a visual cue, such as a line or marker, indicating that the third object is perfectly centered between the two reference objects. This ensures equal spacing.
6. Aligning Objects with Slide Elements
Smart Guides are versatile and can also be used to align objects with key slide elements, enhancing the overall layout and design of your presentation.
6.1. Identifying Key Slide Elements
Key slide elements include:
- Slide edges
- Center of the slide
- Other fixed elements
6.2. Moving Objects Towards Slide Elements
As you move an object, Smart Guides will show alignment lines corresponding to these elements. These lines indicate when the object is aligned with the slide’s edges, center, or other fixed elements.
6.3. Achieving Precise Alignment
Use these alignment lines to precisely position your objects in relation to the slide elements. This ensures a balanced and professional look for your presentation.
7. Temporarily Disabling Smart Guides
In some situations, you may need to make minute adjustments without the assistance of Smart Guides. PowerPoint allows you to temporarily disable them.
7.1. Pressing and Holding the ‘ALT’ or ‘Option’ Key
To temporarily disable Smart Guides, press and hold the ‘ALT’ key on Windows or the ‘Option’ key on Mac while dragging the object.
7.2. Dragging the Object Without Smart Guides
While holding the key, drag the object to its new position. Smart Guides will be temporarily disabled for this specific action, allowing you to make fine-tuned adjustments without their assistance.
7.3. Releasing the Key to Re-enable Smart Guides
Once you release the ‘ALT’ or ‘Option’ key, Smart Guides will be re-enabled. This allows you to quickly switch between using and not using Smart Guides as needed.
8. Troubleshooting: Smart Guides Not Showing
If Smart Guides are not appearing when you expect them to, there are a few troubleshooting steps you can take to resolve the issue.
8.1. Checking Grid & Guidelines Settings
The first step is to check the Grid & Guidelines settings to ensure that Smart Guides are enabled.
8.2. Accessing the Grid and Guides Dialog Box
Navigate to the ‘View’ tab in the Ribbon and click on the small square icon in the ‘Show’ group to open the ‘Grid and Guides’ dialog box.
8.3. Ensuring the Checkbox is Ticked
In the dialog box, make sure the checkbox labeled Display smart guides when shapes are aligned is ticked. If it is not, click on it to enable Smart Guides.
8.4. Restarting PowerPoint
If Smart Guides still do not appear after checking the settings, try restarting PowerPoint. This can resolve any temporary glitches that may be preventing Smart Guides from functioning correctly.
9. Real-Life Applications of Smart Guides
Smart Guides are not just for basic alignment; they have numerous practical applications that can significantly improve the quality and professionalism of your presentations.
9.1. Creating Professional-Looking Slides
Smart Guides help ensure that all elements on your slides are aligned and spaced correctly, contributing to a polished and professional look. This is particularly important for presentations that are used in business or academic settings.
9.2. Enhancing Visual Communication
Proper alignment and spacing make your slides easier to read and understand. Smart Guides help you create visually appealing slides that effectively communicate your message.
9.3. Improving Design Consistency
By using Smart Guides, you can maintain a consistent design across all slides in your presentation. This creates a cohesive and professional look that enhances the overall impact of your message.
10. The Importance of Visual Communication
In today’s world, where presentations play a crucial role in various fields, visual communication is paramount. Smart Guides help you create visually appealing slides that effectively convey your message.
10.1. Making a Strong First Impression
A well-designed presentation can make a strong first impression on your audience. Smart Guides help you create slides that are visually appealing and professional, ensuring that your message is well-received.
10.2. Engaging Your Audience
Visually engaging slides can capture and maintain your audience’s attention. Smart Guides help you create slides that are both informative and visually appealing, keeping your audience engaged throughout your presentation.
10.3. Improving Information Retention
Well-designed slides can improve information retention. Smart Guides help you create slides that are easy to read and understand, making it easier for your audience to remember key points from your presentation.
11. Understanding PowerPoint’s Interface
To effectively use Smart Guides, it’s essential to have a solid understanding of PowerPoint’s interface. This includes knowing where to find key features and how to navigate the application.
11.1. Navigating the Ribbon
The Ribbon is the main toolbar at the top of the PowerPoint window. It contains various tabs, each with its own set of tools and options. Understanding how to navigate the Ribbon is crucial for accessing the features you need.
11.2. Using the Quick Access Toolbar
The Quick Access Toolbar is a customizable toolbar located at the very top of the PowerPoint window. You can add frequently used commands to this toolbar for quick and easy access.
11.3. Exploring the File Menu
The File menu contains options for creating, opening, saving, and printing presentations. It also includes settings for customizing PowerPoint’s behavior.
12. Advanced Techniques for Using Smart Guides
Once you’ve mastered the basics of using Smart Guides, you can explore some advanced techniques to further enhance your presentation design.
12.1. Using Smart Guides with Grouped Objects
Smart Guides can be used with grouped objects to align and space them as a single unit. This is particularly useful for complex layouts with multiple elements.
12.2. Creating Custom Guides
In addition to Smart Guides, PowerPoint allows you to create custom guides to align objects with specific points on your slides. This gives you even more control over your layout.
12.3. Using Smart Guides with Tables and Charts
Smart Guides can be used to align tables and charts with other elements on your slides. This ensures that your data is presented in a visually appealing and professional manner.
13. Incorporating Branding Elements Using Smart Guides
Maintaining brand consistency is crucial for professional presentations. Smart Guides can assist in accurately positioning logos, brand colors, and other branding elements.
13.1. Precise Placement of Logos
Use Smart Guides to ensure logos are consistently placed in the same location on each slide, reinforcing brand recognition.
13.2. Aligning Brand Colors
When using colored shapes or backgrounds, Smart Guides help maintain alignment with other elements, ensuring brand colors are consistently presented.
13.3. Consistent Font Alignment
Ensure that headings and body text are aligned consistently using Smart Guides, maintaining a uniform look that reflects brand guidelines.
14. Enhancing Visual Hierarchy with Smart Guides
Visual hierarchy helps guide the audience’s eye through the presentation. Use Smart Guides to create a clear visual hierarchy, emphasizing key information.
14.1. Aligning Titles and Subtitles
Use Smart Guides to align titles and subtitles, creating a clear structure that helps the audience understand the flow of information.
14.2. Spacing Text Blocks
Ensure that text blocks are evenly spaced using Smart Guides, improving readability and reducing visual clutter.
14.3. Aligning Images with Text
Align images with corresponding text using Smart Guides, creating a balanced layout that enhances visual appeal and understanding.
15. Utilizing Smart Guides for Data Visualization
Data visualization is a critical aspect of many presentations. Smart Guides can help ensure that charts, graphs, and other visual representations of data are accurately aligned and presented.
15.1. Aligning Chart Elements
Use Smart Guides to align chart titles, labels, and legends, ensuring that data is presented in a clear and organized manner.
15.2. Consistent Graph Placement
Ensure that graphs are consistently placed on each slide using Smart Guides, maintaining a uniform look throughout the presentation.
15.3. Aligning Data Tables
Use Smart Guides to align data tables with surrounding text and images, creating a cohesive and visually appealing presentation of data.
16. Creating Infographics with Precision
Infographics are a powerful tool for conveying complex information in a visually engaging format. Smart Guides can help ensure that all elements of your infographics are precisely aligned and spaced.
16.1. Aligning Icons
Use Smart Guides to align icons with corresponding text, creating a clear and visually appealing representation of information.
16.2. Spacing Infographic Elements
Ensure that infographic elements are evenly spaced using Smart Guides, improving readability and reducing visual clutter.
16.3. Aligning Visuals with Text
Align visuals with corresponding text using Smart Guides, creating a balanced layout that enhances visual appeal and understanding.
17. Tips for Optimizing Slide Layout with Smart Guides
Optimizing slide layout is crucial for creating effective presentations. Here are some tips for using Smart Guides to improve your slide layouts.
17.1. Use Grids and Guides Together
Combine Smart Guides with PowerPoint’s grid feature for even more precise alignment and spacing.
17.2. Create a Template
Create a template with predefined guides to ensure consistent layout across all slides.
17.3. Use the Ruler
Use the ruler to measure distances between objects and ensure accurate alignment.
18. The Role of Smart Guides in Collaborative Projects
In collaborative projects, maintaining consistency is essential. Smart Guides can help ensure that all team members adhere to the same layout standards.
18.1. Shared Templates
Create and share templates with predefined guides to ensure consistency across all team members.
18.2. Style Guides
Develop a style guide that outlines the use of Smart Guides and other layout standards.
18.3. Regular Reviews
Conduct regular reviews to ensure that all team members are adhering to the established standards.
19. Accessibility Considerations When Using Smart Guides
When designing presentations, it’s important to consider accessibility for all audience members. Smart Guides can help ensure that your slides are accessible to people with disabilities.
19.1. Clear Visual Hierarchy
Use Smart Guides to create a clear visual hierarchy, making it easier for people with visual impairments to understand the flow of information.
19.2. Sufficient Contrast
Ensure that there is sufficient contrast between text and background colors, making it easier for people with low vision to read the text.
19.3. Alternative Text for Images
Provide alternative text for all images, making it easier for people with visual impairments to understand the content of the images.
20. Maximizing Efficiency with Keyboard Shortcuts
Using keyboard shortcuts can significantly improve your efficiency when working with Smart Guides. Here are some useful shortcuts.
20.1. Temporary Disable
Hold the ‘ALT’ key on Windows or the ‘Option’ key on Mac to temporarily disable Smart Guides.
20.2. Nudging Objects
Use the arrow keys to nudge objects into precise alignment.
20.3. Copy and Paste
Use Ctrl+C and Ctrl+V (or Cmd+C and Cmd+V on Mac) to quickly copy and paste objects.
21. Common Mistakes to Avoid When Using Smart Guides
While Smart Guides are a powerful tool, it’s important to avoid some common mistakes to ensure that you’re using them effectively.
21.1. Over-Reliance
Don’t rely too heavily on Smart Guides. Use your own judgment to ensure that objects are aligned and spaced correctly.
21.2. Ignoring Visual Balance
Pay attention to visual balance. Just because objects are aligned doesn’t mean that the layout is visually appealing.
21.3. Cluttered Layouts
Avoid creating cluttered layouts. Use Smart Guides to create a clean and organized look.
22. Incorporating User Feedback for Continuous Improvement
Gathering user feedback is crucial for continuous improvement. Use feedback to refine your use of Smart Guides and improve the overall quality of your presentations.
22.1. Conduct Surveys
Conduct surveys to gather feedback from audience members.
22.2. Analyze Performance
Analyze the performance of your presentations to identify areas for improvement.
22.3. Iterate and Refine
Iterate and refine your use of Smart Guides based on feedback and performance data.
23. Future Trends in Presentation Design
Staying up-to-date with the latest trends in presentation design can help you create more effective and engaging presentations.
23.1. Minimalist Design
Embrace minimalist design principles to create clean and uncluttered layouts.
23.2. Interactive Elements
Incorporate interactive elements to engage your audience.
23.3. Storytelling
Use storytelling techniques to create more compelling presentations.
24. Resources for Learning More About Smart Guides
There are many resources available for learning more about Smart Guides and presentation design.
24.1. Online Tutorials
Explore online tutorials on sites like YouTube and LinkedIn Learning.
24.2. PowerPoint Help
Consult PowerPoint’s built-in help resources.
24.3. Design Blogs
Read design blogs for tips and inspiration.
25. Automating Alignment with Macros and Add-ins
For advanced users, automating alignment tasks with macros and add-ins can significantly boost productivity.
25.1. Creating Custom Macros
Create custom macros to automate repetitive alignment tasks.
25.2. Using Add-ins
Explore PowerPoint add-ins that offer advanced alignment features.
25.3. Scripting
Use scripting languages like VBA to create custom alignment tools.
26. The Ethical Implications of Visual Communication
Ethical considerations are paramount in visual communication. Ensure that your presentations are honest, accurate, and respectful.
26.1. Accurate Data
Present data accurately and avoid misleading visualizations.
26.2. Respectful Imagery
Use imagery that is respectful and avoids stereotypes.
26.3. Transparency
Be transparent about your sources and methods.
27. Integrating Smart Guides with Other Design Tools
Smart Guides can be integrated with other design tools to create more sophisticated presentations.
27.1. Adobe Illustrator
Use Adobe Illustrator to create custom graphics and import them into PowerPoint.
27.2. Adobe Photoshop
Use Adobe Photoshop to edit images and optimize them for PowerPoint.
27.3. Canva
Use Canva to create visually appealing graphics and layouts.
28. Customizing Smart Guides for Specific Needs
PowerPoint allows for some customization of Smart Guides, enabling users to tailor the feature to their specific design requirements.
28.1. Adjusting Sensitivity
Some add-ins or third-party tools may offer options to adjust the sensitivity of Smart Guides, controlling how closely objects need to be aligned for the guides to appear.
28.2. Color Customization
While PowerPoint doesn’t natively support color customization for Smart Guides, certain add-ins may provide this functionality to enhance visibility against different slide backgrounds.
28.3. Creating Presets
Develop custom presets or templates with specific guide configurations to streamline the design process for recurring presentation types.
29. Best Practices for Mobile Presentations
With the increasing use of mobile devices for presentations, optimizing slides for smaller screens is essential. Smart Guides can help ensure that your slides are easily viewable and navigable on mobile devices.
29.1. Simplified Layouts
Use simplified layouts with fewer elements to improve readability on smaller screens.
29.2. Larger Font Sizes
Use larger font sizes to ensure that text is legible on mobile devices.
29.3. Responsive Design
Design your slides to be responsive, adjusting to different screen sizes and orientations.
30. Measuring the Impact of Well-Aligned Presentations
Measuring the impact of well-aligned presentations can provide valuable insights into the effectiveness of your visual communication.
30.1. Audience Engagement
Track audience engagement metrics such as attention span and participation.
30.2. Information Retention
Assess information retention through quizzes or surveys.
30.3. Business Outcomes
Measure business outcomes such as sales and customer satisfaction.
In conclusion, PowerPoint’s Smart Guides are an invaluable asset for anyone looking to create polished and professional presentations. By understanding how to enable and effectively use this feature, you can ensure that your slides are visually appealing, easy to understand, and impactful. For more detailed guides and resources on presentation design and ethical guidelines, visit CONDUCT.EDU.VN. We are located at 100 Ethics Plaza, Guideline City, CA 90210, United States. You can also contact us via Whatsapp at +1 (707) 555-1234 or visit our website at CONDUCT.EDU.VN. Unlock the full potential of your presentations with the power of alignment accuracy today. Don’t struggle with misaligned objects and unprofessional-looking slides. Visit conduct.edu.vn now to discover detailed guides and resources that will transform your presentations and elevate your visual communication skills. Achieve pixel-perfect precision and create presentations that captivate your audience and drive results.