How To Use A Honing Guide For Chisels effectively involves understanding the right techniques and tools for achieving optimal sharpness. CONDUCT.EDU.VN provides clear guidance on mastering this essential woodworking skill, improving your precision, and extending the life of your tools. Discover the benefits of using sharpening jigs, honing stones, and lapping film for professional-quality results.
Table of Contents
1. Understanding the Basics of Honing Chisels
4. Essential Tools and Materials
- 4.1. Honing Stones
- 4.2. Lapping Film
- 4.3. Flattening Stone or Plate
- 4.4. Water or Honing Oil
- 4.5. Soft Cloth or Towel
5. Preparing Your Chisel for Honing
6. Setting Up Your Honing Guide
- 6.1. Identifying the Correct Angle
- 6.2. Adjusting the Honing Guide
- 6.3. Securing the Chisel in the Honing Guide
7. The Honing Process: Step-by-Step
- 8.1. Creating a Micro-Bevel
- 8.2. Using a Two-Bevel Honing Method
- 8.3. Honing Curved or Skewed Chisels
9. Maintaining Your Honing Stones
10. Troubleshooting Common Honing Issues
12. The Importance of Sharp Chisels in Woodworking
13. Integrating Honing Guides with Other Sharpening Methods
14. Choosing the Right Honing Guide for Your Needs
15. Case Studies: Successful Honing Techniques
16. Expert Tips from Seasoned Woodworkers
17. The Future of Honing Technology
18. Conclusion: Mastering the Honing Guide for Optimal Results
19. FAQ: Frequently Asked Questions About Honing Chisels
1. Understanding the Basics of Honing Chisels
Honing chisels is a critical skill for any woodworker aiming for precision and quality in their projects. Honing, unlike grinding, is the process of refining the edge of a chisel to make it as sharp as possible. This involves using fine abrasive surfaces, such as honing stones or lapping films, to remove microscopic imperfections and create a polished, razor-sharp edge. The primary goal is to achieve an edge that can cleanly slice through wood fibers, resulting in smooth, accurate cuts. Honing is a maintenance process that should be performed regularly to keep your chisels in optimal condition.
2. Why Use a Honing Guide?
Using a honing guide offers several advantages, particularly for beginners and those who may not have the experience to hone freehand effectively. These guides ensure consistent angles, improve efficiency, and help preserve the life of your tools. Here are the key benefits:
2.1. Consistency and Precision
One of the most significant advantages of using a honing guide is the consistency it provides. A honing guide helps maintain a precise angle between the chisel and the honing surface. This is crucial because maintaining a consistent angle ensures that the entire bevel is evenly sharpened. Without a guide, it’s easy to inadvertently rock the chisel, leading to a rounded edge that is not as sharp. The precision afforded by a honing guide results in a more effective cutting edge.
2.2. Time Efficiency
While freehand honing can be faster for experienced woodworkers who sharpen their tools daily, it requires a significant amount of practice to develop the necessary muscle memory. For most hobbyists and occasional users, a honing guide can be more time-efficient. It eliminates the guesswork involved in maintaining the correct angle, allowing you to focus on the actual sharpening process. This is particularly useful when working with multiple chisels or plane blades, as it ensures each tool is sharpened to the same standard quickly.
2.3. Preserving Tool Life
By maintaining a consistent angle and preventing rounding, a honing guide helps preserve the life of your chisels. Over-honing or incorrect sharpening can gradually wear down the blade, reducing its lifespan. A honing guide minimizes the amount of material removed during each sharpening session, extending the life of your chisels. Additionally, it reduces the likelihood of making mistakes that require extensive grinding to correct, which can also shorten the lifespan of your tools.
3. Types of Honing Guides
Honing guides come in various designs, each with its own set of features and benefits. The main types include fixed-angle, adjustable, and roller-type honing guides. Understanding the differences between these types can help you choose the best option for your specific needs.
3.1. Fixed-Angle Honing Guides
Fixed-angle honing guides are designed to hold the chisel at a specific, predetermined angle. These guides are simple to use, making them ideal for beginners. However, their main limitation is the lack of adjustability. Once set, the guide can only sharpen at that specific angle. This type of guide is suitable if you primarily use chisels with a standard bevel angle and want a straightforward, no-fuss sharpening solution.
3.2. Adjustable Honing Guides
Adjustable honing guides offer greater flexibility by allowing you to set the sharpening angle according to your preferences. These guides typically feature a mechanism that allows you to change the angle of the chisel relative to the honing surface. This adjustability is particularly useful if you work with chisels that have different bevel angles or if you want to experiment with creating secondary bevels. While they may require a bit more setup and calibration, adjustable honing guides provide the versatility needed for a wide range of sharpening tasks.
3.3. Roller-Type Honing Guides
Roller-type honing guides feature a roller that allows the guide to move smoothly across the honing surface. These guides are designed to maintain a consistent angle while minimizing friction, making the sharpening process easier and more efficient. Some roller-type guides also include adjustable features for setting the sharpening angle. The roller mechanism ensures that the chisel maintains constant contact with the honing stone, resulting in an even and consistent sharpening.
4. Essential Tools and Materials
To effectively use a honing guide, you’ll need several essential tools and materials. These include honing stones, lapping film, a flattening stone, water or honing oil, and a soft cloth. Each of these components plays a crucial role in achieving a sharp, well-honed chisel.
4.1. Honing Stones
Honing stones are the primary abrasive surfaces used for sharpening chisels. They come in various grits, ranging from coarse to fine. Coarse stones are used for removing significant imperfections and shaping the bevel, while fine stones are used for polishing the edge to a razor sharpness. Common types of honing stones include water stones, oil stones, and diamond stones. Water stones require water as a lubricant, while oil stones use honing oil. Diamond stones can be used dry or with water and are known for their fast cutting action.
4.2. Lapping Film
Lapping film is an alternative to honing stones, consisting of a thin sheet of abrasive material adhered to a backing. Lapping films come in ultra-fine grits and are used for achieving a highly polished edge. They are particularly effective for creating a mirror-like finish on the bevel and are often used as the final step in the honing process. Lapping films are typically used with a flat surface, such as a piece of glass or granite.
4.3. Flattening Stone or Plate
Maintaining a flat honing surface is essential for effective sharpening. Over time, honing stones can develop an uneven surface due to wear. A flattening stone or plate is used to restore the flatness of your honing stones. These tools are typically made of diamond or silicon carbide and provide a flat, abrasive surface for grinding down any high spots on the honing stone.
4.4. Water or Honing Oil
Water or honing oil is used as a lubricant during the honing process. The lubricant helps to carry away the swarf (tiny metal particles) produced during sharpening, preventing it from clogging the pores of the honing stone. Water is typically used with water stones, while honing oil is used with oil stones. Diamond stones can be used dry or with water, depending on the manufacturer’s recommendations.
4.5. Soft Cloth or Towel
A soft cloth or towel is used for cleaning the chisel and honing stones during and after the sharpening process. It’s important to keep the chisel and stones free of debris to ensure optimal sharpening performance. The cloth should be lint-free to avoid leaving any residue on the blade or stone.
5. Preparing Your Chisel for Honing
Before you begin honing, it’s important to prepare your chisel properly. This involves assessing the chisel edge, cleaning it thoroughly, and grinding it if necessary. Proper preparation ensures that the honing process is effective and efficient.
5.1. Assessing the Chisel Edge
Begin by carefully examining the chisel edge to determine its condition. Look for any chips, dings, or excessive wear. If the edge is severely damaged, you may need to grind it before honing. A slightly dull edge, however, can be easily restored through honing alone. Assessing the edge helps you determine the appropriate course of action and ensures that you’re not wasting time honing a blade that requires more intensive repair.
5.2. Cleaning the Chisel
Clean the chisel thoroughly to remove any dirt, rust, or residue. Use a solvent or mild detergent to remove any grease or oil. A clean chisel ensures that the honing stone is not contaminated and that the sharpening process is not hindered by debris. Dry the chisel completely before proceeding to the next step.
5.3. Grinding (If Necessary)
If the chisel edge is severely damaged or has an incorrect bevel angle, you may need to grind it before honing. Grinding involves using a powered grinder to remove a significant amount of material and reshape the edge. Use a coarse grinding wheel and take care not to overheat the steel, as this can damage the temper of the blade. Grind the chisel to the desired bevel angle, leaving a slightly rough surface that can then be refined through honing.
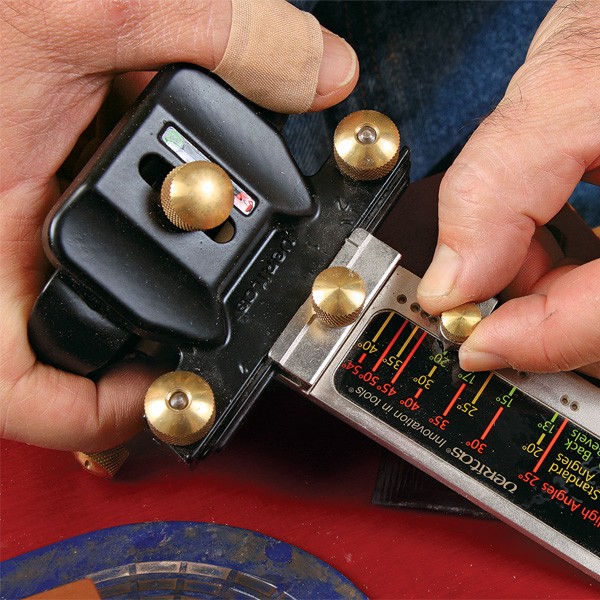
6. Setting Up Your Honing Guide
Setting up your honing guide correctly is crucial for achieving accurate and consistent results. This involves identifying the correct angle, adjusting the honing guide accordingly, and securing the chisel in the guide.
6.1. Identifying the Correct Angle
The correct honing angle depends on the type of chisel and its intended use. Common bevel angles range from 25 to 30 degrees for general-purpose chisels. For chisels used for chopping or heavy-duty work, a slightly steeper angle of 30 to 35 degrees may be preferred. For paring chisels, a shallower angle of 20 to 25 degrees can provide a finer edge. Consult the manufacturer’s recommendations or research the best angle for your specific chisel.
6.2. Adjusting the Honing Guide
Adjust the honing guide to the desired angle using a protractor or angle gauge. Most adjustable honing guides have a mechanism that allows you to change the angle of the chisel relative to the honing surface. Follow the manufacturer’s instructions for setting the angle accurately. Double-check the angle to ensure it is correct before securing the chisel in the guide.
6.3. Securing the Chisel in the Honing Guide
Secure the chisel firmly in the honing guide, ensuring that the blade is centered and aligned correctly. The chisel should be held tightly to prevent it from shifting during the honing process. Some honing guides have a clamping mechanism that securely holds the chisel in place. Ensure that the cutting edge of the chisel is parallel to the roller or reference surface of the honing guide.
7. The Honing Process: Step-by-Step
The honing process involves several steps, including flattening the back of the chisel, honing the bevel, and polishing the edge. Each step is crucial for achieving a razor-sharp edge.
7.1. Flattening the Back of the Chisel
The first step in honing a chisel is to flatten the back of the blade. The back of the chisel should be perfectly flat to ensure that the cutting edge is aligned correctly. Place the back of the chisel on a flattening stone or plate and rub it back and forth using light pressure. Continue until the entire back of the chisel is uniformly flat and polished. This step is particularly important for new chisels, as they may have slight imperfections on the back.
7.2. Honing the Bevel
Once the back of the chisel is flat, you can begin honing the bevel. Place the honing guide with the chisel on a coarse honing stone and apply light pressure. Move the guide back and forth, ensuring that the entire bevel is in contact with the stone. Continue honing until you have removed any scratches or imperfections from the grinding process. Then, move to a medium-grit stone and repeat the process. Finally, use a fine-grit stone to polish the bevel to a razor sharpness.
7.3. Polishing the Edge
The final step in the honing process is to polish the edge of the chisel. This can be done using a very fine honing stone or lapping film. Place the chisel on the polishing surface and move it back and forth using light pressure. Continue until the edge is highly polished and reflects light evenly. A polished edge is sharper and will cut through wood more cleanly.
8. Advanced Honing Techniques
Once you’ve mastered the basic honing process, you can explore advanced techniques to further improve the sharpness and performance of your chisels. These techniques include creating a micro-bevel, using a two-bevel honing method, and honing curved or skewed chisels.
8.1. Creating a Micro-Bevel
A micro-bevel is a small, secondary bevel added to the very edge of the chisel. This technique enhances the sharpness and durability of the cutting edge. After honing the primary bevel, slightly increase the angle of the honing guide by a degree or two and hone the edge again. This creates a tiny micro-bevel that is incredibly sharp and resistant to wear.
8.2. Using a Two-Bevel Honing Method
The two-bevel honing method involves creating two distinct bevels on the chisel edge: a primary bevel and a secondary bevel. The primary bevel is ground to a lower angle, while the secondary bevel is honed to a slightly steeper angle. This technique combines the benefits of a shallow bevel for sharpness and a steeper bevel for durability.
8.3. Honing Curved or Skewed Chisels
Honing curved or skewed chisels requires a slightly different approach than honing straight chisels. For curved chisels, use a curved honing stone or a piece of leather charged with honing compound. Follow the curve of the chisel as you move it across the honing surface. For skewed chisels, ensure that the entire cutting edge is in contact with the honing stone as you move the guide back and forth.
9. Maintaining Your Honing Stones
Proper maintenance of your honing stones is essential for ensuring their performance and longevity. This includes flattening, cleaning, and storing your stones correctly.
9.1. Flattening Your Stones
Over time, honing stones can develop an uneven surface due to wear. A flattening stone or plate is used to restore the flatness of your honing stones. Place the honing stone on a flat surface and rub the flattening stone back and forth using light pressure. Continue until the entire surface of the honing stone is uniformly flat.
9.2. Cleaning Your Stones
Clean your honing stones regularly to remove any swarf or debris. Water stones can be cleaned with water and a scrub brush, while oil stones can be cleaned with honing oil and a cloth. Diamond stones can be cleaned with water or a specialized cleaning solution. A clean honing stone ensures optimal sharpening performance.
9.3. Storing Your Stones
Store your honing stones in a safe, dry place to prevent damage. Water stones should be allowed to dry completely before being stored, while oil stones should be kept lightly oiled. Protect your stones from dust and debris by storing them in a case or container.
10. Troubleshooting Common Honing Issues
Even with a honing guide, you may encounter some common issues during the honing process. Understanding how to troubleshoot these issues can help you achieve better results.
10.1. Rounded Edges
Rounded edges are a common problem when honing chisels. This can occur if you are not maintaining a consistent angle or if you are applying too much pressure. To correct a rounded edge, ensure that you are using a honing guide to maintain a consistent angle and that you are applying light pressure. You may need to grind the chisel back to a straight edge before honing again.
10.2. Uneven Bevels
Uneven bevels can occur if the chisel is not properly aligned in the honing guide or if you are not applying even pressure. To correct an uneven bevel, ensure that the chisel is centered and aligned correctly in the honing guide. Apply even pressure as you move the guide back and forth on the honing stone.
10.3. Scratches on the Bevel
Scratches on the bevel can occur if you are using a honing stone that is too coarse or if there is debris on the stone. To prevent scratches, start with a medium-grit stone and gradually move to finer grits. Clean your honing stones regularly to remove any debris.
11. Safety Precautions
When honing chisels, it’s important to take certain safety precautions to prevent injuries. Always wear safety glasses to protect your eyes from flying debris. Use a honing guide to keep your hands away from the sharp edge of the chisel. Be careful when handling sharp tools and avoid distractions.
12. The Importance of Sharp Chisels in Woodworking
Sharp chisels are essential for achieving precise and clean cuts in woodworking. A sharp chisel requires less force to use, reducing the risk of accidents and improving the quality of your work. Sharp tools also make woodworking more enjoyable and efficient.
13. Integrating Honing Guides with Other Sharpening Methods
Honing guides can be integrated with other sharpening methods to create a comprehensive sharpening system. For example, you can use a grinder to shape the bevel and then use a honing guide to refine the edge. You can also use lapping film after honing to achieve an ultra-polished edge.
14. Choosing the Right Honing Guide for Your Needs
Choosing the right honing guide depends on your specific needs and preferences. Consider the type of chisels you use, your skill level, and your budget. Fixed-angle honing guides are ideal for beginners, while adjustable honing guides offer greater flexibility. Roller-type honing guides provide smooth and consistent sharpening.
15. Case Studies: Successful Honing Techniques
Examining case studies of successful honing techniques can provide valuable insights and practical tips. For example, one case study might demonstrate how a professional woodworker uses a honing guide to maintain the sharpness of their chisels over time. Another case study might explore the use of advanced honing techniques to achieve exceptional results.
16. Expert Tips from Seasoned Woodworkers
Seasoned woodworkers often have valuable tips and tricks for honing chisels. Some common tips include using light pressure, maintaining a consistent angle, and cleaning your honing stones regularly. Learning from the experience of others can help you improve your honing skills.
17. The Future of Honing Technology
The future of honing technology may include advancements in honing guides, sharpening stones, and lapping films. New materials and designs could lead to more efficient and effective sharpening methods. Stay informed about the latest developments in honing technology to stay ahead of the curve.
18. Conclusion: Mastering the Honing Guide for Optimal Results
Mastering the use of a honing guide is essential for achieving optimal results in woodworking. By following the steps outlined in this guide, you can keep your chisels razor sharp and improve the quality of your work. Remember to practice regularly and experiment with different techniques to find what works best for you.
19. FAQ: Frequently Asked Questions About Honing Chisels
Q1: What is the best angle for honing a chisel?
The best angle for honing a chisel typically ranges from 25 to 30 degrees for general-purpose use. For chopping or heavy-duty work, a slightly steeper angle of 30 to 35 degrees may be preferred. For paring chisels, a shallower angle of 20 to 25 degrees can provide a finer edge.
Q2: How often should I hone my chisels?
You should hone your chisels whenever they become dull or lose their sharpness. This could be after each use or after several uses, depending on the type of wood you are working with and the amount of use the chisel receives.
Q3: Can I use a honing guide with any type of chisel?
Yes, you can use a honing guide with most types of chisels, including bench chisels, paring chisels, and mortise chisels. However, you may need to adjust the honing guide to accommodate different chisel sizes and shapes.
Q4: What is the difference between grinding and honing?
Grinding is the process of removing a significant amount of material to reshape the edge of a chisel, while honing is the process of refining the edge to make it as sharp as possible. Grinding is typically done with a powered grinder, while honing is done with fine abrasive surfaces like honing stones or lapping films.
Q5: Do I need to flatten the back of my chisel?
Yes, flattening the back of your chisel is essential for ensuring that the cutting edge is aligned correctly. The back of the chisel should be perfectly flat to ensure that the cutting edge is aligned correctly.
Q6: What is the best type of honing stone to use?
The best type of honing stone to use depends on your preferences and budget. Common types of honing stones include water stones, oil stones, and diamond stones. Water stones require water as a lubricant, while oil stones use honing oil. Diamond stones can be used dry or with water and are known for their fast cutting action.
Q7: How do I clean my honing stones?
Water stones can be cleaned with water and a scrub brush, while oil stones can be cleaned with honing oil and a cloth. Diamond stones can be cleaned with water or a specialized cleaning solution.
Q8: Can I use lapping film instead of honing stones?
Yes, lapping film can be used as an alternative to honing stones. Lapping films come in ultra-fine grits and are used for achieving a highly polished edge. They are particularly effective for creating a mirror-like finish on the bevel and are often used as the final step in the honing process.
Q9: What is a micro-bevel?
A micro-bevel is a small, secondary bevel added to the very edge of the chisel. This technique enhances the sharpness and durability of the cutting edge.
Q10: Where can I find more information about honing chisels?
For more detailed information and guidance on honing chisels, visit CONDUCT.EDU.VN. We provide comprehensive resources and expert tips to help you master this essential woodworking skill.
Ensuring you have the right knowledge and tools for honing chisels is crucial for any woodworking enthusiast. At CONDUCT.EDU.VN, we understand the challenges in finding reliable and easy-to-understand guidance on ethical conduct and best practices. If you’re struggling to find clear information on how to maintain your tools or adhere to industry standards, we’re here to help.
Visit CONDUCT.EDU.VN today to explore our extensive resources and discover how we can assist you in navigating the complexities of ethical behavior and tool maintenance. Our comprehensive guides and expert insights will provide you with the clarity and confidence you need to succeed. Contact us at 100 Ethics Plaza, Guideline City, CA 90210, United States, or reach out via Whatsapp at +1 (707) 555-1234. Let conduct.edu.vn be your trusted partner in achieving excellence in both your craft and your conduct.