The magnetic seam guide for sewing machine offers unparalleled precision and efficiency when aiming for consistent seam allowances and professional-looking stitches. CONDUCT.EDU.VN provides comprehensive guidance on how to use a magnetic seam guide effectively, ensuring your sewing projects achieve flawless results with ease, streamlining the process. Discover expert tips and techniques to master the magnetic seam guide, enhancing your sewing experience and optimizing fabric handling for perfect seams every time.
1. Understanding the Magnetic Seam Guide
A magnetic seam guide is a simple yet invaluable tool for any sewing enthusiast. It’s designed to help you maintain a consistent seam allowance, resulting in neater and more professional-looking projects. This guide attaches magnetically to the metal throat plate of your sewing machine, acting as a fence against which you can guide your fabric.
1.1. What is a Magnetic Seam Guide?
A magnetic seam guide is a small, typically metal or plastic, device with a strong magnet on its underside. This magnet allows it to securely attach to the metal surface of your sewing machine’s throat plate. The guide acts as a physical barrier, helping you keep your fabric aligned as you sew.
1.2. Key Benefits of Using a Magnetic Seam Guide
Using a magnetic seam guide offers several significant advantages:
- Accuracy: Ensures consistent seam allowances for professional-looking results.
- Speed: Allows for faster sewing as you don’t need to constantly monitor the fabric edge.
- Consistency: Helps maintain uniform seams across entire projects.
- Ease of Use: Simple to attach, remove, and reposition.
- Versatility: Suitable for various sewing projects and fabric types.
1.3. Different Types of Magnetic Seam Guides
While the basic function remains the same, magnetic seam guides come in various designs:
- Straight Edge Guides: Simple, straight guides for basic seam allowances.
- Adjustable Guides: Allow you to set different seam allowances.
- Curved Guides: Designed for sewing curves and complex shapes.
- Multi-Purpose Guides: Combine features for a range of sewing tasks.
2. Preparing Your Sewing Machine
Before attaching and using your magnetic seam guide, it’s essential to prepare your sewing machine to ensure optimal performance and prevent any potential damage.
2.1. Cleaning the Throat Plate
A clean throat plate ensures the magnetic seam guide adheres properly and moves smoothly. Use a soft cloth to wipe away any dust, lint, or residue. For stubborn spots, a mild cleaning solution can be used, but ensure it is completely dry before attaching the guide.
2.2. Identifying Metal vs. Non-Metal Areas
Magnetic seam guides work only on metal surfaces. Identify the metal areas on your sewing machine, specifically the throat plate. Some machines may have non-metal coatings or inserts, so ensure the guide is placed directly on a metal part for secure attachment.
2.3. Checking Throat Plate Markings
Many throat plates have markings indicating different seam allowances. Verify the accuracy of these markings before using them to position your magnetic seam guide. Use a ruler or seam gauge to confirm the measurements from the needle to the markings.
2.4. Ensuring Proper Lighting
Adequate lighting is crucial for accurate sewing. Position your sewing machine in a well-lit area or use an additional lamp to clearly see the fabric edge and the seam guide. Proper lighting reduces eye strain and improves precision.
3. Attaching the Magnetic Seam Guide
Attaching the magnetic seam guide correctly is crucial for accurate sewing. Follow these steps to ensure it’s securely positioned and ready for use.
3.1. Choosing the Right Seam Allowance
Determine the seam allowance required for your project. Common seam allowances include 1/4 inch, 1/2 inch, and 5/8 inch. Refer to your pattern instructions to confirm the correct measurement.
3.2. Using Throat Plate Markings as a Guide
Utilize the markings on your throat plate to position the magnetic seam guide. Align the edge of the guide with the appropriate marking that corresponds to your desired seam allowance. For example, if you need a 1/2-inch seam allowance, align the guide with the 1/2-inch marking.
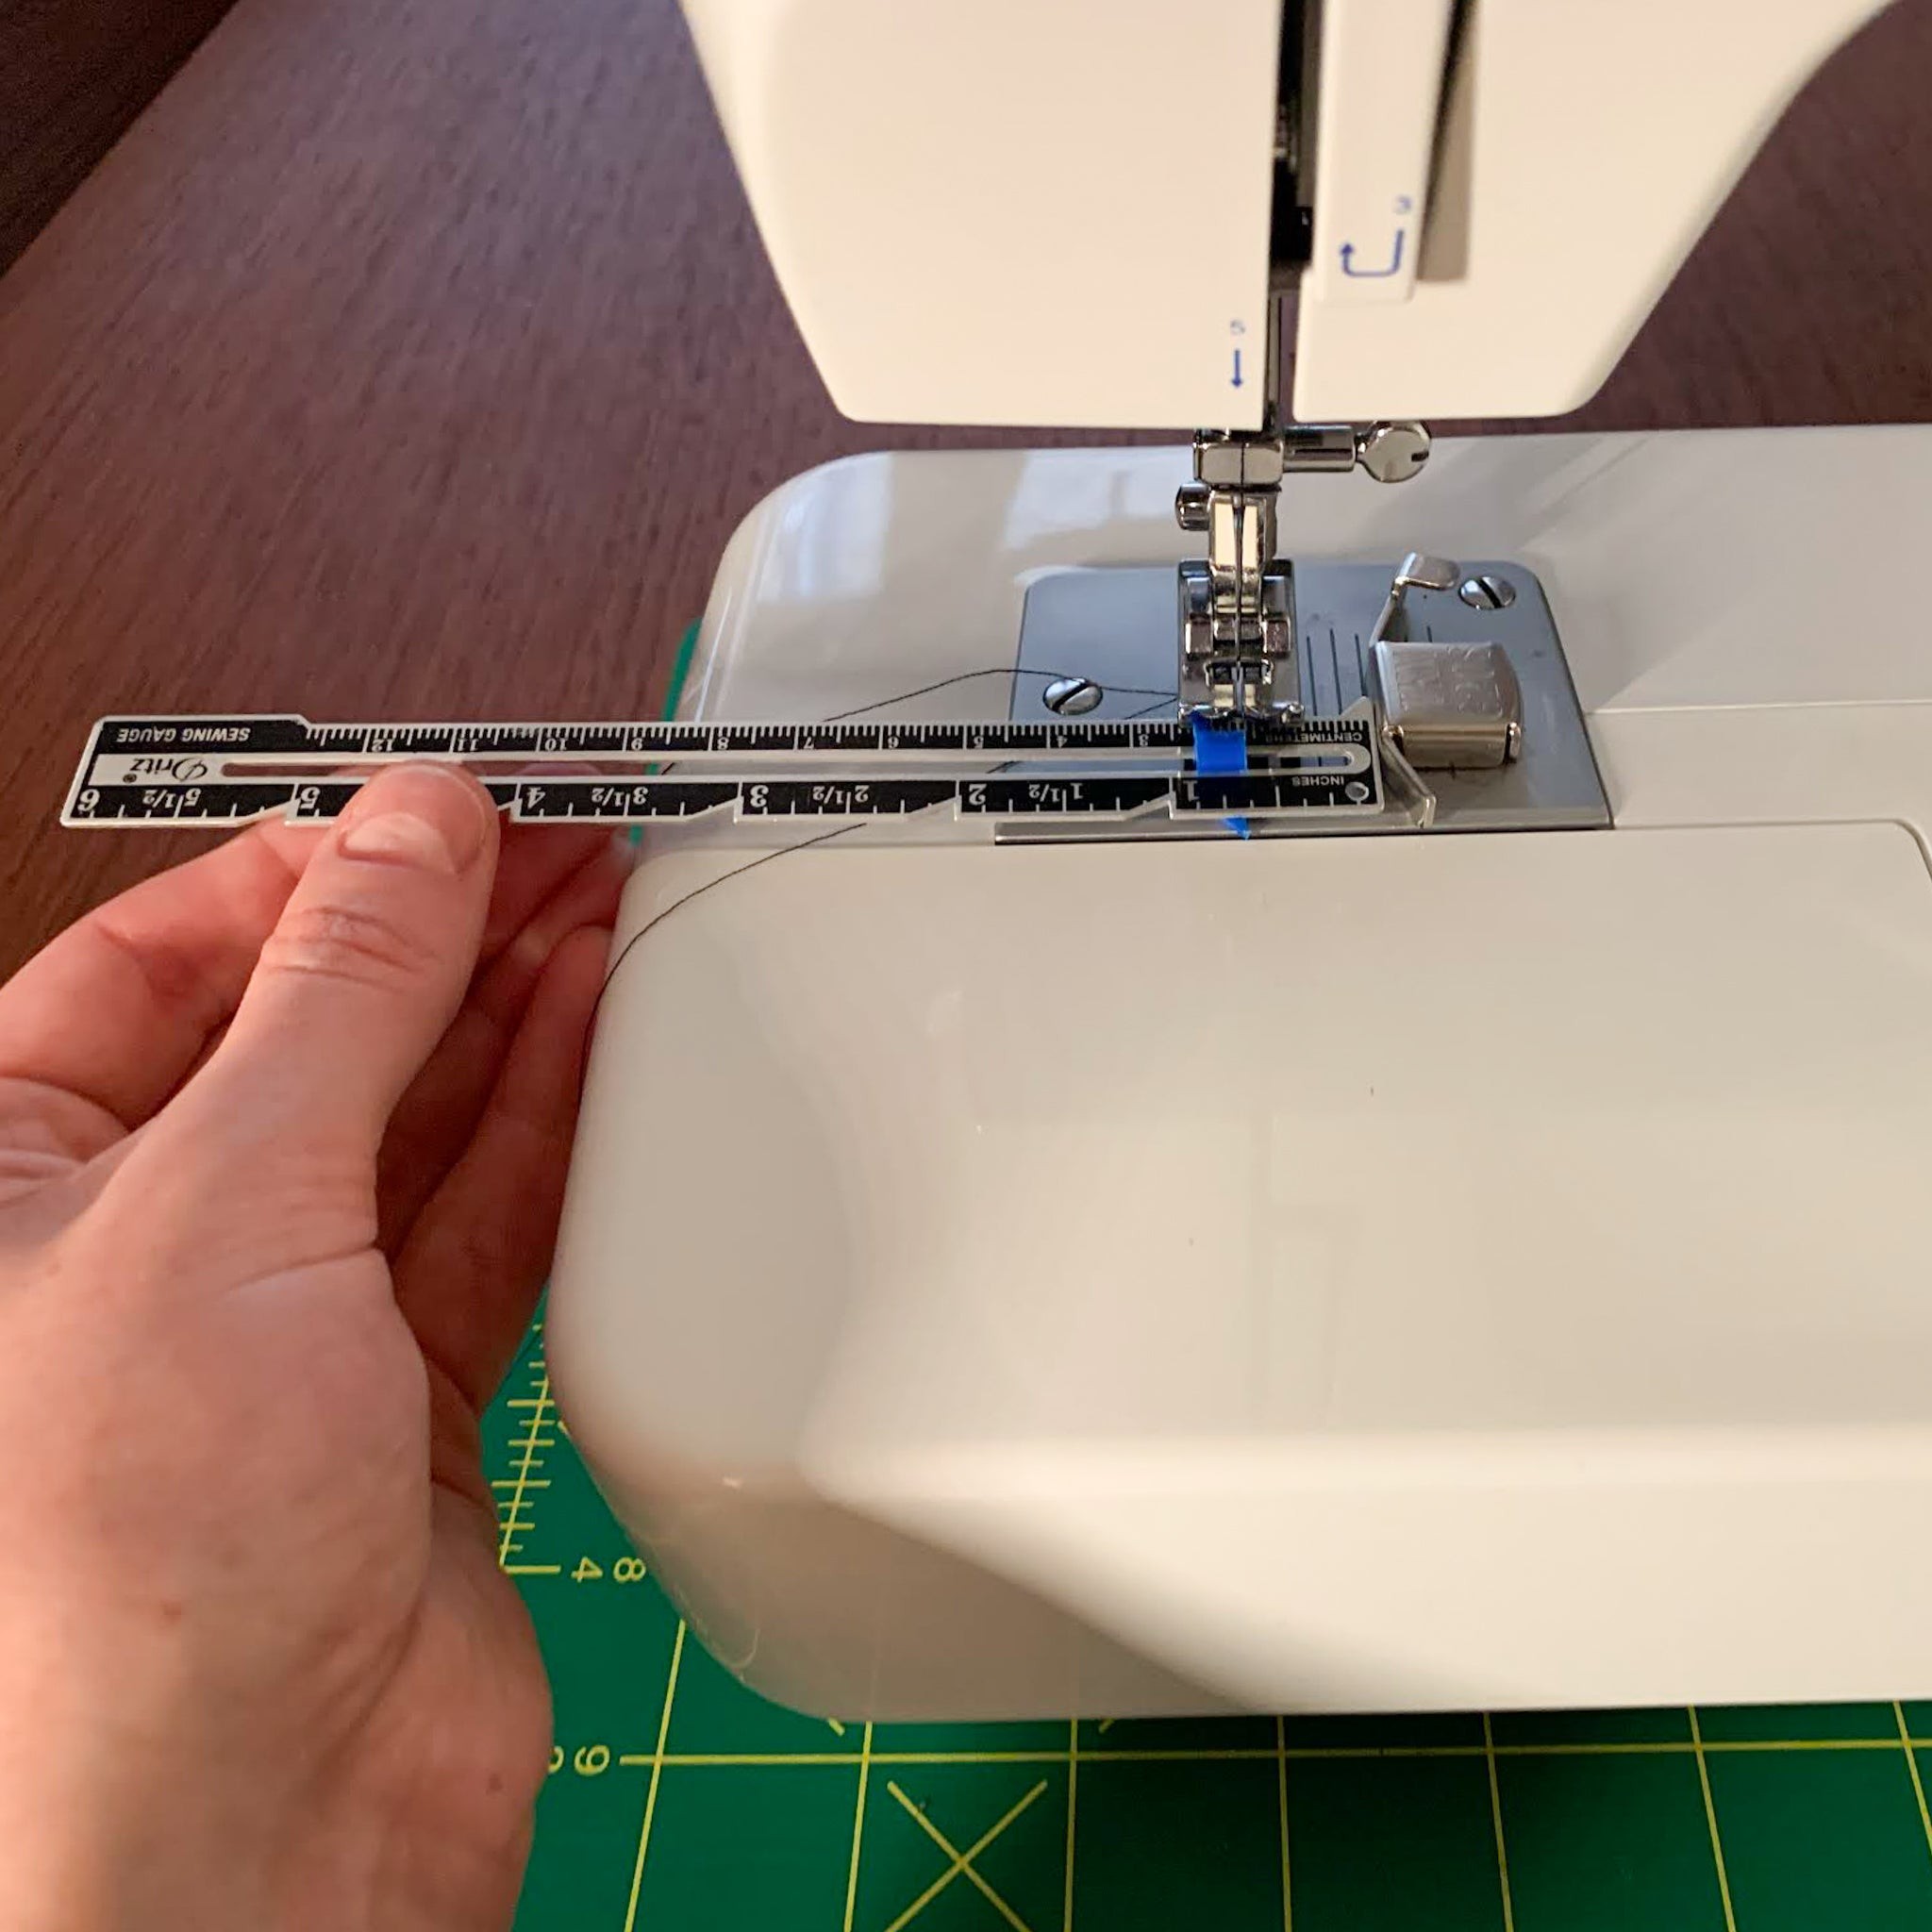
3.3. Using a Seam Gauge for Precision
For even greater precision, use a seam gauge to measure the distance from the needle to the edge of the magnetic seam guide. Place the seam gauge against the needle and adjust the guide until the desired seam allowance is achieved.
3.4. Securing the Magnetic Seam Guide
Once you’ve positioned the guide accurately, gently place it onto the throat plate. The magnet should securely attach the guide to the metal surface. Ensure the guide is flush with the throat plate and doesn’t wobble or move.
3.5. Testing the Placement
Before starting your project, test the placement of the magnetic seam guide. Feed a scrap piece of fabric through the machine, using the guide to maintain the seam allowance. Check the resulting stitches to ensure they are accurate and consistent.
Using a seam gauge ensures precise alignment of the magnetic seam guide, guaranteeing accurate seam allowances every time.
4. Sewing with the Magnetic Seam Guide
With the magnetic seam guide properly attached, you’re ready to start sewing. Here’s how to use it effectively for various projects.
4.1. Guiding the Fabric
As you sew, gently guide the fabric along the edge of the magnetic seam guide. Maintain a consistent pressure and ensure the fabric remains flush against the guide. Avoid pushing or pulling the fabric, as this can cause uneven seams.
4.2. Maintaining Consistent Pressure
Maintaining consistent pressure is key to achieving uniform seams. Use a steady hand and avoid varying your speed. Let the sewing machine feed the fabric through, and simply guide it along the edge of the magnetic seam guide.
4.3. Adjusting Speed for Different Fabrics
Adjust your sewing speed based on the type of fabric you’re using. Thicker fabrics may require a slower speed to ensure accurate stitching, while lighter fabrics can be sewn at a faster pace. Experiment to find the optimal speed for each fabric.
4.4. Sewing Straight Lines
The magnetic seam guide is particularly useful for sewing straight lines. Simply align the fabric edge with the guide and sew along its length, maintaining a consistent seam allowance. This is ideal for projects like quilting, garment construction, and home décor.
4.5. Sewing Curves
While magnetic seam guides are primarily designed for straight lines, they can also be used for gentle curves. Sew slowly and pivot the fabric around the guide, maintaining a consistent distance between the needle and the fabric edge. For tighter curves, you may need to remove the guide and sew freehand.
5. Troubleshooting Common Issues
Even with a magnetic seam guide, you may encounter some common sewing issues. Here’s how to troubleshoot them.
5.1. Fabric Slipping
Slippery fabrics like silk or satin can be challenging to sew with a magnetic seam guide. To prevent slipping, use fabric weights or clips to hold the fabric in place. You can also try using a walking foot, which helps feed the fabric evenly.
5.2. Uneven Seams
Uneven seams can result from inconsistent pressure or incorrect guide placement. Double-check the guide’s position and ensure it’s securely attached to the throat plate. Practice maintaining consistent pressure and speed while sewing.
5.3. Guide Moving During Sewing
If the magnetic seam guide moves during sewing, it may not be securely attached or the throat plate may be dirty. Clean the throat plate and ensure the guide is flush with the surface. If the issue persists, consider using a stronger magnetic guide.
5.4. Needle Hitting the Guide
The needle hitting the guide is a rare but potentially damaging issue. Stop sewing immediately if this occurs. Check the needle position and ensure it’s properly aligned. Adjust the guide’s position to provide sufficient clearance for the needle.
5.5. Fabric Bunching
Fabric bunching can occur when sewing thick or multiple layers of fabric. Use a longer stitch length and reduce the presser foot pressure to prevent bunching. You can also try using a seam ripper to gently ease the fabric through the machine.
6. Advanced Techniques
Once you’re comfortable with the basics, explore these advanced techniques to maximize the benefits of your magnetic seam guide.
6.1. Chain Piecing
Chain piecing is a technique used in quilting to sew multiple pieces of fabric together in a continuous chain. Use the magnetic seam guide to maintain consistent seam allowances while chain piecing, increasing efficiency and accuracy.
6.2. Sewing Binding
Sewing binding involves attaching a strip of fabric to the edge of a quilt or other project to finish the raw edges. The magnetic seam guide helps maintain a uniform seam allowance while attaching the binding, resulting in a neat and professional finish.
6.3. Creating Piping
Piping is a decorative trim used to add definition and detail to sewing projects. Use the magnetic seam guide to sew the piping cord into the fabric, ensuring a consistent distance from the edge. This technique creates clean and even piping for a polished look.
6.4. Topstitching
Topstitching is a decorative row of stitching that is visible on the right side of the fabric. Use the magnetic seam guide to create straight and even topstitching, adding a professional touch to your projects.
6.5. Sewing Zippers
Sewing zippers can be challenging, but the magnetic seam guide can help maintain a consistent seam allowance along the zipper tape. This ensures the zipper is installed straight and functions smoothly.
7. Maintaining Your Magnetic Seam Guide
Proper maintenance ensures your magnetic seam guide remains in good condition and performs optimally.
7.1. Cleaning the Guide
Regularly clean your magnetic seam guide to remove any dust, lint, or residue. Use a soft cloth and mild cleaning solution if necessary. Ensure the guide is completely dry before storing it.
7.2. Storing the Guide
Store your magnetic seam guide in a safe place where it won’t be damaged or lost. A small container or drawer is ideal. Keep it away from other metal objects to prevent scratches.
7.3. Checking Magnet Strength
Periodically check the magnet strength of your seam guide. If the magnet weakens, the guide may not stay securely attached to the throat plate. Consider replacing the guide if the magnet is no longer effective.
7.4. Preventing Scratches
To prevent scratches on your sewing machine’s throat plate, lift the magnetic seam guide before repositioning it. Avoid sliding the guide across the surface, as this can cause damage.
Prevent scratches on your sewing machine’s throat plate by lifting the magnetic seam guide when repositioning it, rather than sliding it.
7.5. Avoiding Extreme Temperatures
Avoid exposing your magnetic seam guide to extreme temperatures, as this can weaken the magnet or damage the materials. Store it in a cool, dry place away from direct sunlight.
8. Safety Considerations
While magnetic seam guides are generally safe to use, it’s important to be aware of potential safety considerations.
8.1. Magnets and Electronic Devices
Be cautious when using magnetic seam guides near electronic devices, as strong magnets can interfere with their operation. Keep the guide away from computers, phones, and other sensitive electronics.
8.2. Pacemakers and Medical Devices
Individuals with pacemakers or other medical devices should consult their doctor before using magnetic seam guides. Magnets can potentially interfere with the function of these devices.
8.3. Small Parts and Choking Hazards
Keep magnetic seam guides away from small children and pets, as they may pose a choking hazard. Store the guide in a secure location where it cannot be accessed by young children.
8.4. General Sewing Safety
Always follow general sewing safety guidelines when using a magnetic seam guide. Keep your fingers away from the needle and avoid sewing over pins. Use caution when operating the sewing machine and disconnect it from the power source when not in use.
8.5. Machine Compatibility
While most modern sewing machines are safe to use with magnetic seam guides, it’s always a good idea to consult your machine’s user manual or contact the manufacturer to confirm compatibility. This ensures you’re not using anything that could potentially damage your machine.
9. Magnetic Seam Guides in Quilting
Quilting is a popular application for magnetic seam guides, offering precision and efficiency for various quilting techniques.
9.1. Piecing Blocks
Accurate piecing is essential for creating beautiful quilt blocks. The magnetic seam guide helps maintain consistent seam allowances when piecing blocks together, resulting in precise and well-aligned quilts.
9.2. Sewing Sashing
Sashing is the fabric that separates quilt blocks. Use the magnetic seam guide to sew straight and even sashing strips, adding definition and structure to your quilt.
9.3. Adding Borders
Borders frame the quilt and add visual interest. The magnetic seam guide helps maintain a uniform seam allowance when attaching borders, creating a professional and polished finish.
9.4. Binding Quilts
Binding is the final step in quilting, finishing the raw edges of the quilt. Use the magnetic seam guide to sew the binding strips to the quilt, ensuring a consistent seam allowance and a neat, durable edge.
9.5. Creating Quilt-As-You-Go Projects
Quilt-as-you-go is a technique where you quilt each block individually before joining them together. The magnetic seam guide helps maintain consistent seam allowances and straight lines while quilting each block, making the joining process easier and more accurate.
10. Projects Ideal for Magnetic Seam Guides
Magnetic seam guides are versatile tools suitable for a wide range of sewing projects.
10.1. Garment Construction
From dresses and skirts to shirts and pants, the magnetic seam guide helps maintain consistent seam allowances when constructing garments. This results in well-fitting and professional-looking clothes.
10.2. Home Décor Items
Curtains, pillows, and tablecloths benefit from the precision offered by magnetic seam guides. Consistent seams ensure these items are well-constructed and visually appealing.
10.3. Accessories
Bags, wallets, and pouches require accurate stitching for durability and aesthetics. The magnetic seam guide helps maintain uniform seam allowances when sewing these accessories, resulting in high-quality and long-lasting items.
10.4. Quilting Projects
As mentioned earlier, quilting projects greatly benefit from the use of magnetic seam guides. From piecing blocks to adding borders, the guide ensures accuracy and efficiency in quilting.
10.5. Craft Projects
Small craft projects like fabric baskets, coasters, and ornaments also benefit from the precision of a magnetic seam guide. Consistent seams add a professional touch to these handmade items.
11. Comparing Magnetic Seam Guides to Other Tools
While magnetic seam guides are effective, it’s helpful to compare them to other sewing tools to determine the best option for your needs.
11.1. Adjustable Seam Guides
Adjustable seam guides offer the flexibility to set different seam allowances, making them versatile for various projects. However, they may be more complex to use and less precise than magnetic seam guides.
11.2. Laser Seam Guides
Laser seam guides project a laser beam onto the fabric, indicating the seam allowance. They offer high precision but can be expensive and require a power source.
11.3. Edge Stitching Feet
Edge stitching feet attach to the presser foot and guide the fabric along the edge. They are useful for topstitching and edge finishing but may not be as versatile as magnetic seam guides.
11.4. Seam Rippers
While not a direct alternative, seam rippers are essential for correcting mistakes. They help remove unwanted stitches and adjust seams, ensuring accuracy in your sewing projects.
11.5. Hand-Marking Seam Allowances
Manually marking seam allowances with a ruler and pencil is a traditional method. It’s inexpensive but time-consuming and less accurate than using a magnetic seam guide.
12. Magnetic Seam Guide Brands and Models
Several brands offer high-quality magnetic seam guides. Here are some popular options:
12.1. Wilibees Magnetic Seam Guide
Wilibees offers a popular magnetic seam guide known for its strong magnet and durable construction. It’s suitable for a wide range of sewing machines and projects.
12.2. SINGER Magnetic Seam Guide
SINGER, a well-known sewing machine brand, also offers a magnetic seam guide. It’s designed to work seamlessly with SINGER sewing machines but can also be used with other brands.
12.3. Clover Magnetic Seam Guide
Clover is a reputable brand in the sewing and quilting industry. Their magnetic seam guide is known for its precision and ease of use.
12.4. Dritz Magnetic Seam Guide
Dritz offers a magnetic seam guide that’s affordable and effective. It’s a good option for beginners and casual sewers.
12.5. Generic Magnetic Seam Guides
Many generic magnetic seam guides are available online. While they may be less expensive, it’s important to check the magnet strength and construction quality before purchasing.
13. The Science Behind Magnetic Seam Guides
Understanding the science behind magnetic seam guides can help you appreciate their effectiveness and use them more efficiently.
13.1. How Magnets Work
Magnets create a magnetic field that attracts or repels other magnetic materials. The magnetic seam guide uses a strong magnet to adhere to the metal throat plate of the sewing machine.
13.2. Types of Magnets Used
Magnetic seam guides typically use neodymium magnets, which are known for their high strength and durability. These magnets provide a strong and reliable hold.
13.3. Magnetic Field Strength
The magnetic field strength determines how well the guide adheres to the throat plate. A stronger magnetic field ensures the guide stays securely in place during sewing.
13.4. Magnet Placement and Design
The placement and design of the magnet are crucial for optimal performance. The magnet should be positioned to maximize contact with the throat plate and provide a stable base.
13.5. Safety of Magnets
While magnets are generally safe to use, it’s important to handle them with care. Avoid exposing magnets to extreme temperatures or strong impacts, as this can weaken their strength.
14. Tips for Beginners
If you’re new to using magnetic seam guides, here are some helpful tips to get you started:
14.1. Start with Simple Projects
Begin with simple projects like straight-line sewing or basic quilting blocks. This will help you get comfortable with the guide and develop your skills.
14.2. Practice Regularly
Practice using the magnetic seam guide regularly to improve your accuracy and speed. The more you use it, the more natural it will become.
14.3. Watch Tutorials
Watch online tutorials and videos to learn different techniques and tips for using magnetic seam guides. Visual aids can be very helpful for understanding the process.
14.4. Experiment with Different Fabrics
Experiment with different fabrics to see how the magnetic seam guide performs. Adjust your speed and pressure as needed to achieve the best results.
14.5. Don’t Be Afraid to Make Mistakes
Everyone makes mistakes when learning a new skill. Don’t be afraid to make mistakes and learn from them. Use a seam ripper to correct any errors and keep practicing.
15. Advanced Sewing Room Setup with Magnetic Seam Guides
Elevate your sewing space by integrating magnetic seam guides into an advanced setup, optimizing workflow and precision.
15.1. Integrating with a Sewing Table
Incorporate a sewing table with a built-in metal plate to seamlessly integrate magnetic seam guides. This setup provides a stable and consistent surface for accurate sewing.
15.2. Using Multiple Guides
Employ multiple magnetic seam guides for complex projects requiring various seam allowances. This technique ensures accuracy and saves time by eliminating the need to constantly reposition the guide.
15.3. Combining with Other Tools
Combine magnetic seam guides with other tools like laser guides and adjustable presser feet for enhanced precision. This multi-tool approach addresses different sewing needs effectively.
15.4. Ergonomic Considerations
Ensure your sewing setup is ergonomic to reduce strain and improve comfort. Adjust the height of your sewing table and chair to maintain proper posture while using magnetic seam guides.
15.5. Optimizing Lighting
Optimize lighting in your sewing room to improve visibility and accuracy. Use a combination of ambient and task lighting to eliminate shadows and highlight the fabric and guide.
16. Maximizing Efficiency in Mass Production
In mass production settings, magnetic seam guides can significantly increase efficiency and accuracy.
16.1. Standardizing Seam Allowances
Standardize seam allowances across all projects to streamline the sewing process. This allows you to set the magnetic seam guide once and maintain consistent results.
16.2. Training Staff
Provide comprehensive training to staff on the proper use of magnetic seam guides. This ensures everyone is using the tool correctly and maximizing its benefits.
16.3. Implementing Quality Control
Implement quality control measures to check the accuracy of seams produced with magnetic seam guides. This helps identify and correct any issues early on, reducing waste and improving overall quality.
16.4. Automating Processes
Automate processes where possible to further increase efficiency. This may involve using automated sewing machines with integrated magnetic seam guides.
16.5. Regular Maintenance
Establish a regular maintenance schedule for magnetic seam guides to ensure they remain in good condition. This includes cleaning, checking magnet strength, and replacing worn parts.
17. Environmental and Ethical Considerations
Consider the environmental and ethical aspects of using and disposing of magnetic seam guides.
17.1. Sustainable Materials
Choose magnetic seam guides made from sustainable materials where possible. This reduces the environmental impact of your sewing projects.
17.2. Responsible Manufacturing
Support brands that prioritize responsible manufacturing practices. This includes fair labor standards and environmentally friendly production methods.
17.3. Proper Disposal
Dispose of magnetic seam guides properly when they are no longer usable. Check with your local recycling center to see if they accept magnets.
17.4. Reducing Waste
Reduce waste by using magnetic seam guides carefully and maintaining them properly. This extends their lifespan and reduces the need for frequent replacements.
17.5. Supporting Ethical Brands
Support brands that are committed to ethical practices and sustainability. This helps promote responsible manufacturing and reduces the environmental impact of the sewing industry.
18. The Future of Magnetic Seam Guides
Explore the potential future developments and innovations in magnetic seam guide technology.
18.1. Smart Guides
Smart guides with integrated sensors and digital displays could provide real-time feedback on seam accuracy. This would further enhance precision and efficiency.
18.2. Enhanced Magnet Technology
Advancements in magnet technology could lead to stronger and more durable magnetic seam guides. This would improve their performance and lifespan.
18.3. Customizable Designs
Customizable designs that allow you to create magnetic seam guides tailored to your specific needs could become more common. This would provide greater flexibility and versatility.
18.4. Integration with Sewing Machines
Seamless integration with sewing machines could become a standard feature. This would simplify the sewing process and improve accuracy.
18.5. Eco-Friendly Materials
The use of eco-friendly materials in the construction of magnetic seam guides could become more prevalent. This would reduce the environmental impact of the sewing industry.
19. Resources and Further Reading
Expand your knowledge of magnetic seam guides with these resources and further reading materials.
19.1. Online Forums
Participate in online sewing and quilting forums to connect with other enthusiasts and share tips and advice.
19.2. Sewing Blogs
Follow sewing blogs for tutorials, project ideas, and product reviews.
19.3. Books on Sewing and Quilting
Read books on sewing and quilting to learn more about various techniques and tools, including magnetic seam guides.
19.4. Sewing Classes
Take sewing classes to get hands-on instruction and personalized feedback from experienced instructors.
19.5. Product Reviews
Read product reviews to compare different magnetic seam guides and find the best option for your needs.
20. FAQ: Mastering Magnetic Seam Guides
Get quick answers to frequently asked questions about using magnetic seam guides.
20.1. What is a magnetic seam guide?
A magnetic seam guide is a tool used to maintain a consistent seam allowance while sewing.
20.2. How does a magnetic seam guide work?
It attaches magnetically to the throat plate of your sewing machine and acts as a fence for the fabric.
20.3. Are magnetic seam guides safe for computerized sewing machines?
Yes, most modern computerized sewing machines are safe, but consult your manual.
20.4. How do I clean a magnetic seam guide?
Use a soft cloth to wipe away dust and lint.
20.5. Can I use a magnetic seam guide for quilting?
Yes, they are ideal for piecing, sashing, and adding borders.
20.6. What are the benefits of using a magnetic seam guide?
Accuracy, speed, consistency, and ease of use.
20.7. How do I choose the right seam allowance?
Refer to your pattern instructions for the correct measurement.
20.8. What if my fabric slips while sewing?
Use fabric weights or a walking foot to prevent slipping.
20.9. Can I use a magnetic seam guide for curves?
Yes, but sew slowly and pivot the fabric around the guide.
20.10. Where can I buy a magnetic seam guide?
Sewing supply stores, online retailers, and craft shops.
Navigating the world of sewing and ensuring precision in every project doesn’t have to be daunting. The magnetic seam guide is your reliable companion for achieving consistent, professional-looking seams effortlessly.
Ready to elevate your sewing skills and ensure flawless seams every time? Visit CONDUCT.EDU.VN for more detailed guides, expert tips, and comprehensive resources on mastering the magnetic seam guide and other essential sewing tools. Unlock your sewing potential and create projects with unparalleled accuracy and finesse. For further assistance, contact us at 100 Ethics Plaza, Guideline City, CA 90210, United States, Whatsapp: +1 (707) 555-1234 or visit our website conduct.edu.vn.
Using a magnetic seam guide saves time by eliminating the need to mark seam allowances on fabric, leading to more efficient sewing.