Have you ever struggled to maintain consistent spacing while sewing? A seam guide can be your secret weapon for achieving professional-looking results. This guide explores How To Use A Seam Guide effectively, unlocking precision in your sewing projects.
Many sewing machines come with an accessory that might look unassuming but holds immense potential: the seam guide. Whether you’re a seasoned sewist or a beginner, mastering its use can significantly improve the accuracy and consistency of your stitches. Let’s delve into the world of seam guides and discover how they can elevate your sewing.
Understanding Seam Guides: Types and Compatibility
A standard seam guide typically consists of an angled piece of metal that attaches to the right (and sometimes the left) of your presser foot. These guides help maintain a consistent distance between the needle and the edge of your fabric.
Before you start, check your presser feet. Feet with a hole at the back and a protruding thumbscrew are compatible with most seam guides. Here’s a closer look at different types:
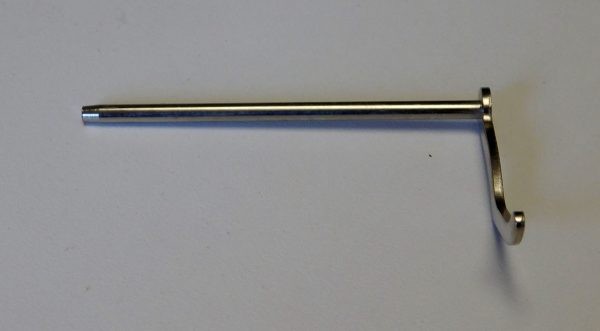
- Standard Seam Guide: Often included in the accessories package of your sewing machine.
Alt text: A close-up of a standard metal seam guide, highlighting its angled shape and attachment mechanism.
- Walking Foot Seam Guides: The BERNINA Walking Foot #50 often includes two seam guides, one for each side of the foot, providing added stability and control, especially when working with multiple fabric layers.
Alt text: A BERNINA walking foot with seam guides attached on both sides, illustrating its extended reach for guiding fabric.
- Seam Guides with Scale: These deluxe options feature a built-in scale or ruler, allowing for even more precise measurements and spacing.
Alt text: A seam guide with a built-in ruler demonstrating how it allows for accurate measurements and spacing between stitches.
How to Attach and Adjust Your Seam Guide
- Locate the screw: Find the thumbscrew on the back of your chosen presser foot.
Alt text: A detailed view of a presser foot showing the location of the thumbscrew used to attach the seam guide.
- Loosen the screw: Slightly loosen the screw to create space for the seam guide.
- Insert the guide: Slide the long, round part of the seam guide through the hole.
- Adjust the length: Position the seam guide at your desired length.
- Tighten the screw: Secure the guide in place by tightening the screw.
Alt text: A rear view of a seam guide attached to a presser foot, illustrating the proper insertion and screw-tightening process.
Why Use a Seam Guide? The Benefits Explained
While a sewing machine’s throat plate offers measurements, they become obscured when larger fabric pieces cover them. A seam guide provides a consistent visual reference, ensuring accurate spacing even when the throat plate is hidden.
- Consistent Seam Allowances: Achieve uniform seam widths for professional-looking garments and quilts.
- Precise Decorative Stitching: Create evenly spaced decorative lines, borders, and patterns.
- Accurate Gridwork: Sew perfectly aligned grids for quilting and other projects.
- Enhanced Efficiency: Reduce the need for constant marking and measuring, saving time and effort.
Step-by-Step Guide: Using a Seam Guide for Decorative Stitching
Let’s explore using a seam guide for decorative stitching on a placemat as an example.
- Set the Spacing: If using a guide without a built-in scale, use a ruler to set the desired spacing. Place the ruler with the zero point at the needle’s center and position the seam guide at your desired measurement (e.g., 1 1/4″). Alternatively, mark the desired depth on your project with a pin or fabric marker.
Alt text: Demonstrating how to use a ruler to set the spacing on a seam guide without a built-in scale, ensuring accurate placement.
- Align the Fabric: Place the fabric edge against the seam guide, ensuring it consistently touches the guide as you sew.
- Stitch: Select your desired stitch. Sew around the placemat, keeping your eye on the guide to maintain consistent spacing.
Alt text: A sewing machine in operation, showcasing how the seam guide helps to maintain a consistent distance from the fabric edge.
- Navigate Curves: When approaching curves, gently steer the fabric, ensuring the guide remains perpendicular to the edge.
Alt text: Demonstrating how to navigate curves while using a seam guide by keeping the guide perpendicular to the fabric edge.
- Multiple Lines: For additional lines, mark the beginning point and reposition the seam guide accordingly.
Mastering Grids and Plaids with Seam Guides
Seam guides are invaluable for creating accurate grids and plaids. To create a plaid design:
- Set the Grid: Determine your desired grid size (e.g., 1 1/4″ square). Set your seam guide accordingly.
Alt text: Setting the seam guide to create a 1 1/4″ square grid, demonstrating precise measurement for consistent spacing.
- Sew Vertical Lines: Stitch vertical lines, using the seam guide to maintain consistent spacing. Turn at each corner with the needle down.
Alt text: Demonstrating the process of sewing vertical lines with a seam guide, maintaining consistent spacing throughout the grid.
- Sew Horizontal Lines: Repeat the process for horizontal lines, creating a complete grid.
Alt text: A completed grid pattern, highlighting the accuracy and consistency achieved by using a seam guide.
- Create the Plaid: Use the edge of your presser foot as a guide to stitch along each line, creating a thicker, plaid-like effect.
Alt text: Close-up view of creating a plaid effect by stitching along each grid line, showcasing the detailed and symmetrical result.
Conclusion: Unlock Precision with Seam Guides
Mastering the use of a seam guide can transform your sewing projects, bringing a new level of precision and consistency to your work. From achieving accurate seam allowances to creating intricate decorative patterns, this simple tool is a valuable addition to any sewist’s toolkit. Explore the possibilities and discover how a seam guide can elevate your sewing skills.
Take the time to explore the different presser feet and seam guides available for your sewing machine. Visit the BERNINA website or your local BERNINA store to discover the perfect accessories to enhance your sewing experience.