Guided Access on iPad Pro is a powerful accessibility feature that allows you to temporarily restrict your device to a single app. This is incredibly useful in various situations, such as: letting a child use your iPad without accessing other apps or features, creating a distraction-free environment for focused work, or setting up a kiosk-style experience. This guide provides a comprehensive walkthrough on How To Use Guided Access On Ipad Pro, covering everything from setup to customization.
Setting Up Guided Access on iPad Pro
Before you can utilize Guided Access, you need to enable and configure it within your iPad Pro’s settings. Here’s how:
- Navigate to Accessibility Settings: Open the Settings app on your iPad Pro. Scroll down and tap on “Accessibility.”
- Find Guided Access: In the Accessibility menu, scroll down to the “General” section and tap on “Guided Access.”
- Enable Guided Access: Toggle the switch next to “Guided Access” to the ON position.
 iPad Guided Access settings showing the Guided Access toggle switched on.
Customizing Guided Access Settings
After enabling Guided Access, you can customize it to fit your specific needs:
- Passcode Settings:
- Tap on “Passcode Settings.”
- Select “Set Guided Access Passcode” and enter a passcode. This passcode will be required to end a Guided Access session.
- You can also enable Face ID or Touch ID (depending on your iPad Pro model) for ending sessions. This provides a convenient alternative to using a passcode.
- Time Limits:
- Enable “Time Limits” to play a sound or speak the time remaining before the Guided Access session automatically ends. This is useful for managing usage time, especially for children.
- Accessibility Shortcut:
- Allow the use of the Accessibility Shortcut during Guided Access sessions. This allows quick access to other accessibility features if needed.
- Display Auto-Lock:
- Set how long it takes for your iPad Pro to automatically lock during a Guided Access session.
Starting a Guided Access Session on iPad Pro
Once Guided Access is set up, starting a session is simple:
- Open the Desired App: Launch the app you want to lock your iPad Pro into.
- Activate Guided Access: Triple-click the top button (on iPad Pro models with Face ID) or the Home button (on older iPad Pro models).
- Configure Options (Optional): Before starting, you can customize the session by:
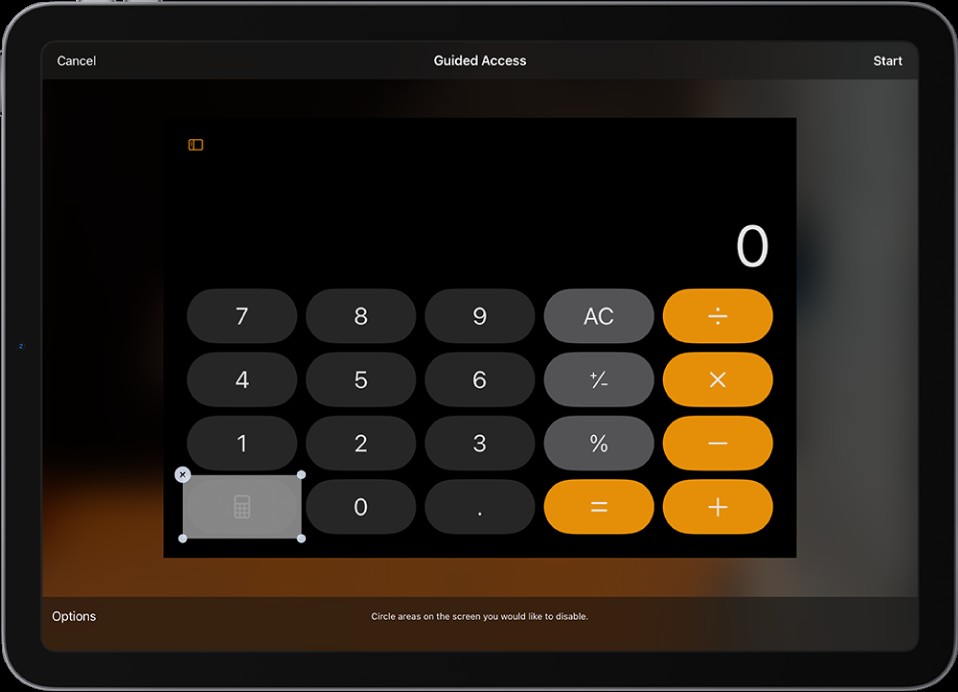
- Disabling Screen Areas: Circle any areas of the screen you want to disable. This is useful for preventing access to specific buttons or features within the app. You can drag and resize the masked areas as needed.
- Accessing Options: Tap the “Options” button at the bottom left of the screen. Here, you can toggle the following settings:
- Top Button/Home Button: Disable the top button (or Home button) to prevent exiting the app.
- Volume Buttons: Disable the volume buttons.
- Motion: Prevent the iPad Pro from switching between portrait and landscape modes or responding to other motions (shaking, etc.)
- Software Keyboards: Disable the software keyboard.
- Touch: Disable touch input altogether. This effectively turns the screen into a display-only mode.
- Time Limit: Set a specific time limit for the session.
- Start the Session: Tap “Start” in the upper right corner of the screen.
Ending a Guided Access Session on iPad Pro
Ending a Guided Access session is straightforward:
- Triple-Click: Triple-click the top button (on iPad Pro models with Face ID) or the Home button (on older iPad Pro models).
- Enter Passcode or Use Biometrics:
- If you set a Guided Access passcode, enter it now.
- If you enabled Face ID or Touch ID, use the appropriate method to unlock your iPad Pro.
- Tap End: Once authenticated, tap “End” in the upper left corner of the screen.
Siri Integration for Guided Access
You can also use Siri to start Guided Access. Simply say, “Turn on Guided Access” while in the app you wish to lock. This provides a hands-free way to initiate a session. Make sure Siri is enabled on your device by going to Settings > Siri & Search.
Troubleshooting Guided Access
- Forgetting the Passcode: If you forget your Guided Access passcode, you will need to restore your iPad Pro to factory settings. This will erase all data on your device, so it’s crucial to remember your passcode.
- Guided Access Not Working: Ensure that Guided Access is enabled in Settings > Accessibility > Guided Access. Also, make sure the Accessibility Shortcut is configured correctly if you intend to use it.
- Screen Not Responding: If you accidentally disabled touch input in the Options menu, you’ll need to triple-click the top/Home button and enter your passcode to regain control.
Conclusion
Guided Access is a versatile and valuable feature on iPad Pro. By understanding how to set up, customize, and use it effectively, you can create a more controlled and focused environment for yourself or others using your device. Whether you’re a parent, educator, or professional, Guided Access offers a practical solution for a variety of needs.