Guided Access on iPhone 11 is a powerful feature for focused usage, and CONDUCT.EDU.VN offers expert advice on utilizing it. This feature enhances device security and accessibility by limiting the iPhone to a single app, and also helps improve digital well-being. Learn how to setup guided access, control which features are available, and create a distraction-free environment with our comprehensive guided access tutorial.
1. Understanding Guided Access on iPhone 11
Guided Access is an accessibility feature available on iPhone 11 and other iOS devices that allows you to lock your device into a single app. This can be incredibly useful in a variety of situations. It lets you temporarily restrict your device to one app, disabling the Home button (or gestures), volume controls, and other features to prevent the user from navigating away from the intended application. This ensures a focused and controlled user experience, making it ideal for kids, individuals with sensory sensitivities, or anyone needing to concentrate on a specific task. Think of it as creating a digital boundary within your iPhone 11, helping to improve focus and minimize distractions.
1.1. What is Guided Access?
Guided Access is an iOS accessibility feature designed to limit an iPhone, iPad, or iPod touch to a single app. It disables the Home button (or gestures on newer iPhones), volume controls, and other functions to keep the user within the app. This is particularly useful when:
- Children are using the device: Prevent them from accidentally accessing other apps or making unauthorized purchases.
- Individuals with cognitive or sensory sensitivities are using the device: Create a simplified and distraction-free environment.
- Presentations or demonstrations are being conducted: Ensure the device stays focused on the intended app.
- Situations where accidental touches or gestures are a concern: Prevent unintended actions by disabling touch input in specific areas of the screen.
1.2. Why Use Guided Access on Your iPhone 11?
There are numerous benefits to using Guided Access on your iPhone 11.
- Enhanced Focus: By limiting the device to a single app, you eliminate distractions and encourage concentration. This is perfect for studying, reading, or working on a specific task.
- Improved Accessibility: Guided Access can simplify the user experience for individuals with cognitive or motor skill challenges, making it easier to use the iPhone 11.
- Parental Control: It provides a safe and controlled environment for children using the device, preventing them from accessing inappropriate content or making accidental purchases.
- Content Protection: In business or educational settings, Guided Access can ensure that users only interact with specific content, preventing unauthorized access to other apps or settings.
1.3. Real-World Applications of Guided Access
The applications of Guided Access are diverse and adaptable to various needs:
- Education: Teachers can use Guided Access to lock students into educational apps during class, preventing them from browsing the internet or playing games.
- Retail: Businesses can use Guided Access to display product information or run interactive kiosks on iPads, preventing customers from accessing other apps or settings.
- Healthcare: Caregivers can use Guided Access to simplify the interface of medical apps for patients with cognitive impairments, making it easier for them to follow instructions or manage their medication.
- Home: Parents can use Guided Access to allow their children to watch videos or play games without accidentally accessing other apps or making unauthorized purchases.
- Accessibility: Guided Access can be customized to disable certain screen areas, like distracting ads, reducing potential visual overstimulation.
1.4. Understanding the Limitations
While Guided Access is a powerful tool, it’s important to understand its limitations:
- It’s not a foolproof security measure: A determined user might find ways to bypass Guided Access, especially with physical access to the device.
- It doesn’t prevent all in-app purchases: Some apps may have in-app purchase options that can still be accessed within Guided Access. It’s important to disable in-app purchases in the general settings of your iPhone 11 for complete protection.
- It can be accidentally enabled or disabled: Users should be aware of the triple-click gesture to avoid accidentally activating or deactivating Guided Access.
2. Setting Up Guided Access on iPhone 11: A Step-by-Step Guide
Before you can start using Guided Access, you need to enable it in your iPhone 11 settings. Here’s a step-by-step guide:
2.1. Enabling Guided Access in Settings
- Open the Settings app: Locate the Settings app on your iPhone 11’s home screen and tap to open it.
- Navigate to Accessibility: Scroll down and tap on “Accessibility.”
- Find Guided Access: Scroll to the bottom of the Accessibility menu and tap on “Guided Access.”
- Toggle Guided Access On: Slide the “Guided Access” switch to the right to turn it on. The switch will turn green when enabled.
2.2. Configuring Passcode Settings
After enabling Guided Access, you need to set up a passcode that will be used to end a Guided Access session.
- Tap Passcode Settings: In the Guided Access menu, tap on “Passcode Settings.”
- Tap Set Guided Access Passcode: Tap on “Set Guided Access Passcode.”
- Enter a Passcode: Enter a six-digit passcode. You will be prompted to enter it again to confirm.
- (Optional) Enable Face ID or Touch ID: You can also enable Face ID or Touch ID as an alternative way to end a Guided Access session. Toggle the “Face ID” or “Touch ID” switch to the right to enable it.
2.3. Setting a Time Limit (Optional)
Guided Access allows you to set a time limit for each session. When the time limit expires, the session will automatically end.
- Go to Accessibility: In the Guided Access menu, tap on “Accessibility.”
- Find Time Limits: Tap on “Time Limits.”
- Choose an Action: You can select what happens when the time limit expires. Options include a sound and a verbal announcement.
3. Starting a Guided Access Session on iPhone 11
Once you’ve enabled and configured Guided Access, you can start using it in any app.
3.1. Initiating Guided Access
- Open the Desired App: Open the app you want to lock the device into.
- Triple-Click the Side Button: Quickly press the side button (the power button) three times in a row. This will activate Guided Access.
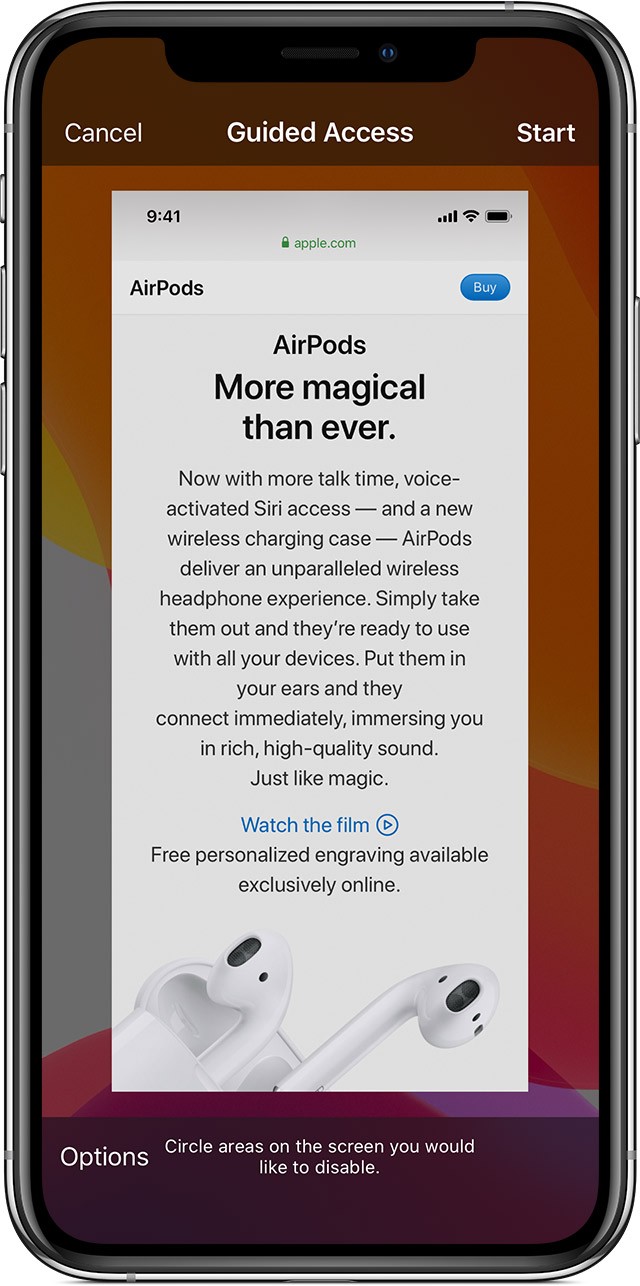
- Adjusting Screen Responsiveness: Use one finger to circle areas of the screen you want to disable touch input on. You can resize and move these circles. Tap the X to remove a circle.
- Start Guided Access: Tap “Guided Access” in the bottom-left corner. Then, tap “Start” in the top-right corner. If you have a passcode set, you will be prompted to enter it the first time you start a session.
3.2. Using Siri to Start Guided Access
You can also use Siri to start a Guided Access session.
- Open the Desired App: Open the app you want to lock the device into.
- Activate Siri: Say “Hey Siri” or press and hold the side button to activate Siri.
- Tell Siri to Turn on Guided Access: Say “Turn on Guided Access.” Siri will then start a Guided Access session in the current app.
*Siri features might vary by country or region.
3.3. Customizing Options Before Starting
Before starting a Guided Access session, you can customize several options to control which features are available.
-
Triple-Click the Side Button: Quickly press the side button three times in a row to access the Guided Access options.
-
Tap Options: In the bottom-left corner, tap “Options.” If you don’t see Options, triple-click the Side button again and enter your passcode.
-
Choose Your Options: A menu will appear with various options you can toggle on or off. These options include:
- Sleep/Wake Button: Disables the side button, preventing the device from being put to sleep.
- Volume Buttons: Disables the volume buttons, preventing the user from adjusting the volume.
- Motion: Limits the device’s response to motion. When disabled, the screen won’t respond to shaking, and the screen won’t rotate.
- Keyboards: Disables the keyboard, preventing text input.
- Touch: Disables touch input on the screen, making the device unresponsive to touch.
- Dictionary Lookup: Enables or disables the Look Up feature when selecting text.
- Time Limit: Allows you to set a time limit for the Guided Access session.
-
Tap Done: Once you have selected your desired options, tap “Done” in the top-right corner.
-
Start Guided Access: Tap “Start” in the top-right corner to begin the Guided Access session.
4. Controlling Available Features During a Guided Access Session
One of the key benefits of Guided Access is the ability to control which features are available during a session. This allows you to tailor the experience to the specific needs of the user.
4.1. Accessing the Options Menu
To access the options menu during a Guided Access session:
- Triple-Click the Side Button: Quickly press the side button three times in a row.
- Enter Your Passcode: If prompted, enter your Guided Access passcode.
- The Options Menu Appears: The Options menu will appear at the bottom of the screen.
4.2. Available Options and Their Functions
The Options menu provides a range of controls that can be toggled on or off to customize the Guided Access experience:
- Sleep/Wake Button:
- Function: Disables the side button, preventing the device from being put to sleep or turned off.
- Use Case: Useful when you want to ensure the device remains active and the user cannot interrupt the session by turning off the screen.
- Volume Buttons:
- Function: Disables the volume buttons, preventing the user from adjusting the volume.
- Use Case: Useful when you want to maintain a consistent volume level or prevent the user from accidentally muting the device.
- Motion:
- Function: Limits the device’s response to motion. When disabled, the screen won’t respond to shaking, and the screen won’t rotate, no matter how you hold your device.
- Use Case: Useful for users with sensory sensitivities or when you want to prevent accidental screen rotations.
- Keyboards:
- Function: Disables the keyboard, preventing text input.
- Use Case: Useful when the user only needs to view content and not interact with it, or when you want to prevent the user from typing inappropriate content.
- Touch:
- Function: Disables touch input on the screen, making the device unresponsive to touch.
- Use Case: Useful when you want to prevent the user from accidentally tapping on the screen or navigating to different sections of the app.
- Dictionary Lookup:
- Function: Enables or disables the Look Up feature when selecting text.
- Use Case: Useful for educational purposes or when you want to allow the user to quickly look up the definition of words.
- Time Limit:
- Function: Allows you to set a time limit for the Guided Access session.
- Use Case: Useful when you want to limit the amount of time the user spends on the device or in a specific app.
4.3. Adjusting Options During an Active Session
You can adjust the options during an active Guided Access session as needed. Simply triple-click the side button, enter your passcode, and toggle the desired options on or off.
5. Ending a Guided Access Session on iPhone 11
When you’re ready to end a Guided Access session, follow these steps:
5.1. Using the Passcode
- Triple-Click the Side Button: Quickly press the side button three times in a row.
- Enter Your Passcode: Enter your Guided Access passcode.
- Tap End: In the bottom-left corner, tap “End.”
5.2. Using Face ID or Touch ID
If you have enabled Face ID or Touch ID for Guided Access:
- Double-Click the Side Button: Quickly press the side button twice in a row.
- Authenticate with Face ID or Touch ID: Use Face ID or Touch ID to authenticate.
- The Guided Access session will end automatically.
6. Advanced Guided Access Features and Tips
Beyond the basic setup and usage, Guided Access offers several advanced features and tips that can enhance your experience.
6.1. Creating Customized Zones
Guided Access allows you to create customized zones on the screen that are unresponsive to touch. This is useful for disabling distracting elements or preventing accidental taps.
- Start a Guided Access Session: Start a Guided Access session in the desired app.
- Triple-Click the Side Button: Quickly press the side button three times in a row.
- Draw Circles Around Areas to Disable: Use one finger to draw circles around the areas of the screen you want to disable touch input on. You can resize and move these circles as needed.
- Tap the X to Remove a Circle: If you want to remove a circle, tap the X inside the circle.
- Start Guided Access: Tap “Start” in the top-right corner to begin the Guided Access session with the customized zones.
6.2. Disabling Hardware Buttons
As mentioned earlier, you can disable the Sleep/Wake button and Volume buttons during a Guided Access session. This can be useful for preventing the user from turning off the device or adjusting the volume.
6.3. Setting Time Limits for Sessions
Setting a time limit for Guided Access sessions can be a helpful way to manage device usage, especially for children. To set a time limit:
- Start a Guided Access Session: Start a Guided Access session in the desired app.
- Triple-Click the Side Button: Quickly press the side button three times in a row.
- Tap Options: In the bottom-left corner, tap “Options.”
- Toggle Time Limit On: Toggle the “Time Limit” switch to the right to turn it on.
- Set the Time Limit: Choose the desired time limit.
- Tap Done: Tap “Done” in the top-right corner.
- Start Guided Access: Tap “Start” in the top-right corner to begin the Guided Access session with the time limit.
When the time limit expires, the Guided Access session will automatically end, and the device will be locked.
6.4. Guided Access Shortcut
For faster access to Guided Access, you can create an Accessibility Shortcut.
- Open Settings: Go to Settings > Accessibility > Accessibility Shortcut.
- Select Guided Access: Choose Guided Access from the list.
Now, triple-clicking the side button will toggle Guided Access on or off, making it quicker to start and end sessions.
7. Troubleshooting Common Guided Access Issues
While Guided Access is generally reliable, you may encounter some issues from time to time. Here are some common problems and their solutions:
7.1. Forgetting the Guided Access Passcode
If you forget your Guided Access passcode, you will need to restore your iPhone 11 to factory settings. This will erase all data on your device, so it’s important to back up your iPhone regularly.
To restore your iPhone 11:
- Connect Your iPhone to a Computer: Connect your iPhone 11 to a computer using a USB cable.
- Open iTunes or Finder: Open iTunes (on older macOS versions) or Finder (on newer macOS versions).
- Put Your iPhone into Recovery Mode: The process for entering recovery mode varies depending on your iPhone model. For iPhone 8 and later (including iPhone 11): Press and quickly release the Volume Up button. Press and quickly release the Volume Down button. Then, press and hold the Side button until you see the recovery mode screen.
- Restore Your iPhone: In iTunes or Finder, you will see a message saying that there is a problem with your iPhone and that it needs to be restored or updated. Click “Restore.”
- Follow the On-Screen Instructions: Follow the on-screen instructions to restore your iPhone to factory settings.
After your iPhone is restored, you can set up Guided Access again with a new passcode.
7.2. Guided Access Not Starting
If Guided Access is not starting when you triple-click the side button, make sure that Guided Access is enabled in Settings > Accessibility > Guided Access. Also, make sure that you have not accidentally enabled another Accessibility Shortcut.
7.3. Touchscreen Not Working in Guided Access
If the touchscreen is not working in Guided Access, make sure that the “Touch” option is enabled in the Guided Access options menu. To access the options menu, triple-click the side button and enter your passcode.
7.4. Guided Access Ending Unexpectedly
If Guided Access is ending unexpectedly, check the time limit settings. If a time limit is set, the session will automatically end when the time expires. You can also check to see if Face ID or Touch ID is accidentally being triggered, ending the session prematurely.
8. The Importance of Accessibility Features like Guided Access
Accessibility features like Guided Access play a crucial role in making technology accessible to everyone, regardless of their abilities or needs.
8.1. Promoting Inclusivity
Accessibility features promote inclusivity by providing tools and options that allow people with disabilities to use technology effectively. This can have a profound impact on their lives, enabling them to participate more fully in education, employment, and social activities.
8.2. Enhancing User Experience for Everyone
While accessibility features are primarily designed for people with disabilities, they can also enhance the user experience for everyone. For example, Guided Access can be useful for anyone who wants to focus on a specific task without distractions, or for parents who want to create a safe and controlled environment for their children.
8.3. Legal and Ethical Considerations
In many countries, there are legal requirements that mandate accessibility for digital content and technology. Adhering to these requirements is not only a legal obligation but also an ethical responsibility. By providing accessible technology, we can create a more equitable and inclusive society.
9. Guided Access and Digital Well-being
In today’s digital age, digital well-being is becoming increasingly important. Guided Access can be a valuable tool for promoting digital well-being by helping users manage their screen time, focus on specific tasks, and reduce distractions.
9.1. Managing Screen Time
Guided Access can be used to set time limits for specific apps or activities, helping users manage their screen time and avoid excessive use of technology. This is particularly useful for children, who may not be able to regulate their own screen time effectively.
9.2. Reducing Distractions
By limiting the device to a single app and disabling unnecessary features, Guided Access can help users reduce distractions and focus on the task at hand. This can be particularly helpful for students who are trying to study or for anyone who needs to concentrate on a specific project.
9.3. Promoting Mindful Technology Use
Guided Access can encourage mindful technology use by prompting users to be more intentional about how they use their devices. By consciously choosing to lock the device into a specific app, users are more likely to engage with that app in a focused and deliberate way.
10. Frequently Asked Questions (FAQ) About Guided Access on iPhone 11
Here are some frequently asked questions about Guided Access on iPhone 11:
- What is Guided Access?
- Guided Access is an accessibility feature that locks your iPhone into a single app.
- How do I enable Guided Access?
- Go to Settings > Accessibility > Guided Access and toggle the switch to on.
- How do I start a Guided Access session?
- Open the desired app and triple-click the side button.
- How do I end a Guided Access session?
- Triple-click the side button and enter your passcode, or use Face ID or Touch ID.
- What options can I control during a Guided Access session?
- You can control the Sleep/Wake button, Volume buttons, Motion, Keyboards, Touch, Dictionary Lookup, and Time Limit.
- Can I disable certain areas of the screen?
- Yes, you can draw circles around areas of the screen to disable touch input.
- What happens if I forget my Guided Access passcode?
- You will need to restore your iPhone to factory settings.
- Can I use Siri to start Guided Access?
- Yes, you can say “Turn on Guided Access” to Siri.
- Is Guided Access a foolproof security measure?
- No, it’s not a foolproof security measure, but it can be an effective way to limit device usage.
- Where can I find more information about accessibility features on iPhone?
- Visit the Accessibility section in the Settings app or check out the Apple Accessibility website.
Conclusion: Maximizing Your iPhone 11 Experience with Guided Access
Guided Access is a versatile and powerful tool that can enhance your iPhone 11 experience in many ways. Whether you’re a parent looking to protect your child, an educator seeking to focus students, or simply someone who wants to minimize distractions, Guided Access offers a customizable solution. By understanding its features and following the steps outlined in this guide, you can unlock the full potential of Guided Access and create a more focused, accessible, and enjoyable mobile experience.
Remember, CONDUCT.EDU.VN is your trusted resource for understanding and implementing ethical technology use. We encourage you to explore our website for more information on digital well-being, accessibility, and responsible technology practices.
For further assistance or inquiries, please contact us at:
Address: 100 Ethics Plaza, Guideline City, CA 90210, United States
Whatsapp: +1 (707) 555-1234
Website: CONDUCT.EDU.VN
Unlock a world of focused productivity and responsible digital engagement with Guided Access and conduct.edu.vn today.
 iPhone 11 Settings Accessibility Guided Access Safari
Icon representing the volume controls feature within Guided Access settings, indicating volume limitations.
Icon depicting the keyboards option in Guided Access settings, used to restrict keyboard access.
Icon showcasing the dictionary lookup feature in Guided Access settings, allowing or restricting dictionary use.
