Apple Maps offers more than just basic navigation. Beyond getting you from point A to point B, it provides tools to plan your trips and discover interesting places. One of its standout features is Guides, which allows you to create personalized lists of locations you want to visit. This guide will show you How To Use Guides In Apple Maps effectively on both your Mac and iPhone, ensuring you make the most of your travel experiences.
Why should you bother creating custom Guides? Imagine having a curated list of restaurants, attractions, and hidden gems, all accessible with a tap. Guides provide quick access to vital information for each location – opening hours, costs, reviews, and direct links for navigation. Whether you’re meticulously planning an itinerary or exploring on the fly, Guides helps keep your travel plans organized and readily available.
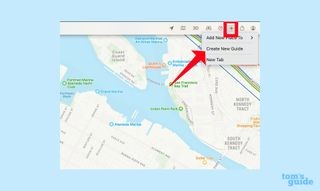
Creating a Guide in Apple Maps on Your Mac
Planning a trip often starts at home on a computer. Here’s how to create and populate a Guide using Apple Maps on your Mac:
1. Initiate a New Guide
You have a couple of options to start your Guide:
- Method 1: In the Maps window, look at the navigation bar at the top. Click the plus (+) button located near the right side of the screen. From the dropdown menu that appears, choose “Create New Guide”.
- Method 2: Navigate to the sidebar in Apple Maps. Under the “My Guides” header, click the plus button that sits next to “Add Guides”.
2. Name and Customize Your Guide
After you choose one of the above methods, the app will ask you to name your guide. Type your desired title into the provided text field. To add a visual identifier, click on “Change Key Photo” to select an image from your photo library. When you are happy with the title and thumbnail, press Enter to save.
3. Add Points of Interest
Now it’s time to fill your guide with destinations. Search for a location you want to include. In the location’s information window, click the three-dot menu and then select “Save to Guide.” A new menu will pop up, allowing you to choose the guide you wish to save the location to. (You can also create a new guide directly from this menu if needed. Remember to go back to step 2 to title the guide.)
Repeat this step for all the places you want in your guide. The end result is a customized folder with all your desired locations easily accessible.
Creating a Guide in Apple Maps on Your iPhone
The process on your iPhone is very similar to that on a Mac, although some of the buttons and menus are in different spots due to the iOS interface. Here’s how to do it:
1. Start a New Guide
First, look up a place in Apple Maps. Once you’ve found it, tap the “More” button. In the menu that appears, select “Add to Guide”. Now, tap “New Guide” on the menu that slides up.
Alternatively, you can also create a new guide by swiping up on the search screen to reveal the “My Guides” section. Tap “New Guide” to begin.
2. Name and Customize Your Guide
Similar to the Mac, you’ll be prompted to enter a title in the text field. You can also tap the camera icon to add a thumbnail image from your photo library. When you’re finished, tap “Create.”
3. Add Destinations to Your Guide
After searching for a specific place, tap the “More” button. From the pop-up menu, select “Add to Guide.” Then, tap on the guide you want to add the location to.
Sharing Your Apple Maps Guides
The ability to share your curated Guides with fellow travelers is a game-changer for group trips. The sharing process is identical on both your Mac and iPhone:
1. Sharing on Mac
In the Maps app on your Mac, tap the Share button located on the right side of the screen. Then, choose the person or app you wish to share your guide with.
2. Sharing on iPhone
At the bottom of your guide on your iPhone, tap the share button. The first time you share, you might see a prompt asking you to confirm your intention to share the guide. In the following screen, choose the person or app you want to share with, or you can use AirDrop to send your guide to a nearby Apple device.
Conclusion
Using Guides in Apple Maps is a fantastic way to organize your travel plans, discover new places, and share your favorite spots with friends and family. Whether you’re on your Mac or iPhone, creating and sharing guides is straightforward. By taking advantage of this feature, you can elevate your travel experiences and make the most of your adventures.