Using motion guide in Flash provides animators with unparalleled control over object movement, enhancing creative possibilities. At CONDUCT.EDU.VN, we offer expert guidance on mastering this powerful feature. Learning how to use motion guides opens doors to sophisticated animation techniques, ensuring your projects stand out with fluid, precise motion. Explore our resources to discover the art of guided animation, path animation, and trajectory design in Flash.
Table of Contents
- Understanding Motion Guides in Flash
- Step-by-Step Guide: Creating a Motion Guide Animation
- Advanced Techniques for Motion Guides
- Troubleshooting Common Motion Guide Issues
- Best Practices for Optimizing Motion Guides
- Examples of Effective Motion Guide Usage
- Integrating Motion Guides with Other Flash Features
- The Role of Motion Guides in Professional Animation
- Future Trends in Motion Guide Animation
- Frequently Asked Questions (FAQs) About Motion Guides
1. Understanding Motion Guides in Flash
Motion guides in Flash are paths that you create to control the movement of objects, offering precision beyond standard tweening. Unlike basic motion tweens, motion guides let you define the exact trajectory an object follows. This feature is invaluable for creating complex animations where objects must move along specific, non-linear paths. Understanding the basic principles behind motion guides can vastly improve the quality and complexity of your Flash animations.
1.1. What is a Motion Guide?
A motion guide is essentially a custom-drawn path that you attach to a layer in Flash. When you link an object to this guide, the object follows the path during the animation. This allows you to create movements that are impossible with simple linear or circular tweens. The guide itself is not visible in the final animation, providing a clean and professional look.
1.2. Key Benefits of Using Motion Guides
Using motion guides offers several advantages:
- Precise Control: Dictate exactly where an object moves.
- Complex Paths: Create intricate movements that would be difficult or impossible with standard tweens.
- Professional Look: Ensure smooth, natural-looking animations.
- Creative Flexibility: Experiment with unique and imaginative movements.
1.3. Comparing Motion Guides to Traditional Tweens
Traditional tweens (motion and shape tweens) automatically generate movement between two keyframes. While useful for simple animations, they lack the control offered by motion guides. Here’s a comparison:
| Feature | Motion Tween | Motion Guide |
|---|---|---|
| Path Control | Limited to straight lines or simple curves | Fully customizable paths |
| Complexity | Suitable for basic movements | Ideal for intricate and specific movements |
| User Input | Minimal; Flash interpolates the movement | Requires drawing and fine-tuning the motion path |
| Flexibility | Less flexible; hard to change paths | Highly flexible; easy to adjust the motion path |
| Use Cases | Simple transitions, fades, and rotations | Complex animations, character movements, and more |
| Professional Use | Basic animation tasks | Advanced animation and precise movement control |

1.4. Essential Terminology for Motion Guides
- Motion Guide Layer: The layer containing the path that the object will follow.
- Guided Layer: The layer containing the object that will follow the motion guide.
- Pivot Point: The point on the object that is attached to the motion guide.
- Keyframe: A point in the timeline where changes occur, such as the object’s position or properties.
- Tweening: The process of creating intermediate frames to give the appearance of motion.
1.5. Understanding the Flash Interface for Motion Guides
Navigating the Flash interface is crucial for effectively using motion guides. Key areas include:
- Timeline: Where you create and manage layers, frames, and tweens.
- Tools Panel: Contains drawing tools like the Line tool, Oval tool, and Free Transform tool.
- Properties Panel: Allows you to modify the properties of selected objects and layers.
- Library Panel: Stores reusable assets like symbols, bitmaps, and sounds.
By familiarizing yourself with these interface elements, you can streamline your workflow and create more complex and visually appealing animations with motion guides.
2. Step-by-Step Guide: Creating a Motion Guide Animation
Creating a motion guide animation in Flash involves several steps, each requiring attention to detail. This section provides a comprehensive, step-by-step guide to help you create your first motion guide animation.
2.1. Setting Up a New Flash Project
- Open Adobe Flash: Launch Adobe Flash Professional on your computer.
- Create a New Document: Go to
File > Newand selectActionScript 3.0as the document type. - Set Stage Properties: In the
Propertiespanel, adjust the stage size, frame rate, and background color as needed. A typical frame rate is 24 frames per second (fps).
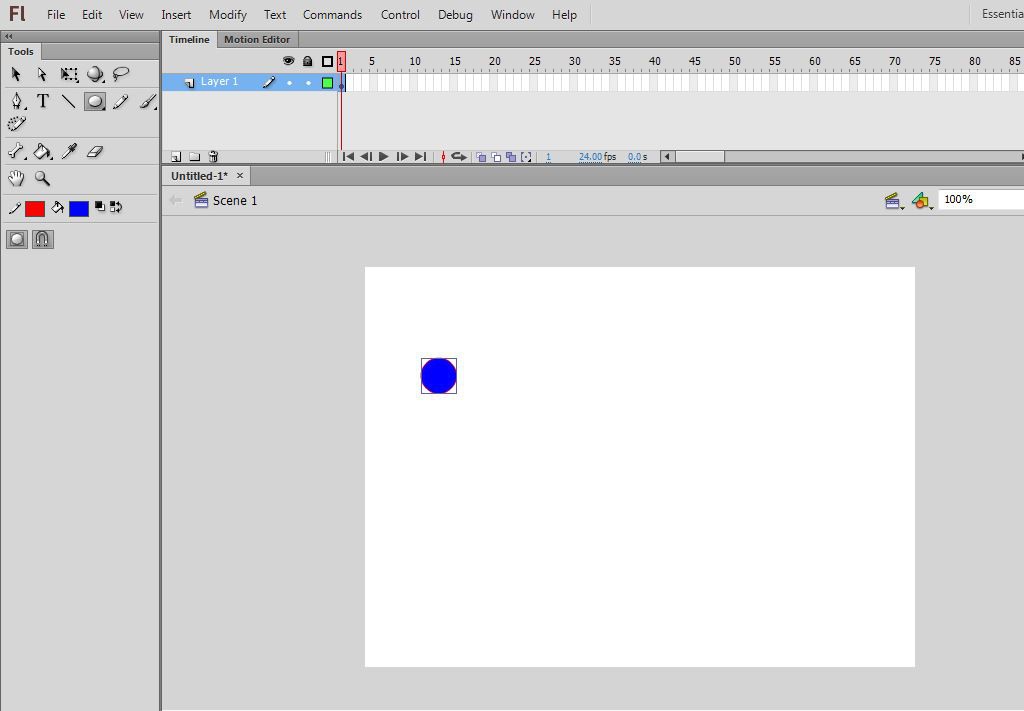
2.2. Creating the Object to Animate
- Select a Layer: In the
Timelinepanel, selectLayer 1. - Draw an Object: Use the
Oval Toolor any other drawing tool to create an object on the stage. For example, draw a circle.
Alt Text: A screenshot showing the creation of a circle using the Oval Tool in Adobe Flash for a motion guide animation.
- Convert to Symbol: Select the object and press
F8to convert it into a symbol. ChooseMovie Clipas the type and give it a name like “Ball”. This is essential for tweening.
2.3. Adding the Motion Guide Layer
- Add a New Layer: Click the
Add Layerbutton in theTimelinepanel to create a new layer. - Rename the Layer: Double-click on the new layer’s name and rename it “Guide”.
- Convert to Guide Layer: Right-click on the “Guide” layer and select
Guidefrom the context menu. This turns the layer into a motion guide layer.
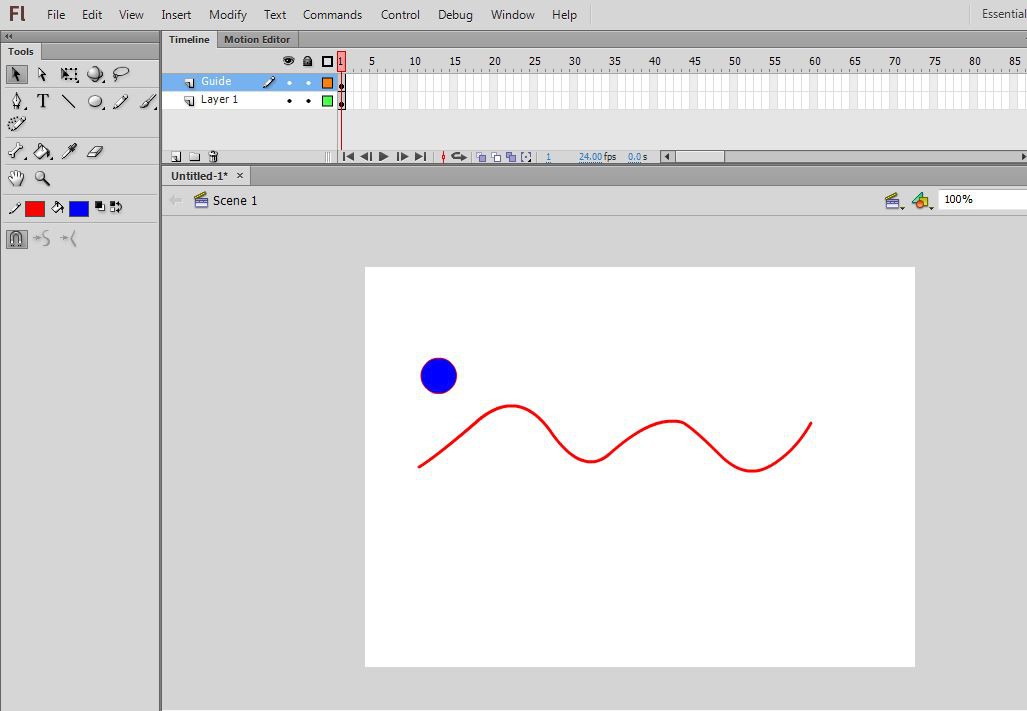
2.4. Drawing the Motion Path
- Select the Guide Layer: Make sure the “Guide” layer is selected.
- Choose a Drawing Tool: Use the
Line Tool,Pencil Tool, orBrush Toolto draw a path on the stage. This path will be the trajectory of your object.
Alt Text: A screenshot demonstrating how to draw a curved line on the Guide layer using the Line Tool in Flash, serving as the motion path.
- Modify the Path: Use the
Selection ToolandSubselection Toolto adjust the path, creating curves and bends as desired.
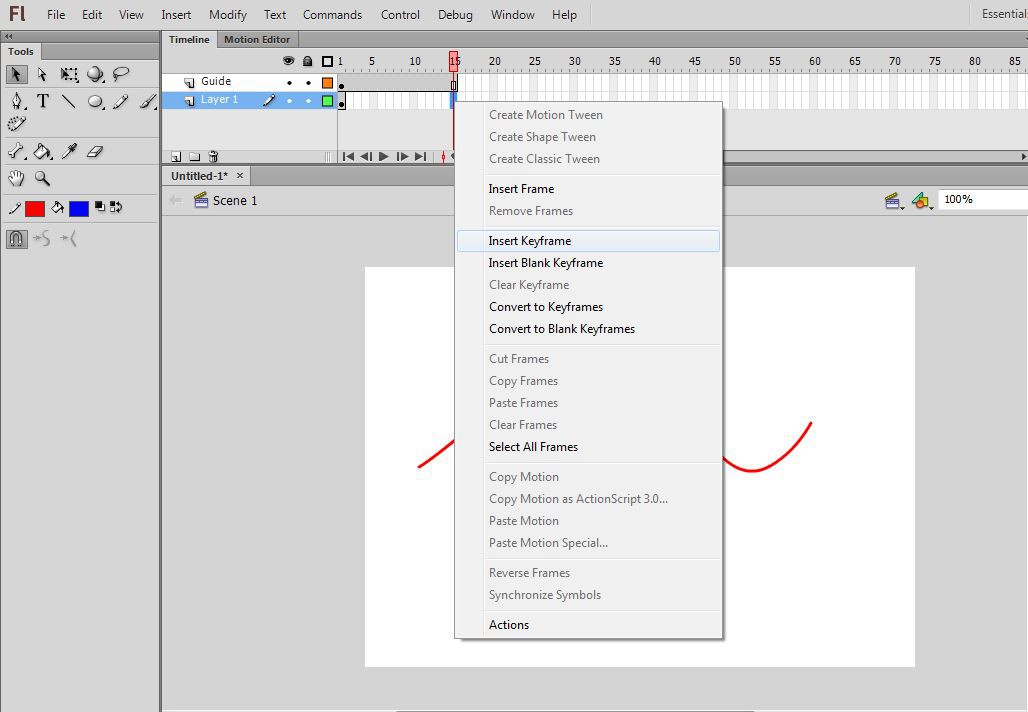
2.5. Creating Keyframes and Tweening
- Add Keyframes: In the
Timelinepanel, select a frame further down the timeline (e.g., frame 30) on both the “Guide” and “Layer 1” layers. - Insert Keyframes: Right-click on the selected frames and choose
Insert Keyframe.
Alt Text: The process of inserting a Keyframe into Layer 1 in the Flash Timeline to define the end point of the motion guide animation.
- Position the Object: On frame 1 of “Layer 1”, drag the “Ball” symbol so its pivot point (the small circle in the center) is touching the beginning of the motion path on the “Guide” layer.
- Move to the Last Keyframe: Select the last keyframe on “Layer 1” (e.g., frame 30) and drag the “Ball” symbol so its pivot point is touching the end of the motion path.
Alt Text: Moving the circle to the end of the line on the last keyframe in Flash to complete the motion guide setup.
- Create Classic Tween: Right-click on any frame between the first and last keyframes on “Layer 1” and select
Create Classic Tween.
2.6. Linking the Layer to the Motion Guide
- Drag the Guided Layer: Click on “Layer 1” and drag it slightly to the right, onto the “Guide” layer. When done correctly, “Layer 1” will indent under the “Guide” layer, indicating it is linked.
2.7. Testing the Animation
- Test Movie: Press
Ctrl + Enter(orCmd + Enteron Mac) to test your animation. The “Ball” symbol should now follow the path you drew on the “Guide” layer.
2.8. Final Touches and Adjustments
- Adjust Timing: If the animation is too fast or slow, adjust the number of frames between the keyframes.
- Refine the Path: Use the
Selection ToolandSubselection Toolto fine-tune the motion path for smoother movement. - Orient to Path: In the
Propertiespanel for the tween, check theOrient to pathoption to make the object rotate along the path.
By following these steps, you can create a basic motion guide animation in Flash. Practice and experimentation will help you master this powerful feature and create more complex and visually appealing animations.
3. Advanced Techniques for Motion Guides
Once you’ve mastered the basics of motion guides, you can explore advanced techniques to create more sophisticated animations. These techniques involve using multiple motion guides, masks, and variable speeds to add depth and complexity to your projects.
3.1. Using Multiple Motion Guides
To create complex animations, you can use multiple motion guides within the same project. This allows you to switch an object from one path to another seamlessly.
- Create Multiple Guide Layers: Add more guide layers to your timeline, each with its own distinct path.
- Position Keyframes: Ensure your object’s keyframes align with the start and end points of each guide path.
- Link and Unlink Layers: Drag the object layer to link it to one guide layer, and then unlink it at a specific frame to link it to another guide layer. This creates a transition between paths.
3.2. Applying Masks to Motion Guides
Masks can add visual interest and reveal parts of an object as it moves along the motion guide.
- Create a Mask Layer: Add a new layer above the layer you want to mask.
- Draw a Mask Shape: On the mask layer, draw a shape that will act as the mask.
- Link the Layers: Right-click on the mask layer and select
Mask. The layer below will be masked by the shape you created. - Animate the Mask: You can animate the mask shape itself to create dynamic effects as the object follows the motion guide.
3.3. Variable Speed and Acceleration Along the Path
Controlling the speed of the object along the motion path can add realism and emphasis to your animation.
- Use Easing: In the
Propertiespanel for the tween, adjust theEasingvalue to control the acceleration and deceleration of the object. A negative value will cause the object to start fast and slow down, while a positive value will cause it to start slow and speed up. - Adjust Keyframe Spacing: Vary the distance between keyframes along the timeline. Closer keyframes result in slower movement, while farther keyframes result in faster movement.
3.4. Orienting Objects to the Path
Ensuring that an object rotates and aligns with the motion path can enhance the visual appeal and realism of your animation.
- Enable Orient to Path: In the
Propertiespanel for the tween, check theOrient to pathoption. This will make the object rotate to follow the direction of the path. - Adjust Registration Point: Make sure the registration point of the object (the small crosshair in the center) is properly aligned. This point will be used as the pivot point for rotation.
3.5. Utilizing Symbols and Graphic Instances
Using symbols and graphic instances can optimize your animation workflow and reduce file size.
- Convert to Symbol: Always convert your objects into symbols before animating them. This makes it easier to reuse and modify the objects.
- Use Graphic Instances: For static elements, use graphic instances instead of movie clip instances. Graphic instances are lighter and can improve performance.
By mastering these advanced techniques, you can create more dynamic and visually stunning animations with motion guides in Flash. Experiment with different combinations of these techniques to achieve unique and professional-looking results.
4. Troubleshooting Common Motion Guide Issues
Even with a good understanding of motion guides, you may encounter issues. This section provides solutions to common problems that arise when working with motion guides in Flash.
4.1. Object Not Following the Path
If your object isn’t following the motion path correctly, consider these troubleshooting steps:
- Check Linking: Ensure the object layer is properly linked to the motion guide layer. The object layer should be indented under the guide layer in the timeline.
- Pivot Point Alignment: Verify that the pivot point of the object is touching the motion path at the start and end keyframes.
- Keyframe Placement: Make sure you have keyframes on both the object layer and the guide layer at the same points in the timeline.
4.2. Jerky or Unsmooth Motion
Jerky motion can detract from the quality of your animation. Here’s how to address it:
- Increase Frame Rate: A higher frame rate (e.g., 30 fps) can smooth out the animation. Adjust the frame rate in the
Document Settings. - Add More Keyframes: Adding more keyframes along the motion path can help smooth out curves and changes in direction.
- Adjust Easing: Use easing to control the acceleration and deceleration of the object. Experiment with different easing values to find the smoothest motion.
4.3. Path Visible in the Final Output
The motion guide path should not be visible in the final animation. If it is, follow these steps:
- Guide Layer Setting: Ensure that the layer is correctly set as a guide layer. Right-click on the layer and verify that
Guideis selected. - Testing the Movie: Always test the movie (
Ctrl + EnterorCmd + Enter) to see the final output. The path should not be visible in the tested movie.
4.4. Object Rotation Problems
If the object is not rotating correctly along the path, or if it’s rotating in an unexpected way, try these solutions:
- Orient to Path: Make sure the
Orient to pathoption is checked in thePropertiespanel for the tween. - Registration Point: Adjust the registration point of the object to ensure it’s properly aligned. The registration point should be at the center of the object for even rotation.
- Manual Rotation: For more complex rotations, you may need to manually rotate the object at keyframes along the path.
4.5. Layering Issues
Incorrect layering can cause objects to appear in the wrong order or be obscured by other elements.
- Check Layer Order: Ensure that layers are stacked in the correct order in the timeline. Layers at the top of the timeline appear in front of layers at the bottom.
- Use Masks: Masks can help control the visibility of objects and create complex layering effects.
- Avoid Conflicting Tweens: Make sure there are no conflicting tweens on different layers that could be affecting the object’s visibility or position.
By addressing these common issues, you can ensure that your motion guide animations run smoothly and look professional. Regular testing and attention to detail are key to troubleshooting and resolving any problems that may arise.
5. Best Practices for Optimizing Motion Guides
Optimizing motion guides is essential for creating efficient and high-quality animations. This section outlines best practices to ensure your motion guides are well-structured, performant, and visually appealing.
5.1. Keeping Paths Simple and Efficient
Complex paths can lead to performance issues and unsmooth motion. Here’s how to keep your paths efficient:
- Minimize Anchor Points: Use as few anchor points as possible when drawing your motion path. Fewer points mean less processing for Flash.
- Smooth Curves: Use the
Smoothoption in theModify > Shapemenu to smooth out any jagged edges in your path. - Avoid Sharp Turns: Sharp turns can cause the object to slow down or jerk unexpectedly. Try to create gradual curves instead.
5.2. Using Symbols for Reusability
Symbols are reusable assets that can significantly reduce file size and improve performance.
- Convert to Symbol: Always convert your objects into symbols before animating them.
- Library Panel: Store your symbols in the
Librarypanel for easy access and reuse. - Graphic vs. Movie Clip: Use graphic symbols for static elements and movie clip symbols for animated elements.
5.3. Managing Keyframes Effectively
Effective keyframe management is crucial for smooth and controlled animation.
- Strategic Placement: Place keyframes at important points along the motion path, such as changes in direction or speed.
- Avoid Overlapping Keyframes: Make sure keyframes on different layers don’t overlap unnecessarily.
- Use Frame Labels: Use frame labels to mark important sections of your animation for easy navigation and editing.
5.4. Optimizing File Size
Large file sizes can lead to slow loading times and poor performance. Here’s how to optimize your Flash files:
- Compress Images: Use optimized image formats like JPEG for photographs and PNG for graphics with transparency.
- Reduce Sound Quality: Lower the bit rate and sample rate of your audio files to reduce their size.
- Remove Unused Assets: Delete any unused symbols, bitmaps, or sounds from your
Librarypanel.
5.5. Testing on Different Platforms
Animations can behave differently on different platforms and devices.
- Multiple Browsers: Test your animation in different web browsers to ensure compatibility.
- Mobile Devices: If your animation is intended for mobile devices, test it on a variety of devices to ensure it looks and performs well.
- Flash Player Versions: Consider the different versions of Flash Player that your audience may be using and test accordingly.
By following these best practices, you can create motion guide animations that are efficient, visually appealing, and perform well on a variety of platforms. Regular optimization and testing are key to delivering a high-quality user experience.
6. Examples of Effective Motion Guide Usage
To illustrate the power and versatility of motion guides, let’s explore several examples of their effective use in different types of animations.
6.1. Character Animation: Walking and Running Cycles
Motion guides can be used to create realistic and fluid walking and running cycles for characters.
- Create the Character: Design your character and break it down into separate parts (e.g., legs, arms, torso).
- Draw the Path: Use a motion guide to define the path that the character’s feet will follow during the walking or running cycle.
- Animate the Limbs: Animate the character’s legs and arms to move in sync with the motion guide. Use inverse kinematics to create natural-looking movements.
6.2. Vehicle Animation: Cars, Planes, and Trains
Motion guides are ideal for animating vehicles moving along specific routes.
- Create the Vehicle: Design your vehicle and convert it into a symbol.
- Draw the Path: Use a motion guide to define the path that the vehicle will follow (e.g., a road, a flight path, or a train track).
- Orient to Path: Enable the
Orient to pathoption to make the vehicle rotate to follow the direction of the path. - Add Secondary Motion: Add secondary motion, such as rotating wheels or blinking lights, to make the animation more realistic.
6.3. Logo Animation: Dynamic Logo Reveals
Motion guides can be used to create dynamic and eye-catching logo reveals.
- Import the Logo: Import your logo into Flash and convert it into a symbol.
- Create the Path: Use a motion guide to define the path that the logo will follow during the reveal animation.
- Add Effects: Add effects such as scaling, fading, and rotation to make the logo reveal more visually interesting.
6.4. Abstract Animation: Particle Effects and Trails
Motion guides can be used to create abstract animations with particle effects and trails.
- Create a Particle: Design a small particle and convert it into a symbol.
- Draw the Path: Use a motion guide to define the path that the particle will follow.
- Duplicate Particles: Duplicate the particle symbol multiple times and offset their start times to create a trail effect.
- Add Effects: Add effects such as color changes, scaling, and fading to make the animation more visually dynamic.
6.5. Interactive Animation: User-Controlled Paths
Motion guides can be combined with ActionScript to create interactive animations where users can control the path of an object.
- Draw the Path: Use a motion guide to define the initial path of the object.
- Add ActionScript: Use ActionScript to allow users to modify the path by dragging control points or drawing new segments.
- Update the Animation: Update the animation in real-time to reflect the changes made by the user.
These examples demonstrate the wide range of applications for motion guides in Flash. By experimenting with different techniques and combining them with other Flash features, you can create unique and compelling animations.
7. Integrating Motion Guides with Other Flash Features
Motion guides are powerful on their own, but their capabilities are greatly enhanced when combined with other Flash features. This section explores how to integrate motion guides with features like masking, ActionScript, and shape tweens for more complex and dynamic animations.
7.1. Combining Motion Guides with Masks
Masks can be used to reveal or hide portions of an object as it moves along a motion guide, creating interesting visual effects.
- Create the Motion Guide Animation: Set up your basic motion guide animation with an object following a defined path.
- Add a Mask Layer: Add a new layer above the object layer and draw a shape on this layer to serve as the mask.
- Apply the Mask: Right-click on the mask layer and select
Mask. The object layer will now be masked by the shape on the mask layer. - Animate the Mask: Animate the mask shape to create dynamic reveal effects as the object moves along the motion guide.
7.2. Using ActionScript to Control Motion Guides
ActionScript can be used to dynamically control the properties of a motion guide, such as its path or speed, creating interactive and responsive animations.
- Create a Motion Guide Animation: Set up your basic motion guide animation.
- Add ActionScript: Use ActionScript to access the properties of the motion guide and modify them based on user input or other events.
- Dynamic Control: For example, you can use ActionScript to change the speed of the object along the path, or to dynamically adjust the shape of the path itself.
7.3. Integrating Shape Tweens with Motion Guides
Shape tweens can be used to morph the shape of an object as it moves along a motion guide, creating complex and visually interesting animations.
- Create the Motion Guide Animation: Set up your basic motion guide animation.
- Add Shape Tweening: On the object layer, create a shape tween between two different shapes.
- Combine Effects: As the object moves along the motion guide, it will also morph between the two shapes, creating a combined motion and shape animation.
7.4. Working with Filters and Effects
Filters and effects can be used to add visual polish to your motion guide animations.
- Create the Motion Guide Animation: Set up your basic motion guide animation.
- Apply Filters: Use the
Filterspanel to add effects such as blur, glow, or drop shadow to the object. - Animate Filters: Animate the properties of the filters to create dynamic effects that change over time.
7.5. Incorporating Sound and Music
Sound and music can enhance the emotional impact of your motion guide animations.
- Create the Motion Guide Animation: Set up your basic motion guide animation.
- Import Sound: Import sound files into your
Librarypanel. - Add Sound to Timeline: Drag the sound files onto the timeline to add them to your animation.
- Sync Sound to Motion: Use the timeline to synchronize the sound with the motion of the object, creating a cohesive and engaging animation.
By integrating motion guides with these other Flash features, you can create animations that are more complex, dynamic, and visually appealing. Experiment with different combinations of these techniques to discover new and creative possibilities.
8. The Role of Motion Guides in Professional Animation
Motion guides are a fundamental tool in the professional animator’s toolkit, enabling precise control and sophisticated movement that is essential for high-quality animation. In this section, we’ll explore how motion guides are used in professional animation projects and their importance in creating compelling visual experiences.
8.1. Use in Film and Television
In film and television, motion guides are used to create complex character movements, vehicle animations, and special effects.
- Character Animation: Motion guides are used to create realistic walking and running cycles, as well as complex action sequences.
- Vehicle Animation: Motion guides are used to animate cars, planes, and other vehicles moving along specific routes, such as roads or flight paths.
- Special Effects: Motion guides are used to create dynamic special effects, such as explosions, particle effects, and fluid simulations.
8.2. Use in Web Design and Interactive Media
Motion guides are used in web design and interactive media to create engaging user experiences and dynamic visual elements.
- Logo Animation: Motion guides are used to create eye-catching logo reveals and animations that add visual interest to websites.
- Interactive Animations: Motion guides are combined with ActionScript to create interactive animations that respond to user input, such as mouse movements or button clicks.
- Educational Content: Motion guides are used to create educational animations that illustrate complex concepts and processes in a visually engaging way.
8.3. Importance of Precision and Control
In professional animation, precision and control are paramount. Motion guides provide animators with the ability to fine-tune the movement of objects, ensuring that they follow specific paths and behave in a realistic manner.
- Realistic Movement: Motion guides allow animators to create realistic movement by precisely controlling the speed, acceleration, and rotation of objects.
- Complex Choreography: Motion guides enable animators to choreograph complex sequences of movements, such as dance routines or fight scenes.
- Visual Storytelling: Motion guides can be used to enhance visual storytelling by guiding the viewer’s eye and creating a sense of drama and excitement.
8.4. Examples of Professional Projects
Here are some examples of professional animation projects that have used motion guides effectively:
- Animated Music Videos: Many animated music videos use motion guides to create dynamic and visually stunning animations that complement the music.
- Commercials: Motion guides are used in commercials to create eye-catching animations that grab the viewer’s attention and promote the product or service being advertised.
- Video Games: Motion guides are used in video games to create realistic character movements and dynamic game environments.
8.5. How to Develop Professional Skills
To develop professional skills in motion guide animation, consider the following:
- Practice Regularly: Practice using motion guides on a regular basis to develop your skills and build your portfolio.
- Study Professional Work: Study the work of professional animators to learn their techniques and approaches.
- Take Courses and Workshops: Consider taking courses and workshops to learn advanced motion guide techniques and best practices.
- Seek Feedback: Seek feedback from other animators and industry professionals to improve your skills and identify areas for growth.
By mastering motion guides and integrating them into your animation workflow, you can create professional-quality animations that stand out from the crowd.
9. Future Trends in Motion Guide Animation
As technology evolves, so do the techniques and applications of motion guide animation. This section explores some of the future trends in motion guide animation, including the integration of AI, the use of real-time animation, and the development of new tools and software.
9.1. Integration of Artificial Intelligence (AI)
AI is poised to play a significant role in the future of motion guide animation.
- AI-Assisted Path Creation: AI algorithms can be used to automatically generate motion paths based on user input or predefined parameters.
- Predictive Motion: AI can be used to predict the future movement of objects and automatically adjust the motion path to create more realistic and fluid animations.
- Automated Optimization: AI can be used to optimize motion paths for performance, ensuring that animations run smoothly on a variety of devices.
9.2. Real-Time Animation
Real-time animation is becoming increasingly popular in industries such as gaming, virtual reality, and live events.
- Interactive Motion Guides: Motion guides can be used to create interactive animations that respond to user input in real-time.
- Virtual Production: Real-time motion guides can be used in virtual production environments to create dynamic camera movements and special effects.
- Live Performances: Motion guides can be used to create live animations that are performed in real-time, such as virtual concerts or theatrical productions.
9.3. New Tools and Software
The development of new tools and software is constantly pushing the boundaries of motion guide animation.
- Advanced Path Editors: New path editors are being developed that offer more precise control over the creation and manipulation of motion paths.
- Procedural Animation Tools: Procedural animation tools can be used to automate the creation of complex motion guide animations based on predefined rules and parameters.
- Integration with 3D Software: Seamless integration with 3D software allows animators to create motion guide animations that combine 2D and 3D elements.
9.4. Virtual and Augmented Reality (VR/AR)
VR and AR technologies are creating new opportunities for motion guide animation.
- Immersive Experiences: Motion guides can be used to create immersive VR and AR experiences that allow users to interact with animated objects and environments.
- Spatial Animation: Motion guides can be used to create spatial animations that are anchored to specific locations in the real world.
- Interactive Storytelling: Motion guides can be used to create interactive storytelling experiences that allow users to explore different narrative paths.
9.5. The Growing Importance of Accessibility
As animation becomes more ubiquitous, accessibility is becoming an increasingly important consideration.
- Clear Visuals: Use clear and simple visuals to ensure that animations are easy to understand.
- Descriptive Audio: Provide descriptive audio tracks for animations to make them accessible to visually impaired users.
- Alternative Formats: Offer animations in alternative formats, such as text-based descriptions or interactive simulations, to make them accessible to users with different needs.
By staying informed about these future trends and embracing new technologies, animators can continue to push the boundaries of motion guide animation and create compelling visual experiences for a wide range of audiences.
10. Frequently Asked Questions (FAQs) About Motion Guides
This section addresses some of the most frequently asked questions about using motion guides in Flash, providing quick and helpful answers to common queries.
10.1. What is the difference between a motion tween and a motion guide?
A motion tween automatically generates movement between two keyframes, while a motion guide allows you to define the exact path an object follows. Motion tweens are suitable for simple animations, while motion guides are ideal for complex and precise movements.
10.2. How do I create a motion guide in Flash?
To create a motion guide:
- Create a new layer and rename it “Guide”.
- Right-click on the “Guide” layer and select
Guide. - Draw a path on the “Guide” layer.
- Create an object on another layer and convert it into a symbol.
- Link the object layer to the “Guide” layer by dragging it onto the “Guide” layer.
- Create keyframes and position the object at the start and end of the path.
- Create a classic tween between the keyframes.
10.3. Why is my object not following the motion path?
If your object isn’t following the motion path, check the following:
- Ensure the object layer is properly linked to the motion guide layer.
- Verify that the pivot point of the object is touching the motion path at the start and end keyframes.
- Make sure you have keyframes on both the object layer and the guide layer at the same points in the timeline.
10.4. How do I make the motion path invisible in the final output?
The motion path should automatically be invisible in the final output when the layer is correctly set as a guide layer. Test the movie (Ctrl + Enter or Cmd + Enter) to see the final output.
10.5. How do I make an object rotate along the motion path?
To make an object rotate along the motion path, check the Orient to path option in the Properties panel for the tween.
10.6. Can I use multiple motion guides in a single animation?
Yes, you can use multiple motion guides in a single animation. Create multiple guide layers, each with its own path, and link and unlink the object layer to different guide layers at different points in the timeline.
10.7. How do I control the speed of the object along the motion path?
You can control the speed of the object along the motion path by adjusting the spacing between keyframes and using easing. Closer keyframes result in slower movement, while farther keyframes result in faster movement. Easing can be used to control the acceleration and deceleration of the object.
10.8. Can I use ActionScript to control motion guides?
Yes, you can use ActionScript to dynamically control the properties of a motion guide, such as its path or speed.
10.9. How do I optimize motion guides for performance?
To optimize motion guides for performance:
- Keep paths simple and efficient by minimizing anchor points and smoothing curves.
- Use symbols for reusability.
- Manage keyframes effectively.
- Optimize file size by compressing images and reducing sound quality.
10.10. Where can I find more resources and tutorials on motion guides?
You can find more resources and tutorials on motion guides at CONDUCT.EDU.VN, as well as on websites like Adobe Help, YouTube, and other animation and design communities.
We at CONDUCT.EDU.VN understand the challenges in finding reliable guidelines and standards of behavior. We’re here to help. If you’re struggling to find reliable standards of behavior, visit conduct.edu.vn for detailed information and useful guides. Our resources offer clear explanations of ethical principles and practical examples to help you navigate complex situations. For additional support, contact us at 100 Ethics Plaza, Guideline City, CA 90210, United States, or call +1 (707) 555-1234. You can also reach us via WhatsApp at +1 (707) 555-12