How To Use Smart Guides Powerpoint effectively to create visually appealing and well-aligned presentations is a crucial skill. CONDUCT.EDU.VN offers detailed guidance on leveraging smart guides for precise object alignment and spacing, ultimately enhancing the professional look of your slides. Explore CONDUCT.EDU.VN for resources on presentation design principles and visual communication techniques, including alignment assistance and gridline tools.
1. Understanding PowerPoint Smart Guides
PowerPoint Smart Guides are visual aids that appear automatically when you move, resize, or align objects on a slide. These guides help you precisely position objects relative to each other and to the slide itself. By understanding how these guides work, you can create visually balanced and professional-looking presentations. The benefits extend beyond aesthetics; well-aligned content improves readability and enhances the overall impact of your message.
1.1. What are Smart Guides?
Smart Guides are non-printing lines that appear on your slide as you move objects. They dynamically adjust based on the position of other objects and the slide’s boundaries. When an object is aligned with another object’s edge, center, or midpoint, a Smart Guide will appear, indicating the alignment. These guides simplify the process of creating visually consistent layouts.
1.2. Why Use Smart Guides?
Using Smart Guides ensures consistency and precision in your slide design. This leads to presentations that are more visually appealing and easier to understand. Aligned objects create a sense of order and professionalism, making your message more credible. Smart Guides also save time by eliminating the need for manual adjustments and guesswork.
1.3. Key Benefits of Smart Guides
- Precision Alignment: Ensure objects are perfectly aligned with each other.
- Even Spacing: Distribute objects evenly across the slide.
- Professional Appearance: Create a polished and consistent look.
- Time Savings: Reduce the time spent manually adjusting object positions.
- Improved Readability: Enhance the visual flow and clarity of your content.
2. Enabling and Disabling Smart Guides in PowerPoint
Before you can start using Smart Guides, you need to make sure they are enabled in PowerPoint. The process is straightforward and can be done in a few simple steps. Knowing how to toggle Smart Guides on and off is also useful, as there may be times when you prefer to work without them.
2.1. How to Enable Smart Guides
- Open PowerPoint: Launch PowerPoint and open the presentation you want to work on.
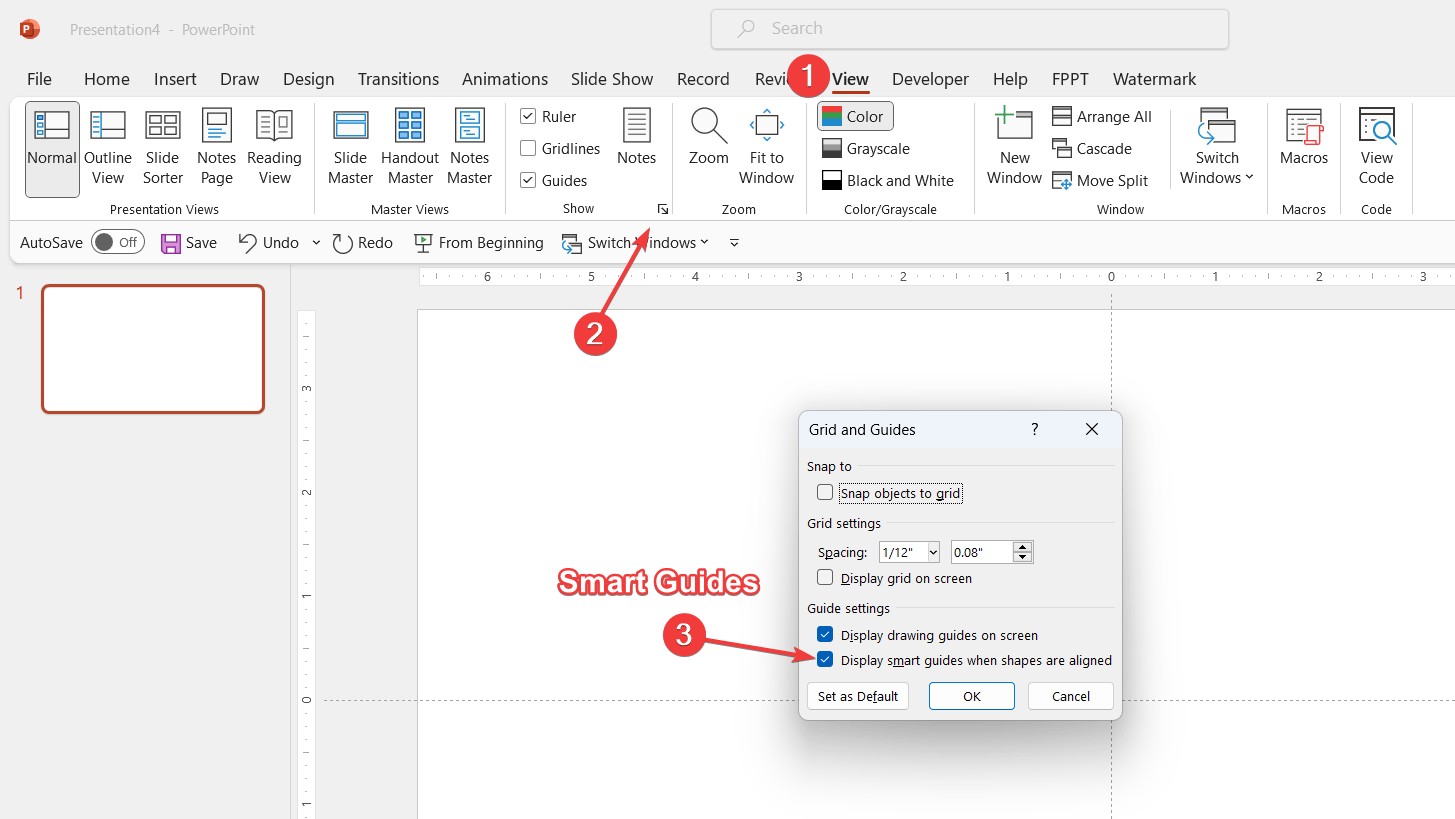
- Go to the View Tab: Click on the “View” tab in the PowerPoint Ribbon.
- Access the Grid and Guides Dialog Box: In the “Show” group, click the small arrow at the bottom-right corner to open the “Grid and Guides” dialog box.
- Check the Smart Guides Option: In the “Grid and Guides” dialog box, make sure the “Display smart guides when shapes are aligned” checkbox is ticked. If it is not, click on it to enable the feature.
- Apply the Settings: Click “OK” to apply the settings and close the dialog box.
 Enable Smart Guides in PowerPoint
2.2. How to Disable Smart Guides
Disabling Smart Guides follows a similar process to enabling them.
- Open PowerPoint: Launch PowerPoint and open the presentation you want to work on.
- Go to the View Tab: Click on the “View” tab in the PowerPoint Ribbon.
- Access the Grid and Guides Dialog Box: In the “Show” group, click the small arrow at the bottom-right corner to open the “Grid and Guides” dialog box.
- Uncheck the Smart Guides Option: In the “Grid and Guides” dialog box, click the “Display smart guides when shapes are aligned” checkbox to uncheck it. This will disable the Smart Guides.
- Apply the Settings: Click “OK” to apply the settings and close the dialog box.
2.3. Temporarily Turning Off Smart Guides
Sometimes, you might need to make very fine adjustments to an object’s position and find that Smart Guides are getting in the way. In such cases, you can temporarily disable them.
- Windows: Press and hold the “ALT” key while dragging the object.
- Mac: Press and hold the “Option” key while dragging the object.
Releasing the key will re-enable Smart Guides.
3. Moving Objects with Precision Using Smart Guides
One of the primary uses of Smart Guides is to move objects with precision. This ensures that objects are aligned correctly with each other, creating a clean and organized look. Smart Guides can align objects vertically, horizontally, and even indicate when objects are equidistant from each other.
3.1. Aligning Objects to Each Other
- Select an Object: Click on the object you want to move.
- Drag the Object: Click and drag the object towards another object on the slide.
- Watch for Smart Guides: As you move the object, dotted lines will appear, indicating potential alignment points.
- Precise Alignment: When the object aligns perfectly with another object (e.g., its edge, center, or midpoint), the dotted lines will turn solid, signaling precise alignment.
- Release the Mouse Button: Release the mouse button to place the object in its aligned position.
3.2. Aligning Objects Across Slides
Smart Guides are not limited to aligning objects within a single slide. You can also use them to align objects across multiple slides, ensuring consistency throughout your presentation.
- Copy and Paste the Object: Copy the object from one slide and paste it into another.
- Move the Object: Click and drag the object on the new slide.
- Watch for Smart Guides: As you move the object, Smart Guides will appear, referencing the position of objects on the original slide.
- Precise Alignment: Align the object using the Smart Guides, ensuring it is positioned consistently with the original slide.
- Release the Mouse Button: Release the mouse button to place the object in its aligned position.
3.3. Common Alignment Scenarios
- Top Alignment: Align the top edges of multiple objects.
- Bottom Alignment: Align the bottom edges of multiple objects.
- Left Alignment: Align the left edges of multiple objects.
- Right Alignment: Align the right edges of multiple objects.
- Center Alignment (Vertical): Align the vertical centers of multiple objects.
- Center Alignment (Horizontal): Align the horizontal centers of multiple objects.
4. Spacing Objects Evenly with Smart Guides
Equally spacing objects is crucial for creating visually appealing and balanced slides. Smart Guides make this task simple by indicating when objects are equidistant from each other. This feature is particularly useful when creating lists, diagrams, or any layout where consistent spacing is important.
4.1. Steps to Space Objects Evenly
- Align Two Reference Objects: Start by aligning two objects as a reference point. These objects will define the boundaries for the remaining objects.
- Drag the Third Object: Drag a third object between the two reference objects.
- Watch for Smart Guides: As you move the third object, Smart Guides will appear, indicating when it is equidistant from the two reference objects.
- Precise Spacing: When the Smart Guides show that the object is perfectly spaced, release the mouse button to place it in its aligned position.
- Repeat for Additional Objects: Repeat the process for any additional objects you want to space evenly.
4.2. Using Smart Guides for Distributing Objects
PowerPoint also has a “Distribute” feature that works in conjunction with Smart Guides.
- Select Multiple Objects: Select all the objects you want to distribute evenly.
- Go to the Arrange Menu: Click on the “Arrange” button in the “Drawing Tools Format” tab.
- Distribute Objects: Choose either “Distribute Horizontally” or “Distribute Vertically” from the menu.
- Use Smart Guides for Fine Tuning: After distributing the objects, use Smart Guides to fine-tune their positions for perfect alignment and spacing.
4.3. Examples of Even Spacing
- Bullet Points: Ensure bullet points are evenly spaced from the text.
- Diagram Elements: Space elements in a diagram consistently for clarity.
- Image Galleries: Create a visually balanced image gallery with equal spacing between images.
- Navigation Buttons: Distribute navigation buttons evenly across the slide for a professional look.
5. Aligning Objects to Slide Elements with Smart Guides
Smart Guides are not only useful for aligning objects with each other but also for aligning objects with key slide elements. This includes the slide edges, the center of the slide, and other fixed elements. Aligning objects to these elements can create a sense of balance and structure in your presentation.
5.1. Aligning to Slide Edges
- Select an Object: Click on the object you want to move.
- Drag the Object: Click and drag the object towards the edge of the slide.
- Watch for Smart Guides: As you move the object, Smart Guides will appear when the object’s edge aligns with the slide’s edge.
- Precise Alignment: Release the mouse button to place the object precisely at the slide’s edge.
5.2. Aligning to the Center of the Slide
- Select an Object: Click on the object you want to move.
- Drag the Object: Click and drag the object towards the center of the slide.
- Watch for Smart Guides: As you move the object, Smart Guides will appear when the object’s center aligns with the slide’s center (both horizontally and vertically).
- Precise Alignment: Release the mouse button to place the object precisely at the center of the slide.
5.3. Aligning to Other Fixed Elements
You can also use Smart Guides to align objects to other fixed elements on the slide, such as headers, footers, or logos.
- Select an Object: Click on the object you want to move.
- Drag the Object: Click and drag the object towards the fixed element.
- Watch for Smart Guides: As you move the object, Smart Guides will appear when the object aligns with the fixed element.
- Precise Alignment: Release the mouse button to place the object precisely in alignment with the fixed element.
6. Troubleshooting PowerPoint Smart Guides
While Smart Guides are generally reliable, there may be times when they don’t appear or don’t function as expected. Here are some common issues and how to resolve them.
6.1. Smart Guides Not Showing
If Smart Guides are not showing, the first thing to do is check if they are enabled in the “Grid and Guides” dialog box (as described in Section 2). If they are enabled and still not showing, try the following:
- Restart PowerPoint: Sometimes, simply restarting PowerPoint can resolve minor glitches.
- Check Slide Master: Ensure that the Slide Master settings are not interfering with Smart Guides.
- Update PowerPoint: Make sure you are using the latest version of PowerPoint, as updates often include bug fixes.
6.2. Smart Guides Inaccurate
In some cases, Smart Guides may appear to be inaccurate. This can be due to several factors:
- Zoom Level: Zooming in or out too far can sometimes affect the accuracy of Smart Guides. Try adjusting the zoom level.
- Object Complexity: Complex objects with many points or curves can sometimes confuse Smart Guides. Simplify the object if possible.
- Conflicting Guides: If there are too many objects and guides on the slide, they can sometimes conflict with each other. Try moving some objects out of the way.
6.3. Smart Guides Interfering
There may be times when Smart Guides are interfering with your work, making it difficult to make fine adjustments. In such cases, you can temporarily disable them by holding down the “ALT” key (Windows) or “Option” key (Mac) while dragging the object.
7. Real-Life Applications of Smart Guides
Smart Guides have numerous real-life applications in presentation design. They are essential for creating professional and visually appealing slides that effectively communicate your message.
7.1. Business Presentations
In business presentations, Smart Guides can help you create slides that are clean, organized, and easy to understand. This is crucial for conveying information effectively and maintaining a professional image.
- Data Visualization: Align charts, graphs, and tables precisely to present data clearly.
- Team Slides: Ensure consistency in team member photos and biographies.
- Project Updates: Align project timelines and milestones for a clear overview.
7.2. Educational Presentations
For educational presentations, Smart Guides can help you create slides that are engaging and informative. This is important for keeping students interested and facilitating learning.
- Diagrams and Illustrations: Align elements in diagrams and illustrations for clarity.
- Text and Image Layouts: Create visually balanced layouts with text and images.
- Interactive Elements: Align interactive elements such as quizzes and polls for a seamless experience.
7.3. Creative Presentations
In creative presentations, Smart Guides can help you create slides that are visually stunning and memorable. This is essential for capturing the audience’s attention and leaving a lasting impression.
- Image Collages: Create visually appealing image collages with precise alignment.
- Artistic Layouts: Experiment with creative layouts and alignments to express your unique style.
- Animation and Transitions: Use Smart Guides to align objects for smooth animations and transitions.
8. Advanced Tips for Using Smart Guides
To maximize the effectiveness of Smart Guides, consider these advanced tips that can streamline your workflow and enhance the precision of your designs.
8.1. Customize Guide Settings
While PowerPoint doesn’t offer extensive customization for Smart Guides, understanding the basic settings can help you optimize their use. Explore the Grid and Guides dialog box for options like adjusting grid spacing, which can indirectly affect how Smart Guides assist in alignment.
8.2. Use with Selection Pane
The Selection Pane (found under the Arrange menu) allows you to manage the layering of objects on your slide. Using it in conjunction with Smart Guides can prevent accidental misalignments when objects overlap.
8.3. Create Custom Guides
For complex layouts, consider adding custom guides (horizontal and vertical lines) to your slide. These act as additional reference points and can be used in conjunction with Smart Guides for even greater precision.
8.4. Zoom for Precision
Zooming in on your slide allows for more accurate alignment using Smart Guides. This is particularly useful when working with small objects or intricate designs.
9. Integrating Smart Guides with Other PowerPoint Tools
Smart Guides are even more powerful when combined with other PowerPoint features. This integration allows for a more streamlined and efficient design process.
9.1. Combine with the Format Painter
Use the Format Painter to quickly copy the formatting of one object to another. Then, use Smart Guides to ensure the newly formatted object is perfectly aligned with the rest of your slide.
9.2. Grouping and Ungrouping Objects
Group objects together to move and align them as a single unit. Ungroup them to make individual adjustments using Smart Guides, then regroup for final placement.
9.3. Utilizing PowerPoint Designer
PowerPoint Designer offers automated design suggestions. Use Smart Guides to fine-tune these suggestions and ensure they meet your specific needs.
10. Best Practices for Presentation Design with Smart Guides
Following best practices in presentation design is essential for creating effective and engaging content. Smart Guides play a critical role in achieving these goals.
10.1. Maintain Visual Consistency
Use Smart Guides to ensure consistent alignment, spacing, and sizing across all slides. This creates a professional and cohesive look.
10.2. Simplify Complex Layouts
Break down complex layouts into smaller, manageable elements. Use Smart Guides to align these elements and create a clear visual hierarchy.
10.3. Balance Aesthetics and Functionality
While visual appeal is important, ensure that your slides are also functional and easy to understand. Use Smart Guides to align text, images, and other elements in a way that enhances readability and comprehension.
10.4. Test Your Presentation
Before presenting, test your slides on different devices and screen sizes. Use Smart Guides to make any necessary adjustments and ensure your presentation looks its best in any setting.
11. Common Mistakes to Avoid When Using Smart Guides
Even with Smart Guides, it’s easy to make mistakes that can detract from the visual appeal of your presentation. Here are some common pitfalls to avoid.
11.1. Over-Reliance on Smart Guides
While Smart Guides are helpful, don’t rely on them exclusively. Use your judgment and eye for design to make sure everything looks visually balanced.
11.2. Ignoring Visual Hierarchy
Smart Guides can help you align objects, but they can’t create a visual hierarchy. Use font sizes, colors, and other design elements to guide the viewer’s eye and highlight important information.
11.3. Cluttered Slides
Avoid cluttering your slides with too many objects, even if they are perfectly aligned. Keep your slides clean and focused to maximize impact.
11.4. Inconsistent Alignment
Be consistent with your alignment choices throughout the presentation. Inconsistent alignment can make your slides look disorganized and unprofessional.
12. The Future of Smart Guides in Presentation Software
As presentation software continues to evolve, Smart Guides are likely to become even more sophisticated and intuitive.
12.1. AI-Powered Alignment
Future versions of PowerPoint may incorporate AI to automatically suggest optimal alignments and layouts based on the content of your slides.
12.2. Real-Time Collaboration
Enhanced Smart Guides could facilitate real-time collaboration, allowing multiple users to align objects simultaneously in a shared presentation.
12.3. Integration with Design Tools
Seamless integration with other design tools could allow you to import and align objects from various sources with ease.
13. Smart Guides and Accessibility
When designing presentations, it’s important to consider accessibility for all viewers. Smart Guides can play a role in creating more accessible content.
13.1. Clear Visual Structure
Use Smart Guides to create a clear visual structure that makes it easier for people with disabilities to navigate your slides.
13.2. Alt Text for Images
Provide descriptive alt text for all images. Use Smart Guides to align the images and alt text in a way that is visually appealing and informative.
13.3. Color Contrast
Ensure sufficient color contrast between text and background. Use Smart Guides to align text and other elements in a way that maximizes readability.
14. Resources for Learning More About Smart Guides
To further enhance your skills in using Smart Guides, explore these valuable resources.
14.1. Microsoft PowerPoint Help
The official Microsoft PowerPoint Help documentation provides comprehensive information on Smart Guides and other features.
14.2. Online Tutorials
Numerous online tutorials and videos demonstrate how to use Smart Guides effectively. Platforms like YouTube and LinkedIn Learning offer a wealth of content.
14.3. Design Blogs and Forums
Follow design blogs and participate in online forums to learn from experienced designers and stay up-to-date on the latest trends and techniques.
15. Conclusion: Mastering Smart Guides for Professional Presentations
Mastering Smart Guides is essential for creating professional and visually appealing presentations. By understanding how to enable, disable, and use Smart Guides effectively, you can ensure that your slides are well-aligned, evenly spaced, and visually balanced. This will not only enhance the aesthetic appeal of your presentations but also improve their clarity and impact. CONDUCT.EDU.VN is committed to providing you with the knowledge and resources you need to excel in presentation design and deliver compelling messages.
15.1. The Importance of Visual Communication
In today’s fast-paced world, visual communication is more important than ever. A well-designed presentation can capture your audience’s attention, convey your message effectively, and leave a lasting impression. Smart Guides are a powerful tool for achieving this level of visual excellence.
15.2. Continuous Learning and Improvement
Presentation design is an ongoing process of learning and improvement. By experimenting with different techniques and staying up-to-date on the latest trends, you can continuously enhance your skills and create presentations that are truly exceptional. Remember to visit CONDUCT.EDU.VN for more tips and resources on presentation design.
15.3. Final Thoughts
Smart Guides are more than just alignment tools; they are essential for creating visually stunning and impactful presentations. Embrace this powerful feature and watch your presentations transform from ordinary to extraordinary.
Are you struggling to create professional-looking presentations? Do you find it challenging to align objects and ensure visual consistency? Visit CONDUCT.EDU.VN at 100 Ethics Plaza, Guideline City, CA 90210, United States or contact us via Whatsapp at +1 (707) 555-1234 today to discover more tips, tutorials, and resources that will help you master PowerPoint Smart Guides and elevate your presentation skills. We also offer consulting services to help you design presentations that are both visually appealing and highly effective. Let conduct.edu.vn be your guide to creating presentations that stand out from the crowd.
FAQ: Mastering Smart Guides in PowerPoint
Here are 10 frequently asked questions (FAQs) about Smart Guides in PowerPoint to help you master this essential feature for creating professional presentations:
-
What are Smart Guides in PowerPoint?
Smart Guides are visual aids that appear automatically when you move, resize, or align objects on a slide. They help you precisely position objects relative to each other and to the slide itself, ensuring a visually balanced and professional-looking presentation.
-
How do I enable Smart Guides in PowerPoint?
To enable Smart Guides, go to the “View” tab in the PowerPoint Ribbon, click on the small arrow in the “Show” group to open the “Grid and Guides” dialog box, and make sure the “Display smart guides when shapes are aligned” checkbox is ticked.
-
Can I temporarily disable Smart Guides?
Yes, you can temporarily disable Smart Guides by pressing and holding the “ALT” key (on Windows) or “Option” key (on Mac) while dragging the object. Releasing the key will re-enable Smart Guides.
-
How do Smart Guides help with spacing objects evenly?
Smart Guides indicate when objects are equidistant from each other, making it simple to space objects evenly. Align two objects as a reference point, then drag a third object between them. Smart Guides will appear when it is equidistant from the two reference objects.
-
Are Smart Guides only for aligning objects with each other?
No, Smart Guides can also help align objects with key slide elements, such as the slide edges, the center of the slide, and other fixed elements, creating a sense of balance and structure in your presentation.
-
What should I do if Smart Guides are not showing up?
If Smart Guides are not showing, first check if they are enabled in the “Grid and Guides” dialog box. If they are enabled and still not showing, try restarting PowerPoint, checking Slide Master settings, or updating PowerPoint.
-
How can I use Smart Guides to align objects across multiple slides?
Copy the object from one slide and paste it into another. As you move the object on the new slide, Smart Guides will appear, referencing the position of objects on the original slide, allowing you to align it consistently.
-
What are some common mistakes to avoid when using Smart Guides?
Avoid over-reliance on Smart Guides, ignoring visual hierarchy, cluttering slides, and inconsistent alignment. Use your judgment and eye for design to ensure everything looks visually balanced.
-
Can Smart Guides help with creating accessible presentations?
Yes, Smart Guides can help create accessible presentations by ensuring a clear visual structure, aligning images and alt text, and maximizing readability.
-
Where can I find more resources for learning about Smart Guides?
You can find more information on the official Microsoft PowerPoint Help documentation, online tutorials on platforms like YouTube and LinkedIn Learning, and design blogs and forums.