Guided Access is a powerful feature on iPhones and iPads that allows you to restrict the device to a single app, controlling which features are available, and is fully explained on CONDUCT.EDU.VN. This comprehensive guide explores how to use Guided Access effectively, its diverse applications, and how it enhances device accessibility, ensuring a focused and secure user experience. Discover how to enable screen time management, enhance digital accessibility, and customize parental controls with this robust feature.
1. Understanding Guided Access and Its Benefits
Guided Access is an accessibility feature available on iOS devices (iPhones, iPads, and iPod Touch) that locks the device into a single app and allows administrators to disable certain hardware buttons and screen areas. This feature is designed to help users with cognitive or attention difficulties stay focused on a single task. However, its use extends far beyond accessibility, providing benefits in various scenarios.
1.1. What is Guided Access?
Guided Access is more than just a simple screen lock. It provides a way to customize the device experience by controlling the features available during a session. When Guided Access is active, the user cannot exit the current app without entering a passcode or using Touch ID/Face ID, depending on the device.
1.2. Who Can Benefit from Guided Access?
- Parents: Limit children to educational apps or specific games, preventing them from accessing other content or making unauthorized purchases.
- Educators: Create a controlled testing environment or allow students to focus on a specific learning app without distractions.
- Businesses: Use iPads as kiosks, restricting access to a single app for customer interaction, such as surveys, product catalogs, or informational displays.
- Individuals with Cognitive Difficulties: Help users with autism, ADHD, or other cognitive challenges stay focused on a specific task without being overwhelmed by other options.
- Anyone Seeking Focus: Minimize distractions and improve concentration by locking the device to a single app during work, study, or creative activities.
 iPhone settings showing the Guided Access feature
1.3. Key Benefits of Using Guided Access
- Enhanced Focus: By limiting the device to a single app, users can concentrate on the task at hand without the temptation of notifications, other apps, or the internet.
- Improved Security: Prevent unauthorized access to personal information, settings, or other apps, especially when lending the device to children or using it in public settings.
- Customized Accessibility: Tailor the device experience to meet individual needs by disabling hardware buttons, touch input in specific areas, or setting time limits.
- Simplified User Experience: Create a streamlined and intuitive experience for users with limited technical skills or cognitive challenges.
- Controlled Environment: Establish a controlled environment for testing, training, or presentations, ensuring that users stay within the designated app and follow the intended workflow.
2. Setting Up Guided Access: A Step-by-Step Guide
Setting up Guided Access is a straightforward process that involves enabling the feature in the Accessibility settings and configuring a passcode or biometric authentication method. Here’s a detailed guide on how to get started:
2.1. Enabling Guided Access
- Open the Settings App: Locate and tap the “Settings” app icon on your iPhone or iPad.
- Navigate to Accessibility: Scroll down and tap on “Accessibility.”
- Find Guided Access: In the Accessibility menu, scroll down to the “General” section and tap on “Guided Access.”
- Turn on Guided Access: Toggle the “Guided Access” switch to the ON position. The switch will turn green, indicating that the feature is enabled.
2.2. Configuring Passcode Settings
- Tap Passcode Settings: In the Guided Access menu, tap on “Passcode Settings.”
- Set Guided Access Passcode: Tap on “Set Guided Access Passcode.”
- Enter a Passcode: Enter a passcode of your choice. It’s recommended to use a passcode that is different from your device’s main passcode for added security.
- Re-enter the Passcode: Re-enter the passcode to confirm it.
2.3. Enabling Touch ID or Face ID (Optional)
- Toggle Touch ID or Face ID: In the Passcode Settings menu, you can enable Touch ID or Face ID to end Guided Access sessions. Toggle the respective switch to the ON position.
- Authenticate: If prompted, authenticate using your fingerprint or facial recognition to enable the feature.
2.4. Configuring Accessibility Shortcut (Optional)
- Navigate to Accessibility Shortcut: In the Accessibility menu (Settings > Accessibility), scroll down to the bottom and tap on “Accessibility Shortcut.”
- Select Guided Access: In the Accessibility Shortcut menu, select “Guided Access” by tapping on it. This will enable you to quickly start Guided Access by triple-clicking the Side or Home button (depending on your device model).
3. Starting and Ending a Guided Access Session
Once Guided Access is set up, starting and ending a session is quick and easy. Here’s how to do it:
3.1. Starting a Guided Access Session
- Open the Desired App: Open the app that you want to lock the device into.
- Triple-Click the Side or Home Button: Depending on your device model, triple-click the Side button (on iPhone X and later, and some iPad models) or the Home button (on iPhone 8 and earlier, and some iPad models).
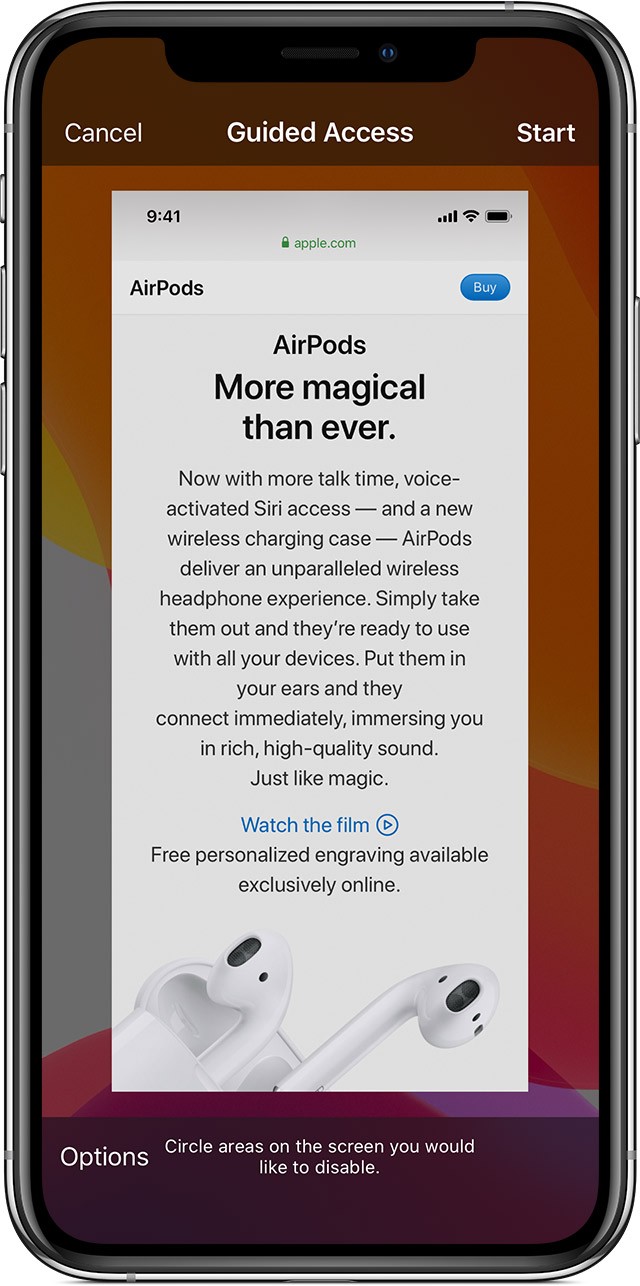
- Adjust Settings (Optional): Before starting the session, you can circle areas of the screen that you want to disable. You can also tap “Options” at the bottom left corner to customize the session further.
- Tap Start: Tap “Start” in the top right corner of the screen to begin the Guided Access session.
- Enter Passcode (If Required): If you haven’t enabled Touch ID or Face ID, you’ll be prompted to enter your Guided Access passcode.
3.2. Ending a Guided Access Session
- Triple-Click the Side or Home Button: Triple-click the Side button or the Home button, depending on your device model.
- Enter Passcode or Use Biometric Authentication: Enter your Guided Access passcode or use Touch ID/Face ID to authenticate.
- Tap End: Tap “End” in the top left corner of the screen to end the Guided Access session.
4. Customizing Guided Access Options for Optimal Control
Guided Access offers a range of customizable options that allow you to tailor the session to your specific needs. These options include disabling hardware buttons, touch input, and setting time limits.
4.1. Accessing Guided Access Options
- Start a Guided Access Session: Begin a Guided Access session in the desired app.
- Triple-Click the Side or Home Button: Triple-click the Side button or the Home button to access the Guided Access options.
- Enter Passcode or Use Biometric Authentication: Enter your Guided Access passcode or use Touch ID/Face ID to authenticate.
- Tap Options: Tap “Options” in the bottom left corner of the screen to view the available customization options.
4.2. Available Customization Options
- Sleep/Wake Button: Disable the Sleep/Wake button to prevent the user from turning off the device.
- Volume Buttons: Disable the volume buttons to prevent the user from adjusting the volume.
- Motion: Limit the device’s response to motion, such as shaking or rotating, to prevent unintended actions.
- Keyboards: Disable the keyboard to prevent text input.
- Touch: Disable touch input to prevent the user from interacting with the screen.
- Dictionary Lookup: Enable or disable the Look Up feature when selecting text.
- Time Limit: Set a time limit for the Guided Access session. When the time limit expires, the session will automatically end, and the device will be locked.
4.3. Configuring Screen Regions
- Start a Guided Access Session: Begin a Guided Access session in the desired app.
- Triple-Click the Side or Home Button: Triple-click the Side button or the Home button to access the Guided Access options.
- Enter Passcode or Use Biometric Authentication: Enter your Guided Access passcode or use Touch ID/Face ID to authenticate.
- Circle Areas to Disable: Use one finger to circle the areas of the screen that you want to disable. These areas will become unresponsive to touch input.
- Adjust or Remove Circles: You can move or resize the circles, or tap the “X” to remove them.
5. Real-World Applications of Guided Access
Guided Access is a versatile tool with a wide range of applications across various settings. Here are some real-world examples of how Guided Access can be used:
5.1. In Education
- Testing and Assessments: Create a controlled testing environment by locking students into a specific testing app, preventing them from accessing other resources or communicating with classmates.
- Learning Activities: Allow students to focus on a specific learning app without distractions, such as educational games, reading apps, or language learning tools.
- Assistive Technology: Help students with learning disabilities or attention difficulties stay focused on the task at hand by minimizing distractions and simplifying the user experience.
- Interactive Whiteboard Control: Lock the iPad to the whiteboard control app, preventing students from accidentally exiting the app or accessing other features.
5.2. In Business
- Kiosk Mode: Use iPads as kiosks in retail stores, trade shows, or museums, restricting access to a single app for customer interaction, such as product catalogs, surveys, or informational displays.
- Employee Training: Provide employees with a controlled training environment, ensuring that they stay within the training app and follow the intended workflow.
- Data Collection: Use iPads for data collection in the field, such as surveys, inspections, or inventory management, preventing unauthorized access to other apps or settings.
- Point of Sale (POS) Systems: Secure the POS system by locking the iPad to the POS app, preventing employees from accessing other apps or settings that could compromise security.
5.3. At Home
- Parental Control: Limit children to educational apps or specific games, preventing them from accessing inappropriate content, making unauthorized purchases, or changing device settings.
- Accessibility for Seniors: Simplify the user experience for seniors with limited technical skills or cognitive challenges by locking the iPad to a single app, such as a video calling app, a photo album, or a news app.
- Focus and Productivity: Minimize distractions and improve concentration by locking the device to a single app during work, study, or creative activities.
- Guest Mode: Allow guests to use your iPad without accessing your personal information or settings by locking the device to a single app, such as a web browser or a photo album.
6. Troubleshooting Common Issues with Guided Access
While Guided Access is generally reliable, users may encounter some issues from time to time. Here are some common problems and their solutions:
6.1. Forgetting the Guided Access Passcode
- Solution: If you forget your Guided Access passcode, you will need to erase your device and restore it from a backup. This will remove the Guided Access passcode and allow you to set a new one. To prevent this from happening, it’s recommended to use a passcode that is different from your device’s main passcode and to store it in a safe place. If you have enabled Touch ID or Face ID for Guided Access, you can use these authentication methods to end the session without entering the passcode.
6.2. Guided Access Not Starting
- Solution: If Guided Access is not starting when you triple-click the Side or Home button, make sure that the Accessibility Shortcut is configured correctly. Go to Settings > Accessibility > Accessibility Shortcut and ensure that “Guided Access” is selected. If it is already selected, try toggling it off and on again. Also, make sure that Guided Access is enabled in Settings > Accessibility > Guided Access.
6.3. Unable to End Guided Access
- Solution: If you are unable to end Guided Access by triple-clicking the Side or Home button and entering the passcode, try restarting your device. Press and hold the Sleep/Wake button and the Home button (or the Volume Down button on iPhone 7 and later) until the Apple logo appears. Once the device restarts, you should be able to end the Guided Access session. If this doesn’t work, you may need to erase your device and restore it from a backup.
6.4. Touch Input Not Working in Certain Areas
- Solution: If touch input is not working in certain areas of the screen, make sure that you haven’t accidentally disabled those areas using the screen region feature. Triple-click the Side or Home button, enter your passcode, and check if there are any circles around the areas that are not responding to touch. If there are, remove the circles by tapping the “X” inside them.
6.5. Time Limit Not Working
- Solution: If the time limit is not working as expected, make sure that the “Time Limit” option is enabled in the Guided Access options. Triple-click the Side or Home button, enter your passcode, and tap “Options.” Ensure that the “Time Limit” switch is toggled to the ON position. Also, make sure that the time limit is set correctly.
7. Tips and Tricks for Advanced Guided Access Usage
Here are some tips and tricks to help you get the most out of Guided Access:
7.1. Using Guided Access with Siri
You can start a Guided Access session using Siri by saying “Turn on Guided Access” while in the desired app. This can be useful for users who have difficulty triple-clicking the Side or Home button. To enable this feature, make sure that Siri is enabled on your device and that Guided Access is configured correctly.
7.2. Creating Custom Profiles for Different Scenarios
You can create custom profiles for different scenarios by configuring the Guided Access options and screen regions to meet your specific needs. For example, you can create a profile for testing that disables all hardware buttons and touch input in certain areas, or a profile for reading that disables the keyboard and the volume buttons. To switch between profiles, you will need to end the current session and start a new one with the desired settings.
7.3. Using Guided Access with Multiple Apps
While Guided Access is designed to lock the device into a single app, you can use it with multiple apps by creating a custom app that links to the other apps. This can be useful for creating a controlled environment for specific tasks that require the use of multiple apps.
7.4. Combining Guided Access with Other Accessibility Features
Guided Access can be combined with other accessibility features, such as VoiceOver, Zoom, and Switch Control, to create a more customized and accessible user experience. For example, you can use Guided Access to lock the device into a single app and then use VoiceOver to provide audio descriptions of the screen content.
7.5. Keeping Guided Access Secure
To keep Guided Access secure, it’s important to use a strong passcode that is different from your device’s main passcode and to enable Touch ID or Face ID for authentication. You should also keep your device’s software up to date to ensure that you have the latest security patches.
8. The Importance of Digital Accessibility and Guided Access
Digital accessibility is the practice of making digital content and technology usable by people with disabilities. Guided Access plays a vital role in enhancing digital accessibility by providing a way to customize the device experience to meet individual needs.
8.1. Understanding Digital Accessibility
Digital accessibility is not just about making websites and apps accessible to people with disabilities. It’s about creating a more inclusive and user-friendly digital world for everyone. By following accessibility guidelines, such as the Web Content Accessibility Guidelines (WCAG), developers can create content and technology that is usable by people with a wide range of abilities and disabilities.
8.2. How Guided Access Enhances Digital Accessibility
Guided Access enhances digital accessibility by providing a way to:
- Simplify the User Interface: By locking the device into a single app and disabling unnecessary features, Guided Access can simplify the user interface and make it easier for people with cognitive or motor impairments to navigate.
- Minimize Distractions: By limiting the device to a single app and disabling notifications, Guided Access can minimize distractions and help people with attention difficulties stay focused on the task at hand.
- Customize Input Methods: By disabling touch input in certain areas of the screen, Guided Access can allow people with motor impairments to use alternative input methods, such as switch control or head tracking.
- Provide a Controlled Environment: By creating a controlled environment for specific tasks, Guided Access can help people with anxiety or sensory sensitivities feel more comfortable and secure.
8.3. Resources for Learning More About Digital Accessibility
- Web Content Accessibility Guidelines (WCAG): The international standard for web accessibility.
- Accessibility for iOS: Apple’s resources for developing accessible iOS apps.
- Web Accessibility Initiative (WAI): The WAI’s resources for web accessibility.
9. The Future of Guided Access and Device Accessibility
As technology continues to evolve, the future of Guided Access and device accessibility looks promising. Here are some potential developments:
9.1. Integration with Artificial Intelligence (AI)
AI could be used to automatically configure Guided Access settings based on the user’s individual needs and preferences. For example, AI could analyze the user’s behavior and automatically disable features that are distracting or confusing.
9.2. Enhanced Customization Options
Future versions of Guided Access could offer even more customization options, such as the ability to create custom gestures or to remap hardware buttons. This would allow users to create a truly personalized device experience.
9.3. Cross-Platform Compatibility
Guided Access could be expanded to other platforms, such as Android and Windows, to provide a consistent accessibility experience across all devices.
9.4. Improved Voice Control Integration
Guided Access could be integrated more closely with voice control, allowing users to control the device and start or end Guided Access sessions using only their voice.
9.5. Focus on Cognitive Accessibility
Future versions of Guided Access could focus more on cognitive accessibility, providing features that help people with cognitive impairments stay focused, organized, and productive.
10. Frequently Asked Questions (FAQs) About Guided Access
Here are some frequently asked questions about Guided Access:
- What is Guided Access? Guided Access is an accessibility feature on iOS devices that locks the device into a single app and allows administrators to disable certain hardware buttons and screen areas.
- Who can benefit from Guided Access? Parents, educators, businesses, individuals with cognitive difficulties, and anyone seeking focus can benefit from Guided Access.
- How do I enable Guided Access? Go to Settings > Accessibility > Guided Access and toggle the “Guided Access” switch to the ON position.
- How do I set a Guided Access passcode? In the Guided Access menu, tap on “Passcode Settings” and then tap on “Set Guided Access Passcode.”
- How do I start a Guided Access session? Open the desired app, triple-click the Side or Home button, and tap “Start.”
- How do I end a Guided Access session? Triple-click the Side or Home button, enter your Guided Access passcode or use Touch ID/Face ID, and tap “End.”
- What customization options are available in Guided Access? You can disable the Sleep/Wake button, volume buttons, motion, keyboards, touch, dictionary lookup, and set a time limit.
- What do I do if I forget my Guided Access passcode? You will need to erase your device and restore it from a backup.
- Can I use Guided Access with Siri? Yes, you can start a Guided Access session using Siri by saying “Turn on Guided Access.”
- How does Guided Access enhance digital accessibility? By simplifying the user interface, minimizing distractions, customizing input methods, and providing a controlled environment.
Guided Access is a valuable tool for enhancing focus, improving security, and customizing accessibility on iOS devices, and CONDUCT.EDU.VN is dedicated to providing clear and comprehensive information on its usage. Whether you’re a parent, educator, business professional, or someone seeking to improve their own productivity, Guided Access can help you achieve your goals. If you’re looking for more detailed guides and information on optimizing your digital environment, visit conduct.edu.vn at 100 Ethics Plaza, Guideline City, CA 90210, United States, or contact us via WhatsApp at +1 (707) 555-1234. Let us help you navigate the complexities of digital accessibility and ethical technology use.