Embarking on the Heartwarming Dream quest in MapleStory can feel like a grand adventure. This comprehensive guide will walk you through each step, ensuring you navigate every challenge with ease. Whether you’re a seasoned Maple World explorer or just starting your journey, this guide will illuminate your path.
1. Wiz’s Woes at Ludibrium Library
Begin your questline by heading to Ludibrium and seeking out Wiz the Librarian. Initiate the quest Wiz’s Woes by speaking with him.
Wiz needs your help sorting books back onto their shelves. The library is in disarray, and it’s up to you to restore order. Refer to the image below to correctly place each book in its designated spot.
For the final book, you’ll need to venture into the storage room. Enter the door at the top right of the library, ascend the stairs, and locate the podium in the center of the room. Place the book on the podium to complete this part of the task.
Once all books are correctly shelved, return to Wiz the Librarian and complete Wiz’s Woes.
2. Unlocking the Tome: Who Can Read the Tome?
Start the quest Who Can Read the Tome? by speaking to Wiz again. When prompted for a dialogue option, select “Uhh…” to proceed. After speaking with Wiz, take the elevator up to the Time Control Room on the 101st floor of Helios Tower. Here, you’ll find Karen. Speak to her to finish Who Can Read the Tome?.
3. Waiting on Karen and Gathering Collectibles
Initiate the quest Waiting on Karen with Karen. At this stage, six collection quests become available from various NPCs throughout Ludibrium.
- Marcel: Requires 100 Toy Trojan Swords and 100 Plane Controllers.
- Geanie: Needs 100 Small Eggs and 100 Yellow Ribbons.
- Nara: Seeks help with her map designer application and asks for 100 Sticky Spiderwebs and 100 Stiff Feathers.
- Mason the Collector: (First house to the left of Ludibrium’s town portal) Starts the quest [Necki vs Apple] Mason and the Collectibles, requesting 100 Toy Ducklings and 100 Plastic Crowns.
- Document Roll: (Fourth house to the left of Ludibrium’s town portal) Starts [Necki vs Apple] More Lives for the Necki!, asking for 100 Mechanical Hearts and 100 Motors.
- Korin: (Last house on the stretch to the left of Ludibrium) Starts [Necki vs Apple] Korin and the Memory Card, requesting 100 Cogs and 3 Rombot Memory Cards.
To streamline your farming, consider collecting materials from multiple quests simultaneously. Here’s an efficient farming route based on monster spawns:
- Teddy’s Yellow Ribbon: Teddy (6th Floor)
- Toy Trojan Sword: Toy Trojan (Cloud Terrace )
- Toy Duckling: Roloduck (Sky Terrace )
- Mechanical Heart: Master Robo (Zone 1)
- Cog: Any Chronos mob, Master Chronos recommended (Lost Time )
- Motor: Propelly (59th/58th Floor)
- Sticky Spiderweb: Green Trixter (56th Floor)
- Plane Controller: Planey (25th Floor)
- Plastic Crown: King Blocktopus (22nd Floor)
- Rombot Memory Card: Hidden Street: Hidden Tower (accessible via 8th Floor). Note: Two spawns, one at the top and one at the bottom. Respawn timers: 30 minutes and 20 minutes respectively. Important: Also collect 100 Yellow Toy Blocks and 100 Blue Toy Blocks from Block Golems in Hidden Tower for a later quest step.
- Small Eggs: Tweeter (6th Floor)
Farming all these items requires patience, so take your time or consider purchasing them from the Free Market. Once you have gathered all the requested items and completed all six quests, return to Karen in the Time Control Room to turn in Waiting on Karen.
4. Picture This! Capturing Eos and Helios Tower
Karen will then give you the quest Picture This! and an Old Camera. Your task is to take pictures of Eos Tower and Helios Tower from specific vantage points. For optimal angles, go to Cloud Terrace and Sky Balcony, the leftmost and rightmost maps on the first level of the Clocktower.
At each location, simply use the Old Camera from your inventory. The photos will take 3 minutes to develop after being taken. Use this time to travel between maps before returning to Karen.
Note: If you have the [Storybook] Unknown Letter in your inventory, it may cause you to enter a different instance of Cloud Balcony. Store the letter on another character or in your storage to proceed with taking the photo.
Once the photos are developed, return to Karen in the Time Control Room and submit Picture This!.
5. The Mystery of Meneos and The Blueprint 1
Begin The Mystery of Meneos with Karen. She will give you a Blue Piece of Paper. Deliver this paper to Porter at the Omega Sector Command Center. Upon delivering the paper, Porter will give you The Blueprint 1 quest.
6. The Blueprint 2 and Mateon & Plateon Hunt
Head to Rice the Medic, located on the bottom rightmost side of Omega Sector, and turn in The Blueprint 1 to start The Blueprint 2. Rice needs your help dealing with monsters and tasks you to defeat 200 Mateons and 100 Plateons.
Boswell Field I is an ideal map to find both Mateons and Plateons. It’s located to the left of Omega Sector; enter the portal above on the leftmost end of the map.
After defeating the required monsters, return to Rice the Medic and submit The Blueprint 2.
7. The Blueprint 3 and Mecateon & MT-09 Challenge
Start The Blueprint 3 with Rice the Medic. This time, you must defeat 300 Mecateons and 2 MT-09s. Head to Boswell Field VI. In this map, find the alien graffiti rock and press the up key to access Hidden Street: Defeat Monsters.
Hidden Street: Defeat Monsters is the only map where MT-09s spawn. Three MT-09s will appear per channel, with a respawn timer of 19 to 22 minutes each.
Once you’ve defeated the required Mecateons and MT-09s, return to Rice the Medic to complete The Blueprint 3. Then, head back to Karen in Helios Tower.
8. A Blue Clue and Sheets in the Wind at Korean Folk Town
Start and finish A Blue Clue with Karen. She will give you the Meneos Blueprint.
Next, travel to Korean Folk Town. At the top right corner of the map, find Swallow and begin Sheets in the Wind.
Jump down from Swallow and click on the rice stack beside Chil Nam to obtain a Blueprint Piece. Complete Sheets in the Wind with Swallow after acquiring the piece.
9. Picking Up the Pieces and Moon Bunny Hunt
Begin Picking Up the Pieces with Swallow. Head one map to the right to Entrance to Black Mountain. A light bulb icon will appear above your character’s head. Accept The Moon Bunnies quest and defeat 200 Moon Bunnies.
Upon completion, The Moon Bunnies quest automatically grants you another blueprint piece.
10. The Tree Cutter and Axe Adventure
Proceed to the next map and enter the top portal to reach Tiger Forest II. Here, you’ll find the Tree Cutter and start The Tree Cutter quest.
The Tree Cutter will give you a Black Mountain Axe, which you must equip for this part of the quest.
Across all maps in Korean Folk Town (excluding Hidden Streets), you will find dried trees. Attack these trees with the Black Mountain Axe. The location of the correct tree is random for each character, so check each tree until you find the one that drops a blueprint piece.
If you are questing with a party, it’s beneficial to split up across different maps or channels. Only the player who lands the final hit on the correct tree will receive the blueprint piece.
Here are the locations of dried trees in each Korean Folk Town map:
Once you find the correct tree and obtain a blueprint piece, return to the Tree Cutter to complete The Tree Cutter quest. Note that he will take back the Black Mountain Axe.
11. The God of Mountains and Dye Mixing
Return to Entrance to Black Mountain and enter the top portal to A Small Well. Start The God of Mountains quest with the God of Mountains NPC. Engage in the dialogue, selecting the following options to avoid being warped back to Korean Folk Town:
- No, my piece of paper is not made of gold.
- No, I’m looking for a regular blue paper piece.
After the dialogue, you will receive a blueprint piece and a dye bag.
The God of Mountains will also give you three hints for dye mixtures he requires. To create these dyes:
- Mix two dye powders of the correct colors. Double-click the dye bag to open the mixing window and drag dye powders into it.
- Obtain dye powders by defeating instanced King Goblins, accessible by talking to the God of Mountains and selecting ‘I wish to gather…‘.
- Completed dyes require only two colors. Mixing three or more colors will yield no result but won’t consume your current dye.
Match the descriptions provided by the God of Mountains to the finished dye colors:
- Yellow + Red = Orange (…for the sun after a long day…)
- Yellow + Green = Lime (…bright grass and leaves…)
- Yellow + Blue = Lavender (…for the dawn…)
- Yellow + Purple = Coconut (…trees captured under the sunlight…)
- Red + Green = Chocolate (…soil, and it has a nice aroma…)
- Red + Blue = Plum (…the sky after the sun has set…)
- Red + Purple = Fushia (…for bright flowers…)
- Green + Blue = Teal (…rivers and other water bodies…)
- Green + Purple = Charcoal (…shaping dark mountains…)
- Blue + Purple = Eggplant (…reflections on a night sky…)
Once you have mixed and turned in all three dyes, complete The God of Mountains to receive your final blueprint piece from Korean Folk Town.
At this point, double-click the Meneos Blueprint ETC item and drag the four blueprint pieces into the Meneos Blueprint window. Complete Picking up the Pieces with Swallow after combining the pieces.
12. Completing the Blueprint in Deep Ludibrium
Return to Karen and start Completing the Blueprint. She will give you a Dimensional Radar and task you with finding the last four blueprint pieces in Deep Ludibrium.
The radar charges as you defeat monsters in Deep Ludibrium. A quest indicator tracks the charge level, also visible in the Quest Helper UI.
You can bind the radar to a hotkey for easier use.
Here’s how the radar works:
-
You don’t need a full 300 units of charge to use the radar.
-
Blueprint pieces are randomized and can appear in any Deep Ludibrium map, including Hidden Streets and Thanatos/Gatekeeper areas.
-
Maps that previously didn’t contain a blueprint piece can contain one after using the radar a few times.
-
Double-clicking the radar consumes 25 units and provides a result:
- FAIL: The Radar did not pick any signal. I should search in another map…
- COLD: The Radar picked a very faint signal. I’m in the right map, but still far away.
- WARM: The signal is good. I’m getting closer. Let’s keep moving.
- HOT: The signal is strong! I must be close to a Blueprint piece!
- PASS: I picked up a piece of Blueprint!
-
If you get FAIL, move to another map.
-
For COLD to HOT, continue searching within the current map and using the radar.
Your goal is to collect four blueprint pieces using the radar. Once you have them, combine all four pieces with the Meneos Blueprint item as you did with the previous pieces.
Return to Karen to finish Completing the Blueprint.
13. Back to the Beginnings and Library Book Retrieval
Start Back to the Beginnings with Karen and turn it in to Wiz the Librarian. Wiz will ask you to retrieve one of the books you sorted earlier (in this example, it’s Mysteries of the Maple World). Return to the designated shelf and click on it to retrieve the book.
14. Over the Moon and Meeting Astrum
Begin Over the Moon with Wiz the Librarian. He’ll tell you a story about a big, old, and bare tree located in a field high enough to be close with the moon, which might reveal the secret of the Meneos Blueprint.
This description points to Fox Ridge in Korean Folk Town. Enter Hidden Street: Moon Ridge through the hole in the wall in Fox Ridge.
In Moon Ridge, you’ll find an old, bare tree next to the moon. Press the up key at the tree to meet Astrum.
Complete Over the Moon with Astrum.
15. Astrum’s Sibling and Corrupted Tachion Collection
Start Astrum quest with Astrum. He needs 100 Corrupted Tachions to find his sibling on the other side of the moon. These drop from any Deep Ludibrium monster. If you still have Deep Ludibrium maps saved, use a Teleport Rock to return there quickly. Otherwise, walk back to Deep Ludibrium and collect the Tachions.
Once you’ve collected 100 Corrupted Tachions, return to Astrum and complete the Astrum quest. He will warp you to Astralis’ Asteroid.
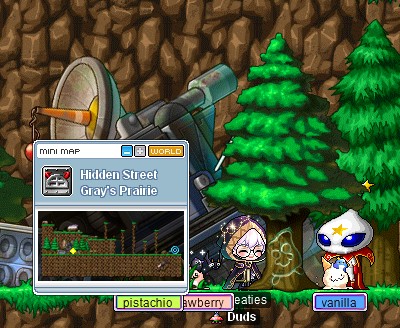
16. Astralis and Gray’s Prairie Investigation
Start Astralis quest with Astralis on her asteroid. You’ll suspect the Alien Grays are involved with the Meneos Blueprint. Take the portal to her left to enter Gray’s Prairie.
Head one map to the right of Gray’s Prairie and use a Town Scroll to Omega Sector. Turn in Astralis to Dr. Kim at the Command Center.
17. Gray Area and Agent Ribley Encounter
Start Gray Area with Dr. Kim. He asks you to find Agent Ribley. She is located in Kulan Field III. Agent Ribley doesn’t have a minimap indicator or NPC name label, blending in effectively. Turn in Gray Area to her.
18. Four Shades of Gray and Alien Gray Elimination
Begin Four Shades of Gray with Agent Ribley. She needs you to eliminate the following Alien Grays:
- 150 Barnard Grays
- 120 Zeta Grays
- 100 Ultra Grays
- 10 Chief Grays
These monsters are spread across the Kulan Field maps. Defeat them all and return to Agent Ribley to submit Four Shades of Gray.
19. Infiltrate the Secret Base and Gray Transformation
Start Infiltrate the Secret Base with Agent Ribley. Speak to her again and select the bottommost dialogue option. She will transform you into a Gray for 5 minutes, allowing you to infiltrate the base. The base entrance is the rock directly across from Ribley. Press the up key there.
20. Secret Base Jump Quest
You’ll enter a simple two-stage jump quest.
Stage 1: Before proceeding upwards, head right and hit the switch. This switch opens the door and only needs to be activated once, despite its visual reset.
Stage 2: Continue upwards, hitting switches along the way. There are four switches to activate in this stage.
For one switch, after climbing the ropes, drop down to the circled platform and press up to teleport back to the ropes above.
Jump on the pipes to progress through the stage.
The block shown below acts as a ladder. Hold the Up key when you jump into this section to climb.
21. King Rombot Showdown and Reporting Back
After completing both jump quest stages, you’ll face Alien Gray. Select the bottommost dialogue option to spawn King Rombot. Defeat King Rombot and report back to Agent Ribley.
22. Reporting Results and Toy Block Delivery
Start Reporting Results with Agent Ribley and turn it in to Dr. Kim. Dr. Kim will then give you Delivery Supplies, requiring you to collect 100 Blue Toy Blocks and 100 Yellow Toy Blocks. If you collected these earlier from Block Golems in Hidden Tower, you can skip the farming and proceed to quest submission.
23. Rebuilding Eos Tower – A Timed Challenge
Begin Rebuilding Eos Tower with Tigun. After accepting, select the bottommost dialogue to warp to the Eos Tower repair room. You have a 10-minute time limit for this task. Click on the box to obtain a Toy Tower Piece.
Place the Toy Tower Pieces into the holes in the tower that match their shapes. You can only carry one piece at a time. You can take and drop pieces immediately around the box to save time clicking.
Use the pipe to teleport to the highest hole at the top of the tower.
Once you’ve placed all the pieces, turn in the quest to Tigun. Then, return to Karen in Helios Tower.
24. Memories of Meneos and Astrum & Astralis Visit
Begin Memories of Meneos 1 with Karen. She’s reviewing the blueprint again. Teleport Rock or walk back to Moon Ridge in Korean Folk Town and report to Astrum via the old bare tree. You’ll also say thanks to Astralis through Memories of Meneos 2.
After speaking with both Astrum and Astralis, you’ll be back in Gray’s Prairie. Teleport Rock or walk back to Karen.
25. A Happy Ending and Unlocking Fast Travel
Take A Happy Ending from Karen. Teleport Rock or walk to Gray’s Prairie and press up at the glowing tree to visit Astralis one last time.
Turn in A Happy Ending to Astralis. Congratulations! You have completed the Heartwarming Dream storyline quest and unlocked a quick travel route between Korean Folk Town and Omega Sector! You can purchase the travel item from Karen, similar to the Nautilus-Omega and Ellinia-Leafre routes.