Are you lost in the gruesome labyrinth of Mortal Kombat 11’s Krypt? This comprehensive Mk11 Krypt Guide will illuminate your path through every shadowy corner, secret passage, and puzzle-filled room. The Krypt in Mortal Kombat 11 is not just a visually stunning area; it’s packed with chests brimming with Konsumables, Brutalities, gear, Kosmetics, and Fatalities. Unlocking these treasures is key to enhancing your MK11 experience. While chest contents are randomized to ensure every player’s journey is unique, our walkthrough will equip you with the knowledge to explore every nook and cranny of the Krypt. We’ll show you how to progress through each area, solve environmental puzzles, and gather essential items to unlock new zones and riches.
Before we delve into the walkthrough, it’s worth noting a past issue with Kenshi’s Blindfold, which caused Soul Fragment currency to glitch into negatives. While that specific bug should be resolved, always be mindful of your resources in the Krypt. On a brighter note, NetherRealm boosted the Krypt’s FPS cap from 30 to 60, making your exploration of this macabre maze smoother and more visually appealing. Ready to uncover all the Krypt’s secrets? Let’s begin our detailed mk11 krypt guide.
Mortal Kombat 11 Krypt Walkthrough
Palace Entrance
Your Krypt journey begins at the Palace Entrance. Immediately, two chests will greet you. Consider these your welcome gifts, typically containing 50,000 Koins and 100 Hearts each. Opening these chests triggers the main gate to swing open, revealing Shao Kahn’s Hammer resting on an altar. This hammer is your essential tool – grab it! It allows you to smash through cracked walls, unveiling new paths and hidden areas within the Krypt.
Once you have the hammer, turn around. Behind the altar area, you’ll spot a partially destroyed gate. Smash through it and proceed to the Courtyard.
Alt text: MK11 Krypt Courtyard entrance with gong visible, guiding players in the walkthrough.
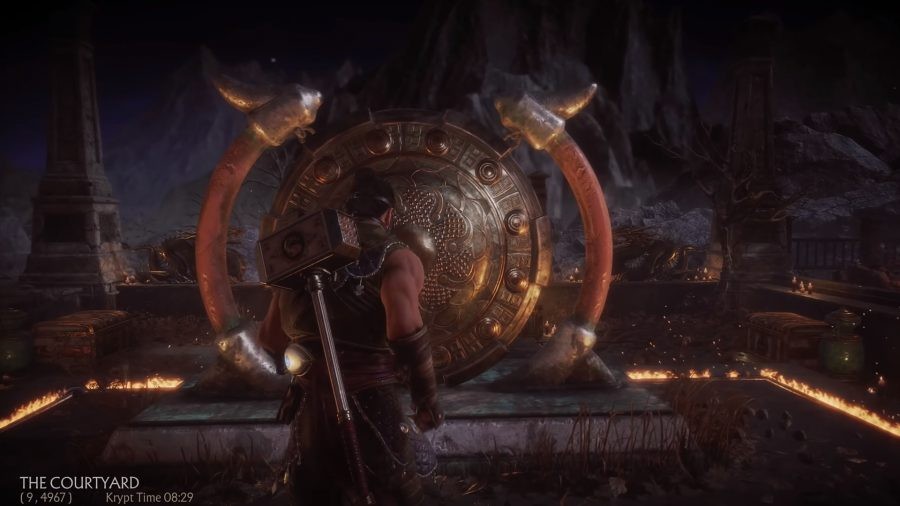
Courtyard
Upon entering the Courtyard, head left. Look for a breakable wall positioned near the blue glow of Kronika’s Time Vault. Smash this wall to proceed.
You’ll immediately see a large gong. Equip Shao Kahn’s Hammer and strike the gong. This action unlocks a gate within the Courtyard and rewards you with an in-game achievement. Now, return to the central Courtyard and go through the newly opened gate to enter the Forge area.
Forge
The Forge is where you can craft various items in the Krypt. However, crafting requires specific ingredients that you’ll gather throughout your exploration. If you’re interested in crafting recipes, you can consult a dedicated MK11 Forge recipes guide. For now, take the path to the right of the Forge. This path leads to the Mountain Pass, and ultimately, to the Shrine.
Alt text: MK11 Krypt Shrine area showing the meteorite crash site, important location for progression in the guide.
Shrine
The Shrine offers multiple interactions and opportunities. Completionists can aim for the ‘Gimme Dat Money’ achievement by spending 50,000 Koins here. More importantly, the Shrine can reward you with key items for unlocking new areas and crafting materials.
First, proceed to the right of the Shrine to trigger a cutscene involving a meteorite crashing down. After the scene, smash the meteorite with your hammer to obtain the Gem of the Living. Once you have the gem, head to the left of the meteorite crash site and descend the stairs. You’ll find another gong. Striking this gong grants you 25,000 Koins and opens a gate that leads back to the central Courtyard.
As a side note for dedicated explorers: If you happen to possess the Blue Amulet (found randomly in chests), you can use it on the broken statue in the Shrine to acquire Raiden’s Staff.
Warrior Shrine
Exiting the Shrine from the north point of the map will bring you to the Warrior Shrine. Here, you’ll see statues of every Mortal Kombat 11 fighter, each initially with a locked chest in front. To unlock these chests, you must venture out of the Krypt and perform 50 Fatalities or Brutalities on each specific fighter in the Towers of Time mode. Upon achieving this, you’ll earn their head. Return to the Warrior Shrine and place each head on their respective pike to unlock the corresponding chest.
The Courtyard (Revisited)
Return to the Courtyard area where you struck the first gong. To the left of the gong, you’ll now see a door that can be opened using the Gem of the Living. Pass through this door to enter the Gardens.
Alt text: MK11 Krypt Gardens door entrance, highlighting the use of Gem of the Living for unlocking new areas.
Gardens
In the Gardens, cross the bridge and destroy the wooden barricade on your left. Proceed into this new room, and you’ll find another room containing a lever. Pull the lever to open the right gate. Behind this gate, you’ll discover the Cracked Horn of Motaro.
Now, you need to backtrack slightly. Return to the meteorite crash site in the Shrine. Directly in front of the meteorite, you’ll see a large door. Interact with this door and place the Cracked Horn of Motaro into it to gain access to the Courtyard Cave.
Courtyard Cave
The Courtyard Cave is a short transitional area. Simply proceed through it and pull the lever on the elevator to descend into Goro’s Lair.
Alt text: MK11 Krypt Goro’s Lair entrance with chests, indicating the start of a more complex area in the walkthrough.
Goro’s Lair
Goro’s Lair is a sprawling area with multiple rooms and puzzles. Begin by following the path straight ahead to trigger a cutscene.
After the cutscene, explore the room to your right. At the end of this path, you’ll reach a jail cell area. Here, you can find Kenshi Takashi’s Blindfold. This item is crucial as it allows you to see into the spirit realm, revealing hidden loot and breakable walls. Be aware that using the Blindfold consumes Soul Fragments. To exit this jail cell area, activate Kenshi’s Blindfold and look for a destructible wall on the side of the room. Smash it with your hammer.
Now, return to Goro’s Throne room and take the path slightly to the right, leading upwards and behind the throne. Follow this path to find Scorpion’s Spear. This iconic weapon allows you to grab distant objects and corpses, opening up further exploration possibilities.
Alt text: MK11 Krypt volcano vista in Goro’s Lair, showing a key environmental area in the walkthrough.
Next, explore the path to the left of Goro’s Throne. Use the chains on the walls along this path to open a gate, leading you to a large dining hall. Go upstairs in the dining hall and you’ll find another gate on your right. Open it using the chain on the nearby wall. Proceed through to find an elevator. Take the elevator up and follow the path. You’ll witness a gruesome scene of a body falling onto spikes. Loot the corpse to acquire Ermac’s Amulet of Souls. This amulet allows you to spend Souls on green pots for 100 Souls each and repair certain objects like the bridge near the Forge. Exit this area the way you came in.
If you obtained Raiden’s Shattered Staff earlier, you can use it to open a door down the left path from the Torture Halls. Inside, navigate past the swinging traps and open the 20,000 Koin chest to find the Dragon Amulet Keystone. This keystone unlocks the Dragon Door in the Mountain Pass, just past the Forge.
Get over here: Discover more thrilling combat in the best fighting games on PC.
With these new tools and items, return to the entrance of Goro’s Lair and interact with the large door. To open it, you’ll need the Mind of One Being, Soul of the One Being, and Heart of the One Being. To acquire these, you must exit the Krypt and complete Tower challenges in Klassic Towers or Towers of Time. Perform ten Fatalities, ten Brutalities, and ten Mercies in Tower challenges. Once completed, return to the Krypt and open the vault. Inside, you’ll find a chest requiring a hefty 80,000 Koins to open. Opening this chest rewards you with the Heart of Blaze, which is crucial for solving a puzzle in The Sacrifice area.
Kytinn Hive
While in Goro’s Lair, you can explore the first Kytinn Hive by taking the right path from the Torture Halls. You’ll encounter a large spider enemy. Defeat it with your hammer to get a unique D’vorah character skin. Continue eliminating the smaller spiders in this area until one drops a special Forge item: the Ensorcelled Eye of a Dragon. This item is needed to forge a Key Item later.
Alt text: MK11 Krypt The Sacrifice puzzle area, depicting the pyre and statues essential for chest unlocking in the guide.
The Sacrifice
Now, let’s utilize the Heart of Blaze. Return to the Courtyard and then to the Warrior Shrine. Descend the stairs below the statues to reach The Sacrifice. You’ll see three monk bodies on a pyre between three giant statues and two locked chests. Pull the lever to lower a cage. Place the Heart of Blaze in the cage when prompted. Pull the lever again to raise the cage and Heart. Finally, use Scorpion’s Spear to strike the cage and ignite the Heart of Blaze. This action unlocks both chests in this area.
The Dojo
Return to the Warrior Shrine statues and look for a small alcove to the right of the door to Goro’s Lair. Activate Kenshi’s Blindfold, and you should see a weak spot in the wall. Break through it to enter the Dojo.
Explore the chests in the Dojo area. Once done, locate the gate and pull the lever to open a new path, rewarding you with 1,000 Koins and 10 Soul Fragments.
Second Courtyard
As you exit the Dojo, look at the wall opposite the Dojo gate. Use Kenshi’s Blindfold, and you should see another section of weak wall. Break it open to reveal another cave behind the Central Courtyard.
In this cave, you’ll find a few chests and a chain that raises a gate, providing a shortcut back to the central Courtyard. There’s also a gate leading to an area requiring the Dragon Amulet. If you have the Dragon Amulet, use it to open the Dragon Door in the Mountain Pass, which in turn opens this gate to the rest of the Courtyard Cave. From here, you can access the second Kytinn Hive.
Second Kytinn Hive
Proceed to the bottom of the pit past the Dragon Door to reach a sealed gate. This gate requires solving a puzzle involving three stone wheels and levers. Manipulate the wheels and levers until you see three slots. Each slot requires a specific amulet:
- Kronika’s Amulet: Donate 1,000 Koins at the large Shrine past the Mountain Pass.
- Shinnok’s Amulet: Craft this at the Forge. You’ll need: Ensorcelled Demon’s Heart (random reward), Ensorcelled Dragon’s Eye (from Kytinn Hive spiders), and Ensorcelled Gem of Trapped Souls (Soul Vault in Dead Woods – 10,000 Souls).
- Cetrion’s Amulet: Perform 50 Fatalities on Cetrion in the Towers of Time. Then, place her head on her pike at the Warrior Shrine.
Once all three amulets are in place, the gate opens, granting you 5,000 Koins and access to a new area filled with chests and rewards.
Shang Tsung’s Throne Room
This final area requires significant dedication. Return to the Warrior Shrine and place the head of every fighter on their respective pike. Remember, heads are obtained by performing 50 Fatalities on each fighter in Towers of Time or Klassic Towers. Placing ten heads unlocks Shang Tsung’s Throne Room, 15 heads grants access to his first treasure cache, and 25 heads unlocks his second treasure cache. These treasure caches contain rare items, including intros and victory animations for each character, making the grind worthwhile for completionists.
Explore more Mortal Kombat 11 guides:
Mortal Kombat 11: How to Unlock Frost
Mortal Kombat 11 Endings
Mortal Kombat 11 Fatalities
This concludes our comprehensive mk11 krypt guide, covering areas from the Palace Entrance to Shang Tsung’s Throne Room. We will continue to update this guide with any new areas discovered or changes introduced through game updates, ensuring you have the most up-to-date information for your Krypt explorations. Happy treasure hunting!