Polycom Phone User Guide from CONDUCT.EDU.VN offers a comprehensive overview and user-friendly instructions for efficiently utilizing your Polycom phone system. This guide helps users navigate the features and functionalities of their Polycom devices, ensuring optimal communication and productivity; learn to troubleshoot common issues, customize settings, and maximize the capabilities of your IP phone, VoIP phone, and business phone systems.
1. Introduction to Polycom Phones
Polycom phones are a staple in many businesses, known for their reliability and clear audio quality. Understanding the basics can significantly enhance your communication efficiency. This section provides an overview of the different Polycom phone models commonly used in business environments and outlines the key features that make them a valuable asset for professional communication.
1.1 Overview of Polycom VVX Series
The Polycom VVX series is a popular line of desk phones designed for modern office environments. These phones are known for their user-friendly interface and robust feature set. Different models within the VVX series cater to varying needs, from basic communication to advanced conferencing capabilities.
The VVX series typically includes models such as the VVX 150, VVX 250, VVX 350, VVX 450, and higher-end models like the VVX 601. Each model offers a range of features suitable for different user roles within an organization.
1.2 Key Features of Polycom Phones
Polycom phones come equipped with a variety of features designed to improve communication and productivity:
- High-Definition Audio: Provides crystal-clear voice quality for enhanced communication.
- User-Friendly Interface: Intuitive design for easy navigation and operation.
- Multiple Line Support: Allows handling of multiple calls simultaneously.
- Integrated Speakerphone: Enables hands-free communication.
- Call Management Features: Includes call waiting, call transfer, and conferencing.
- Customizable Settings: Allows users to personalize their phone settings for optimal performance.
- PoE Support: Power over Ethernet (PoE) support simplifies installation by providing power and data through a single cable.
- Advanced Security: Ensures secure communication through encryption and other security protocols.
1.3 Benefits of Using Polycom Phones
Using Polycom phones offers several advantages for businesses:
- Improved Communication Quality: High-definition audio ensures clear and effective communication.
- Enhanced Productivity: Features like multiple line support and call management tools streamline workflows.
- Cost-Effective: VoIP technology reduces call costs compared to traditional phone systems.
- Scalability: Easy to add or remove phones as your business grows.
- Reliability: Polycom phones are known for their durability and consistent performance.
- Integration: Seamless integration with other business communication tools and platforms.
2. Getting Started with Your Polycom Phone
Setting up your Polycom phone correctly is crucial for optimal performance. This section provides step-by-step instructions on how to connect your phone, perform initial configurations, and customize basic settings.
2.1 Unboxing and Connecting Your Polycom Phone
-
Unboxing:
- Carefully unpack the Polycom phone and its accessories.
- Verify that all components are included, such as the phone base, handset, handset cord, Ethernet cable, and power adapter (if not using PoE).
-
Connecting the Handset:
- Plug one end of the handset cord into the handset and the other end into the designated port on the phone base.
-
Connecting to the Network:
- Use the Ethernet cable to connect the phone to your network.
- Plug one end of the Ethernet cable into the network port on the phone and the other end into an available port on your network switch or router.
-
Powering On:
- If using PoE, the phone will power on automatically once connected to the network.
- If not using PoE, connect the power adapter to the phone and plug it into a power outlet.
2.2 Initial Configuration
-
Phone Startup:
- Once powered on, the phone will display a startup screen.
- Wait for the phone to initialize and connect to the network.
-
IP Address Configuration:
- In most cases, the phone will automatically obtain an IP address from your network’s DHCP server.
- If necessary, you can manually configure the IP address by accessing the phone’s settings menu.
- Press the Home button.
- Navigate to Settings > Basic > IP Configuration.
- Enter the required IP address, subnet mask, gateway, and DNS server information.
-
Time and Date Settings:
- Set the correct time and date to ensure accurate call logs and scheduling.
- Press the Home button.
- Navigate to Settings > Basic > Date and Time.
- Enter the correct date and time or configure the phone to synchronize with a network time server.
- Set the correct time and date to ensure accurate call logs and scheduling.
2.3 Customizing Basic Settings
-
Setting Up Your Extension:
- Follow the prompts to enter your extension number and password.
- This information is usually provided by your system administrator.
-
Adjusting Volume:
- Use the volume control buttons to adjust the handset, speakerphone, and ringer volume.
-
Configuring Ringtone:
- Customize the ringtone to your preference.
- Press the Home button.
- Navigate to Settings > Basic > Ringtone.
- Select a ringtone from the available options.
- Customize the ringtone to your preference.
-
Setting Up Voicemail:
- Access the voicemail setup menu to configure your voicemail greeting and passcode.
- Press the Messages button.
- Follow the prompts to set up your voicemail.
- Access the voicemail setup menu to configure your voicemail greeting and passcode.
3. Understanding the User Interface
Navigating the user interface of your Polycom phone is essential for efficient operation. This section details the key components of the interface, including the Lines View, Home View, and feature keys.
3.1 Lines View
The Lines View is your phone’s default display, providing quick access to your phone lines and favorite contacts.
-
Accessing Lines View:
- The Lines View is typically the default screen when the phone is idle.
- If you are in another view, press the Home button and then select Lines to return to this screen.
-
Key Elements:
- Line Keys: These keys represent your phone lines. Each key can be configured to display a phone line, a shared line, or a speed dial contact.
- Call Status: The display shows the status of each line, such as idle, ringing, or in use.
- Favorite Contacts: Quickly call frequently contacted individuals by assigning them to a line key.
3.2 Home View
The Home View provides access to the phone’s main features and settings.
-
Accessing Home View:
- Press the Home button to display the Home View.
-
Key Elements:
- Messages: Access your voicemail messages.
- Directories: Manage your contacts.
- Do Not Disturb (DND): Enable or disable the DND feature.
- Call Forwarding: Configure call forwarding settings.
- Settings: Access the phone’s configuration settings.
- Applications: Access any installed applications.
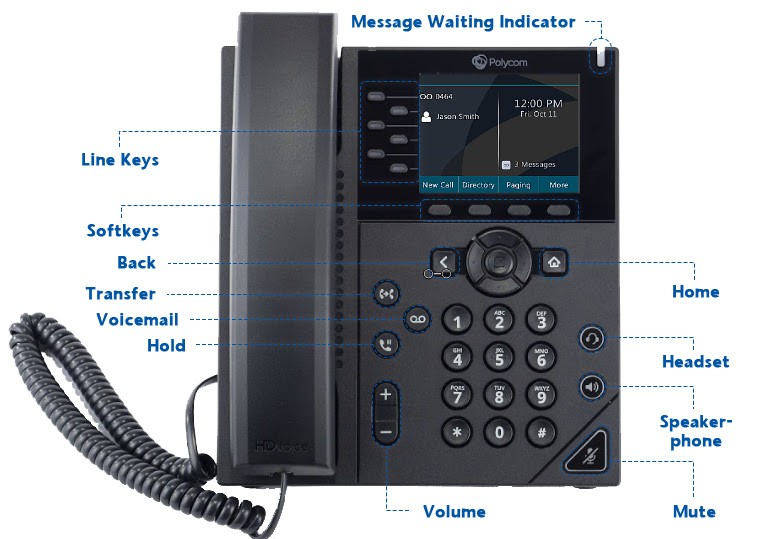
3.3 Feature Keys
Feature keys provide quick access to commonly used functions.
-
Home Key:
- Pressing the Home key from any screen will display the Home View.
- If the phone is idle, pressing the Home key will display the Lines View.
-
Headset Key:
- Enables you to place and receive calls through a headset.
- The key glows green when an analog headset is activated and blue when a USB or Bluetooth headset is activated.
-
Speakerphone Key:
- Used to place and receive calls using the speakerphone.
- The key glows green when activated.
-
Mute Key:
- Mutes the local audio during calls and conferences.
- The key glows red when activated.
-
Transfer Button:
- Used to transfer calls to another person.
-
Hold Button:
- Places active calls on hold.
| Feature Key | Description |
|---|---|
| Home Key | Press the Home key from any screen to display the home view. From the home view, press to display other phone views. If your phone is idle, press to display the lines view. |
| Headset Key – This key enables you to place and receive calls through a headset. The key glows green when an analog headset is activated. The key glows blue when a USB or Bluetooth headset is activated. | |
| Speakerphone Key | This key is used to place and receive calls using the speakerphone. The key glows green when activated. |
| Mute Key – Use this key to mute local audio during calls and conferences. The key glows red when activated. | |
| Transfer Button | This key is used to transfer, or send calls to another person. |
| Hold Button – Use this key to place active calls on hold. |
4. Making and Receiving Calls
Understanding how to make and receive calls is fundamental to using your Polycom phone. This section provides detailed instructions on placing calls, answering calls, and managing multiple calls.
4.1 Placing Calls
-
Dialing the Number:
- Enter the phone number using the keypad.
- Ensure you include any necessary prefixes or area codes.
-
Initiating the Call:
- Pick up the Handset.
- Alternatively, press the Speakerphone or Headset key to initiate the call hands-free.
4.2 Answering Calls
There are several ways to answer an incoming call, depending on your preference:
-
Using the Handset:
- Lift the receiver to connect to the call.
-
Using the Speakerphone:
- Press the Speakerphone button.
-
Using a Headset:
- Press the Headset button.
-
Using the Answer Softkey:
- Press the Answer softkey to receive the call using the speakerphone.
4.3 Managing Multiple Calls
-
Answering a Second Incoming Call:
- If you are already on an active call and another call comes in, press the Answer softkey.
- The first call will automatically be placed on hold.
-
Switching Between Calls:
- Use the navigation arrows to scroll to the call you wish to resume.
- Press the Resume softkey to reconnect to that call.
5. Essential Call Management Features
Polycom phones offer several call management features to enhance your communication experience. This section covers essential features such as hold, mute, call transfer, and conference calls.
5.1 Hold
-
Placing a Call on Hold:
- Press the Hold button or the Hold softkey.
-
Resuming a Call:
- Press the Hold button again or the Resume softkey.
-
Managing Multiple Calls on Hold:
- If you have more than one call on hold, use the navigation arrows to select the call you wish to reconnect with.
- Press the Resume softkey.
Note: If your system is configured with music-on-hold, the calling party will hear music while they are on hold.
5.2 Mute
-
Muting a Call:
- While on an active call, press the Mute button.
- The other party will not be able to hear you.
-
Unmuting a Call:
- Press the Mute button again to unmute the call.
- The other party will be able to hear you again.
5.3 Call Transfer
There are several types of call transfers you can perform:
-
Blind Transfer:
- A blind transfer (or unannounced transfer) occurs when you transfer a call to someone else without announcing the call first.
- Press the Transfer button or softkey.
- Press the Blind softkey.
- Dial the number or choose a contact from the call list or directory.
-
Consulted Transfer:
- A consulted transfer (or announced transfer) is performed when you announce the call to the recipient prior to transferring the call.
- Press the Transfer button or softkey.
- Enter the number to which you wish to transfer the call.
- Press the Send softkey. The caller is automatically placed on hold.
- Once the receiving party answers, announce the call.
- To complete the transfer, press the Transfer button or softkey again.
-
Direct-to-Voicemail Transfer:
- A direct-to-voicemail transfer is performed when you wish to transfer a call directly to another user’s voicemail.
- Press the Transfer button or softkey.
- Enter Star (*) 55 on the keypad, then enter the Extension followed by the pound (#) key.
- Press Transfer again to complete the voicemail transfer.
5.4 Three-Way Conference Call
- Initiating a Conference Call:
- While on an active call, press the More softkey.
- Press the Conference softkey. The first call is then held.
- Dial the second number.
- When the second party answers, press the More softkey.
- Press the Conference softkey again to connect the calls.
6. Advanced Features for Enhanced Productivity
Polycom phones also offer advanced features to further enhance productivity. This section covers Do Not Disturb, Call Forwarding, and Call Park.
6.1 Do Not Disturb (DND)
The Do Not Disturb feature sends all incoming calls directly to voicemail.
-
Enabling DND:
- From the main screen, press the More softkey, followed by the DND softkey.
- Alternatively, press the Home button, use the Down Navigational arrow to locate the DND icon, and press Select.
-
Disabling DND:
- Repeat the previous steps to disable the feature.
Note: The functionality of the DND button may vary depending on how your system administrator has configured your extension. In some cases, enabling DND may affect incoming calls to other connected devices as well.
6.2 Call Forwarding
By default, unanswered calls go to voicemail. To forward calls to a different destination, enable call forwarding.
-
Enabling Call Forwarding:
- Press the More softkey.
- Press the Forward softkey or the Home button.
- Select Forward.
- Choose the type of forwarding option you would like to enable:
- Call forwarding always
- Call forwarding no answer
- Call forwarding busy
- Enter the phone number you wish to forward calls to in the contact field and select Enable.
-
Configuring Call Forwarding No Answer:
- Select Forward.
- Select Call forwarding no answer.
- Enter the number to which to forward calls to in the contact field, then select the number of rings field and enter the desired number of rings.
- Select Enable.
-
Disabling Call Forwarding:
- Select the forwarding service to disable, then select Disable.
6.3 Call Park
Call Park allows you to place a call on hold on a specific extension, allowing anyone in the office to retrieve it.
-
Parking a Call:
- While on an active call, select Transfer.
- Enter Star (*) 68, and enter the extension on which you wish to park the call, followed by the Pound(#) key.
-
Retrieving a Parked Call:
- Dial Star (*) 88.
- When prompted, dial the extension number on which the call was parked, followed by the Pound(#) key.
6.4 Enhanced Call Park
Enhanced Call Park allows users to park and retrieve calls using line keys on their desk phone.
-
Parking a Call:
- While on an active call, press and hold the desired line key for 3 seconds, then press the Park Softkey.
- This will park the call on one of the call park lines. A parked symbol will be shown on the line where the call was parked.
-
Retrieving a Call:
- Retrieve the call from your phone or any other phone by pressing and holding the associated line key, then pressing the Retrieve softkey.
-
Call Park Timeout:
- If the call is not picked up within the configured timeout period, the call will ring back.
- Press the Answer softkey to retrieve the call park that timed out.
-
Parking Calls Using Call Attendant:
- Go to your phone’s Settings.
- Select Basic.
- Select Preferences.
- Select Attendant Call Action.
- Select Park.
- When receiving an incoming call, press (do not hold) the Park key to park the call on one of the shared lines.
7. Managing Contacts and Call History
Efficiently managing your contacts and call history can save time and improve communication. This section covers accessing call history, adding contacts to your directory, and setting up speed dial.
7.1 Accessing Call History
-
Using Navigation Arrows:
- Press the down arrow to access your call lists.
- Press the Type softkey to switch between your call lists.
- Choose the list you wish to view and press Select.
-
From the Home View:
- Use the navigation arrows to select the Directory icon.
- Select Recent calls.
- To dial a number, find the desired number and press the Dial softkey.
7.2 Adding Contacts
-
From Call History:
- From the Home View, use the navigation arrows to select Directory.
- Select Recent calls.
- Select the caller you wish to add.
- Press the Info softkey, then press Save to add the caller to your directory.
- To edit the contact’s information, use the navigation arrows to scroll to the field you wish to edit, enter the information, then press Save to save your changes.
-
Adding Contacts Manually:
- From the Home view, use the navigation arrows to select Directories.
- Then select Contact Directory.
- Press the Add softkey.
- Enter the contact’s first name, last name, phone number, and job title using the keypad.
- You can also set a contact to Favorite from here, which will allow you to dial them from the line buttons on your phone screen.
- Your top 4 favorites, labeled 1-4, are viewable as a line option on your phone’s screen.
- When finished, press Save to save the contact.
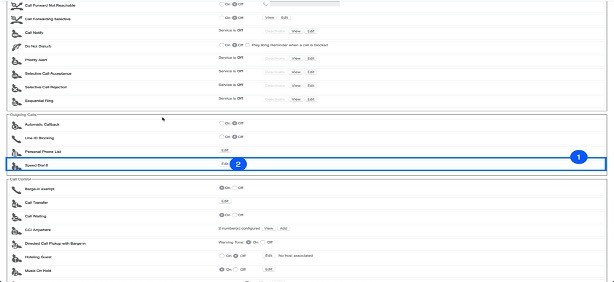
7.3 Setting Up Speed Dial
-
Accessing Speed Dial Settings:
- Log in to the End User Portal.
- Locate the Outgoing Calls section.
- Find the Speed Dial List and click Edit.
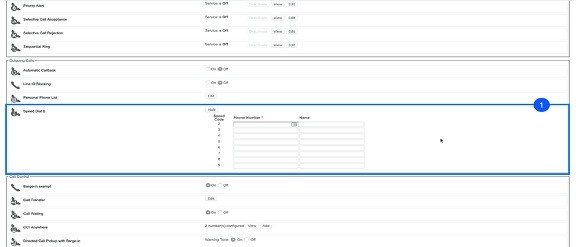
-
Adding Contacts to Speed Dial:
- Enter the Phone Number and Contact Name in the corresponding fields in the spot you wish it to appear within the speed dial list.
- Repeat this step until you’re complete or have filled out the available speed dial spots.
- Click Save.
-
Using Speed Dial:
- Once you’ve added a contact to your speed dial list, you can begin using speed dial to reach the contact.
- Dial the pound key “#” followed by the two-digit prefix assigned to a phone number or extension.
8. Voicemail Management
Voicemail is an essential tool for managing missed calls. This section provides instructions on setting up voicemail, accessing voicemail messages, and managing your voicemail settings.
8.1 Voicemail Setup
- Initial Setup:
- Dial your extension and use your handset to activate the call or press the Dial softkey to utilize the speakerphone.
- Enter your default passcode, followed by the Pound (#) key.
- Enter your new passcode followed by the Pound (#) key and confirm it once again.
- Record your first and last name, then press the Pound (#) key.
- Press 1 to access the voice messaging main menu. You can record your greetings and retrieve voice messages.
8.2 Accessing Voicemail
- Checking Voicemail:
- A red Message Waiting Indicator light notifies you when you have a new voicemail message.
- Dial your extension number.
- Press the Dial softkey.
- Enter your voicemail passcode followed by the Pound (#) key.
- Follow the audio prompts to retrieve your voicemail messages.
9. Troubleshooting Common Issues
Even with reliable equipment, issues can arise. This section provides troubleshooting tips for common problems you may encounter with your Polycom phone.
9.1 No Dial Tone
-
Check Connections:
- Ensure the handset cord is securely connected to both the handset and the phone base.
- Verify that the Ethernet cable is properly connected to the phone and the network.
-
Restart the Phone:
- Unplug the power adapter (or disconnect the Ethernet cable if using PoE), wait a few seconds, and then plug it back in.
-
Contact IT Support:
- If the issue persists, there may be a problem with your network connection or phone system. Contact your IT support for assistance.
9.2 Poor Audio Quality
-
Check Volume Levels:
- Ensure that the volume is turned up on both the handset and the speakerphone (if in use).
-
Adjust Microphone Position:
- If using the speakerphone, make sure you are speaking directly into the microphone.
-
Reduce Background Noise:
- Minimize any background noise that may be interfering with the call quality.
-
Restart the Phone:
- Restarting the phone can sometimes resolve audio quality issues.
9.3 Cannot Access Voicemail
-
Verify Voicemail Number:
- Ensure you are dialing the correct voicemail access number.
-
Check Passcode:
- Make sure you are entering the correct voicemail passcode.
-
Contact System Administrator:
- If you have forgotten your voicemail passcode, contact your system administrator to have it reset.
10. Optimizing Your Polycom Phone Usage
To get the most out of your Polycom phone, consider these optimization tips.
10.1 Personalizing Your Phone Settings
-
Customize Line Keys:
- Assign frequently used contacts or features to your line keys for quick access.
-
Adjust Display Settings:
- Adjust the screen brightness and contrast to improve visibility.
-
Set Up Speed Dial:
- Add frequently called numbers to your speed dial list for faster dialing.
10.2 Best Practices for Clear Communication
-
Speak Clearly:
- Enunciate clearly and speak at a moderate pace to ensure the other party can understand you.
-
Use Mute When Not Speaking:
- Mute your microphone when you are not speaking to minimize background noise.
-
Position the Microphone Properly:
- If using the speakerphone, position the microphone so that it is close to you but not directly in front of your mouth.
10.3 Keeping Your Phone Updated
-
Check for Firmware Updates:
- Regularly check for firmware updates to ensure your phone is running the latest software.
- Firmware updates often include bug fixes, performance improvements, and new features.
-
Follow Update Instructions:
- Follow the instructions provided by your system administrator or the phone manufacturer when updating the firmware.
11. Regulatory Compliance and Security
Using Polycom phones in a business environment requires attention to regulatory compliance and security.
11.1 Ensuring Regulatory Compliance
-
Adherence to Industry Standards:
- Ensure that your phone system complies with relevant industry standards and regulations, such as those related to telecommunications and data privacy.
-
Accessibility Considerations:
- Consider accessibility requirements for users with disabilities, such as providing TTY compatibility or alternative communication methods.
11.2 Security Best Practices
-
Password Protection:
- Use strong passwords for voicemail and other phone settings to prevent unauthorized access.
-
Network Security:
- Ensure that your network is secure to protect against eavesdropping and other security threats.
-
Regular Audits:
- Conduct regular security audits to identify and address any potential vulnerabilities.
12. Frequently Asked Questions (FAQ)
1. How do I set up my Polycom phone for the first time?
- Follow the steps in Section 2 to connect your phone, configure initial settings, and customize basic preferences.
2. How do I access my voicemail?
- Dial your extension number, press the Dial softkey, and enter your voicemail passcode followed by the Pound key.
3. How do I transfer a call to another extension?
- Press the Transfer button, enter the extension number, and press Transfer again to complete the transfer.
4. How do I set up a conference call?
- While on an active call, press More, then Conference, dial the second number, and press Conference again to connect the calls.
5. How do I use the Do Not Disturb feature?
- Press More, then DND, or navigate to the DND icon in the Home View and select it.
6. How do I forward my calls to another number?
- Press More, then Forward, select the type of forwarding, enter the number, and select Enable.
7. What should I do if my Polycom phone has no dial tone?
- Check the connections, restart the phone, and contact IT support if the issue persists.
8. How do I improve the audio quality on my Polycom phone?
- Check volume levels, adjust microphone position, reduce background noise, and restart the phone.
9. How do I add a contact to my speed dial list?
- Log in to the End User Portal, locate the Speed Dial List, edit the list, enter the contact information, and save.
10. How do I update the firmware on my Polycom phone?
- Check for firmware updates in the phone settings or contact your system administrator for assistance.
By following this comprehensive Polycom phone user guide from CONDUCT.EDU.VN, you can effectively utilize your Polycom phone system, troubleshoot common issues, and optimize your communication experience. For more detailed information and support, visit conduct.edu.vn or contact us at 100 Ethics Plaza, Guideline City, CA 90210, United States, Whatsapp: +1 (707) 555-1234. Remember, mastering your Polycom phone contributes to smoother operations and enhanced productivity in your professional environment.