2
4
14
Introduction
Welcome to the ultimate guide for Heroic Queen Ansurek, the formidable final boss awaiting you in Nerub’ar Palace. This comprehensive walkthrough will equip you with the knowledge and strategies needed to overcome Queen Ansurek on Heroic difficulty. We will break down her intricate mechanics and provide a recommended strategy to ensure your raid’s success.
Fight Style: Single Target & AoE Encounter
Recommended Raid Composition: 2 Tanks / 4 Healers / 14 DPS
Essential Utilities: None
Heroism/Bloodlust Timing: Start of the Encounter
Mechanics Breakdown
Expand the sections below for detailed explanations of each mechanic you’ll encounter during the Queen Ansurek fight. Understanding these mechanics is crucial for executing the strategy effectively.
Reactive Toxin
Reactive Toxin targets two players, marked by medium-sized green circles. These circles must be strategically placed near the boss or raid group. Upon placement, a green blob remains on the ground. Entering the center of this blob triggers an explosion, knocking players upwards.
This knock-up is essential to dodge the lethal Venom Nova waves. Your raid should be divided into two groups, each positioned within a Reactive Toxin circle before detonation to mitigate damage to the trigger player.
Post-detonation, be prepared to dodge several moving blobs. Additionally, two players will be afflicted with large green circles, requiring them to move away from the raid to prevent collateral damage.
Venom Nova
Venom Nova is a sweeping green wave emanating from Queen Ansurek. It is imperative to use the Reactive Toxin knock-up to jump over these waves and avoid taking significant damage.
Failing to trigger a Reactive Toxin blob before the Venom Nova wave passes through it will result in an enrage effect for the boss, significantly increasing the difficulty of the encounter.
Silken Tomb
Silken Tomb applies a debuff, indicated by a small circle around each player. After a short delay, players are rooted and take damage in a small radius. Abilities that remove root effects can be used to break free from Silken Tomb.
Liquefy
Liquefy is a heavy tank attack. After the initial hit, it leaves a patch of green puddles on the ground, covering a small area. A tank hit by Liquefy cannot be targeted by this ability again for 30 seconds, necessitating a tank swap strategy.
Feast
Feast is another substantial tank hit that applies a healing absorb effect based on the damage taken. It is highly recommended for tanks to use strong defensive cooldowns and external raid cooldowns to minimize the healing absorb applied.
Web Blades
Web Blades manifests as multiple lines of webbing that shoot across the platform. Contact with these webs inflicts high damage and applies a 95% slow for 3 seconds. Players must actively dodge these projectiles to avoid taking unnecessary damage and movement impairment.
Acrid Presence
Acrid Presence is unavoidable raid-wide damage that occurs every 2 seconds throughout Phase 1. Healers must be prepared for consistent healing output to counteract this persistent damage.
Predation
Predation marks the start of the Intermission phase. Queen Ansurek gains a significant shield that must be destroyed to transition out of the intermission. Simultaneously, all players are tethered to the boss by spiderwebs, dealing damage every 1.5 seconds. These webs also cause players to inflict damage to allies within a small radius, requiring careful positioning.
Wrest
Wrest is a pull mechanic. Upon completion of the cast, all players are forcefully pulled towards Queen Ansurek.
Devour
Devour is an instant kill mechanic. Players who are too close to Queen Ansurek, especially when pulled in by Wrest, will be instantly killed. Maintaining a safe distance from the boss during Wrest is crucial.
Acid Bolt
Acid Bolt is unavoidable raid-wide damage that occurs during Phase 2. Healers must maintain consistent raid healing to manage this damage.
Wrest (Phase 2)
Wrest is also present in Phase 2. Similar to the Intermission, it pulls players towards the center. Be mindful of your positioning to avoid being pulled off the platform during this phase.
Acidic Apocalypse
Acidic Apocalypse is a hard enrage timer during Phase 2. If the cast completes, it results in a raid wipe. This enrage is triggered if players are too slow in defeating the adds in Phase 2, emphasizing the need for efficient add management and DPS.
Shadowblast (Ascendant Voidspeaker)
Shadowblast is cast by Ascendant Voidspeaker adds in the Intermission and Phase 2. It deals heavy damage to a targeted player and is interruptible. Interrupting Shadowblast is a priority to prevent unnecessary player deaths.
Gloom Orbs (Ascendant Voidspeaker)
Gloom Orbs are spawned by Ascendant Voidspeakers at a random player’s location. These orbs split into smaller orbs after a short delay, which then shoot outwards, inflicting high damage to any player hit. Players must be vigilant and dodge these projectiles.
Gloom Touch (Devoted Worshipper)
Gloom Touch is a debuff applied by Devoted Worshipper adds in Phase 2 to multiple players. It deals low damage over 1.5 seconds. Upon expiration or dispel, it explodes, dealing significant damage to everyone in the vicinity. Dispel Gloom Touch strategically, one at a time, to stagger the explosions and avoid overwhelming raid damage.
Cosmic Apocalypse (Devoted Worshipper)
Cosmic Apocalypse is a hard enrage cast by Devoted Worshippers in Phase 2. Failing to defeat the Devoted Worshipper before this cast finishes will result in a raid wipe. Prioritize DPS on these adds to avoid this enrage.
Oust (Chamber Guardian)
Oust is a heavy melee attack from Chamber Guardian adds in Phase 2. It knocks back the tank and spawns several swirls that must be dodged. Tanks should be aware of the knockback and position themselves accordingly, while the raid needs to avoid the swirls.
Expulsion Beam (Chamber Expeller)
Expulsion Beam is cast by Chamber Expeller adds in Phase 2. It is a large beam that deals heavy damage and knocks back any players hit. Players must avoid standing in the path of the beam.
Caustic Fangs (Caustic Skitterer)
Caustic Fangs is a melee attack from Caustic Skitterer adds in Phase 2 that applies a stacking damage taken debuff to players. Tanks handling these adds should be mindful of the stacking debuff and potentially require tank swaps or increased healing as stacks accumulate.
Infest (Phase 3)
Infest targets the current tank in Phase 3, dealing heavy initial damage and applying a damage-over-time effect. The infested tank also gains a large purple circle. Upon expiration, this circle deals heavy damage to anyone inside and spawns Gloom Hatchling adds. The infested tank must move away from the raid to drop the circle and adds safely.
Gloom Hatchlings will attempt to reach Queen Ansurek. Each hatchling that reaches the boss inflicts heavy raid-wide damage and increases Queen Ansurek’s damage by 20% for 20 seconds. Crowd control and efficient add clearing are essential.
Gorge (Phase 3)
Gorge is a heavy tank hit in Phase 3 that occurs immediately after Infest. It deals additional damage based on physical damage taken from the initial hit. Gorge also releases swirls towards players, which must be dodged. These swirls leave behind puddles of Gloom.
Royal Condemnation (Phase 3)
Royal Condemnation targets two players in Phase 3, marking them with large spider-web circles. After a short delay, these circles explode, dealing heavy raid-wide damage, reduced by distance. Additionally, all players are shackled to the explosion points, taking damage every 3 seconds until the shackles are destroyed. Affected players should move to a pre-determined location to minimize raid damage and facilitate cleave on the Royal Shackles.
Abyssal Infusion (Phase 3)
Abyssal Infusion targets two players in Phase 3 with large purple circles. Upon expiration, these circles damage players within and spawn Abyssal Conduit portals.
These portals are crucial for bypassing waves of Frothing Gluttony. Using a conduit destabilizes it, causing an explosion that deals heavy damage in a 12-yard radius and leaves a Gloom puddle. Portal placement needs to be strategic to manage space and avoid unnecessary damage.
Frothing Gluttony (Phase 3)
Frothing Gluttony is a wave mechanic in Phase 3 that applies a heavy damage-over-time effect to anyone it touches, lasting 8 seconds. Using Abyssal Conduit portals is the intended method to avoid this wave.
Crucially, if the Frothing Gluttony wave touches any Queen’s Summons adds or their essences dropped after death, it triggers an enrage effect, resulting in a wipe. Precise portal usage and add management are vital.
Web Blades (Phase 3)
Web Blades reappear in Phase 3. They function identically to Phase 1, with lines of webbing shooting across the area, dealing high damage and slowing players by 95% for 3 seconds. Continue to actively dodge these projectiles.
Dreadful Presence (Phase 3)
Dreadful Presence is unavoidable raid-wide damage in Phase 3. Its damage increases by 12% each time Abyssal Conduit portals are spawned. At 4 stacks of Dreadful Presence, if Frothing Gluttony is cast, it instantly triggers an enraged effect called Cataclysmic Evolution, likely leading to a wipe. Efficiently navigating portal phases is key to preventing this enrage.
Null Detonation (Queen’s Summons)
Null Detonation is cast by Queen’s Summons adds in Phase 3. Adds spawn with an absorb shield, preventing interrupts initially. Once the shield is broken, interrupt Null Detonation immediately. Each successful cast increases its damage by 50%, quickly becoming lethal.
Acolyte’s Essence (Queen’s Summons)
Upon death, each Queen’s Summon add drops an Acolyte’s Essence. These essences must be picked up by players. Holding an essence inflicts heavy damage every second.
Passing through an Abyssal Conduit portal destroys the portal and removes the essence from the player. The player who removes an essence cannot pick up another for 4 minutes.
If a player carrying an essence is hit by the Frothing Gluttony wave, it triggers a raid-wiping enrage. Careful coordination between essence carriers and portal usage is vital.
Phase 1 Strategy: Positioning and Reactive Toxins
In Phase 1, divide your raid into two balanced groups. Designate one group to handle Reactive Toxins near the platform’s edge and the other for those closer to the center. This spatial separation simplifies positioning and assignment.
Assign six players as “blob poppers,” two per Reactive Toxin cast. Ranged DPS are preferred for this role to maximize damage uptime. The same player should not pop Reactive Toxin blobs consecutively.
Initial Positioning:
Begin the encounter near the platform’s edge. Soon after, the first Liquefy will target the tank, leaving a green puddle under the boss. Rotate the boss clockwise as you receive the first Reactive Toxin cast.
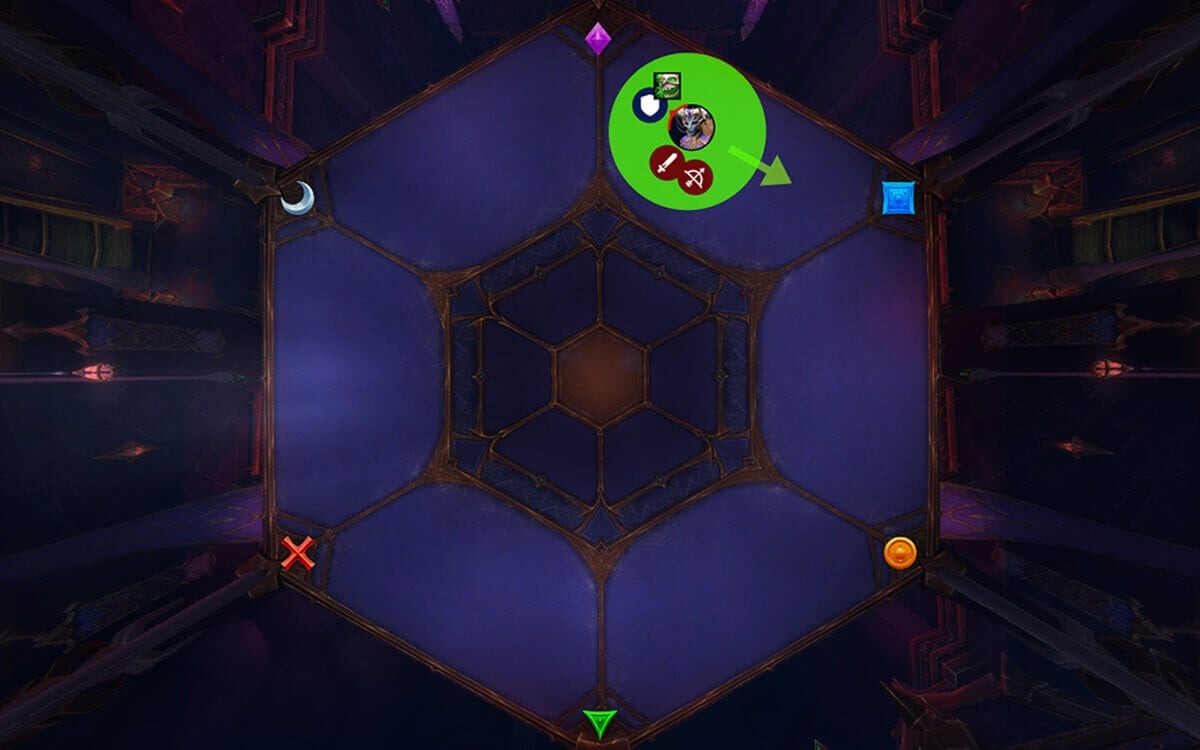
Position the two Reactive Toxin blobs roughly as shown above. Both raid groups should immediately move to soak them. All players in each group should stack at the edge of their assigned circle, closest to the boss. Designated blob poppers enter the blob just as Venom Nova finishes casting.
Immediately after the knock-up from Reactive Toxin, as you descend, two players will be targeted with large damage circles. These circles do not leave puddles. Affected players should quickly move away from the raid – the exact direction is not critical.
Be prepared to dodge green waves emanating from the Reactive Toxin locations. Successful execution will result in the area between the Purple and Blue markers being covered in green puddles.
Next, move the boss to the center of the section between the Blue and Orange markers before the second Liquefy cast.
This will cover a significant portion of that section with green puddles. Then, move the boss towards the edge of the Orange marker section.
Here, you will encounter the first Silken Tomb (roots). These also leave puddles upon expiration.
To manage Silken Tomb puddles, stack tightly in the area you just cleared of puddles.
Players who can self-remove roots should prioritize spreading to the edges, while others should stack closer to the boss to facilitate cleave damage on the roots.
Following Silken Tomb, Web Blades will be cast, requiring simple dodging. The phase then repeats.
Positioning and movement remain consistent and logical: place mechanics near existing puddles to conserve space and reposition the boss as sections become saturated.
Repeat this cycle through three Reactive Toxin casts. After the third, the Intermission phase will begin.
Important Note: The third Reactive Toxin overlaps with Web Blades. It is advisable to place both Reactive Toxin circles towards the platform’s edge during this overlap. Web Blades targets players, so placing Toxins at the edge avoids cluttering standard raid positioning, as the edge is typically unoccupied.
Intermission Strategy: Shield Phase and Add Split
Queen Ansurek moves to the room’s center and gains a massive shield. Focus all DPS to break this shield and end the intermission.
The entire raid should stack in a single section during this phase. Healing is intense, and tight stacking ensures everyone is within range of healers and group heals.
Every player is connected to the boss by webs, taking damage and dealing damage to nearby allies. Maintain loose stacking, avoiding excessive overlap of personal circles.
Periodically, Queen Ansurek casts Wrest, pulling players towards her. Being too close upon pull completion results in Devour (instant death).
Position yourselves in the designated safe spot just before Wrest finishes casting. No further mechanics follow immediately after the pull, aside from the constant, low-strength pull from the webs.
Classes with movement abilities that can interrupt pulls (Double Jump, Hover, Disengage, Blink, etc.) can position more freely if confident in their timing.
Large, easily avoidable blobs will also spawn during the intermission. Simply dodge them.
Once the shield is destroyed, two Ascendant Voidspeaker adds spawn on opposite sides of the room. Split the raid into the same two groups used for Reactive Toxin soaking in Phase 1. This avoids regrouping confusion.
Ascendant Voidspeakers must be interrupted on Shadowblast immediately to prevent player deaths.
While adds are active, Gloom Orbs spawn at random player locations. Dodge these orbs and their subsequent smaller projectiles.
Upon an add’s death, it releases an orb that knocks back everyone in the direction they are facing after a short delay. Position yourselves at the platform’s edge, facing the smaller platform ahead. This knockback launches you to the Phase 2 mini-platforms.
Phase 2 Strategy: Mini-Platforms and Add Priority
Both raid groups will face identical add compositions on separate mini-platforms. However, only one group will be targeted by Wrest at a time.
1st Mini Platform (Chamber Guardian + Chamber Expeller)
Upon landing, both Chamber Guardian and Chamber Expeller adds will be stacked. Shortly after, the Chamber Expeller will jump away and target a random player with Expulsion Beam, a laser beam that must be dodged.
The group targeted by the initial Wrest cannot stack adds until the pull is complete. The other group should immediately move the Chamber Guardian onto the Chamber Expeller for cleave damage.
Dodge the ground puddles that spawn. These are the primary mechanics on this platform.
Once both adds are dead, click the crystals to spawn a bridge to the next platform.
2nd Mini Platform (Little Spiders + Devoted Worshipper)
The tank should gather the Little Spiders (or crabs) on the bridge and position them with the Devoted Worshipper.
The Devoted Worshipper casts Gloom Touch, which needs to be dispelled. Dispel one Gloom Touch at a time to stagger the damage explosions and prevent overwhelming raid damage. The debuff expires naturally after 12 seconds.
Prioritize killing the Devoted Worshipper before Cosmic Apocalypse finishes casting. Click the crystals again for another bridge once all adds are defeated.
This platform also features Wrest. Ensure safe positioning if your group is targeted.
3rd Mini Platform (Little Spiders + Ascendant Voidspeaker)
This is the simplest platform. You face spiders and the same Ascendant Voidspeaker add from the Intermission. Interrupt Shadowblast and dodge Gloom Orbs.
Wrest is not present on this platform. Instead, Queen Ansurek casts Acidic Apocalypse, a raid wipe if the cast finishes before both groups are knocked back.
Stand at the edge, facing the main platform, and await the knockback after defeating the add. This knockback returns you to the main platform and Phase 3.
Phase 3 Strategy: Final Push and Portal Management
Queen Ansurek remains inactive until Aphotic Communion completes. Maximize DPS during this brief window.
Afterward, she jumps to a purple marked area. Dodge this initial impact zone.
The first mechanic in Phase 3 is Infest. The current tank is infested and must move away from the raid to drop spiderlings and avoid circle damage.
Simultaneously, the other tank taunts the boss and prepares to take Gorge.
Ranged DPS should position themselves at the platform’s edge. Gorge expels swirls towards ranged players, creating puddles at range.
Prepare to crowd control the Gloom Hatchlings spawned by Infest immediately. Even a single hatchling reaching the boss can cause a wipe. Hunter traps and similar abilities are highly effective. Spiderlings also leave puddles upon death.
Immediately after dealing with spiderlings, Royal Condemnation targets two players.
These players receive large web circles that do not clip allies. Move in front of the boss to place these circles relatively close together. This allows for cleave damage on Queen Ansurek and the resulting Royal Shackles.
This movement is natural as the area behind you will be filling with puddles from spiderlings and Gorge swirls.
Important Note: No player should touch the web anchors from Royal Condemnation. Contact results in being cocooned and requiring rescue.
Next, you will encounter Abyssal Infusion, creating two portals to bypass Frothing Gluttony waves.
Two players are targeted. Place one portal near the room’s center and the other opposite, near the platform’s edge. Edge placement provides more reaction time for the wave.
Melee DPS should prioritize the center portal, and ranged DPS the outer portal. Adjust if two melee or ranged are targeted.
Avoid touching the portal circles during placement as they deal damage. Dodge the orbs that spawn from the portals initially.
Frothing Gluttony waves are cast almost immediately after orb dodging. Stay near the center portal, resisting Queen Ansurek’s slight pull to avoid accidental portal entry. Play it safe and stay a few yards away initially; there’s ample time to enter before it’s too late.
The wave originates from the platform’s edge, moving towards the boss. Once the wave passes the outer portal, it is safe to take the center portal.
Upon exiting a portal, all players receive Abyssal Reverberation, creating a small circle requiring quick spreading.
Portals then explode, leaving puddles and releasing orbs. Dodge these orbs.
The next major mechanics are Infest and Royal Condemnation. Handle these exactly as before.
Royal Condemnation targets should always move in front of the boss. The infested tank always moves to the back to spawn spiderlings.
Ranged DPS remain behind the boss to manage Gorge swirl puddles, which always follow Infest.
The final mechanic in Phase 3 is the spawning of Summoned Acolyte adds.
Three Acolytes spawn simultaneously with shields and begin casting Null Detonation. Interrupting Null Detonation is initially impossible due to the shields. Break the shields quickly, then prioritize interrupting every subsequent Null Detonation cast.
Upon killing the three Acolytes, three players must pick up the dropped Acolyte’s Essence. The Essence and the Adds must not be touched by the wave that follows shortly after, as this will trigger a wipe. Essence carriers must execute portal usage flawlessly to avoid wiping the raid.
From this point, the fight repeats all Phase 3 abilities. Reaching four sets of portals triggers an enrage, making efficient execution and DPS essential for victory.