- Estimated Trophy Difficulty: 6/10
- Approximate Platinum Time: 240-300 Hours (200 Hours Single Player + 40-100 Hours Multiplayer)
- Offline Trophies: 34 (2 x Platinum, 4 x Gold, 28 x Bronze)
- Online Trophies: 18 (1 x Gold, 1 x Silver, 16 x Bronze)
- Missable Trophies: 4 – Lending a Hand, Friends With Benefits, Give to the Poor, Errand Boy
- Glitched Trophies: None Reported
- Hardest Trophy: Gold Rush (Earn 70 Gold Medals)
- Difficulty Settings Impact: No Difficulty Settings
- Cheats Disable Trophies: Yes (Refer to Cheats List)
- Minimum Playthroughs: 1
Introduction
Welcome to the ultimate guide for conquering the trophies in Red Dead Redemption 2! Embarking on the platinum journey for RDR2 is no small feat, demanding dedication and a comprehensive approach. This expansive open-world epic from Rockstar Games packs a substantial trophy list, including 108 main story missions, 21 intricate stranger questlines, a requirement to secure 70 Gold Medals out of 104 missions, over 200 collectibles to discover, 178 animal species to encounter, 90 challenges to overcome, and reaching Rank 50 in the online multiplayer realm.
Adding to the challenge, Red Dead Redemption 2 includes 4 missable trophies directly tied to your camp interactions between Chapters 2 and 4, and completing all optional story missions. The main narrative alone will consume approximately 50-60 hours of gameplay. Following the story, you’ll need to dedicate time to replaying missions for those coveted Gold Medals, meticulously hunting down collectibles for full 100% completion, and finally, tracking down every animal.
To monitor your progress towards each trophy, the Rockstar Social Club provides a valuable resource. It offers a detailed breakdown of your earned percentage for each trophy, allowing you to strategically plan your platinum pursuit. Let’s saddle up and dive into the roadmap for trophy success in Red Dead Redemption 2.
Step 1: Focus on Missable Trophies, Optional Missions, Honor, and Gold Medals
Your initial playthrough of Red Dead Redemption 2’s sprawling story (comprising 108 missions) should prioritize careful attention to the 4 missable trophies. These require specific actions during Chapters 2-4 and can be easily overlooked if you’re not vigilant.
- Lending a Hand (Complete All Optional Honor Story Missions): Certain Story Missions are remarkably easy to miss. Consult the dedicated trophy description for “Lending a Hand” to access a complete, chronologically ordered list of these missions, including quest givers and starting locations. Keep this list close at hand throughout your playthrough. Notably, the Chapter 6 mission ‘Do Not Seek Absolution’ requires Honor Level 4/8 to be accessible, making an honorable playstyle crucial from the outset.
- Note: As of Patch 1.03, a potential workaround exists: after completing the story, replaying the mission “Home Improvement for Beginners” (Epilogue) may instantly unlock the trophy, regardless of missed honor missions. However, it’s advisable to aim for all missions during your main playthrough in case this exploit is patched in future updates.
- Friends With Benefits (Complete a Companion Activity in Each Camp): This trophy necessitates participating in a random companion activity at your camp in Chapters 2, 3, and 4. Refer to the trophy description for a comprehensive list of available events.
- Give to the Poor (Donate $250 to the Gang Tithing Box): The tithing box in your camp vanishes after Chapter 4. Ensure you donate $250 cumulatively before this point to secure this trophy.
- Errand Boy (Deliver 5 Camp Companion Item Requests): Similar to other camp-related tasks, item requests must be fulfilled between Chapters 2 and 4. The trophy description provides a detailed list of requests and how to satisfy them.
In the event of dishonorable actions, immediately reload your last save to maintain your honor level. You can monitor your honor by pressing . Reaching the halfway point on the right side (white portion) is necessary to access all optional honor missions. A white cowboy hat icon in the top right corner indicates honor gains, while a red bandit hat signifies dishonorable actions. Consult the Honor Guide for optimal methods to increase your honor and understand story decisions that impact it.
Early in your playthrough, aim to rob 4 Homesteads for the “Breaking and Entering” trophy. Your first opportunity arises after Chapter 2 begins. Homesteads are limited, some are linked to companion activities, and others may become unavailable if you eliminate the owners without realizing. Be mindful of missable weapons as well. Fortunately, only 48 out of 62 weapons are required for platinum, allowing some leeway for missed weapons.
While progressing through Story Missions, proactively strive for Gold Medals to minimize mission replays. Gold Medals are often more manageable during your initial playthrough because replays restrict tonic usage and limit weapon choices. While the game doesn’t display requirements initially, you can still achieve them with prior knowledge. Refer to the comprehensive Red Dead Redemption 2 Gold Medals Guide for detailed objectives. Simultaneously, you can begin tackling challenges. There are 9 categories, each containing 10 tasks (9×10 = 90 total). All challenges are mandatory for 100% completion and can be tracked under Pause Menu > Progress > Challenges.
Regularly create manual saves (Pause Menu > Story > Save Game). This precautionary measure allows you to revert to an earlier point if you miss something crucial, preventing the need for a complete restart.
A note regarding “Skin Deep” & “Zoologist” trophies (skin & study all animals): Animals exclusive to the Chapter 5 island, Guarma, which is inaccessible post-Chapter 5, are not required for these trophies. Only animals found on the main map are necessary. If you miss the Guarma animals, you can still earn these trophies. Refer to the trophy descriptions for specific details.
Step 2: Achieve 100% Completion
Post-story completion, focus shifts to achieving 100% game completion. The bulk of this phase involves acquiring over 200 Collectibles and conquering 90 Challenges. Track your progress via Pause Menu > Progress > Total Completion.
Consult the detailed Red Dead Redemption 2 – 100% Guide & Checklist for a structured approach to this completionist endeavor.
Step 3: Master the Animal Kingdom
Interestingly, only 50 out of the 178 animal species are required for 100% completion. Even after “completing” the game, a significant 128 animals remain to be studied and skinned for the “Skin Deep” and “Zoologist” trophies. This step focuses on systematically hunting and documenting the remaining wildlife.
Step 4: Conquer Red Dead Online
The online trophies are generally straightforward and will naturally unlock as you progress towards Rank 50. The primary consideration is resource management. Save in-game currency to acquire a Permanent Posse ($200), unlock 5 horse stalls ($1700), and purchase 5 camp upgrades ($250). These three objectives require a total of $2150. Avoid unnecessary spending, as money accrues more slowly in multiplayer compared to single player. Beyond these specific trophies, immerse yourself in the Red Dead Online experience and enjoy the various activities.
Useful Tips, Tricks, and Guides:
Red Dead Redemption 2 Trophy Guide
| Trophy Icon | Trophy Name | Trophy Icon (Small) |
|---|---|---|
| Legend of the West | ||
| Description: Earn all other trophies in Red Dead Redemption 2 to unlock Platinum, including Online Trophies (DLC not required). | ||
| Back in the Mud | ||
| Description: Complete Chapter 1. | Automatic story trophy, cannot be missed. | |
| Description: Complete ‘Enter, Pursued by a Memory’. | Automatic story trophy, cannot be missed. | |
| Description: Complete Chapter 2. | Automatic story trophy, cannot be missed. | |
| Description: Complete Chapter 3. | Automatic story trophy, cannot be missed. | |
| Description: Complete Chapter 4. | Automatic story trophy, cannot be missed. | |
| Description: Complete Chapter 5. | Automatic story trophy, cannot be missed. | |
| Description: Complete ‘Goodbye, Dear Friend’. | Automatic story trophy, cannot be missed. Unlocks in Chapter 6. | |
| Redemption | ||
| Description: Complete ‘Red Dead Redemption’. | Automatic story trophy, cannot be missed. Unlocks at the end of Chapter 6, just when the Epilogue starts. | |
| Description: Complete ‘A New Jerusalem’. | Automatic story trophy, cannot be missed. Unlocks in Epilogue. | |
| Endless Summer | ||
| Description: Complete the Epilogue. | This trophy is unlocked when beating the story (finished Epilogue – Part II). | |
| Description: Complete all optional Honor story missions. | *HIGHLY MISSABLE* This trophy requires you to do ALL optional (=missable) story missions in one playthrough! This includes the debt collecting quests. All of these are quests that you don’t have to do to advance the story, thus they are easy to miss. Some of them are marked with yellow main mission markers, others with white Stranger Mission markers. However, what differentiates them from Stranger Missions is that the “Optional Story Missions” get added to your mission log (Pause Menu > Progress > Story). The “real” Stranger Missions aren’t needed for it. It’s worth noting that after beating the story you unlock some of these missions in the Story Log and can replay them for medals but that does NOT unlock the trophy! You have to do them in a normal playthrough, it doesn’t count via replay. The most important part: You have to play honorably from the start and reach Honor Level 4 of 8 in Story Chapter 6. That’s because the Chapter 6 optional mission “Do Not Seek Absolution” requires Honor Level 4 to be played. Refer to the Honor Guide for the best ways to increase honor. Tip: Catching and releasing fish is the best way and doing bounties. In Chapter 6 you gain +50% honor. Also follow the story decisions in the Honor Guide to gain ranks quickly. Below is a list of all optional story missions that are required, in chronological order, with quest giver and starting location: For an overview of All Story Missions in their correct unlock order, check out the Red Dead Redemption 2 Story Walkthrough. You can do the missions in the order listed there and use it to check when each one becomes available. Do make a manual save from time to time (Pause Menu > Story > Save Game). In case you missed something it allows you to jump back without having to start a new game from scratch. After each chapter, check your story log (Pause Menu > Progress > Story) and make sure it didn’t add any undone missions to the bottom of the list. By default, the game makes missed missions available for replay so this is how you can track if you missed something (again, playing them from the replay menu does not count). EASY TRICK TO UNLOCK THIS TROPHY IF YOU MISSED IT: In Patch 1.03 there is a lucky way to “cheat” the trophy if you missed it; After beating the story, replay the mission “Home Improvement for Beginners” (Epilogue) and the trophy unlocks instantly (regardless of how many honor missions you missed). But do go for all missions on your main playthrough regardless, just in case this trick gets patched in a future update. (Credit to Reddit User JOEdrinksBEER for finding this trick). | |
| Description: Attain 100% completion. | » Red Dead Redemption 2 – 100% Guide & Checklist | |
| Description: Earn 70 Gold Medals in Story missions. | » Red Dead Redemption 2 Gold Medals Guide | |
| Description: Complete a Companion Activity in each camp. | *MISSABLE* This trophy is missable. You must complete 1 companion activity in Chapter 2, Chapter 3, Chapter 4. The trophy will unlock in Chapter 4 (the camps in later chapters are not needed for this). Below is a list of all the activities for each chapter. Do note that only 1 per chapter is needed, not all of them! So pick whatever shows up for you. These activities won’t always be there. If they aren’t, advance the story or sleep in your tent and try at a different daytime. You can also keep track of your trophy progress in Rockstar Social Club after each one to see if it counted or not. Playing table games with gang members doesn’t count. Also keep a manual save from the start of each chapter so you can go back in case you missed something. Chapter 2: – Javier – Home Robbery: Talk to Javier at camp, he wants to do a home robbery with you in Valentine. This can still be available in Chapter 3. – Charles – Hunting: Talk to Charles at camp, he wants to hunt a Bison with you. Chapter 3: – Sean – Coach Robbery: Talk to Sean at camp, he wants to rob a Stagecoach. – Bill – Coach Robbery: Talk to Bill at camp, he wants to rob a Stagecoach. – Javier – Fishing: Talk to Javier at camp, he wants to go fishing. – Kieran – Fishing: Talk to Kieran at camp and go fishing together. – Javier – Home Robbery: If you haven’t done his robbery in chapter 2, it may show up again in chapter 3. Chapter 4: – Charles – Bank Robbery: Only available if you have the Deluxe or Ultimate Edition of the game. This is an exclusive bonus mission, not available with Standard Edition of RDR2. – Micah – Coach Robbery: Talk to Micah at camp, he wants to go rob a stagecoach. – Lenny – Coach Robbery: Talk to Lenny at camp, he wants to go rob a stagecoach. – Pearson – Hunting: Talk to Pearson at camp, he wants to go hunting. – Uncle – Robbery: Talk to Uncle at camp, he wants to go steal some cows with you. | |
| Description: Play all mini games. | There are 4 minigames: Five Finger Fillet, Blackjack, Dominoes, Poker. You only need to start playing them for a moment, no need to win. You don’t even have to finish a match. After sitting down for a game you can stand up again and leave. You can keep track of it under Pause Menu > Progress > Total Completion > Table Games. » Red Dead Redemption 2 – All Table Game Locations – Five Finger Fillet: Found in Strawberry – Blackjack: Found in Rhodes (Saloon) – Dominoes: Found in Saint Denis (Park) – Poker: Found in Saint Denis (Saloon) | |
| Description: Recover the stash from 4 homesteads. | » Red Dead Redemption 2 – All Homestead Stash Locations | |
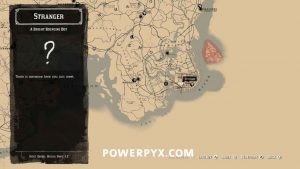
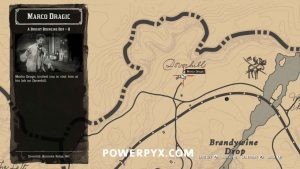
| Description: Discover the fate of Marko Dragic. | This trophy unlocks by doing the Stranger Mission Questline “A Bright Bouncing Boy” given by Marco Dragic in Saint Denis. Step 1: Go to the starting location and do Marco’s first mission “A Bright Bouncing Boy – I”. You must have reached Chapter 4 and it’s only available at day. | |
| Description: Rob or loot $250. | Make sure you always loot dead bodies during the story. Some main mission targets keep over $100 with them. The average enemy only has a few cents, sometimes a few dollars. It’s gonna take a while but should unlock later into the story. Just be sure to loot everyone. | |
| Description: Donate $250 to the gang tithing box. | *MISSABLE* In your camp you have a donation box only in Chapter 2, Chapter 3, Chapter 4. Getting $250 is easy enough, you get well over $1000 from some story missions. To get this trophy you must donate $250 combined (not at once). You can also donate valuable items to the tithing box, which are acquired from looting dead enemies. These add towards the $250 as well. Do note, however, that donations from other gang members don’t count. You must put in $250 yourself. After Chapter 4 there is no tithing box anymore and this trophy becomes unobtainable. Be sure to do it before then. | |
| Description: Spend $5000 across all shops. | First, you’ll want to amass $5000 (you get $20,000 automatically for completing the story). Then make a manual Save under Pause Menu > Story > Save Game. Now spend all your money at any type of shop (Stables and Gunsmiths are the fastest way to spend $5000). After the trophy pops, go back into Pause Menu > Story > Load Game and reload your manual save to get the money back. You can also make it work with ~$3500. Just go to a Stables, buy all horses and resell them immediately to get part of your money back. You can do the same tactic in General Stores and immediately sell back what you bought. | |
| Description: Reach maximum or minimum Honor level. | This trophy cannot be earned until you’ve completed Chapter 5 Main Mission “Paradise Mercifully Escaped”! Since there isn’t much to affect your honor in Chapter 5, the first realistic shot at this is in Chapter 6 or after beating the story (in Chapter 6 you gain +/- 50% Honor for all actions). You can see your current honor by pressing (the red / white bar at bottom of screen). The bar must reach the left side (dishonorable) or the right side (honorable). Being dishonorable is easier. Just kill everyone you encounter and cause a lot of havoc. When you see random people on the roads, kill and loot them. However, you should make a manual save beforehand to reload and have your honor back. One of the optional story missions in Chapter 6 “Do Not Seek Absolution” for trophy “Lending a Hand” requires you to have Honor Level 4. It would be hard to come back from a dishonorable score and you’d miss out on that trophy. Honor affects prices in stores and how some people react to you. If you want to unlock all outfits you should keep high honor as it’s a requirement to purchase certain outfits and to unlock certain optional missions. If you want to go the honorable route, catching and releasing fish adds a lot, and after the story you can replay daily quests at the Beecher’s Hope Farm. This is much more grindy than being evil though (also see the Honor Guide for other options). | |
| Description: Complete 10 Stranger mission strands. | Strangers are the givers of side quests. There are more than 10 of them (in total 26 of which 22 count towards this trophy). It only counts when you complete their full questlines from start to end (not just their first quest). They all give you a series of quests. You can still play their quests after the story. To keep track of your progress, check under Pause Menu > Progress > Total Completion > Strangers. The trophy unlocks later than it should for some reason. It can take 12+ stranger mission strands to pop it. Even if it says 10/10 in Rockstar Social Club, just keep doing more stranger questlines and it will unlock! Refer to the guide below for all their locations and walkthroughs: » Red Dead Redemption 2 – Stranger Missions Walkthrough & Red Dead Redemption 2 – All Stranger Locations Map | |
| Description: Survive 3 days holding a bounty of $250 in all states. | Getting $250 bounty is quite easy. Go to the major towns and start shooting people. When the lawmen come, shoot them too. Repeat until you have $250 bounty on your head (as is displayed on the world map) and then ride to the next state. There are 5 States in Red Dead Redemption 2: – Lemoyne – New Hanover – Ambarino – West Elizabeth – New Austin (during the story you automatically have $250 bounty here) During the story you only need to get a $250 bounty in the first 4 states. In New Austin you have $250 bounty automatically until reaching the Epilogue. After the story you must also get a bounty in the fifth state New Austin. The Bounty stays on your head permanently until you pay it off at the post office. You should create a Manual Save before doing this (Pause Menu > Story > Save Game). This is because you don’t want to lose your Honor Levels as it will lock you out of missions for the trophy “Lending a Hand” (complete all optional honor missions). The only tricky region is Ambarino because there are no towns there. Simply kill a random person, pack them on the back of your horse, ride to Ambarino and wait on the road until someone comes riding along. They will see the corpse and alert the Lawmen. Then 3 waves of Lawmen will come to hunt you down. Kill them and repeat the process. After you got $250 bounty in all 5 regions, you can sleep to skip time for 3 days. Sleep twice in a row, then you must wait 5-10 minutes (real time) before you can sleep again. Keep sleeping until the trophy unlocks. | |
| Description: Complete one of the Collectable strands. | » Red Dead Redemption 2 Collectibles GuideThere are 4 “Collectible Strands” that count for this (only the ones that are tied to Stranger Missions): 144 Cigarette Cards, 30 Dinosaur Bones, 10 Rock Carvings, Exotic Objects. You only need to complete one of four. The Rock Carvings are the fastest. For 100% completion you will need all of them though. | |
| Description: Find the graves of each of your fallen companions. | » Red Dead Redemption 2 – All Grave LocationsThe graves can only be found after having finished the story. There are 9 of them in total. They can be collected in any order and are also needed for 100% completion. See the above guide for their spots. | |
| Description: Deliver 5 camp companion item requests. | *MISSABLE* This is only possible in Chapter 2, Chapter 3, Chapter 4. Make sure you get this before completing Chapter 4. While you’re at your gang’s camp, people will randomly come up to you and give you item requests of stuff they want. This is somewhat random so spend a lot of time in the camp and socialize with your crew to get more requests. You need to progress a little bit into Chapter 2 and play a main mission with each camp member so that more requests are offered to you. Luckily, there are much more than 5 requests. Below is a list of all requests with the chapters, request givers, and where to get the item. Do this as early as possible! Also, the requests are generally only given at day between 8:00 – 20:00. So don’t try this in the middle of the night. Some of the request items can be very random so stick to what’s straightforward and easy to locate. Chapter 2 (from 8:00 – 20:00): – Abigail – Request: $5 – Location: Give Her Your Money – Jack – Request: Abigail’s Thimble – Location: Randomly found from looting dead bodies – Jack – Request: Penny Dreadful Book – Location: it can be in 5 places; Osman Grove in Hut east of Emerald Ranch (Location Screenshot), Clawson’s Rest in Hut north-west of Valentine, Pleasance in School north-east of Eris Field, Downes-Ranch in Hut east of Wallace Station, Lake Don Julio in Hut south-east of Armadillo – Javier – Request: Oleander – Location: See Oleander Location, a plant found in the wilderness, use + + to see plants. – Molly – Request: Pocket Mirror – Location: In a hut of Martha’s Swain, east of Three Sisters. You can find it on the nightstand next to the bed (Pocket Mirror Location). – Sadie – Request: Harmonica – Location: Found in a shelf of a hut east of Flatneck Station (Harmonica Location). Chapter 3 (12:00 – 18:00): | |
| Description: Find a permanent home for the squirrel statue. | This is only possible after beating the story! Step 1: Finish the Story (complete Epilogue Part 2). Step 2: Do All 5 Hunting Requests for Ms. Hobbs (you can already start working on these as early as chapter 2 but the last one isn’t available until Epilogue Part 1). They are on Posters inside the Train Stations at the following towns: Valentine, Saint Denis, Rhodes, Van Horn, Strawberry, Armadillo. You go inside the train station where the post office is and look for the poster on the wall, pull it down to see the hunting request. It then gets added to your Satchel (hold and find it under documents). You must then deliver the requested animals in perfect condition to the post office and mail them to Ms. Hobbs! It’s absolutely vital that the carcasses are in perfect condition (3 stars), otherwise they won’t be accepted. See Hunting Requests Guide. Step 3: After completing 5 Hunting Requests, Ms. Hobbs sends you an invite to her hut (in the post office). It is in the top right of Strawberry. She will award you with the Squirrel Statue for your hard work! Step 4: Head to your farm Beecher’s Hope near Blackwater (only available after story, this is why you had to beat the story first). Step 5: Place the statue above the fireplace. Step 6: Advance time for one day and the statue should be gone (if not, advance time as often as you need). Someone in the house stole it. You must then find the statue again and put it back above the fireplace and repeat this procedure of sleeping and finding it again until you find it at its sixth location. After putting it back above the fireplace always sleep for 24 hours so it gets stolen again. The statue locations are as follows: 1. Chest in John’s Bedroom 2. Check the Chimney in John’s Bedroom 3. Go to the kitchen where you’ll find a ladder to the loft. It’s in the chest on the right. 4. Outside next to the barn where the sheep are, inside the wheelbarrow. 5. Inside the barn, climb the ladder and it’s in the chest. 6. This one isn’t on the farm. It’s way off in the north of West Elizabeth Region, north of Strawberry, on Mount Shann (Location Screenshot). *Thanks to SolidNinjaSnake for helping with the squirrel statue locations. | |
| Description: Craft 30 unique items in Story Mode. | While out in the wilderness, hold for a few seconds and then press to enter the crafting menu. You can also make a camp via the item wheel, rest at the camp and craft things there. You earn some recipes automatically from the story, others are bought from fences, and yet others are automatically available after getting the meat of certain animals so you can cook it over the campfire. | |
| Description: Skin every species of animal in Story Mode. | There are 178 animals. You can keep track under Pause Menu > Progress > Compendium > Animals. You must kill and skin all of the skinnable ones (only about half of them can be skinned, i.e. the animals with pelts. Small animals and birds that can only be “collected” or “plucked” aren’t needed – but keep in mind that bigger birds are skinnable). There is one missable lion from a stranger mission but it’s not needed because it doesn’t get added to the compendium. Only animals in compendium count for this. » Red Dead Redemption 2 All Animal Locations *Note: You can’t go back to the chapter 5 island “Guarma”. Some animals only live there but aren’t needed for “Skin Deep” or “Zoologist”. There are multiple confirmations on this. The animals exclusive to Chapter 5’s Guarma island (which are not needed and can be skipped) are: the 3 native Guarma parrots = Blue & Yellow Macaw, Scarlet Macaw, Great Green Macaw, the 4 native Guarma snakes = Sunglow Boa, Rainbow Boa, Red Boa and Fer-De-Lance, and lastly the other native Guarma bird = Red-Footed Booby. The rest of the Guarma animals does spawn on the main map: “Cuban Land Crab” & “Green Iguana” spawn on the main map, on the largest of the islands in the Flat Iron Lake on the East side of the lake and directly West of Rhodes just off the shore. *Big thanks to EphemeralEcho for initially figuring out all the missable Chapter 5 animals and DOM098652 for figuring out they do not affect the trophy. | |
| Description: Study every animal across all states in Story Mode. | There are 178 animals. You can keep track under Pause Menu > Progress > Compendium > Animals. You must study all of them. You can use binoculars to look at them when you’re close enough and press to study them. You also need to kill and skin them for the “Skin Deep” trophy. Tracking them is not required for either trophy so you don’t need 100% on each animal in the compendium. Just fulfill the “study” requirement by looking at the animal through binoculars and press to study. Studying just one per species is not enough (e.g. there are multiple pigs but you need all possible sub-species for this!). There is one missable lion from a stranger mission but it’s not needed because it doesn’t get added to the compendium. Only animals in compendium count for this. » Red Dead Redemption 2 All Animal Locations *Note: You can’t go back to the chapter 5 island “Guarma”. Some animals only live there but aren’t needed for “Skin Deep” or “Zoologist”. There are multiple confirmations on this. The animals exclusive to Chapter 5’s Guarma island (which are not needed and can be skipped) are: the 3 native Guarma parrots = Blue & Yellow Macaw, Scarlet Macaw, Great Green Macaw, the 4 native Guarma snakes = Sunglow Boa, Rainbow Boa, Red Boa and Fer-De-Lance, and lastly the other native Guarma bird = Red-Footed Booby. The rest of the Guarma animals does spawn on the main map: “Cuban Land Crab” & “Green Iguana” spawn on the main map, on the largest of the islands in the Flat Iron Lake on the East side of the lake and directly West of Rhodes just off the shore. *Big thanks to EphemeralEcho for initially figuring out all the missable Chapter 5 animals and DOM098652 for figuring out they do not affect the trophy. | |
| Description: Catch a fish weighing at least 16 lbs (7.3 kg). | You will unlock this automatically while catching all 13 Legendary Fish (which are required for 100% completion). » Red Dead Redemption 2 – All Legendary Fish Locations | |
| Description: Upgrade each available component for a single sidearm or longarm weapon. | Go to any Gunsmith (marked on map in towns), for example there’s one in Valentine. Look at the Gunsmith with “Customize”. Select any weapon > “Components” > Change every Component. For example the basic Double-Action Revolver has these 4 Components: Grip, Barrel Length, Barrel Rifling, Iron Sights. It costs a few dollars to change these but you can make a manual save beforehand and reload it afterward to reset the money (Pause Menu > Story > Save Game / Load Game). | |
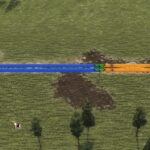
| Description: Survive 18 bear attacks and kill the bear each time in Story Mode. | In the wilderness, when you encounter a bear you must let it grab you. Then quickly press to escape before it instant-kills you. While you’re on the ground you have a short moment to shoot the bear. You must kill it during this phase. Always let the bear grab you, break free, kill it before getting back up. Bears can spawn in many places but it’s a bit random. When you’ve found a bear spot, try farming it by sleeping to advance time (can make a camp via the item wheel). Pick a weapon that does a lot of damage and use express ammo (the best is the fully upgraded “Carbine Repeater” + Express ammo). We’ll go through it step by step. Step 1: Fully upgrade the weapon “Carbine Repeater” at a Gunsmith and buy Express ammo for it (also from Gunsmith). You get the Carbine Repeater automatically during Chapter 1. Equip the weapon so it’s ready to shoot and make sure you select the Express Ammo in weapon wheel. Step 2: Go to a bear hunting spot. 1) This here is the recommended spot (between Wallace Station & Watson’s Cabin): Here are some alternative spots where bears may spawn: 2) Just east of the Legendary Bear hunting spot. [ very fast to break free. After breaking free there’s a short moment to shoot the bear, very quickly tap to blast it in the face with your Carbine Repeater Express Ammo. It will die in 1-3 shots to the face. You have to kill it during this animation! It won’t count if you just shoot the bear from afar. It absolutely has to be during this QTE sequence and weak weapons won’t kill the bear quick enough so use the recommended combo of Carbine Repeater + Express Ammo for best results. Step 4: Farm the same spot. To do this, get away from the area (ride away for 30-60 seconds, the further you get away the better the chance the bear will respawn). Then make a camp from the item wheel and sleep for one day until morning or noon. Return to the spot and check for the bear. There’s roughly a ~30% chance for it to respawn. If it’s not there, blow yourself up with some dynamite and check again. If still nothing, either sleep again until it spawns or make a Manual Save > Exit Game > Continue (you find these options under Pause Menu, Story). Each time you exit and continue it cycles through the animal spawns in the area so this can help getting a new bear to spawn. If not, just sleep again. It can sometimes take 15-20 minutes of advancing time, blowing yourself up with dynamite and exiting the game. If you have absolutely no luck, move on to the next bear hunting spot. After a while of farming the same spot, the bear spawn rate may drop so just continue with other activities and return after one in-game week has passed, then the spawn rate should be better again. The rest is just repeating Step 4. Getting new bears to spawn and killing them with the Carbine Repeater + Express Ammo combo when they attack you (during the QTE sequence). You can keep track of your trophy progress in Rockstar Social Club! This whole ordeal will take 5-10 hours, due to the randomness of the bear spawn rates. | |
| Description: Reach max bonding level with a horse. | You can see your horse bonding level under Pause Menu > Player > Horse > Bonding. Reaching Bonding Level 4 (the maximum) will unlock this trophy. Here’s how to improve the horse bonding: – Feed the Horse (mount the horse, stand still with it, and select a treat from the horse item wheel. You can buy treats from stables). – Press to pet your horse and calm it when it’s agitated. – Brush the Horse when it’s dirty (dismount, look at it with to brush it). – Ride with your horse, without depleting the stamina core. You can cheat this a bit by using the Automatic Horse Travel (Autopilot) to let your horse ride up and down the map. If you stick with the same horse through most of the story, this will come automatically. Just don’t let your horse die. If you lose it, go get it back from the stables. It takes a few hours to reach maximum bonding level. After the story you still got a lot of collectibles to find so you can combine it there as well. | |
| Description: Red Dead Online: Complete the Intro. | This is the first online trophy that you’ll earn. It unlocks after returning from the first co-op mission “Honor Among Horse Thieves” back to your camp. A guy called Cripps is waiting in your camp and triggers a cutscene, after which this trophy will unlock. This also opens up the rest of the Multiplayer. You can’t miss any of this since the intro consists of a few predefined missions that you must do to unlock the rest of Multiplayer. | |
| Description: Red Dead Online: Take part in a Series. | After having finished the Tutorial, at any time you can open the Pause Menu > Online > Showdown Series / Showdown Series Large / Race Series. Join one of these 3 match types. The trophy pops after the match (not right away upon joining). | |
| Description: Red Dead Online: Accept 10 Free Roam missions from characters around the world. | In Online mode, you can find Free Roam missions on the map marked by an orange icon . These are mostly found in towns. Do 10 of these to unlock the trophy. You can keep track of this under Pause Menu > Progress > Awards > Free Roam > Complete Free Roam missions from 10 characters. | |
| Description: Red Dead Online: Play 5 Free Roam Events. | While in Free Roam, you will randomly get invited to “Free Roam Events” from time to time. They will show up as purple text in the top left corner and you need to hold the Options-Button to join . You need to be quick to accept the invite before the Event starts. These events usually last for about 10 minutes and have mixed objectives where you compete against a large group of other players. Just play a lot in Free Roam and always accept these purple events when you get invited to them. You don’t need to win, just play the event to the end. | |
| Description: Red Dead Online: Achieve 5 gold belt buckles from awards. | There are 425 Awards in Online Mode. You can view them and keep track of each one’s progress under Pause Menu > Awards > Select an Award Category. They are mostly just a sort of progression tracker for having done an action multiple times. You need the gold buckle in each one, which is the highest achievable tier (think of it as a gold medal). Now luckily, these aren’t hard at all, just time-consuming, and you only need 5 ouf 425 available awards! Here are the easiest ones, pick the five that you like best: – Sharpshooter: Get 1000 kills with one weapon type (automatically on way to Rank 50) – Combat: 1000 Enemies killed (automatically on way to Rank 50) – Hunting: Kill 1 flying bird with an arrow (the bow unlocks at Rank 10 at Gunsmith, birds are everywhere at day) – Travel: Rode on horseback from Valentine to Strawberry in 3:30 (buy horse stimulants from a stable to refill horse stamina instantly on the go) – Travel: Rode on horseback from Emerald Ranch to Braithwaite Manor in 3:45 (buy horse stimulants from a stable to refill horse stamina instantly on the go. Emerald Ranch is in New Hanover, Braithwaite Manor is south of Rhodes) – Travel: Rode on horseback from Colter to Adler’s Ranch in 1:30 (buy horse stimulants from a stable to refill horse stamina instantly on the go. Colter is a town in the snowy region of Ambarino, west of Cairn Lake. Adler’s Ranch is north-east of it at the edge of the map. See Colter Location & Adler’s Ranch Location) – Trade: Visit 50 Shops (just use a stagecoach to fast travel from one town to the next and visit every shop in the game) – Trade: Spend $1,000 in Shops (this will come automatically on your way to Rank 50 when you buy new weapons, horses and consumables) – Trade: Sell an item to 3 shop types (super easy, sell herbs to doctor, meat to butcher, some enemy loot to a fence) – Horse: Achieved Maximum Bond Level with your Horse (this too will come automatically on your way to Rank 50 when you stick to one horse, see How to Increase Horse Bonding) – Horse: Purchase 5 unique Horse Breeds (easy but expensive, can be combined with the trophy “Horses for Courses”. You can view all horse breeds at any stables) – Free Roam: Complete Free Roam missions from 10 characters (you have to play 10 of these anyway for trophy “Gun For Hire” so it can be combined). | |
| Description: Red Dead Online: Achieve MVP 3 times (in a round with at least 4 players). | To be the MVP (Most Valuable Player) you need to be the overall best performing player who gets featured at the end of the match. After each match there’s a short scene that shows who was MVP. Now generally that will be whoever had the highest score and was at the top of the leaderboard, but this isn’t always the case. For example, in the capture mode, even if you placed third on the scoreboard but you managed to make the most captures, you might still be displayed as the MVP. You also don’t necessarily have to be on the winning team, either (in team matches). If you were the individual who the game deems to have been the “most valuable” you will get featured at the end. Just try to get the highest overall score to increase the odds. What’s important is that there at least 4 players in the match, which will always be the case in public matches (you don’t need to be in a 4-player posse for it, just 4 total players in the match). This is the only skill-relevant online trophy for which you actually need to be a decent player, but on the way to Rank 50 it will very likely come naturally. It’s easier to do this in the standard Showdown Series as it has only 16 players (Large Showdown Series has 32 players). | |
| Description: Red Dead Online: Concurrently own 5 horses. | You must first unlock 5 stalls at the stables and then buy 5 horses. One is unlocked from the start, the other 4 need to be unlocked with money. – First Stall = Free – Second Stall = $100 – Third Stall = $150 – Fourth Stall = $500 – Fifth Stall = $750 Total: $1500 for all Stalls. Next you must also purchase horses for each. You get a free horse from the online tutorial. You can buy the 4 cheapest “Kentucky Saddlers” which cost $50 each ($200 total). Total money needed for this trophy is $1700. | |
| Description: Red Dead Online: Reach Rank 10. | Self-explanatory. See trophy “Notorious”. | |
| Description: Red Dead Online: Reach Rank 50. | Self-explanatory. Play through the online story, play matches (accessed via the Pause Menu > Online > select a Series to participate in), and do Free Roam Missions to increase your level. Luckily, we only need to reach Rank 50 of 100 so it’s “only” halfway up to max rank. To reach Rank 50 you need a total of 175,300 XP. For the best XP Exploit (7,000+XP per hour) see this: Red Dead Redemption 2 Online: Fastest XP Exploit / Glitch *Thanks to Waraneasy for this method | |
| Description: Red Dead Online: Successfully counter a rival Posse’s Free Roam mission. | In online free roam you will get notified when a rival Posse has started a Free Roam Mission near you. Stay close to towns where these mission icons are (and also check that there are posse leaders in the area, represented by a star-icon on the map whereas solo players are displayed as dots). Keep in mind that not every mission can be countered by rivals (especially the assassination missions). The ones from train stations work best for it so stay near those! E.g. wait around the train station of Valentine, Rhodes, Blackwater or Saint Denis (wherever the most posse leaders with a star-icon are). When a rival posse leader accepts such a mission you get a red on-screen notification to attack them. Your goal then is to prevent the enemy posse from completing their objective. If you succeed in doing this (causing the enemy to fail their mission), you will unlock the trophy. You are allowed to play solo yourself, you don’t have to be in a posse with other players for it to work. However, if another posse lands the final blow it won’t unlock, you have to do it (because multiple gangs can try to prevent the same mission it may give them the trophy but not you). How to boost this trophy: 1. Create a Posse ( > create posse). 2. Invite your friend to Posse. 3. Have your friend join. They will spawn near you (the whole purpose of the invitation is so that you spawn in the same place). 4. Now have your friend leave your posse and make them create their own one. This is important because only missions accepted by a posse will count for the trophy (not by solo players who’re not in a posse). 5. Now have one player do a Free Roam Mission and the other prevents it. Because you are no longer in the same posse it will count as rivals. Keep in mind some missions don’t give the option to be prevented. The ones inside train stations are best suited for it. When one player got the trophy you repeat this for the second player. Only after it shows the red on-screen notification that other players can prevent your mission, it will count. | |
| Description: Red Dead Online: Purchase 5 camp improvements. | Go to your camp and talk to Cripps (after having finished the online tutorial). You need to look at Cripps with to see the camp improvements. Buy 5 of them. The easiest and cheapest option is to buy 5 different flag colors. Each costs $50 so that’s $250 total. The flag colors are unlocked from the start (after online tutorial). One player reported having to buy 5 flags at once to pop the trophy, without leaving the purchase menu (and that’s what I did too when I did it). So to be safe, it’s recommended you save up $250 first and buy 5 flags in a row without leaving the purchase menu. | |
| Description: Red Dead Online: Craft 25 pieces of ammunition. | First you will need ammunition recipes. They can be bought from fences but require you to rank up first. You can then hold to Rest > to Craft > to switch to ammunition. Craft 25 total pieces of any ammunitions. You can craft the same one multiple times (doesn’t have to be 25 different ones). You can keep track of this under Pause Menu > Progress > Awards > Survivalist > Craft items (remember to check this number before you start to deduct already crafted items). | |
| Description: Red Dead Online: Form a Persistent Posse. | First you must finish the Online Tutorial to unlock the function to create a Posse. You also need $200 to start a Persistent Posse! Once you have done that, press Form a Posse > Type: Persistent > Form a Posse. The difference between a Temporary and Persistent Posse is that the Persistent one costs $200 to open and acts as a permanent clan. The trophy pops instantly upon creating the posse, no need to invite any members to it. | |
| Description: Red Dead Online: Craft 20 items (excluding ammo). | The easiest way is to cook animal meat over the camp’s fire. You can cook the same meat multiple times and each piece of meat will count towards the trophy (does NOT have to be 20 different types of “items”). So just go hunting and skin animals for their meat. Now head to your camp. If you forgot where it is, relocate your camp from the item wheel (hold over the campfire to start “crafting”. After cooking the meat be sure to eat it right away. For some reason it counts as 2 items crafted when you eat it (thus you only need 10 meat). If you stow it in your satchel it only counts as one item crafted, if you eat it counts as two items crafted. You can keep track of this under Pause Menu > Progress > Awards > Survivalist > Craft items (remember to deduct crafted ammo from the total). | |
| Description: Red Dead Online: Sell 20 items to the Butcher. | You can find Butchers in Valentine, Strawberry, Blackwater, Rhodes, Saint Denis, Tumbleweed. Kill animals in the wilderness and skin them. Then bring 20 animal loot to the Butcher and sell them to him. You can also bring him the skinned animal carcasses as they can be sold in addition to the skinned resources. You don’t have to sell him 20 different items. It can be the same item multiple times (e.g. some animals give you 3 x the same meat and each piece of meat counts towards this trophy). Note: Make sure you skin the animals first, this gives you way more sellable items (multiple pieces of meat, feathers, skins, antlers etc.) than just selling the carcass in one piece! Most large animals give you 5-6 items so this can be done really quickly and the materials will be stored in your satchel until you sell them. For example, in Valentine, ride out of town, kill a bunch of animals, skin them, and sell everything to the Valentine Butcher (this trophy only takes 5 minutes). | |
| Description: Red Dead Online: Pick 25 Herbs. | The trophy description for this is a bit misleading. You just need to pick any 25 plants in the wildneress, it doesn’t have to be “herbs”. Mushrooms, Berries, Flowers etc. also count for this. Any plant that you can pick up will add towards this trophy. To see them more easily, use eagle vision + . This will highlight plants with some blue “dust” around them. So just walk around and pick up any plant you come across. You can keep track of this under Pause Menu > Progress > Awards > Survivalist > Pick Herbs. | |
| Description: Red Dead Online: Complete a Free Roam mission as part of a Posse with at least 2 members. | You can either make a Posse to invite others or join an existing Posse. The best option is to make one yourself. After having finished the Tutorial you can press > Form a Posse. In the same menu click “Invite to Posse” and just invite everyone on the server (or press to switch to invite friends). Now head to a Free Roam Mission and complete it (marked on the map with orange icon). If nobody joins, you can press > Online > Posse Up, to join a random Posse. |
Special Thanks / Credits
Massive thanks to the following people for sending tips:
EphemeralEcho = He did the heavy lifting with figuring out the chapter 5 animals, sending in hunting tips and info about the animal trophies. SolidNinjaSnake = Additional info on “It’s Art”. DOM098652 = For detailed testing and confirmation that the Chapter 5 Guarma Animals are not needed for “Skin Deep” or “Zoologist” and for finding a way to get Cuban Land Crab & Green Iguana on the main map, on the biggest island of Flat Iron Lake. JOEdrinksBEER (Reddit User) = For finding the easy way to cheat missable trophy “Lending a Hand”. Waraneasy = Who was first to platinum RDR2 and provided the Multiplayer time estimate and also his XP farming method