Root of Nightmares is the newest raid in Destiny 2, launching with the Lightfall expansion. This raid plunges players into a besieged Pyramid Ship where they confront Nezarec, the Final God of Pain. Before diving in, ensure your fireteam is raid-ready with a recommended power level of 1770.
This Root Of Nightmares Guide will provide a comprehensive walkthrough of all four encounters, reveal the locations of the two hidden secret chests, and explain how to guarantee a Deepsight weapon drop each week.
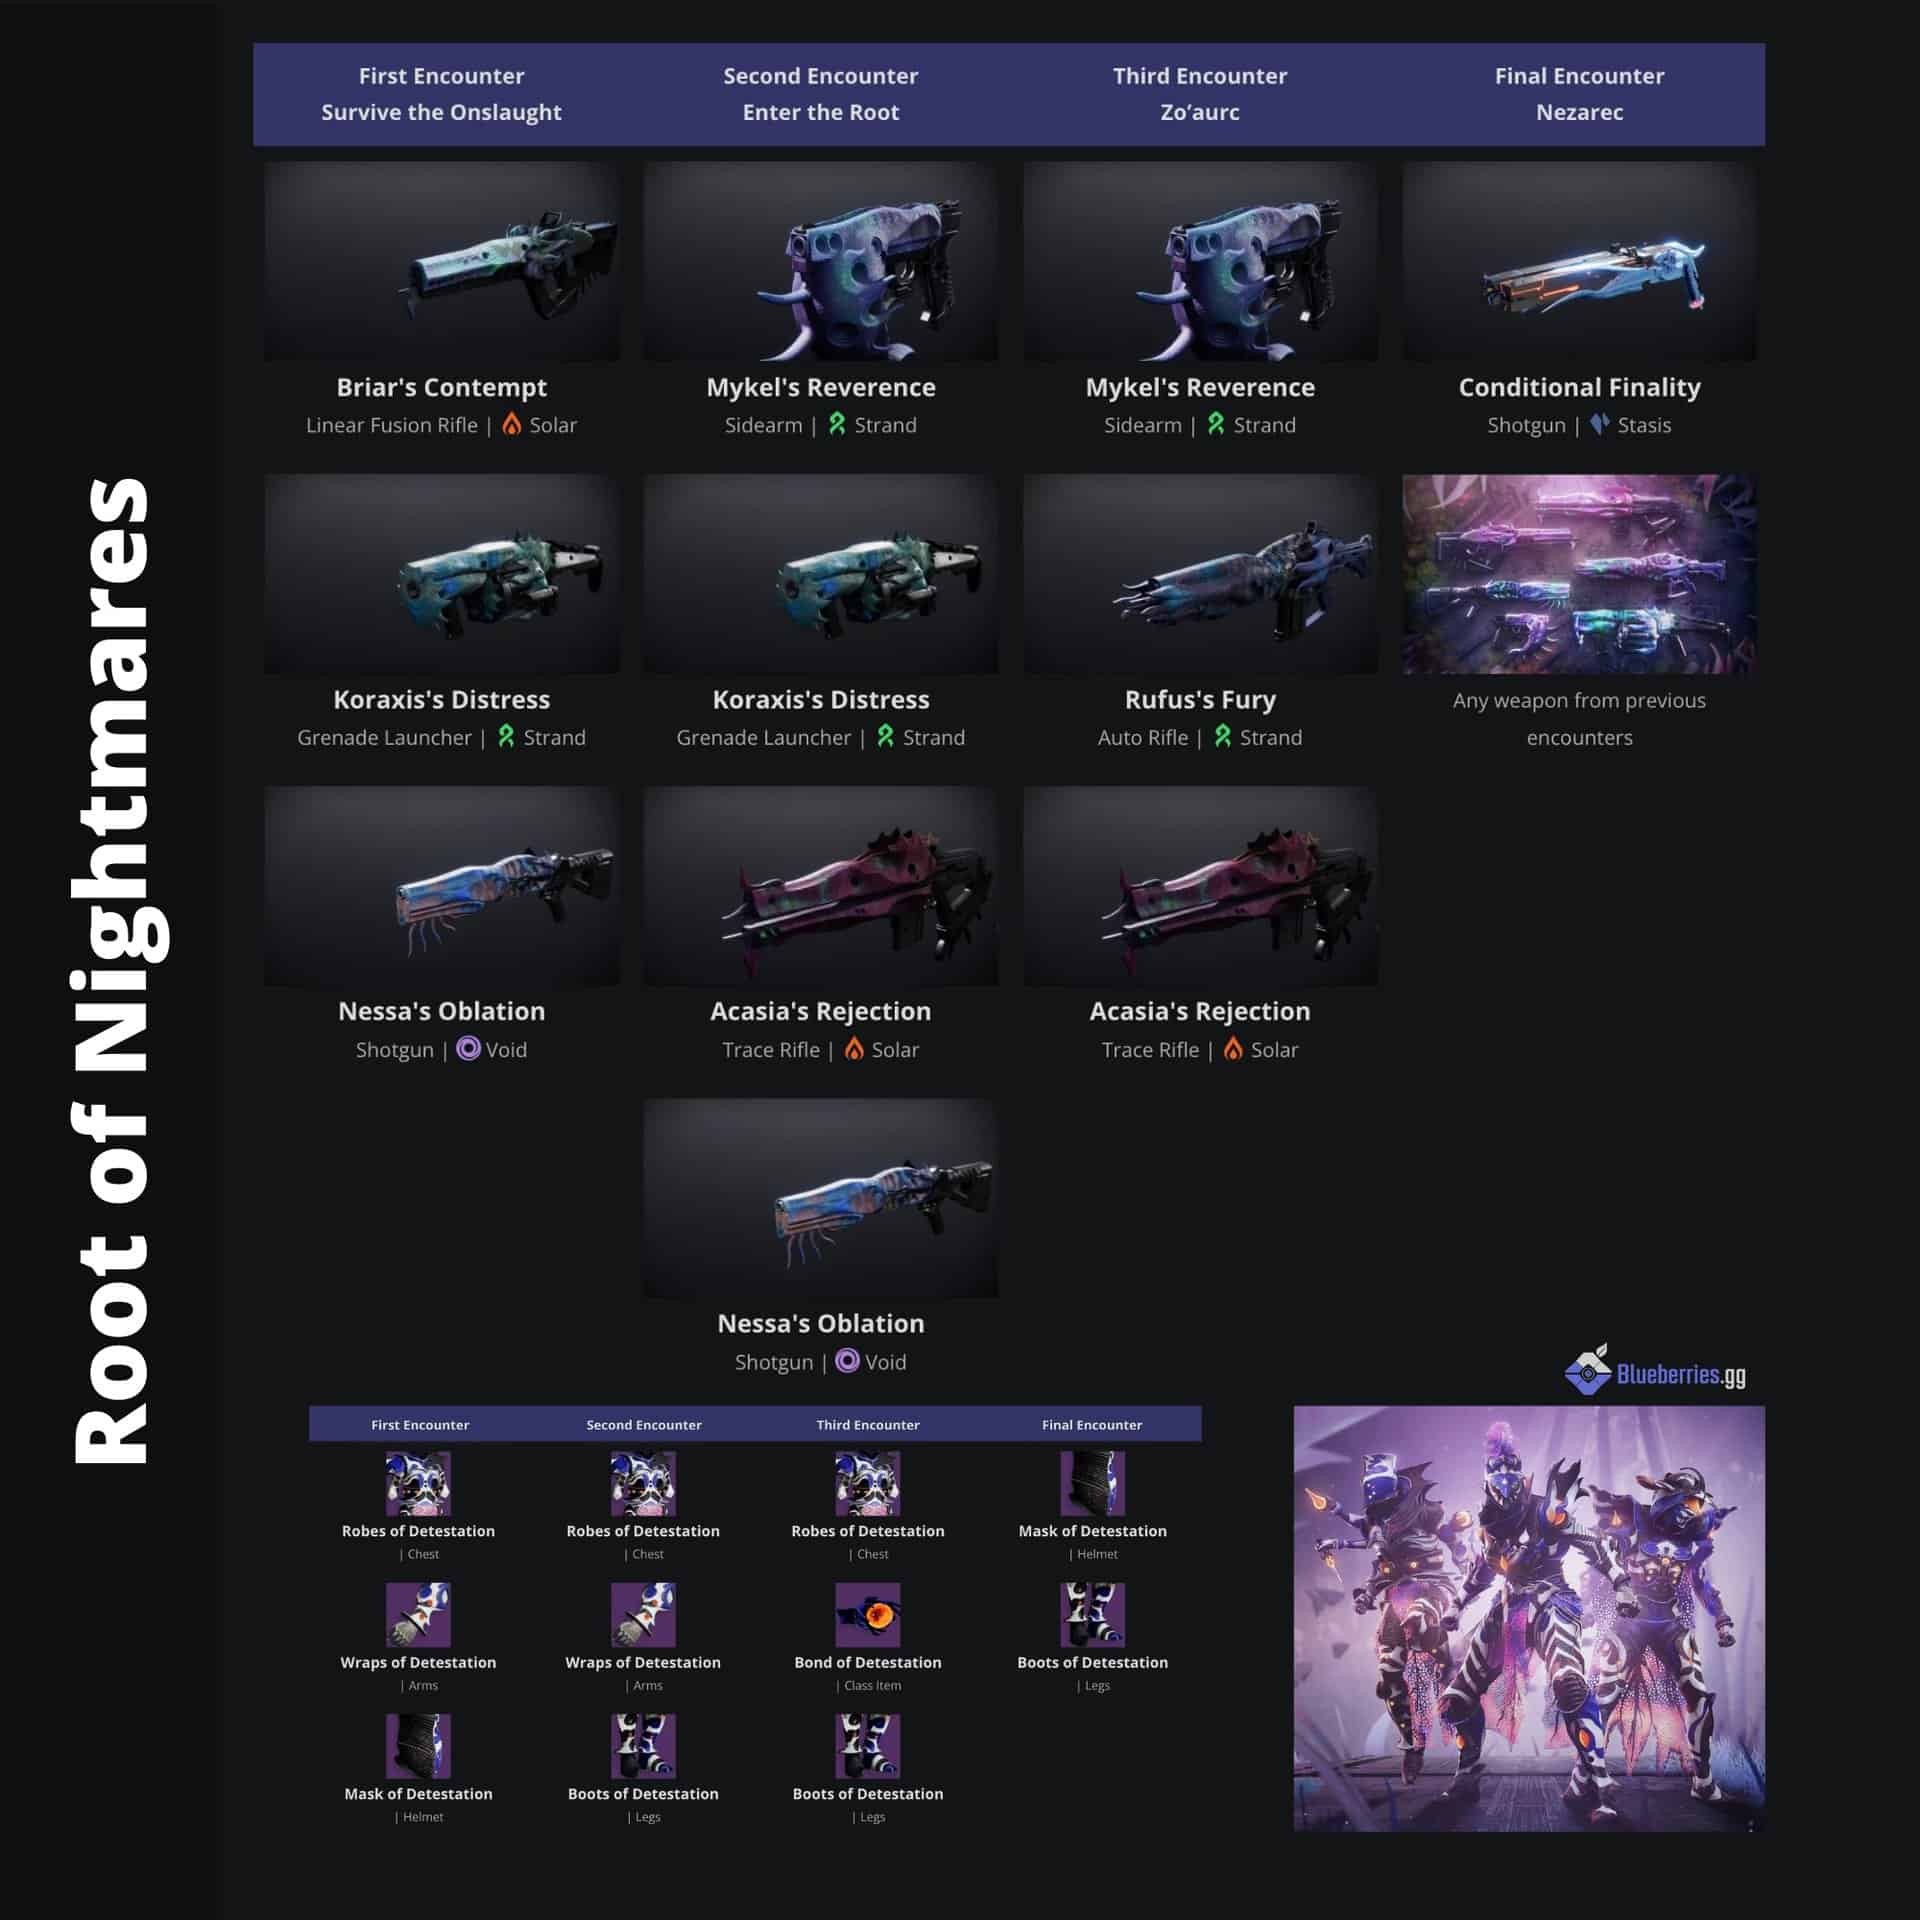
Root of Nightmares Loot Table
Image: Root of Nightmares loot table showcasing weapons and armor obtainable from the raid.
Courtesy of Blueberries.gg, this loot table details the potential rewards from the Root of Nightmares raid. Excluding the raid Exotic, Conditional Finality, all other items on this table can drop from the secret chests after you’ve earned them from an encounter at least once. Secret chest locations will be detailed further in this root of nightmares guide.
Guaranteeing a Deepsight Resonance Chest
A guaranteed Deepsight Resonance chest can be obtained after defeating Nezarec, the final boss, once per account per week. This process is straightforward and highly recommended for players seeking to craft raid weapons. Follow these steps to ensure your guaranteed Deepsight weapon:
Upon spawning into the raid, proceed along the path and stay close to the left wall.
Locating the Deepsight Legend
Image: View of the buildings where the Deepsight legend is located at the start of the Root of Nightmares raid.
Proceed towards the buildings shown above. Behind them, you’ll discover a small display case containing three seeds.
Image: Detailed view of the Deepsight Legend display with three seeds, indicating Light and Dark combinations.
Each seed will be either Light or Dark. Read the display from left to right. This sequence indicates the seed types you need to activate in the corresponding Deepsight rooms throughout the raid.
Deepsight Room One
The first Deepsight room is found shortly after the legend display, before the first encounter. Progress until you reach the area with the light ribbons, just before jumping down.
Image: Doorway to the first hidden Deepsight room in the Root of Nightmares raid.
The room is concealed on the far wall. Look for the door as pictured above.
Inside, activate the seed type indicated by the first seed on the legend display using the Gardener mechanic (explained below). For example, if the first seed is Light, activate the light seed in this room.
- Correct activation will display the message: “Your actions take root….”
- Incorrect activation will display: “Your spoils suffer irreparable damage….” This prevents the Deepsight chest from spawning on this raid run.
Repeat this process for the subsequent Deepsight rooms.
Deepsight Room Two
The second Deepsight room is located between the second and third encounters.
Image: View of the launcher and surrounding area leading to the second Deepsight room in Root of Nightmares.
Navigate the jumping puzzle until you reach the launcher shown above. Instead of following the standard path to the right, look to the left. A floating room will be visible – this is the second Deepsight room.
Image: Inside the second Deepsight room, ready for the second seed activation according to the legend.
Activate the correct seed type as indicated by the second seed in the legend display and proceed to the next encounter.
Deepsight Room Three
The final Deepsight room is located just before the final encounter.
Image: Overview of the area near the third Deepsight room, showing ribbons and platforms.
Instead of jumping upwards towards the final encounter, descend to the lower ribbons.
Image: Small platform to land on before accessing the door to the third Deepsight room.
Land on the small platform and look upwards. A door will be visible. Jump up into it to reach the final seed location.
Image: Doorway to the third and final Deepsight room requiring the last seed activation.
After activating the final seed correctly, you should see the message “A great harvest awaits…” in the combat log. Upon defeating Nezarec, the guaranteed Deepsight weapon chest will spawn. Remember, this can only be done once per account weekly.
Understanding the Root of Nightmares Gardener Mechanic
The core mechanic of the Root of Nightmares raid revolves around the Gardener mechanic. Players must grow a seed by connecting multiple nodes in a chain reaction. Initiate a chain by stepping into a seed field and shooting the seed.
Image: Initial seed point for activating the Gardener mechanic, requiring a shot to initiate.
Shooting the seed grants either the “Field of Light” or “Flux of Darkness” buff, depending on whether you shot a light or dark seed.
Image: Beam of light pointing towards the next node to be activated in the Gardener sequence.
Take this buff to the indicated node. A beam of light will guide you, pointing towards the next node requiring activation.
Image: Node with a visible sphere, indicating it’s the active node for the Gardener mechanic.
The node needing activation will be uniquely marked with a sphere. Approach the sphere and shoot it to activate the node. Successful activation removes your buff.
Once a node is active, return to a source node to regain the “Field of Light” or “Flux of Darkness” buff. Initially, this is the starting point. As the chain progresses, the buff source can shift to previously activated nodes.
Image: In-game buff icon representing either Field of Light or Flux of Darkness, essential for node activation.
Identify the seed/node with a highlighted area around it. This denotes it as the buff source. Re-acquire the buff and proceed to the next node, following the beam. The path isn’t always identical for the first and final encounters, but variations are minor. This mechanic is crucial for the first, second, and final encounters, as well as traversal sections between encounters after the first.
Important Note: Multiple players can hold “Field of Light” and “Flux of Darkness” simultaneously, but all players must acquire their buffs at the same time. Attempting to gain a buff while another player already has one will cause “Nodes of splendor have been disrupted” to appear, halting node activation until timers reset.
Starting the Root of Nightmares Raid
Unlike raids such as Vow of the Disciple and King’s Fall, Root of Nightmares forgoes a traditional opening encounter. Access the raid directly through the Neptune node on the Director. Simply spawn in, move forward, and follow the path to reach the first encounter, Cataclysm.
Cataclysm – The Opening Encounter
Image: Map layout of the Cataclysm encounter, showing node locations and general encounter area.
Credit: Pryanie from Reddit
Cataclysm, the first encounter, is relatively straightforward. Designated Gardeners manage node chains, while the rest of the fireteam eliminates Psions to spawn Tormentors, which must also be defeated. We’ll divide roles into Gardeners and the rest of the team.
The Gardener Role
One or two players should be assigned as Gardeners. While a single Gardener is typically sufficient, a second can be added if chain completion proves challenging. The Gardener’s sole responsibility is to grow the seed by completing four sets of nodes. Node paths vary each time, but the map above provides an overview of potential node locations.
Team Support Roles
The remaining team members are tasked with preventing the wipe mechanic. A timer, “Sweeping Terror: X,” appears on the left side of the screen during chain growth. Killing Tormentors extends this timer.
Image: A bubbled Psion, indicating a target that needs to be eliminated to spawn a Tormentor.
To spawn a Tormentor, kill two bubbled Psions. The combat log will indicate their arrival with “An adherent of torment has appeared.”
After eliminating both Psions, a Tormentor will spawn at either the front or back of the map. Conversely, a Barrier Champion will spawn at the location where the Tormentor doesn’t appear. Defeating a Tormentor adds approximately 30 seconds to the Sweeping Terror timer.
Upon chain completion by the Gardener, the timer disappears, providing a brief respite to clear adds before the next phase begins, repeating the cycle. Four chains must be completed to finish the encounter.
Example Encounter Cycle
A sample cycle, focusing on the first chain, unfolds as follows:
- Gardener shoots the initial seed to gain a buff and initiate the encounter.
- Team eliminates adds and two Psions.
- Gardener progresses through the node chain.
- Psions are defeated, spawning a Tormentor.
- Tormentor is defeated; team clears remaining adds and the Barrier Champion.
- “An adherent of torment has appeared” signals the next Psion spawn.
- Psions are defeated, another Tormentor appears.
- Tormentor is defeated.
- Gardener finishes the chain, timer vanishes.
- Team clears remaining adds and prepares for the next cycle.
First Root of Nightmares Jumping Puzzle and Secret Chest
The initial jumping puzzle follows directly after Cataclysm, navigating through and around Pyramid ship structures intertwined with light ribbons. The path is mostly linear. For the first secret chest, be observant towards the puzzle’s end.
First Secret Chest Location
Image: Wide view of the area where the first secret chest is located, accessible through multiple doorways.
Reaching the outer area before the second encounter, look across. Your view should resemble the image above. Several doors are visible, all leading to the same secret chest area.
Image: Interior of the secret chest room, showing adds and the location of the first secret chest.
Jump through any of these doors and head towards the red light. A Tormentor and accompanying adds will be present. Defeat them; the first secret chest is located just behind these adds.
Scission – Ascending the Cavern
Image: Map layout of the Scission encounter, depicting the three floors and node positions.
Credit: Pryanie from Reddit
The Scission encounter is dynamic, involving launching players across a cavern to complete light and dark seeds. It features three floors, each with one light and one dark seed sequence. Divide your fireteam into two teams of three: a light team and a dark team. Within each team, assign roles: Gardener, redolence slayer, and add clearer. Dark team starts on the left, light team on the right.
Gardener Roles in Scission
Gardeners follow the same node activation process as previously described. However, between node activations, they must launch back and forth across the cavern. The node path is consistent across all floors. Even-numbered nodes are on the opposite side from the starting point; odd-numbered nodes are on your starting side. For example, on the light side floor one, nodes 2, 4, and 6 are on the dark side, while nodes 1, 3, and 5 are on the light side.
Unlike Cataclysm, the node path and buff source nodes remain consistent each run. For nodes 2, 3, and 4, the buff source is node 1 on your side. For nodes 5 and 6, the buff source is node 3 (the second node activated on your path, but first on your side). After all nodes are activated, the Gardener returns to their initial side to assist in clearing remaining adds and the shielded boss.
Redolence Slayer Roles
Image: Redolence of Decay enemy, shielded and requiring Flux of Darkness buff to be vulnerable.
Redolence slayers are responsible for eliminating shielded enemies: “Redolence of Decay” for the dark team and “Redolence of Splendor” for the light team. These enemies are vulnerable only when the slayer possesses the corresponding buff (“Flux of Darkness” or “Field of Light”). Coordination with the Gardener is vital; both must acquire buffs simultaneously to avoid node disruption. If a slayer misses a buff, they can obtain it when the Gardener next picks it up.
After both node sequences are complete, redolence slayers regroup with their add clearer and Gardener (if available) at their side’s final node. Activating this node grants the buff to defeat the last shielded enemies and the shielded boss. Once these are down, launch to the next floor.
Warning: Initiating the final phase before both sides complete their node sequences can prevent the later side from acquiring their buff, locking the encounter and necessitating a wipe. “Interlopers block your ascent” in the combat log signals successful completion of both sides.
Add Clearer Roles
Add clearers have a straightforward task: eliminate all adds except the redolence-shielded enemies. As mentioned, they will converge with the redolence slayers at the end of the node sequence to take down shielded enemies.
Example Encounter Cycle
An example cycle, focusing on the dark side bottom floor, would look like this:
- Gardener and redolence slayer enter the starting node, gaining “Flux of Darkness” while add clearers engage adds.
- Gardener crosses to activate the first node.
- Redolence slayer advances to defeat the first shielded redolence enemy.
- Gardener returns to the starting node, activating it with the redolence slayer to re-acquire buff.
- Gardener and redolence slayer proceed to activate the second node.
- They retreat to the starting node, activating it for buff again.
- Gardener crosses to activate the third node.
- Redolence slayer advances to defeat the third shielded redolence enemy.
- Gardener returns to the second node (now buff source), activating it with the redolence slayer.
- Gardener and redolence slayer move to activate the fourth node.
- They fall back to the second node, activating it for buff.
- Gardener crosses to activate the fifth node.
- Redolence slayer advances to defeat the fifth shielded redolence enemy.
- Gardener crosses back.
- Upon completion of both light and dark sides, both teams enter their respective sixth nodes to gain buffs to defeat the shielded boss.
- After defeating the boss and remaining adds, launch to the next floor and repeat.
Second Jumping Puzzle and Secret Chest
This jumping puzzle is intricate but becomes manageable with understanding. Post light and dark chain completion, use launch pads for navigation. The path is generally clear, but a lethal energy pulse occurs every 15-30 seconds unless you have the “Darkness’s Refuge” buff. This buff is obtained by linking a dark and light seed.
Image: Node layout for the second jumping puzzle, highlighting light and dark nodes that need to be linked.
Upon reaching this section, drop down and activate the light node to gain “Field of Light.” With this buff, activate the adjacent darkness node. This darkness node becomes a safe haven, granting “Darkness’s Refuge” for a short duration, allowing progression to the next light and dark seed pair.
Continue this light-to-dark linking process until you reach the first door. The second secret chest area is directly behind this door. (The door opens only when all fireteam members are present.) After the first door, repeat the light-to-dark chain linking to reach a second door, leading to the Macrocosm encounter.
Second Secret Chest Location
Image: Door marking the entrance to the area containing the second secret chest in the jumping puzzle.
After passing through the first door (requiring the entire fireteam), ascend the steps and look to the right.
Image: Darkness crux, a target to shoot to reveal the entrance to the second secret chest room.
Jump up and peer over the right edge. A darkness crux will be visible. Shoot it to open the secret chest room door.
Image: Inside the second secret chest room, showing the chest location behind the entrance.
Turn around and look directly above the door you entered through. A newly opened door will reveal the chest inside.
Macrocosm – Defeating Zo’Aurc, Explicator of Planets
Image: Map layout of the Macrocosm encounter, indicating planet locations, team sides, and central plates.
Image: JoeGibbons from Reddit
Macrocosm, echoing Savathun’s “two truths and two lies,” empowers Guardians to manipulate planets to confront Zo’Aurc, Explicator of Planets. This encounter features unique mechanics. Divide your team into two teams of three: left side and right side. Assign one add clearer per team. Distribute the remaining players across the four planet clusters, with one player per side covering planets 1-3 and the other planets 4-6.
Planet Mover Roles
Each planet mover is responsible for three planets (1-3 or 4-6) and should remain near their assigned clusters. The encounter begins with everyone focusing on adds in the middle. Shortly after, a Solar shielded Chieftain spawns on each side. Defeating these spawns a “Terrestrial Lieutenant” at the left or right side plates. These enemies are moderately tanky but vulnerable to rockets or shotguns. The player who defeats the Lieutenant gains the “Planetary Insight” buff, enabling them to see planet colors.
Image: Example of planet colors in Macrocosm, indicating which planets (L3 and L5 in this case) need to be moved.
On the left side, all planets glow white except two. On the right side, planets glow black and orange except two. Using the map, call out the planets that deviate from the majority color on each side. One planet from each cluster will be different; these are the planets to be moved.
After calling out all four planets, planet movers pick up the orb beneath each called-out planet, gaining the “Planetary Shift” buff. They then carry these orbs to the opposite side’s plate, maintaining their original number group (1-3 to 1-3, 4-6 to 4-6). Deposit each orb into the planet location that was moved from the other side. For example, if L3 and R2 are called out, L3 is moved to R2’s spot, and R2 to L3’s spot. After depositing all four, planets shift across the room. Movers return to their original clusters. Correct planet placement triggers “The indexed planets reveal themselves” in the combat log. Incorrect placement returns wrong planets to their original locations, requiring a repeat phase.
Correct planet indexing spawns two new Chieftains. Defeating them again spawns Terrestrial Lieutenants at each plate. Players who defeat them regain “Planetary Insight,” but this time, they observe the middle of the room.
Image: Middle planets in Macrocosm, showing color configuration for planet deposits at central plates.
The three central planets now glow, either two light and one dark, or vice versa. Players from each side pick up any planet from their side and bring it to the middle. The side with only one planet of their type glowing in the center calls out which planet mover will bring their planet to the middle. Deposit spots are located beneath these central planets. Each player deposits their planet into the spot matching their planet’s color. Using the example above, the left and middle plates require dark side planets, and the right plate requires a light side planet. After depositing, planets lock into position. All movers converge in the middle and shoot the crux among the three planets to initiate the DPS phase.
Add Clearer Roles in Macrocosm
While planet movers manage mechanics, add clearers focus on the middle, where waves of enemies spawn. Prioritize fast elimination, avoiding close proximity to the boss due to his knockback stomp attack. Once planet movers are done, join them for DPS.
Damage Phase (DPS)
DPS in Macrocosm is phased into three mini-phases. During each, the boss has either a light or dark shield. To inflict damage, stand on a plate matching the shield polarity (plates under the central planets).
Using the previous example, left and middle plates are for dark shields, and the right plate for light shields. Crucially, the shield pattern follows A-B-A, where A is the polarity used twice, and B is used once. Knowing this pattern allows pre-DPS plate rotation planning. (Starting left or right first is recommended, e.g., Left, Right, Middle for the configuration above.)
The boss’s health bar displays a small glowing section. This indicates the damageable portion before plate switching. Lingering a few extra seconds at each plate maximizes DPS and shortens the overall fight.
Image: Zo’Aurc’s health bar, highlighting the vulnerable section to focus damage during DPS phases.
Depleting the glowing health section triggers the boss to reveal a small screen and switch shields. The team moves to the next plate with the corresponding buff to continue damage. Standing on plates isn’t mandatory for DPS. A common strategy involves placing a Well of Radiance between the plates, grabbing the buff from the plate, and then moving into the Well for damage. After all three mini-phases, repeat the planet moving phase or enter the final stand.
During the final stand, the boss projects a similar shield. Identify the matching plate, grab the buff, and unleash maximum damage. Success means victory; failure leads to a wipe and encounter restart.
Example Encounter Cycle
A sample cycle looks like this:
- Everyone eliminates adds and shielded Chieftains in the back middle.
- Left and right add clearers manage spawning adds.
- Planet movers defeat Terrestrial Lieutenants and gain Planetary Insight.
- Left movers call out L3 and L6 as dark.
- Right movers call out R2 and R4 as light.
- Front left mover carries L3 to R2’s spot.
- Back left mover carries L6 to R4’s spot.
- Front right mover carries R2 to L3’s spot.
- Back right mover carries R4 to L6’s spot.
- Movers return to original plates as planets shift.
- “The indexed planets reveal themselves” confirms correct planet placement.
- Team eliminates the next Chieftain wave.
- Planet movers defeat Lieutenants and regain Planetary Insight.
- Middle planets display: Left light, Middle dark, Right light.
- Two left light movers pick up planets from any left planet site.
- One right dark mover picks up from any right planet site.
- Light planets are deposited into Left and Right plates.
- Dark planet into Middle plate.
- A team member shoots the crux; players move to the left DPS plate.
- First DPS phase starts.
- First phase ends; players move to the middle plate for the second phase.
- Second phase ends; players move to the right plate for the third phase.
- Third phase ends; players return to starting positions for the next cycle.
Third Jumping Puzzle
After Macrocosm, another light and dark chain using the Gardener mechanic is required. Complete it and follow the path upwards and around to reach the final boss arena.
Nezarec – The Final Boss Fight
Image: Map layout of the Nezarec encounter, showing node locations, safe haven positions, and general arena.
Image: Pryanie from Reddit
The final confrontation is against Nezarec, a Disciple of the Witness. This encounter combines chain creation, add clear, and boss taunting. Split your team into two teams of three: left and right. Assign roles: Gardener, add clearer, and tank per team.
Gardener Roles in Nezarec
Gardeners in the final encounter have an added responsibility: creating safe havens to counter Nezarec’s wipe mechanic, alongside completing node chains.
When a tank draws Nezarec’s aggro, they shoot one of his shoulders. Upon breaking, a blast of energy (white or orange) emanates. If orange, the light side Gardener creates a safe haven on a completed dark side node. If white, the dark side Gardener creates it on a completed light side node. (Node two is recommended for safe havens.)
After creating the safe haven and ensuring wipe mechanic safety, proceed with chain completion. If more time is needed, tanks can shoot the other shoulder to repeat the safe haven process.
Tank Roles in Nezarec
Image: In-game icon for Nezarec’s Hatred debuff, indicating the tank’s role in managing boss aggro.
Tanks must maintain Nezarec’s aggro by acquiring the “Nezarec’s Hatred” debuff. When Nezarec starts applying it to the whole team, tanks shoot his chest to gain the debuff. Once obtained, shoot one of his shoulders. This triggers a large explosion of white or orange. Call out the color so Gardeners know where to create the safe haven. As the debuff timer nears expiration, the other tank shoots his chest to take over. Tanks must continuously juggle the debuff until Nezarec’s wipe mechanic starts or Gardeners finish their chains.
Add Clearer Roles in Nezarec
Add clearers maintain clear lanes for Gardeners in the side lanes and tanks in the middle lane. The initial wave of each phase spawns three Colossus; prioritize eliminating them due to their high threat level. Once Gardeners complete chains, regroup for DPS.
Damage Phase (DPS) in Nezarec
Image: Map of Nezarec encounter with DPS plate highlighted, showing the optimal damage location.
Image: Polygon Via Pryanie from Reddit
Once both chains are finished, DPS phase begins. Gather your team on a high-ground spot. The third node on the dark side (highlighted above) is recommended. A large orange beam will descend from the map’s center, indicating Nezarec is vulnerable. Unleash maximum damage; rockets or Thunderlord are effective DPS options. After DPS ends, repeat the process or enter Nezarec’s final stand. The final stand is straightforward – maximize damage before he wipes the team. Success means raid completion!
Example Encounter Cycle
- Encounter starts; left and right Gardeners initiate their chains.
- Left and right add clearers manage adds, prioritizing Colossus.
- Tanks assist add clear until Nezarec applies Hatred, then one tank shoots his chest to gain aggro.
- Tank shoots a shoulder, revealing Light energy.
- Dark Gardener creates a safety buff on the second Light node.
- All players gain the buff at the safe node to survive the wipe.
- Tanks regain and juggle Nezarec’s Hatred while Gardeners finish chains.
- Team gathers at the middle Dark node, awaiting the central beam indicating DPS start.
- DPS phase commences.
- DPS ends; players return to starting positions to repeat the cycle.
Congratulations on conquering the Root of Nightmares raid!