The Rs3 Necro Guide detailed below provides a robust strategy for defeating Raksha, combining pool clearing safety with pool-skipping speed, leveraging the power of Necromancy. Brought to you by CONDUCT.EDU.VN, this guide includes preset suggestions and rotations to optimize your gameplay. Master this Raksha Necromancy strategy to significantly improve your kill times.
1. Understanding the Necromancy Raksha Strategy
This advanced RS3 Necro guide is designed for players who possess a strong understanding of the Raksha boss fight mechanics. It assumes familiarity with the information presented in basic Raksha guides. The core of this strategy revolves around maximizing damage output while efficiently managing the pools of anima that Raksha creates throughout the fight. Key to this strategy is the use of abilities like Threads of Fate to clear anima pools, while still maintaining significant damage pressure on Raksha.
1.1. Core Principles of the Strategy
- Balancing Damage and Safety: This strategy prioritizes both high damage output and the ability to safely clear anima pools.
- Efficient Pool Management: Utilizing Threads of Fate allows for clearing pools without significant damage loss on Raksha.
- Optimized Ability Rotations: Specific ability rotations are designed to maximize damage and adrenaline generation.
- Strategic Movement: Proper positioning is essential for maximizing damage and avoiding unnecessary damage.
1.2. Key Abilities and Their Uses
- Threads of Fate: Used to clear anima pools quickly and efficiently.
- Death Skulls: A high-damage ability that should be used frequently.
- Touch of Death: Another high-damage ability with a short cooldown.
- Volley of Souls: Useful for dealing area-of-effect damage to both Raksha and the anima pools.
2. Essential Gear and Inventory Setup for the RS3 Necro Guide
Preparing your gear and inventory is critical for a successful Raksha kill using Necromancy. This section outlines the recommended gear setup, inventory items, and relic choices to maximize your damage output and survivability. Having the right equipment will significantly improve your efficiency. CONDUCT.EDU.VN recommends carefully reviewing this section to ensure your setup is optimized for the fight.
2.1. Recommended Gear Setup
- Weapon: Tier 95 Necromancy weapon (e.g., the Wand of the Praesul and Imperium Core)
- Armour: Full set of Tier 90 Necromancy power armour (e.g., Elite Necromancer armour)
- Amulet: Amulet of Souls or Essence of Finality (with appropriate special attack stored)
- Ring: Ring of Vigour, Asylum’s Ring, or Luck Ring (e.g., Luck of the Dwarves)
- Pocket Slot: Scripture of Wen or Scripture of Ful
2.2. Inventory Essentials
- Potions:
- Overload Salve
- Prayer Renewal
- Adrenaline Renewal
- Enhanced Excalibur (for emergency healing)
- Food: High-healing food (e.g., Rocktails or Saradomin Brews)
- Runes: Necromancy runes for ability usage
- Scrolls: Ripper Demon scrolls (for increased damage)
- Bombs: Vulnerability Bombs (for increased damage)
2.3. Relic Choices
- Berserker’s Fury: Increases damage output at low health.
- Death’s Toll: Reduces adrenaline cost of abilities.
- Persistent Rage: Maintains adrenaline levels between phases.
- Freyja’s Blessing: Provides passive healing.
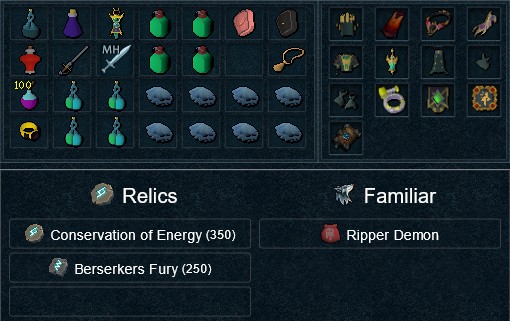 Necromancy Gear Setup
3. Detailed Rotation Guide for Each Phase
This section provides a detailed breakdown of the ability rotations for each phase of the Raksha fight. Following these rotations will help you maximize your damage output, clear pools efficiently, and manage your resources effectively. Remember that adapting to the specific situation and Raksha’s attack patterns is also crucial for success.
3.1. Pre-Build Rotation
Before entering the fight, it’s important to set up your character for maximum efficiency.
- War’s Dummy:
- Soul Sap → Threads of Fate → Touch of Death → Soul Sap + Surge to crystal
- Instance: (drop combat) + Conjure Army → Life Transfer → Command Ghost → Invoke Death + Surge → Command Skeleton → Split Soul + Vulnerability Bomb → equip ranged/magic mainhand
3.2. Phase 1 Rotation
Phase 1 focuses on dealing as much damage as possible while avoiding Raksha’s initial attacks.
- (tc) + Smoke Cloud + equip Omni Guard + Death Skulls → Soul Sap → Volley of Souls → Touch of Death → Soul Sap → Living Death + Adrenaline Renewal → Touch of Death → Death Skulls → Bloat → Soul Sap → Finger of Death
- Note: If you’re at 97% adrenaline before Living Death, do Adrenaline Renewal + Living Death instead of Living Death + Adrenaline Renewal.
3.3. Phase 2 Rotation
Phase 2 introduces the first set of anima pools. This rotation focuses on clearing the pools while maintaining damage on Raksha.
- Necro Auto → Soul Sap + Surge + walk next to eastern edge → Soul Strike Flank → Death Skulls → Touch of Death → Command Skeleton → Finger of Death → Necro Auto → Necro Auto → Finger of Death → Death Skulls → Bloat → Touch of Death → Soul Sap → Command Skeleton → improvise
3.4. Phase 3 Rotation
Phase 3 requires precise movement and ability usage to clear pools efficiently.
- When Phase 3 starts continue with 2 more abilities from Phase 2
- Raksha should be lured in between 2 pools to clear them during Threads of Fate
- If done correctly only 1 set of pools will be left and Raksha won’t absorb more than 5% anima
- ability → ability + Surge → Soul Strike Flank → Soul Strike Flank → Threads of Fate → target north or south pool + Soul Sap → target Raksha + Volley of Souls → Touch of Death → Death Guard 90 EoF Spec → Necro Auto/Soul Sap/Volley of Souls until phased
3.5. Phase 4 Rotation
Phase 4 is the final push to defeat Raksha. This rotation focuses on maximizing damage output and finishing the fight quickly.
- Life Transfer + Dive → Bloat + Vulnerability Bomb → Soul Sap
- If skeleton got stuck: equip Excalibur → equip Soulbound Lantern + Conjure Army → Omni Guard spec → Command Ghost → Command Skeleton
- Otherwise: Command Skeleton → Omni Guard spec
- Soul Sap → Necro Auto → Touch of Death → Soul Sap → Necro Auto → Split Soul → Death Skulls → Bloat → Command Skeleton → Soul Sap → Necro Auto → Touch of Death → Necro Auto → Soul Sap → Volley of Souls + Inner Power → Death Guard 90 EoF Spec → finish with Command Zombie/Command Skeleton/Touch of Death/Finger of Death
4. Optimizing Your Combat Style for Raksha
To truly excel in the Raksha fight using Necromancy, it’s important to optimize your combat style. This includes understanding the nuances of critical strikes, timing your abilities effectively, and mastering player movement.
4.1. Critical Strikes and Ability Timing
Critical strikes play a significant role in maximizing damage output. Prioritize gear and abilities that increase your critical strike chance. Avoid using high-damage abilities when they are likely to hit the damage cap, as this will result in a loss of potential damage.
4.2. Player Movement and Positioning
Proper movement is crucial for avoiding damage and maintaining optimal positioning. Stay within range of Death Skulls and position yourself behind Raksha for Soul Strike Flank. Utilize Surge to quickly reposition yourself as needed.
4.3. Managing Adrenaline and Resources
Efficiently managing your adrenaline and resources is essential for maintaining consistent damage output. Use Adrenaline Renewal to maintain high adrenaline levels. Utilize Soul Sap to replenish essence and ensure you can continue using your abilities.
5. Tips and Tricks for a Smooth Raksha Kill
Beyond the rotations and gear setups, there are several tips and tricks that can help you achieve a smoother and faster Raksha kill. These include strategies for dealing with specific mechanics, optimizing your inventory usage, and maximizing your overall efficiency.
5.1. Dealing with Anima Pools Effectively
- Strategic Placement: Lure Raksha between two pools to clear them with Threads of Fate.
- Prioritize Clearing: Focus on clearing pools quickly to prevent Raksha from absorbing too much anima.
- Adjust as Needed: Be prepared to adjust your strategy if Raksha moves unexpectedly.
5.2. Optimizing Inventory Usage
- Keybind Potions: Assign keybinds to your potions for quick and easy access.
- Pre-Potting: Use Overload Salve and Prayer Renewal before the fight to maximize their duration.
- Emergency Healing: Keep Enhanced Excalibur readily available for emergency healing.
5.3. Maximizing Overall Efficiency
- Practice Rotations: Practice your rotations until they become second nature.
- Watch Example Kills: Study videos of successful Raksha kills to learn new strategies and techniques.
- Stay Calm: Maintain a calm and focused mindset throughout the fight.
6. Common Mistakes to Avoid
Even with the best gear and rotations, it’s easy to make mistakes that can lead to a failed Raksha kill. This section outlines some common mistakes to avoid, helping you stay on track and maximize your chances of success.
6.1. Neglecting Pool Management
Failing to clear anima pools effectively can result in Raksha absorbing too much anima, making the fight significantly harder. Always prioritize pool management.
6.2. Poor Positioning
Incorrect positioning can lead to taking unnecessary damage and missing out on opportunities to use Soul Strike Flank. Pay attention to your positioning at all times.
6.3. Inefficient Ability Usage
Using abilities at the wrong time or in the wrong order can result in a loss of damage and wasted resources. Stick to the recommended rotations as closely as possible.
7. Troubleshooting Common Issues
Despite your best efforts, you may encounter issues during the Raksha fight. This section provides solutions to some common problems, helping you overcome obstacles and complete the kill.
7.1. Dealing with Sticking Skeletons
If your skeleton gets stuck, equip Excalibur, then equip Soulbound Lantern, Conjure Army, Omni Guard spec, Command Ghost, and finally Command Skeleton.
7.2. Managing Low Adrenaline
If you find yourself with low adrenaline, use Adrenaline Renewal and prioritize abilities that generate adrenaline quickly.
7.3. Adapting to Unexpected Mechanics
Be prepared to adapt to unexpected mechanics by adjusting your rotations and utilizing defensive abilities as needed.
8. The Importance of Community and Resources
Mastering the Raksha fight with Necromancy can be challenging, and relying on community resources can greatly enhance your learning experience. Online forums, guides, and video tutorials provide valuable insights and tips that can help you improve your skills.
8.1. Engaging with the RuneScape Community
Engaging with other players in the RuneScape community can provide valuable support and guidance. Share your experiences, ask questions, and learn from the successes and failures of others.
8.2. Utilizing Online Resources
Numerous online resources offer detailed guides, rotations, and tips for the Raksha fight. Take advantage of these resources to enhance your understanding and improve your performance. CONDUCT.EDU.VN also offers additional resources and guidance to help you excel in RuneScape.
9. Frequently Asked Questions (FAQ) About Raksha Necromancy
Here are some frequently asked questions about the Raksha fight and using Necromancy:
-
What is the best gear setup for Raksha Necromancy?
- Tier 95 Necromancy weapon, Tier 90 Necromancy power armour, Amulet of Souls, Ring of Vigour, Scripture of Wen.
-
How do I manage the anima pools effectively?
- Use Threads of Fate to clear pools quickly and efficiently. Lure Raksha between pools to clear multiple at once.
-
What are the key abilities to use during the Raksha fight?
- Death Skulls, Touch of Death, Volley of Souls, and Threads of Fate.
-
How important is positioning during the Raksha fight?
- Positioning is crucial for avoiding damage and maximizing damage output with abilities like Soul Strike Flank.
-
What should I do if my skeleton gets stuck?
- Equip Excalibur, then equip Soulbound Lantern, Conjure Army, Omni Guard spec, Command Ghost, and Command Skeleton.
-
How can I maximize my damage output?
- Optimize your gear, use the recommended rotations, and prioritize critical strikes.
-
What potions should I use during the Raksha fight?
- Overload Salve, Prayer Renewal, Adrenaline Renewal, and Enhanced Excalibur.
-
How do I manage my adrenaline levels?
- Use Adrenaline Renewal and prioritize abilities that generate adrenaline quickly.
-
What are some common mistakes to avoid during the Raksha fight?
- Neglecting pool management, poor positioning, and inefficient ability usage.
-
Where can I find more resources and guides for Raksha Necromancy?
- Engage with the RuneScape community and utilize online resources, including CONDUCT.EDU.VN.
10. Staying Updated with the Latest Strategies
The RuneScape meta is constantly evolving, and new strategies and techniques for the Raksha fight are frequently discovered. Staying updated with the latest information is crucial for maintaining your competitive edge.
10.1. Following Patch Notes and Updates
Keep an eye on the official RuneScape patch notes and updates to stay informed about any changes that may affect the Raksha fight or Necromancy abilities.
10.2. Consulting Advanced Guides and Forums
Regularly consult advanced guides and forums to learn about new strategies and techniques that may not be widely known. CONDUCT.EDU.VN will continue to provide updated guides and resources to keep you at the forefront of the meta.
11. Conclusion: Mastering Raksha with Necromancy
The Raksha fight is one of the most challenging and rewarding encounters in RuneScape 3. By mastering the Necromancy combat style and utilizing the strategies outlined in this guide, you can significantly improve your chances of success and achieve faster kill times. Remember to practice your rotations, optimize your gear setup, and stay updated with the latest information.
11.1. The Benefits of Using This Guide
This RS3 Necro guide provides a comprehensive and detailed strategy for defeating Raksha with Necromancy. By following the recommendations in this guide, you can:
- Maximize your damage output
- Efficiently manage anima pools
- Optimize your gear and inventory setup
- Avoid common mistakes
- Troubleshoot common issues
11.2. Continuous Improvement and Adaptation
Mastering the Raksha fight is an ongoing process. Continue to practice, experiment, and adapt your strategies to the ever-changing RuneScape meta. By staying committed to continuous improvement, you can achieve consistent success and become a master of Raksha Necromancy. Visit CONDUCT.EDU.VN for more detailed guides and resources to enhance your gameplay.
For more in-depth information and guidance, visit conduct.edu.vn. Our resources are designed to help you excel in RuneScape and master the art of ethical gameplay. Contact us at 100 Ethics Plaza, Guideline City, CA 90210, United States, or via Whatsapp at +1 (707) 555-1234.