Learning to solve a Rubik’s Cube can seem daunting at first, but with the right approach, anyone can master this classic puzzle. This guide breaks down the Layer by Layer (LBL) method into 7 simple steps, perfect for beginners. By following these instructions, you’ll be solving the Rubik’s Cube in no time. For your convenience, we also offer a printable PDF version of this guide, making it easy to learn anywhere.
STEP 1 – COMPLETE THE FIRST LAYER CROSS
The first step in solving the Rubik’s Cube is to create a white cross on the top layer.
- White Center on Top: Begin by holding the Rubik’s Cube with the white center piece facing upwards.
- Green Center in Front: Position the cube so the green center piece is facing you.
- Find the Green/White Edge Piece: Locate the edge piece that has both green and white colors. These edge pieces only have two colors.
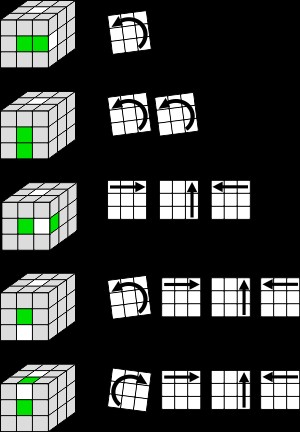
- Position the Edge Piece: Rotate the cube to bring the green/white edge piece to one of the positions shown in the image below, always keeping the white center on top and the green center in front.
- Use the Arrows to Place: Refer to the diagram below that matches your current cube configuration and follow the arrowed steps to correctly position the green/white edge piece.
After placing the green/white edge, rotate the cube so a different colored center face is towards you, while still keeping the white center on top. Repeat the process for each of the remaining edge pieces until the white cross is fully formed.
This step is largely intuitive and develops with practice. The key is to maneuver the white edges into their correct positions without disrupting the pieces already in place.
STEP 2 – COMPLETE THE FIRST LAYER CORNERS
With the white cross complete, the next step is to solve the white corners of the first layer.
- Keep White Cross on Top: Ensure the white cross remains on the top face of the Rubik’s Cube.
- Green Center in Front: Again, position the cube with the green center piece facing you.
- Locate the Green/White/Red Corner: Find the corner piece that has green, white, and red colors. Corner pieces are identifiable by their three colors.
- Position the Corner: Rotate the bottom layer only to place the green/white/red corner piece between the green and red center pieces. It’s crucial to do this without disturbing the white cross you’ve already completed.
Possible Issue: Sometimes, the corner piece you need might be in the top layer but in the wrong position or orientation.
Solution: If the corner is in the top layer incorrectly, turn the cube so that the corner is in the front-right-top position. Then, use the following moves to bring the corner down to the bottom layer.
After performing these moves, the corner piece will be in the bottom layer. Now, go back to the steps above to correctly position and insert the corner piece.
Repeat this process by rotating the cube to bring a different colored face to the front (keeping white on top) and repeating the instructions. Continue until all four white corners are correctly positioned, completing the entire white layer.
STEP 3 – COMPLETE SECOND LAYER
Once the first layer is done, it’s time to tackle the second layer of the Rubik’s Cube.
- White Face on Top: Keep the solved white face at the top.
- Find the Green/Red Edge Piece: Locate an edge piece that has green and red colors.
- Edge Piece in Bottom Layer: If the green/red edge piece is in the bottom layer, rotate the bottom layer to align the edge piece with the matching center color. For instance, align the green side of the edge piece with the green center.
- Edge Piece Not in Bottom Layer: If the edge piece is not in the bottom layer, proceed to step C below.
- Insert Edge Piece – Right (A) or Left (B): Based on whether the red color of the edge piece needs to go to the right or left of the green center, choose the corresponding algorithm (A for Right, B for Left) from the image below to insert the edge piece correctly.
A/B Algorithms:
C – Edge Piece in Wrong Position: If the edge piece you want to move is already in the second layer but in the wrong position or orientation.
Solution: Rotate the cube so that the misplaced edge piece is in the front face of the second layer. Then, perform either algorithm A or B (from above) to move this piece down into the bottom layer. After it’s in the bottom layer, return to step 3 above to correctly place it in the second layer.
Continue using algorithms A and B with different center faces facing you until the entire second layer is solved.
STEP 4 – COMPLETE THE THIRD LAYER CROSS
Now, flip the cube over so that the white layer is at the bottom, and the yellow center is on the top. We will now focus on forming a yellow cross on this top layer.
- Yellow Center on Top: Ensure the yellow center piece is facing upwards.
- Count Yellow Edges: Observe the yellow edge pieces on the top layer. You should see either 0, 2, or 4 yellow edges facing upwards. Ignore the corner pieces for this step.
- Apply the Algorithm: Use the algorithm provided below to work towards creating the yellow cross. Make sure to orient your cube as shown in the image before applying the algorithm.
Repeat this algorithm until you achieve a yellow cross on the top layer.
Swap Edge Pieces to Correct Position (Permutation):
- Align Correct Edges: Rotate the top layer until you have either 2 or 4 edge pieces that match their respective center colors.
- Position Correct Pieces: Hold the cube so that the correctly positioned edge pieces are at the back and right faces.
- Apply the Algorithm: Use the algorithm below to correctly position all the edge pieces.
Possible Issue: If two correctly positioned edge pieces are opposite each other.
Solution: Perform the algorithm once, and then re-orient the cube to match the image shown above and perform the algorithm again.
STEP 5 – COMPLETE THE THIRD LAYER CORNERS
The final step is to position and orient the corners of the third layer to completely solve the Rubik’s Cube.
(A) Position the Corners: First, we need to get all the corner pieces into their correct positions. At this stage, you might have 0, 1, or all corners in the right positions (though they might not be oriented correctly yet). If one corner is in the correct position, rotate the cube so that this correct corner is at the front-top-right position.
Repeat this algorithm until all corner pieces are in their correct positions.
Possible Issue: If none of the corners are in the correct position initially.
Solution: Perform the algorithm in (A) once with any side facing you (yellow at the top). After one application, at least one corner should be in the correct position. Then, proceed with step (A) as described above, placing the correctly positioned corner in the front-top-right.
(B) Orient the Corners: The next steps will orient the corners one by one until they are all correctly oriented, and the Rubik’s Cube is solved.
Note: This process might seem to scramble other parts of the cube temporarily. Do not worry! Keep the same side facing you throughout this step. The cube will only be solved once the last corner is correctly oriented.
Repeat the following moves until the yellow side of the corner piece in the front-top-right position is on the top (yellow face). It may take 1-2 repetitions.
Algorithms for Corner Orientation (To be added – use standard algorithms for orienting last layer corners individually)
After one corner is oriented, KEEP THE SAME SIDE FACING YOU and rotate ONLY THE TOP LAYER until the next misoriented corner is in the top-right-front position. Repeat the corner orientation algorithm until this corner is also correctly oriented. Continue this process for all remaining misoriented corners. Once the last corner is oriented, the Rubik’s Cube will be completely solved!
Full video tutorials are available online for a more visual guide to these steps.
These instructions are also available in a compact book format: “How To Solve the Rubik’s Cube Compact Book“.
Alternatively, you can download a digital copy of this guide here: Print Friendly PDF – Rubik’s Cube Beginners Guide.