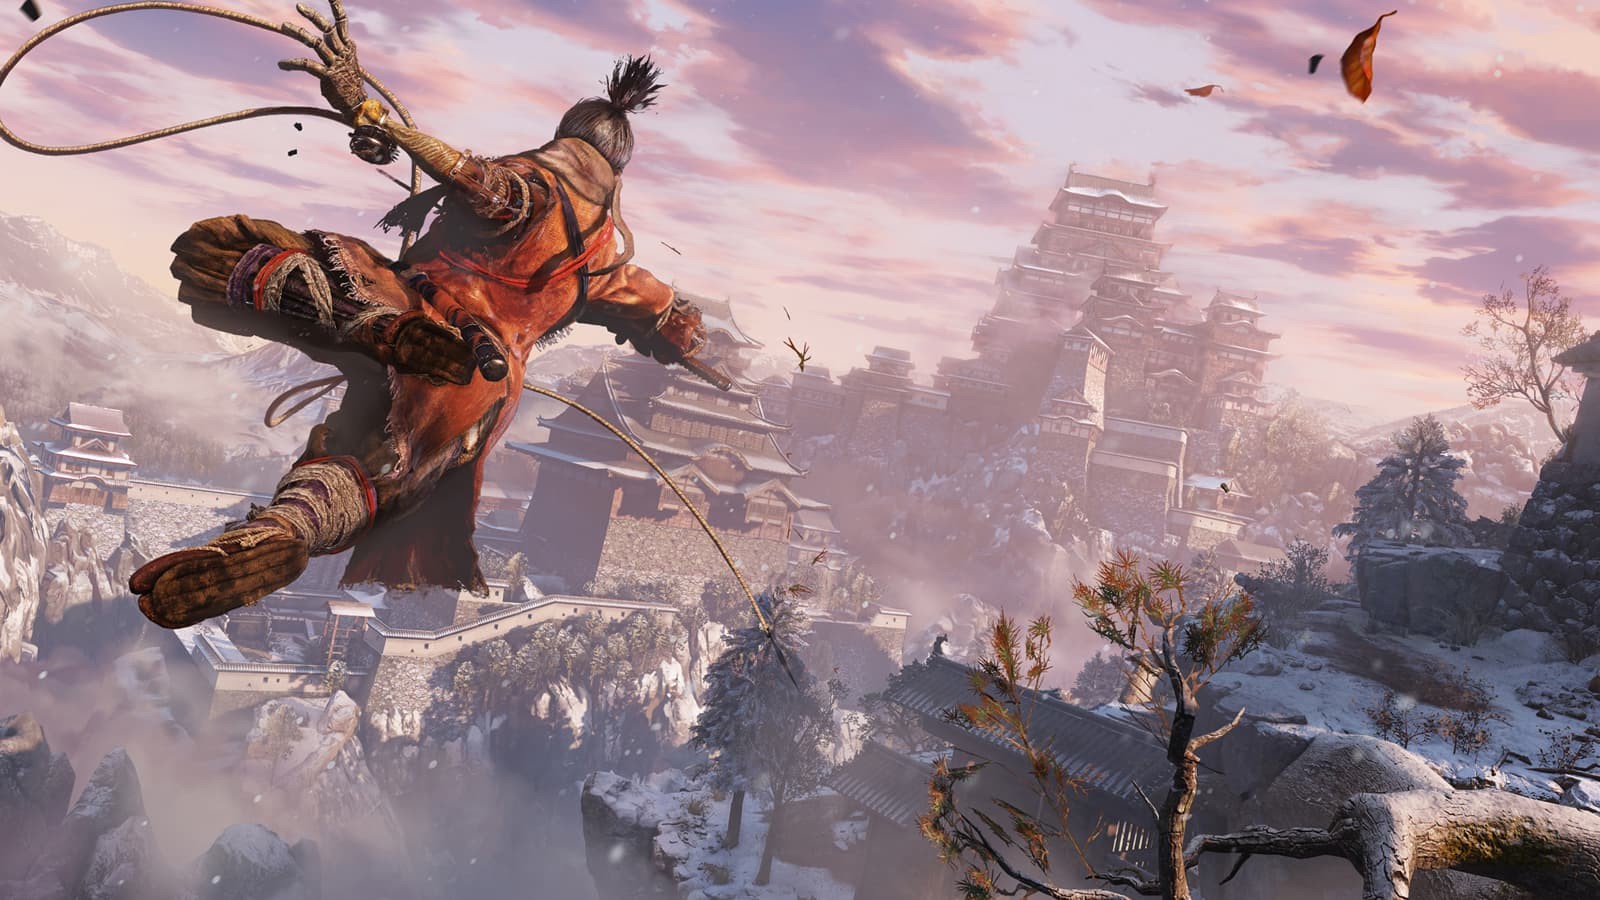
Sekiro: Shadows Die Twice is renowned for its challenging gameplay, often leaving new players feeling lost and overwhelmed. This guide aims to provide essential advice to navigate the initial hurdles and truly appreciate this masterpiece crafted by Hidetaka Miyazaki and FromSoftware. If you’re struggling to find your footing in Ashina, consider this your essential Sekiro Guide to get started on the right path.
Embrace Death and Learn from It
It’s no secret that Sekiro is a difficult game. Dying is not just a possibility; it’s a core mechanic. FromSoftware games are notorious for their punishing difficulty, and Sekiro is no exception. You will die, likely many times, even more than twice. Don’t let this discourage you. Frustration is a natural part of the learning process. Take breaks, step away, and come back with a fresh perspective. Each death is a lesson, an opportunity to analyze what went wrong and adapt your strategy. Perseverance is key in Sekiro, and the satisfaction of overcoming challenges is well worth the effort.
Explore Every Nook and Cranny
In Sekiro, exploration is not just about sightseeing; it’s crucial for survival and progression. While the main path might seem straightforward, venturing off the beaten track is highly rewarding. Hidden areas often contain valuable consumables like Sugars, Pellets, and Piles of Ash, which can significantly aid you in combat. More importantly, exploration is often the key to finding essential prosthetic tool components. Missing out on tools like the Firecracker or the Axe simply because you didn’t explore a side path can put you at a significant disadvantage. Take your time, explore thoroughly, and uncover the secrets Ashina has to offer.
Master the Art of Stealth
Stealth is a fundamental aspect of Sekiro gameplay. It’s not just an option; it’s a vital tool for survival. Utilizing stealth allows you to gain a significant advantage by thinning enemy ranks before engaging in open combat or even bypassing encounters entirely. Crouch walking is your default stealth movement. Use tall grass, ledges, and grapple points to remain unseen. Grappling to rooftops provides excellent vantage points to survey enemy positions and plan your approach. However, be cautious, as archers are often positioned on rooftops to counter such tactics.
Strategic Assassinations are Key
While stealth is powerful, it’s not a complete solution in Sekiro. Eventually, you will have to face enemies head-on. Stealth is best utilized to gain an initial advantage and control the terms of engagement. When you approach an unaware enemy, you can execute a stealth deathblow, instantly eliminating them regardless of their health. This emphasizes the importance of careful positioning and observation of enemy patrol patterns.
Transitioning from stealth to combat effectively involves prioritizing targets. Enemies with torches or signaling devices should be eliminated first as they can alert others to your presence. Similarly, taking out heavily armored enemies or those wielding powerful weapons early can simplify the ensuing open combat encounter. Use stealth to strategically thin enemy numbers and eliminate high-priority threats before engaging the remaining foes.
The Power of the Deathblow
Deathblows are a crucial mechanic in Sekiro, offering more than just a swift kill. Once you’ve initiated combat, breaking an enemy’s posture is key to executing a deathblow. Successfully landing deathblows provides several tactical advantages:
Firstly, it instantly removes an enemy from the fight, irrespective of their remaining vitality. Secondly, you are invulnerable during the deathblow animation, offering a brief window of safety amidst chaotic battles. Thirdly, deathblows contribute to replenishing your Resurrection power (the pink nodes above your health bar). Efficiently utilizing deathblows allows you to control enemy groups, gain temporary invulnerability, and recover your resurrection ability, all vital for survival in Sekiro‘s challenging encounters.
Deflecting: The Superior Defense
Blocking is a basic defensive maneuver in Sekiro, but deflecting is the key to mastering combat. Deflecting attacks, timed perfectly just before an enemy blow lands, not only negates damage but also deals significant posture damage to your opponent and creates an opening for a counter-attack. However, deflecting can be challenging to master, particularly against groups of enemies with unpredictable attack patterns or bosses with lengthy, complex attack sequences.
Blocking remains a viable defensive option, especially when deflecting is difficult. Holding block reduces incoming damage, but it doesn’t negate it entirely, and your posture meter will still fill under sustained attacks. However, blocking can buy you valuable time to reposition, recover posture more quickly when not actively blocking, and escape dangerous situations. While deflecting is the ideal defense, blocking is a useful fallback and a valuable tool in your defensive repertoire.
When to Run: Tactical Retreat
Sometimes, the bravest move in Sekiro is knowing when to disengage and run. Engaging in a fight you’re ill-prepared for can have severe consequences. Death in Sekiro incurs resource loss and can trigger Dragonrot, a debilitating disease that affects NPCs and their interactions with you. If a fight is proving too difficult and the risk of death is high, retreating to a nearby Sculptor’s Idol to rest and regroup is often the wiser choice. You’ll lose any used items, but you’ll avoid harsher penalties.
Running is also a time-saving tactic when revisiting areas you’ve already cleared. Instead of meticulously sneaking through familiar locations, sprinting directly to a challenging boss encounter can be a faster way to re-engage and refine your strategy. While risky, running is a valuable option for both survival and efficiency in Sekiro.
Mini-Bosses: Risk vs. Reward
Ashina is populated by numerous mini-bosses, significantly tougher than regular enemies. These encounters are often optional but offer substantial rewards. Mini-bosses are typically larger, named (e.g., General Tenzen Yamauchi), and have two deathblow markers, indicating they cannot be stealth killed outright.
Engaging mini-bosses is inherently risky, but the rewards are worthwhile. Defeating them yields Prayer Beads, essential items for increasing your Vitality and Posture, directly enhancing your survivability. While many mini-bosses can be bypassed, facing them is often crucial for long-term progression and character strengthening. Consider exploring alternate routes if you find yourself facing a mini-boss unprepared, but recognize the long-term benefits of overcoming these challenging foes.
Skills to Counter Specific Threats
Sekiro offers limited customization compared to other Souls-like games. You cannot change equipment to drastically alter your playstyle or grind stats to overpower challenges. Your progression is largely tied to skill acquisition and mastering combat mechanics. However, the skill tree offers crucial abilities that can directly counter specific enemy types and boss mechanics.
If you’re struggling against spear-wielding enemies, investing in the Mikiri Counter skill is highly recommended. This risky but rewarding skill allows you to counter thrust attacks, dealing massive posture damage and setting up counter-attacks. Similarly, if you’re overwhelmed by fast, aggressive enemies, utilizing the Firecrackers prosthetic tool can create openings by stunning and slowing them down. Analyzing enemy weaknesses and adapting your skills and tools accordingly is key to overcoming Sekiro‘s diverse challenges.
Utilize Your Inventory: Items are Your Allies
Throughout your journey in Sekiro, you’ll accumulate a variety of items, many of which are incredibly useful in combat and exploration. Resist the urge to hoard them out of pride or forgetfulness. Items like Sugars, which boost attack power or defense, and Fistfuls of Ash, which can temporarily stun enemies, are invaluable tools.
Don’t hesitate to use your consumables strategically. They can provide crucial advantages in tough encounters, turning the tide of battle in your favor. Experiment with different items and learn their effects to maximize their utility and overcome challenging situations. Your inventory is a resource meant to be used, not neglected.
Regular Visits to the Dilapidated Temple
The Dilapidated Temple serves as your hub in Sekiro, and regular visits to Emma and The Sculptor are essential. These NPCs offer more than just narrative exposition; they provide valuable insights, quests, and upgrades. Progressing through the story and exploring new areas often triggers new dialogue and unlocks new features at the temple.
Conversations with Emma and The Sculptor can reveal crucial story details, unlock new prosthetic tool upgrades, grant access to valuable skills, and provide guidance on your current objectives. Many key game mechanics and progression paths are initiated through interactions at the Dilapidated Temple. Make it a habit to return frequently to ensure you’re not missing out on important information and upgrades.
This Sekiro guide provides a foundation for your early game experience in Sekiro: Shadows Die Twice. For more in-depth information and community resources, explore the Sekiro: Shadows Die Twice Wiki! Good luck, Shinobi.