The Spire of the Watcher dungeon arrived in Destiny 2 with the Season of the Seraph, plunging Guardians into the heart of a Vex-infested Martian facility brimming with Golden Age secrets. This dungeon is a thrilling test of puzzle-solving and combat prowess, demanding coordination and understanding of its unique mechanics. This comprehensive Spire Of The Watcher Guide will walk you through each encounter, providing detailed strategies and tips to ensure your fireteam triumphs.
To begin your descent into the Spire of the Watcher, you’ll first need to speak with Ikora Rey at the Tower and acquire the “Ares Desperado” quest. This questline will guide you to the dungeon’s entrance, located on Mars within Savathun’s Throne World destination. The recommended Power level for the Normal difficulty is 1570, while Master difficulty cranks it up to 1610 with added modifiers, so gear up accordingly!
Upon loading in, you’ll find yourself in the Ishtar Chronoscopic Analysis area. Your initial task is to navigate the cliffside, following the prominent yellow electrical cord that will lead you towards the dungeon’s entrance. As you approach the entrance mechanic area, be prepared for combat. A lone Goblin may be present initially, but engaging it or stepping further into the combat zone will trigger the spawning of Vex enemies. Expect to face Void-shielded Conduit Minotaurs, Harpies, and Goblins, along with formidable Cyclops perched on the cliffs above, guarding the path forward.
Entrance Dungeon Mechanic: Activating the Spire
This initial mechanic requires teamwork and communication. While one player familiarizes themselves with the node puzzle, the rest of the fireteam should focus on controlling the constantly spawning Vex enemies. Cyclops are particularly dangerous and persistent, potentially respawning even after being defeated, so prioritize eliminating them.
Conduit Minotaurs are key to solving this puzzle. Defeating one will drop a crucial Arc buff called “Arctrician,” granting you 30 seconds to interact with the environment. With the Arctrician buff active, your task is to locate and shoot diamond-shaped nodes, following the yellow electrical cords to complete circuits.
The core objective is to connect these nodes in the correct sequence. A helpful visual cue is that correctly connected cords will turn blue. If a cord remains yellow, it indicates a skipped node or an incorrect starting point. Shooting subsequent nodes while under the Arctrician buff will extend its duration, allowing swift players to potentially complete entire circuits with a single buff. However, Minotaurs respawn frequently, ensuring ample opportunities to reacquire the Arctrician buff if needed.
For the entrance puzzle, time is not a critical constraint. Once a cord turns blue, it remains active, allowing you to proceed methodically. A key tip for identifying the starting node is to look for a small arrow pointing in the direction of the cord and a single wire connection.
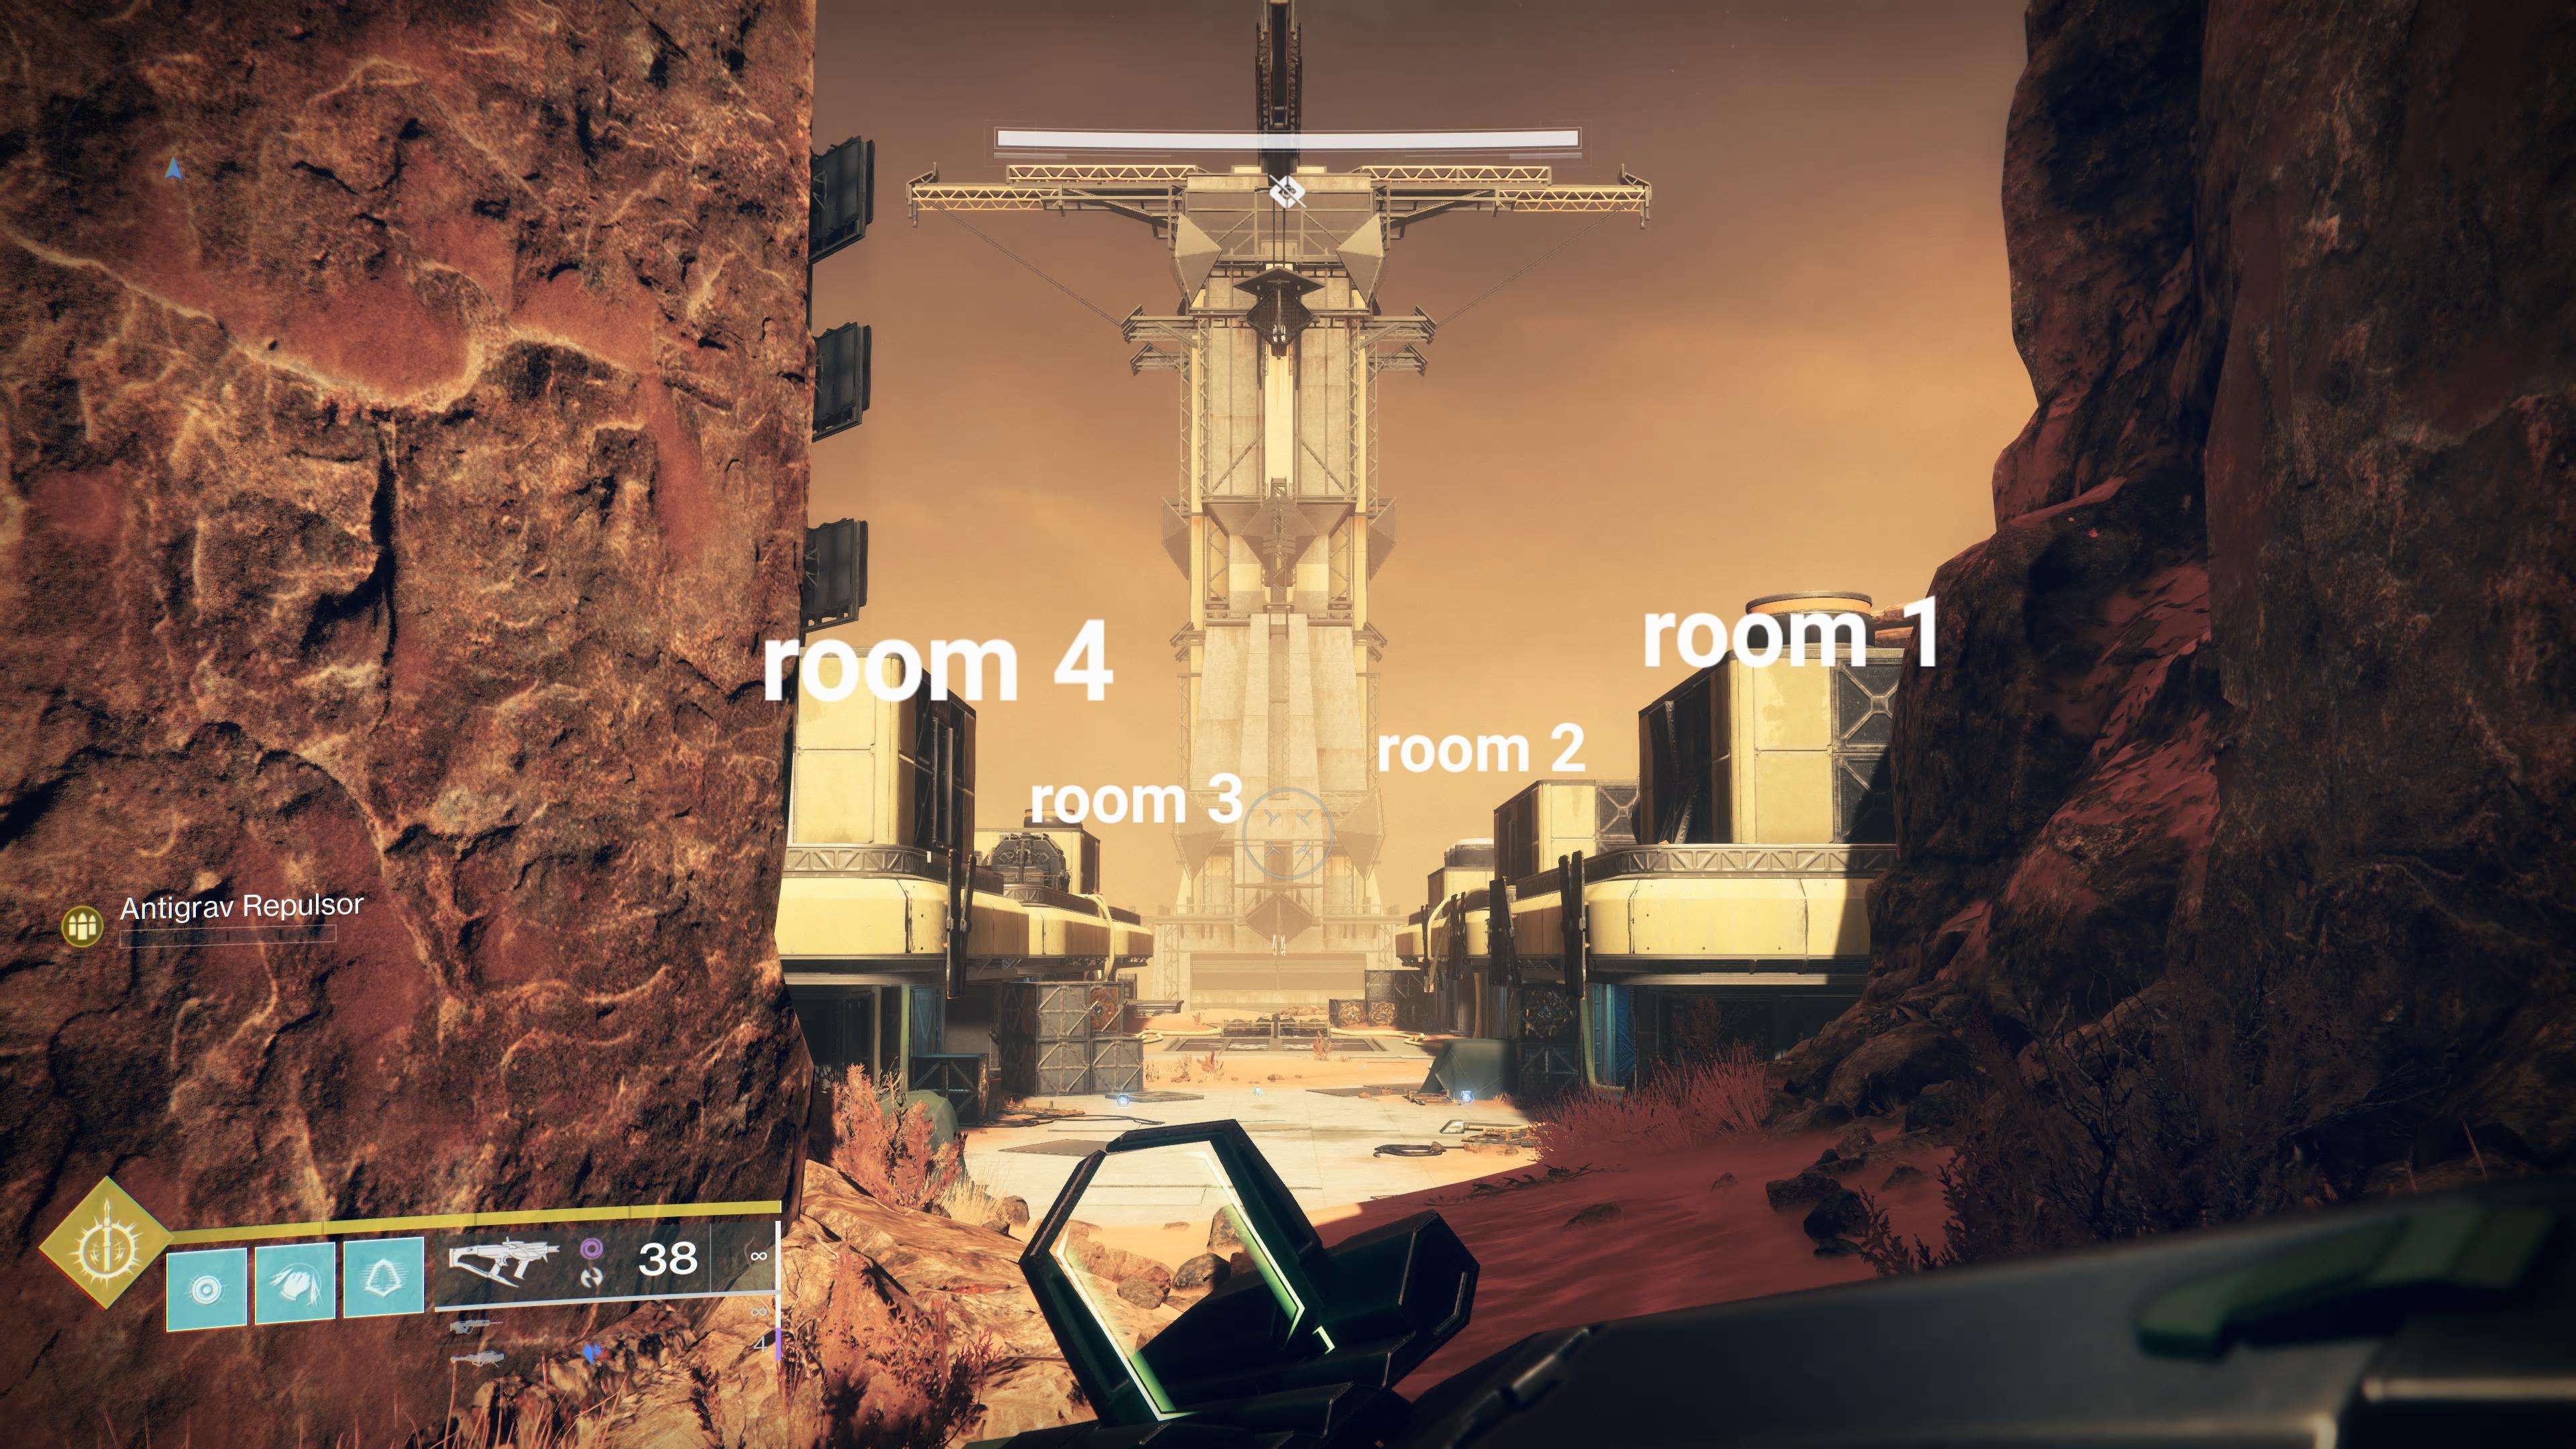
The entrance area is divided into four distinct rooms, each requiring you to complete a circuit to activate one of the four endpoint nodes located at the center, near the spire’s entryway. Let’s break down each room.
Room 1: Right Side, Closest to Spire
Room 1 is situated on the right side when facing the spire, being the closest room. Enter the room and locate a hole in the floorboards. Drop down to find the starting node – shoot the diamond shape to initiate the Room 1 circuit. From there, simply follow the yellow electrical cord, shooting each node you encounter while the Arctrician buff is active.
Room 1 contains a total of five nodes: the starting node, three more within the room, and a final node just outside the room. After activating all five, proceed to the central area and shoot the bottom right endpoint node to complete Room 1’s circuit.
Room 2: Right Side, Adjacent to Room 1
Room 2 is located adjacent to Room 1, still on the right side of the map. The starting node for Room 2 is positioned at the back of the area, attached to the side of the building. From this starting point, navigate to the rooftop of Room 1. The yellow cord will guide you into a small lab situated on the rooftop of Room 2. Finally, return to the central area and connect the circuit by shooting the top right endpoint node, which is located near the doorway.
Room 3: Opposite Side, Tunnel Access
Room 3 is positioned opposite Room 2. This room features a tunnel that leads to a large generator. The starting node for Room 3 is located within this tunnel, near the generator. Head back into Room 3 proper and locate the remaining nodes: one on the left side of the room, one outside, and another inside Room 3. To complete Room 3’s circuit, shoot the bottom left endpoint node in the central area.
Room 4: Opposite Side, Rooftop Start
Room 4’s starting node is found on its rooftop, inside a small, enclosed room. Ascend to the rooftop and enter this room to find the starting node. Exit the small room and cross the bridge. The second node will be directly beside you as you cross. Jump down from this position, and the third node will be directly below the second. The final two nodes for Room 4 are located on Room 3’s rooftop. With the Arctrician buff active, return to the central area and shoot the remaining endpoint node to finalize the circuit and open the spire entrance.
Center Nodes: Unlocking the Spire
Once all four room circuits are complete, the four endpoint nodes in the center, above the spire door, will activate. With all circuits connected, the entrance to the Spire of the Watcher will open, allowing you to proceed deeper into the dungeon.
Reactor Firewall Jumping Puzzle: Navigating the Depths
Beyond the entrance lies a vertical descent and a platforming challenge. Slide down from the entrance area and jump onto the catwalk above. Proceed through the yellow-lit vent to enter a corridor illuminated with red and white lights. Descend through the second red-lit hole in the floor to access the Reactor Firewall.
Within the Reactor Firewall room, ascend the catwalks and navigate to the opposite side. Be prepared for enemy encounters here, including Incarcerator Hydras, Goblins, Hobgoblins, and Harpies. Long-range weaponry will be advantageous to deal with distant threats.
The path forward involves a series of catwalk jumps and hanging structure maneuvers. While seemingly straightforward, pay attention to your surroundings. Upon reaching what appears to be a dead end at the last bridge, look for a hidden platform behind a large pillar. Drop down to this platform, eliminate the enemies, and proceed upwards via the lift. The lift will deposit you in a computer lab room. Traverse to the other side of this room and climb up the broken lift shaft.
Emerging from the broken lift, you will arrive at Ares Spire. Deploy a Rally Flag to prepare for the upcoming encounter. Jump onto the catwalk on the side of the building and ascend to reach the first encounter of the Spire of the Watcher dungeon: Ascend the Spire.
First Encounter – Ascend the Spire: Climbing Higher
The “Ascend the Spire” encounter is a multi-stage climb, each level requiring you to utilize the node mechanic under pressure.
Ascend the Spire Part 1: Initial Ascent
This section introduces a larger node network. Defeat the solitary Conduit Minotaur to gain the Arctrician buff. You’ll notice two starting nodes near the Minotaur’s spawn point. This indicates that you need to complete two separate circuits simultaneously, running to the opposite side of the platform. Each side has six nodes, including the start and end points.
Remember, a single shot is sufficient to activate a node. Sprinting between nodes while buffed is highly recommended. Medium to long-range weapons are ideal for node activation.
The node paths in this first section are relatively straightforward, running along separate sides of the platform without intertwining. However, enemies will spawn, and platforming while under fire can be challenging. Prioritize enemy clearance when necessary.
Upon completing both circuits, a lift will activate, leading to Part 2 of the ascent.
Ascend the Spire Part 2: Electrical Hazard
Part 2 introduces electrical pulses as a hazard. The starting nodes are located within a small corridor filled with these damaging pulses. Carefully navigate past the electricity, avoiding damage, and shoot the starting nodes inside.
Similar to Part 1, you’ll complete two separate circuits, each leading to the opposite side of the platform. Each side now features five nodes. Utilize the solar panels to access the end nodes, which are positioned higher up.
Another lift awaits after completing both circuits, taking you to the final stage of “Ascend the Spire.”
Ascend the Spire Part 3: Intertwined Circuits
The final ascent stage increases the complexity. The platform is diamond-shaped, and the two starting nodes are positioned at separate points – one on the left and one on the right. Crucially, both circuits now converge and end at the same location.
The cord paths intertwine in this section, requiring careful observation. A simple rule to remember at the intersection point is:
- If your cord enters the intersection from the top path, it will exit from the bottom path.
- Conversely, if your cord enters from the bottom path, it will exit from the top path.
Upon successfully completing both intertwined circuits, a chest will spawn, rewarding you with loot. Possible rewards from this encounter include the Terminus Horizon machine gun, Long Arm scout rifle, Seventh Seraph Carbine auto rifle, and TM-EARP Custom Armor.
Ascend the shaft beyond the chest and jump onto the catwalk. Open the window and proceed to the next major encounter: the boss fight against Akelous, The Siren’s Current.
Silence the Siren Boss Fight: Akelous, The Siren’s Current
The “Silence the Siren” encounter pits you against Akelous, a massive Harpy boss. This fight revolves around the familiar circuit mechanic, but now under the pressure of a boss encounter. Throughout the fight, expect to face Goblins, Harpies, and Conduit Minotaurs alongside Akelous.
Four starting nodes are located at the center of the map. Upon obtaining the Arctrician buff from a Minotaur, it’s beneficial to shoot all four starting nodes to streamline circuit activation for your team. You’ll need to complete four separate circuits, which thankfully do not overlap.
The map is structured with bridges labeled one through four. Each circuit originates at the central starting nodes and terminates at the edge of a bridge, near a fuel rod.
Harpies will spawn in the air between bridges, adding to the aerial threats, while Goblins will accompany Conduit Minotaurs on the platforms.
Bridge 1: First Circuit Path
For Bridge 1, the starting node is in the center. The circuit path includes two nodes on the lower level of the central square platform, followed by one node on the right side of Bridge 1, then one on the left side of Bridge 1. The final node is located by the fuel rod at the end of the bridge.
Bridge 2: Second Circuit Path
Bridge 2’s circuit also starts at the center. The path includes two nodes on the lower level of the central square platform, one node located underneath Bridge 2, and the next node on the right side of Bridge 2. The final node is again positioned by the fuel rod.
Bridge 3: Third Circuit Path
Bridge 3’s circuit begins at the center, but uniquely, all subsequent nodes are located directly on the bridge itself. The path includes one node inside the bridge structure, one on top of the bridge, and the next two nodes facing each other from within the bridge’s interior. The final node is at the fuel rod.
Bridge 4: Fourth Circuit Path
Bridge 4 mirrors Bridge 1 in its circuit path. Starting from the center, the path includes two nodes on the lower level of the central square platform, one node on the right side of Bridge 4, and the next on the left side. The final node is once again at the fuel rod.
Damage Phase:
Connecting all four circuits initiates the damage phase against Akelous. Crucially, your fireteam must gather at the fuel rod of the last bridge where you completed a circuit to begin the damage phase. For instance, if Bridge 3 was the last circuit activated, the team should converge at Bridge 3’s fuel rod.
Akelous will approach the designated bridge and open its shell, revealing several glowing weak points. Focus fire on these points, preferably with submachine guns for rapid shield removal. Once the shield is down, Akelous’s central glowing core becomes vulnerable. Linear fusion rifles are highly effective for damage, but rocket launchers can also be utilized. Supers, especially roaming Supers and Well of Radiance, are beneficial for maximizing damage output during the brief damage window.
During each damage phase, Akelous will drift towards the center of the map. Maintain a position closer to the center of the bridge when dealing damage to stay within range. Warning: Akelous will periodically overcharge its shield, unleashing a powerful blast that can knock you back. Jumping during this blast can lead to loss of control and falling off the platform. Staying grounded near the center of the bridge minimizes the risk of being pushed off.
Repeat the circuit connection and damage phases until Akelous is defeated.
Defeating Akelous can reward you with the Terminus Horizon machine gun, the Seventh Seraph Officer Revolver hand cannon, and TM-EARP Custom Armor. After the encounter, descend into the Pillory-0 Cell Stack.
Pillory-0 Cell Stack Doors: Timed Circuits
The Pillory-0 Cell Stack introduces timed circuits, indicated by red electrical cords.
Here, the circuits are timed, requiring swift action. With the Arctrician buff, you must shoot all five red nodes quickly. All five nodes are visible from the bottom floor, allowing for efficient activation. Speed and target prioritization are key in this section.
Carefully descend through the rotating fan blades. Once you navigate past the fans, you will encounter another set of red cord nodes. Again, acquire the Arctrician buff and rapidly shoot this second set of red nodes to proceed.
Pillory Stack Containment: Final Red Circuit
Drop into the Pillory Stack Containment area and prepare for a final red circuit challenge combined with enemy combat. Defeat the initial Incarcerator Hydra and other spawning enemies. Conduit Minotaurs will then appear. Obtain the Arctrician buff from a Minotaur and locate the red cord nodes. This room features four wall-mounted nodes, one on each wall. After activating the wall nodes, a final node will appear in the center of the room, amidst electrical pulses. Avoid the pulses and shoot the central node to complete the circuit.
With the Pillory Stack Containment circuit complete, drop down to the Seraph Reactor Core, the location of the final boss encounter against Persys, Primordial Ruin.
Persys, Primordial Ruin Final Boss Fight: The Ultimate Test
The final boss fight against Persys, Primordial Ruin, combines both red and yellow cord circuits in a confined arena, demanding precise execution and constant awareness. The small arena necessitates constant movement, even when not actively engaging with the mechanics, to avoid enemy fire. Expect a continuous stream of enemies, including Goblins and exploding Harpies. Grenade launchers are effective for area-of-effect damage against groups, and Void damage resistance and Concussive Dampener mods can significantly mitigate incoming damage throughout the encounter.
Reaching the Persys Damage Phase: A Cycle of Circuits
The Persys boss fight involves a repeating cycle of mechanics to reach the damage phase.
Step 1: Hydra Elimination:
Begin by eliminating the initial wave of enemies, including two Incarcerator Hydras.
Step 2: Red Circuit Activation:
Defeating the Hydras will open doors to the opposite side of the arena and spawn Conduit Minotaurs. Acquire the Arctrician buff and focus on the red cord nodes. There are five red nodes in total, positioned on the pillars around the arena and one above the large doorway. Activate all red nodes quickly.
Step 3: Yellow Circuit Activation:
After the red circuits are complete, locate the two active yellow starting nodes. These starting nodes are positioned behind the pillars that held the red cord nodes. Follow each yellow cord to its corresponding endpoint node within the central Reactor room. There are four possible endpoint nodes in the Reactor room. Complete two yellow cord circuits.
Step 4: Reactor Purge and Vulnerability Window:
Upon completing two yellow cord circuits, a message “Reactor core purge – Armed. Reactor Isolation Chamber Active. Take Cover.” will appear, accompanied by an alarm. This is your signal to retreat back to the initial room with the red cords and wait.
Step 5: Red Node Reactivation and Damage Phase Trigger:
As soon as the red cord nodes reactivate, shoot them again. If successful, a message will indicate that “Persys is vulnerable.” However, if you see “Reactor Isolation Chamber Deactivated,” you missed the damage phase window and must repeat the cycle.
Step 6: Damage Phase:
For the damage phase, gather in the middle of the red cord room. This provides some distance from Persys while maintaining line of sight. Persys’s precision damage spot is its small, glowing center, which can be a challenging target. Employ the same effective damage strategies used against Akelous – linear fusion rifles and high-damage Supers are highly recommended.
Step 7: Repeat Cycle:
The damage phase is finite. After it ends, repeat steps 1-7 to initiate subsequent damage phases until Persys, Primordial Ruin, is defeated.
Persys Boss Fight – Quick Steps:
- Defeat Hydras.
- Obtain Arctrician buff from Conduit Minotaurs.
- Quickly connect red cord nodes.
- Connect two yellow cord nodes in the Reactor room.
- Return to the red cord room and wait for reactivation.
- Reconnect red cord nodes quickly.
- Damage vulnerable Persys.
- Repeat.
Defeating Persys can reward you with loot from previous encounters, as well as the Liminal Virgil sidearm, Wilderflight grenade launcher, and the coveted Hierarchy of Needs Exotic bow.
Congratulations, Guardian, on conquering the Spire of the Watcher! This dungeon is a challenging but rewarding experience, offering unique loot and a compelling narrative within the Destiny 2 universe. Now venture forth and test your skills in other Season of the Seraph activities, such as Resonance Amp chests in Override Frequency puzzles or Heist Battlegrounds. Good luck, and may your fireteam find success in all your future endeavors!