Embark on your Grim Dawn journey with an impenetrable defense and surprising offensive power using a sword and shield build! This guide is tailored for beginners and beyond, focusing on the robust Oathkeeper mastery combined with Demolitionist for a potent Shieldbreaker character. We’ll walk you through everything from leveling to endgame optimization, ensuring you can conquer Rogue Dungeons, Monster Totems, and even delve into the Shattered Realm.
This build leverages the inherent shield skills of the Oathkeeper, specifically Righteous Fervor, Smite, and Shattering Smash, amplified by powerful devotions like Fissure and Meteor Shower for devastating area-of-effect damage. Its tankiness makes it ideal for solo play and a valuable asset in multiplayer thanks to its buffs and debuffs. Gameplay is straightforward: charge into the fray, deploy Thermite Mines, unleash Judgment (or Flashbang for early game), and relentlessly attack. With ample hotbar space, you can easily incorporate consumables for tougher challenges in the Shattered Realm.
Let’s dive into the evolution of this formidable sword and shield build:
Beginner Build (Easy to Acquire Colossal Defender): GRIMTOOLS
This starting point utilizes readily accessible gear, with the Colossal Defender shield being a key component. It provides a solid foundation for understanding the core mechanics of the build.
Transition Build (After Farming Fleshwarped Defender): GRIMTOOLS
Once you acquire the Fleshwarped Defender, the build takes a significant leap in both offense and defense. This shield offers superior fire damage and bonuses, making it a worthwhile farm.
Final Endgame Build: Shieldbreaker, Level 100 (GD 1.2.0.3) – Grim Dawn Build Calculator
This is the pinnacle of the build, optimized for endgame content. It incorporates specific rare affixes for maximum effectiveness, focusing on capping resistances and achieving a balance of offense and defense. Note that while rare affixes are mentioned, the build’s damage is substantial even without them, prioritizing survivability and resistance capping.
Watch the build in action in SR 50-51
Farming for the Fleshwarped Defender
The Fleshwarped Defender is a Monster Infrequent (MI) shield that significantly enhances this build. Farming it efficiently is key to progressing to the optimized versions.
Identifying the Fleshwarped Defender: Be vigilant when farming! The orange tint indicating an MI can be subtle and only visible from certain angles. Don’t hesitate to clear out enemy packs thoroughly to ensure you don’t miss it.
Farming Locations:
- Port Valbury Vendor: A vendor within Port Valbury sells this MI. You can reset the vendor’s inventory by exiting the dungeon, waiting approximately 10 seconds, and re-entering. Port Valbury itself is also a great source of legendary items, making it a worthwhile farming location.
- Rotting Croplands: Spamming runs through Rotting Croplands is another effective method. Monster Totems frequently spawn here, adding to the loot potential.
Efficient Farming Route in Rotting Croplands:
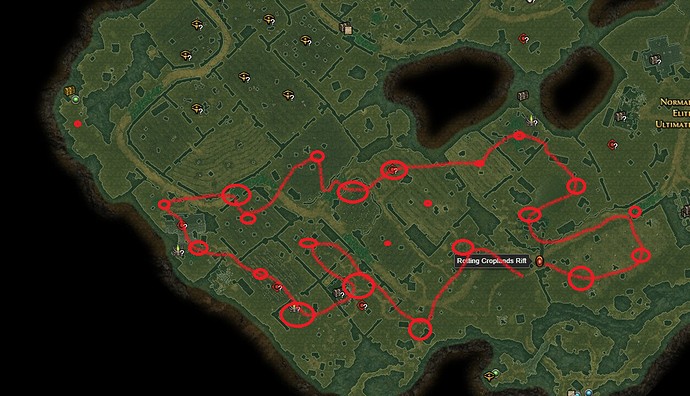 Fleshwarped Defender Farming Route in Rotting Croplands
The image above illustrates a suggested farming route in Rotting Croplands. The red circles indicate potential spawn locations for enemies that can drop the Fleshwarped Defender. Larger circles represent higher probability spawns.
Leveling Guide: From 1 to 100
This section outlines a step-by-step guide to leveling your sword and shield Shieldbreaker, focusing on skill allocation and mastery progression.
Levels 1-10: Demolitionist Start (Faster Start)
- Skill Focus: Stun Jacks. Max Stun Jacks to rank 11.
- Mastery Bar: Invest sparingly in the Demolitionist mastery bar initially.
- Level 8 Respec: At level 8, respec out of Stun Jacks.
- Fire Strike: Put 1 point into Fire Strike and max Explosive Strike.
Oathkeeper Introduction
- Aegis of Menhir: 1 point in Aegis of Menhir.
- দ্বিতীয় Node ( দ্বিতীয় Node ): 4 points into the second node of Aegis of Menhir.
- Avenging Shield (Optional AoE): Consider Avenging Shield for AoE damage or continue investing in Aegis of Menhir for single target.
- Level 8 Respec (Again): Respec at level 8 again.
- Vire’s Might: Allocate all skill points into Vire’s Might.
Levels 11-20: Explosive Strike and Vire’s Might
- Explosive Strike: Continue with Explosive Strike if Demolitionist.
- Flame Touched (Demolitionist): Start investing in Flame Touched.
- Vire’s Might (Oathkeeper): Continue investing in Vire’s Might if Oathkeeper.
Level 15 Respec and Oathkeeper Focus
- Full Respec: Respec out of all active skills at level 15 (keeping 1 point in Vire’s Might for mobility is optional).
- Demolitionist Mastery: Respec Demolitionist mastery bar down to 1.
- Oathkeeper Mastery: Invest up to 20 points in Oathkeeper mastery.
- Shattering Smash: 9 points in Shattering Smash.
- Smite: 9 points in Smite.
- Consecration: 1 point in Consecration.
- Righteous Fervor: Allocate remaining points into Righteous Fervor.
- Passive Skills: 1 point each in Safeguard, Ascension, Resilience, Presence of Virtue, and Haven.
- Max Righteous Fervor: Prioritize maxing Righteous Fervor.
Levels 21-30: Defensive and Offensive Passives
- Max Safeguard and Ascension: Max Safeguard and Ascension, prioritizing based on your needs. Ascension provides defense and damage boost, while Safeguard offers more damage and armor.
Levels 31-40: Deeper into Oathkeeper
- Oathkeeper Mastery to 50: Take Oathkeeper mastery bar to 50.
- Guardians of Empyrion: 1 point in Guardians of Empyrion.
- Divine Mandate: 1 point in Divine Mandate.
- Celestial Presence: Spare points into Celestial Presence.
Levels 41-50: Maximize Celestial Presence and Demolitionist Investment
- Max Celestial Presence: Max Celestial Presence.
- Demolitionist Mastery Investment: Start investing in Demolitionist mastery bar.
- Flame Touched (Demolitionist): 1 point in Flame Touched.
- Vindictive Flame (Demolitionist): 1 point in Vindictive Flame.
- Mastery Bar Focus: Allocate all remaining points into Demolitionist mastery bar.
Levels 51-70: Blast Shield and Thermite Mines
- Blast Shield (Demolitionist): Unlock Blast Shield and Thermite Mines.
- Blast Shield Rank: Take Blast Shield to approximately rank 4-6.
- Thermite Mines: Take Thermite Mines to rank 10.
Levels 70-90: Consecration, Flame Touched, and Blast Shield Top-Up
- Consecration (Oathkeeper): Invest in Consecration.
- Flame Touched (Demolitionist): Invest in Flame Touched.
- Blast Shield Top-Up: Increase Blast Shield rank as needed for survivability.
Flashbang Introduction (Level 84+)
- Flashbang for Fumble: Consider using Flashbang for Searing Light’s fumble effect around level 84+, especially if facing enemies with high offensive ability or if your armor is lacking.
- Flashbang and Searing Light Ranks: 1 point in Flashbang and ~3 points in Searing Light initially.
Levels 91-100: Final Skill Point Allocation
- Divine Mandate, Presence of Virtue, Vindictive Flame: Maximize Divine Mandate, Presence of Virtue, and Vindictive Flame.
- Searing Light and Flashbang Completion: Finish off remaining skills, taking Searing Light to rank 6 and Flashbang to rank 12.
Suggested Leveling Devotions
Devotions play a crucial role in enhancing both offense and defense during leveling. Here’s a recommended path:
Early Game Devotions:
- Movement Speed or Imp: Initially, focus on movement speed or the Imp devotion for early AoE damage until Magi’s Fissure becomes available.
- Crossroads: 1 point in Red Crossroads, 1 point in Green Crossroads, 1 point in Blue Crossroads.
- Jackal: 2 points in Jackal.
- Spider: 2 points in Spider (take attack speed node).
- Sailor’s Guide: 3 points in Sailor’s Guide (take movement speed for the 3rd node).
Mid-Game Devotions (After 14 Devotion Points):
- Respec Crossroads, Jackal, Sailor’s Guide: Respec out of Jackal, Sailor’s Guide, and Red and Blue Crossroads.
- Hawk: 3 points in Hawk.
- Magi: 5 points in Magi for Fissure (excellent AoE).
Late Game and Endgame Devotions:
- Eldritch Fire: Eldritch Fire for Resistance Reduction (RR).
- Ghoul: Ghoul for survivability.
- Viper: Viper for offensive stats.
- Empty Throne: Empty Throne for resistances.
- Rhowan’s Crown: Rhowan’s Crown for elemental damage and RR.
- Revenant: Revenant for attack speed and sustain.
- Ulzuin’s Torch: Ulzuin’s Torch for fire damage and procs.
Leveling Gear and Components
Prioritize resistances, attack speed, and armor while leveling. In the early stages, Ascension and Safeguard provide sufficient armor, allowing you to focus on other stats.
Early Game Gear Affixes:
- “of Zeal” (Belt and Amulet): For cast speed and damage.
- “Durable” (Shields): For physical resistance.
- Physical Resistance Shields: Look for shields with inherent physical resistance.
- “of Alacrity” (Fast Weapons and Gloves): For attack speed.
- “of Haste” (Boots): For movement speed.
Movement Rune:
- Charge Rune (Cult of Dreeg): The Charge movement rune from the Cult of Dreeg (obtainable after Act 1 in the Conclave of the Three) is crucial for proccing Eldritch Fire devotion.
Useful Components:
- Enchanted Flint x2: For fire damage and OA.
- Scaled Hide x2 (Shoulder + Leg): For armor and armor absorption.
- Antivenom Salve (Waist + Feet – if needed): For poison resistance.
- Silk Swatch (Chest): For bleed resistance and armor.
- Restless Remains (Hands): For attack speed and vitality resistance.
- Wardstone x2: For chaos and aether resistance.
- Corpse Dust x2: For vitality and bleed resistance.
- Runestone: For elemental resistances.
Relic:
- Bone/Ivory/Sacred Talisman: Utilize the quest item given by the Elder for a readily available relic.
Build-Enabling Monster Infrequents (MIs)
As you approach level 40, physical damage from Righteous Fervor may start to decline relative to fire damage. Farming for specific Monster Infrequents (MIs) becomes important to maintain damage scaling.
Servitor’s Cleaver (Level 40 Farming):
- Farm Location: Void’s Edge or Lone Watch/Mourndale.
- Enemy Type: Dropped by both Servitor Healers and Chaos Bolt Throwers.
- Purpose: Provides a significant damage boost and fire damage conversion.
Colossal Defender (Endgame Transition Shield):
- Powershopping: After rescuing Hyram in Steelcap, you can powershop vendors (exit to main menu or check multiple vendors to reset inventory) for a Colossal Defender with a high “Durable” affix roll (ideally ~28%+, max is 33%).
- Durable Affix Importance: The “Durable” affix is crucial for physical resistance.
- Shield Stats: Colossal Defender provides fire damage bonus and innate physical resistance.
- Usage: Use Colossal Defender as a strong defensive option and stepping stone until you acquire a good Fleshwarped Defender.
Fleshwarped Defender (Offensive & Defensive Endgame Shield):
- Superior Option: Fleshwarped Defender is a high-damage fire shield with a bonus to Smite, making it superior to Colossal Defender.
- Farming Locations: Monsters around Homestead, Ikon, and the Necropolis. Rotting Croplands and Port Valbury (Agarrad Vendor) are recommended farming locations.
- Aether Resistance for Port Valbury: Take Aetherward Oils from Malmouth Faction for extra Aether resistance when farming in Port Valbury.
Gargoyle Girdle (Endgame Oathkeeper Belt):
- Farm Location: Astral Fields or Basalt Crags from Gargoyles.
- Priority Stats: Resistances are primary, but Offensive Ability (OA) is also beneficial.
Fettan Mask (Late Game +1 All Skills):
- Acquisition: Found in the secret area near the Korvan Sands rift (location: Grim Dawn World Map).
- Usage: Only needed at later levels when the +1 to all skills becomes highly impactful.
Balthazar’s Crest (Damage-Focused Medal):
- Damage Increase: Provides even more damage.
- Endgame Viability: Excellent even at endgame if you farm for good affixes.
Kymon’s Badge (Resistance Medal):
- Vendor Location: Bought from the secret vendor Benevald in the Blood Grove.
- Powershopping: Powershop for a resistance affix by checking Homestead vendors and using the Homestead rift to reset Benevald’s inventory.
Gargabol’s Ring (Luxury Item):
- Source: Drops from the final boss in the Ashes of Malmouth (AoM) Rogue Dungeon.
- Luxury Upgrade: An extreme luxury item and not necessary for the core build. Getting two with good rolls is very difficult.
- Bonus: If obtained, can push Righteous Fervor to rank 24.
Faction Choices and Reputation
Faction choices impact augment availability and gear options, contributing significantly to endgame optimization.
Kymon’s Chosen:
- Faction Choice: Side with Kymon’s Chosen.
- Reputation Goal: Do quests to gain reputation.
- Reward: Jewelry augment for damage reduction is essential for survivability.
Barrowholm:
- Faction Choice: Assist Barrowholm.
- Reputation Goal: Do quests to gain reputation.
- Reward: Ravager fire weapon augments are excellent for damage enhancement.
Malmouth Resistance:
- Faction Choice: Side with Malmouth Resistance.
- Reputation Goal: Reach Revered reputation.
- Reward: Faction armor and jewelry are crucial for endgame gear.
Endgame Consumables
Utilize the ample hotbar space to incorporate consumables for increased performance, especially in challenging content.
Barrowholm Faction Vendor:
- Hungerer Oil: Purchase Hungerer Oil for damage boost.
- Homestead Faction Vendor:
- Courageous Tincture: Purchase Homestead’s Courageous Tincture for defensive buffs.
- Availability: Both consumables are available on the first faction page and require minimal reputation.
Royal Jelly Essence:
- Long-Lasting Pots: Use Royal Jelly Essence for sustained healing and buffs.
Final Build Explanation and Optimizations
Fire Strike Transition:
- Legendary Dagger Requirement: Only switch to Fire Strike as your primary attack when you obtain a Legendary Dagger that converts physical damage to fire damage.
Crafting Completion Bonus (Kaylon at Steelcap):
- Crowd Control (CC) Resistance: Optimal crafting bonus is CC resistance from Kaylon at Steelcap.
- Stun Resistance Target: Aim for near 40% stun resistance without Ascension active as a minimum.
- Secondary Bonus: After achieving sufficient stun resistance, choose between more CC resistance or Angrim’s bonus based on your needs.
Green Gear Alternatives:
- Balthazar’s Crest: Balthazar’s Crest medal is a strong option if you prefer using more green Monster Infrequent (MI) gear.
- Grava Pants: Grava Pants can be a good alternative pants option if you acquire a version with a slow resistance affix.
Affix Priorities:
- Weapon Prefix:
- “Aggressive”: Offensive Ability (OA).
- “Searing” or “Superior”: Flat damage.
- “Hellfire”: Fire damage and OA.
- Weapon Suffix:
- “of Alacrity” or “of Wildfire”: Attack speed (best suffix).
- Shield Prefix:
- “Durable”: Best defensive option (physical resistance).
- “Infernal”: Smaller defense but includes attack speed and fire damage bonus.
- Shield Suffix:
- “Of Attack”: Offensive Ability (OA).
- “Of Readiness”, “Of Wildfire”, “Of Valor”, “Of Redoubt”: Various good defensive and offensive options.
Tips and Suggestions for Endgame
Component Blueprints:
- Annihilation, Bloodied Crystal, Prismatic Diamond: Acquiring blueprints for these components may take time.
- Farming Locations: Farm blueprints from vendors in AoM and FG Rogue Dungeons, Treasure Troves, and Monster Totems.
Shattered Realm (SR) Farming Efficiency:
- SR 40-41: May be the most time-efficient SR farming range.
- SR 50 (Optional): SR 50 is not necessary and may not be time-efficient due to increased difficulty and potential need to pull back from enemies.
- Rune of Blazing Ends (SR 50): Rune of Blazing Ends blueprint might require SR 50, but it’s advisable to wait until you have stronger gear if you encounter difficulties.
Gear Flexibility:
- Pants, Gloves, Boots, Medal: Gear slots for pants, gloves, boots, and medal are flexible. Use items with good resistances and stats as you find them.
- Physical Resistance Priority: Prioritize items with physical resistance for increased survivability.
Monster Infrequent (MI) Farming Frequency:
- Weapon Farming (Level 40 and 94): Farm the Servitor’s Cleaver weapon at level 40 and again before level 94 (or whenever you desire an upgrade, level 55+ versions have increased item mod strength).
- Level 65 Malmouth Faction Gear: Level 65 Malmouth Faction gear can be effective up to level 90 and beyond. Ensure you have a physical resistance shield for higher levels.
This comprehensive guide equips you with the knowledge to build a powerful and resilient sword and shield Shieldbreaker in Grim Dawn. Embrace the shield, conquer your foes, and enjoy your journey through Cairn!