Your thermostat is the command center for your home’s heating, ventilation, and air conditioning (HVAC) system. Correct thermostat wiring is crucial for ensuring your system operates efficiently and effectively. Whether you’re looking to replace an old thermostat, upgrade to a smart model, or troubleshoot HVAC issues, grasping the basics of thermostat wiring is essential.
This guide will break down everything you need to know about thermostat wiring, from understanding wire color codes to identifying different wiring configurations and performing basic troubleshooting and upgrades.
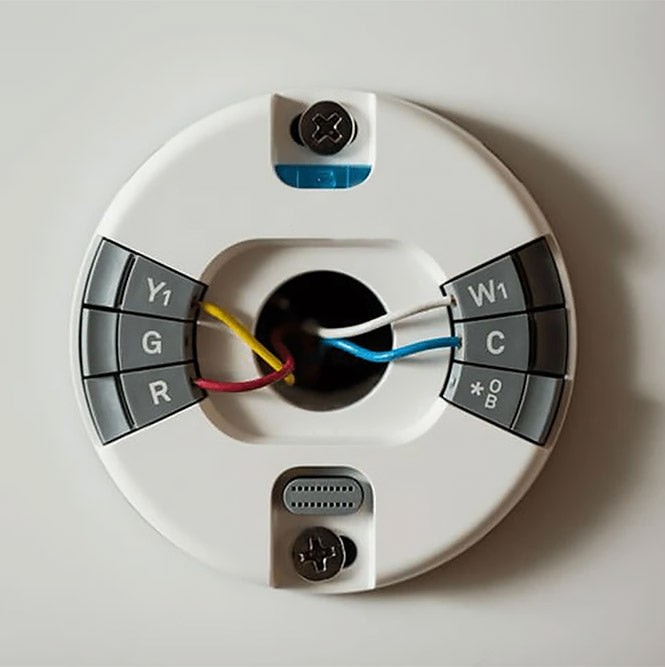
Understanding Thermostat Wire Color Codes
Before you start working with your thermostat wires, it’s crucial to understand the standard color codes. While these are generally consistent, always double-check your thermostat’s manual and wiring diagrams for specific instructions, as variations can occur.
Once you remove your thermostat cover, you’ll likely see a series of terminals labeled with letters. These terminals correspond to different functions within your HVAC system. Here’s a breakdown of common thermostat wire colors and their functions:
- Red (R, Rh, or Rc): This is typically the power wire. “R” usually indicates power for heating systems, “Rc” for cooling, and “Rh” can be used for heating in systems with separate transformers. In many modern systems, a jumper wire connects Rh and Rc, creating a single “R” terminal for power. This wire provides the 24V power needed for the thermostat to operate.
- White (W or W1): This is the heating wire. It’s responsible for activating your furnace or heat pump to produce heat. In multi-stage heating systems, you might also see a W2 wire for the second stage of heating, providing more intense heat when needed.
- Yellow (Y or Y1): This is the cooling wire, controlling your air conditioning compressor. Like heating, some systems have Y2 for a second stage of cooling for more powerful air conditioning.
- Green (G): This is the fan wire. It controls the blower fan in your HVAC system, allowing you to circulate air even when heating or cooling isn’t needed. This is useful for ventilation.
- Blue or Black (C): The common wire or “C-wire” is essential for providing continuous 24V power to modern thermostats, especially smart thermostats that require constant power for their features (Wi-Fi, display, etc.). Older thermostats might not have a C-wire, as they relied on batteries or power stealing from other circuits.
- Orange (O/B): This wire is used in heat pumps for the reversing valve. It determines whether the heat pump is in heating or cooling mode. “O” is typically used for reversing valve energized in cooling, and “B” for energized in heating. Some systems might use “O/B” for a single terminal that can be configured for either function.
- Dark Blue (B): In some heat pump systems, a dark blue wire might be used specifically for the “B” reversing valve function, particularly when “O” is used for cooling. It’s less common than orange for the reversing valve.
Other Less Common Wires and Terminals:
- Brown (usually not standard thermostat wiring): In some rare cases, brown wires might be used for auxiliary functions, but they are not part of the standard color code. Consult your thermostat manual if you encounter a brown wire.
- Grey: Similar to brown, grey wires are not standard and usually indicate proprietary or system-specific functions.
- Aux or Aux Heat: This terminal is often found in heat pump systems and is for auxiliary heat or emergency heat, which are typically electric resistance heaters that provide supplemental heat when the heat pump can’t keep up with demand in very cold weather.
Important Note: Wire colors can sometimes vary, especially in older homes or DIY installations. Always verify the wiring by tracing the wires to their terminals and noting the terminal labels, rather than solely relying on color.
Exploring Different Thermostat Wiring Systems
Thermostat wiring configurations vary depending on the type of HVAC system you have. Here’s a breakdown of common wiring systems you might encounter:
2-Wire Thermostat Systems
- Typical Use: Simple heating-only systems like older furnaces or boilers without air conditioning.
- Wires: Usually only two wires:
- Red (R): Power.
- White (W): Heat.
- Functionality: Basic on/off control for heating.
3-Wire Thermostat Systems
- Typical Use: Often found with boilers and some older heating systems, possibly with a fan.
- Wires: Typically three wires:
- Red (R): Power.
- White (W): Heat.
- Green (G): Fan (sometimes).
- Functionality: Control heating and potentially a fan for air circulation (depending on the system).
4-Wire Thermostat Systems
- Typical Use: Heating-only systems, sometimes with a fan, often battery-powered digital thermostats.
- Wires: Four wires are common:
- Red (R or Rh): Power for heating.
- White (W): Heat.
- Green (G): Fan.
- Common (C) or potentially a second power wire (Rc) for cooling in more complex setups without AC.
- Functionality: Control heating and fan. The configuration can vary; some might have separate Rh and Rc terminals even in heating-only systems to isolate power circuits or be ready for future AC addition.
5-Wire Thermostat Systems
- Typical Use: Standard for homes with both heating and air conditioning.
- Wires: Five wires are most common:
- Red (R or Rh): Power for heating.
- White (W or W1): Heat.
- Yellow (Y or Y1): Cooling.
- Green (G): Fan.
- Common (C): Essential for many modern thermostats.
- Functionality: Comprehensive control of heating, cooling, and fan.
More Than 5 Wires
- Typical Use: Heat pump systems, multi-stage heating and cooling systems, and zone control systems.
- Wires: Can have 7, 8, or more wires depending on the complexity. Heat pumps often require more wires for reversing valves, auxiliary heat, and multi-stage operation. Zone control systems need additional wiring to control dampers and thermostats in different areas of the house.
- Functionality: Advanced control over complex HVAC systems, including heat pumps, multi-stage heating/cooling, and zoned heating/cooling.
When in Doubt, Consult a Professional: If you’re unsure about your wiring configuration, especially if you have more than 5 wires or are dealing with a heat pump, it’s always best to consult a qualified HVAC technician. Incorrect wiring can damage your thermostat and HVAC system.
Troubleshooting Your Thermostat Wiring
If your HVAC system isn’t working correctly, checking your thermostat wiring can be a helpful first step in troubleshooting. Here are some common issues and how to check your wiring:
Symptoms of Wiring Problems:
- Thermostat is blank or unresponsive: Could indicate a power issue (R wire) or common wire (C-wire) problem.
- Heating or cooling doesn’t turn on: Could be a problem with the W (heat) or Y (cool) wires, or a general power issue.
- Fan doesn’t work: Check the G wire and connections.
- Intermittent issues: Loose connections or corroded wires can cause intermittent problems.
Basic Thermostat Wiring Test (for simple heating/cooling systems):
Safety First: Turn off the power to your HVAC system at the breaker box before working with any wiring.
- Remove the Thermostat Cover: Carefully remove the thermostat cover to expose the wiring terminals.
- Take a Picture: Before disconnecting any wires, take a clear photo of the wiring. This will be invaluable as a reference when reconnecting wires.
- Check for Loose Connections: Gently tug on each wire to ensure it’s securely connected to its terminal. Tighten any loose screws on the terminals.
- Inspect Wire Condition: Look for any signs of corrosion, fraying, or damage to the wires. If you see damage, you may need to replace the damaged wire segment.
- Simple Heating Test (for basic 2-wire heat systems):
- Identify the Red (R) and White (W) wires.
- Carefully disconnect both wires from their terminals.
- Twist the bare metal ends of the Red and White wires together. This bypasses the thermostat and directly signals the furnace to turn on.
- Turn the power back on to your HVAC system at the breaker.
- If the furnace starts, the thermostat is likely the problem. If it doesn’t start, the issue is likely elsewhere in your heating system (furnace, wiring further down the line).
- Turn the power back off, disconnect the twisted wires, and reconnect them to their original terminals.
- Simple Cooling Test (for systems with AC – using Red (R) and Yellow (Y) wires): Follow the same steps as the heating test, but twist the Red (R) and Yellow (Y) wires together to test the AC compressor.
Important Considerations:
- Don’t force anything: If wires are stuck or terminals are difficult to access, don’t force them. Seek professional help.
- Label wires if disconnecting: If you need to disconnect multiple wires for more extensive troubleshooting, label each wire with tape and a pen before disconnecting it so you know where it goes.
- Safety is paramount: Always turn off the power before working with wiring. If you are uncomfortable working with electrical wiring, call a qualified HVAC technician.
Upgrading Your Thermostat: A DIY-Friendly Guide
Upgrading to a programmable or smart thermostat can offer enhanced comfort, energy savings, and convenience. Many thermostat upgrades are DIY-friendly, especially if you are replacing an existing thermostat with a similar wiring configuration.
Steps to Upgrade Your Thermostat:
- Choose Your New Thermostat: Select a thermostat that is compatible with your HVAC system (heating only, heating and cooling, heat pump, etc.) and meets your desired features (programmable, smart/Wi-Fi, etc.).
- Turn Off the Power: Crucially, turn off the power to your HVAC system at the breaker box.
- Remove the Old Thermostat Cover: Take off the cover and expose the wiring terminals.
- Take a “Before” Picture: Capture a clear photo of the existing wiring connections. This is your most important reference!
- Label Each Wire: Using small pieces of masking tape or wire labels, carefully label each wire according to its terminal letter (R, W, Y, G, C, etc.). For example, label the red wire “R”, the white wire “W”, and so on. This is critical for accurate reconnection.
- Disconnect the Wires: One at a time, loosen the terminal screws and carefully disconnect each wire. Keep the labeled wires organized and prevent them from falling back into the wall.
- Remove the Old Thermostat Base: Unscrew and remove the old thermostat base from the wall.
- Mount the New Thermostat Base: Position the new thermostat base on the wall, using the same screw holes if possible. Level the base and secure it with screws.
- Connect the Wires to the New Thermostat: Using your labels and the “before” picture as guides, connect each labeled wire to the corresponding terminal on the new thermostat base. Carefully match each wire to the correct terminal letter. Ensure the wires are securely inserted into the terminals and the screws are tightened (but not overtightened).
- Attach the New Thermostat Control Panel: Carefully snap or attach the new thermostat control panel to the base.
- Turn the Power Back On: Restore power to your HVAC system at the breaker box.
- Configure Your New Thermostat: Follow the manufacturer’s instructions to configure your new thermostat, set the date and time, and program your desired heating and cooling schedules or connect it to your Wi-Fi network if it’s a smart thermostat.
- Test Your System: Test both heating and cooling modes to ensure the new thermostat is working correctly.
Tips for a Smooth Thermostat Upgrade:
- Read the Manuals: Carefully read the manuals for both your old and new thermostats before starting.
- C-Wire Requirement: If you are upgrading to a smart thermostat, check if it requires a C-wire. If you don’t have a C-wire, some smart thermostats come with workarounds (power extenders), but it’s best to have a C-wire for reliable operation. If you don’t have a C-wire and your new thermostat requires one, you may need to run a new C-wire from your furnace or call an electrician to install one.
- Wire Stripping (if needed): If the wire ends are frayed or damaged, you might need to carefully strip a small amount of insulation from the wire ends to ensure a clean connection. Use wire strippers and strip only about ¼ inch of insulation.
- Online Resources: YouTube videos and online guides can be helpful visual aids for thermostat wiring and upgrades.
Find Your Thermostat and HVAC Supplies at Superior Home Supplies
Whether you are tackling thermostat wiring troubleshooting, upgrading to a new model, or need other HVAC components, Superior Home Supplies is your resource for quality products. Explore our wide selection of thermostats and HVAC supplies, and contact our knowledgeable team for expert assistance in choosing the right solutions for your home comfort needs.