Are you an astrophotography enthusiast looking to capture stunning long-exposure images of the night sky? A guide scope, often coupled with auto guiding, is an essential tool for achieving sharp, detailed results. At CONDUCT.EDU.VN, we help you understand the purpose, the considerations, and how to choose the best equipment for your astrophotography goals. Explore the world of auto guiding systems and telescope control with us.
1. Understanding the Basics of Autoguiding
Autoguiding is a vital technique in astrophotography, acting as an active telescope control system. It locks your telescope onto a specific star, correcting errors that may arise during long exposures. These errors can stem from various sources, including polar alignment inaccuracies, periodic errors in the telescope’s tracking mechanism, or even gusts of wind.
Autoguiding enhances the precision of your telescope tracking and it allows for significantly longer exposure times. Imagine transforming a system that produces trailed 2-minute exposures into one capable of capturing exposures exceeding 30 minutes. The key lies in proper tuning, thoughtful decision-making about your auto guiding strategy, and in using the right astrophotography equipment.
1.1. What Is Sampling Rate?
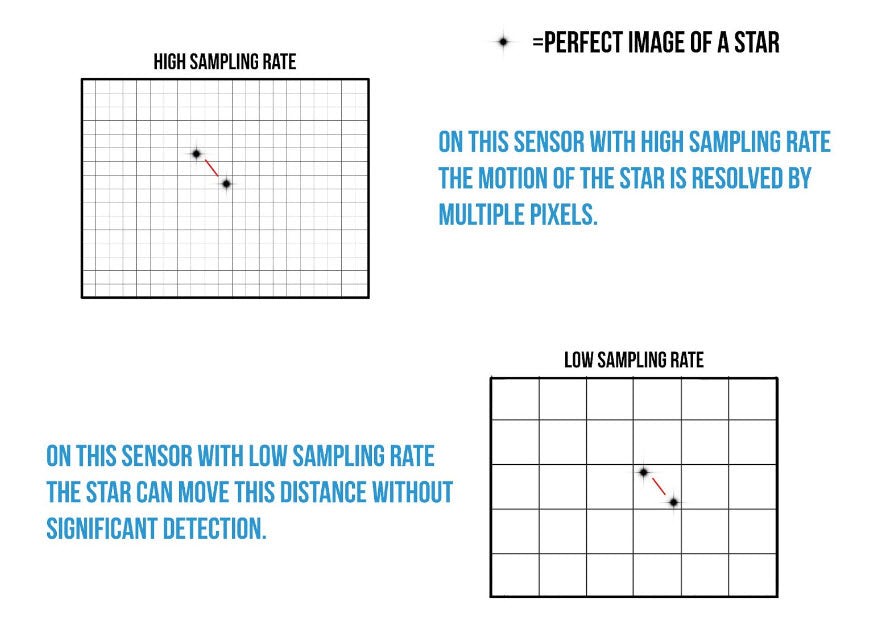
In astrophotography, the sampling rate refers to how frequently a signal is measured across a given dimension. Think of it as the resolution of your data. In the context of astrophotography, the sampling rate refers to how much of the sky each pixel on your camera’s sensor captures. This is typically measured in arcseconds per pixel.
To illustrate, consider the analogy of a gold miner surveying a plot of land. Taking a sample at each corner of the plot won’t provide an accurate estimate of the gold. Increasing the sampling rate by taking samples every 100 feet provides a better understanding, and sampling every 10 feet improves accuracy further. Similarly, in astrophotography, the sampling rate determines how well you can capture the fine details of the night sky.
1.2. How Does Sampling Rate Impact Astrophotography?
Each pixel in your camera captures a small portion of the sky. The smaller the pixels and the more zoomed in your telescope, the smaller the piece of the sky that each pixel captures. Using a camera with a single, large pixel results in a low sampling rate, making it impossible to detect subtle star movements.
1.2.1. The Goal: Detecting Star Movements
The goal of auto guiding is to keep star movements within a single pixel, ensuring sharp images with minimal trailing. This requires an auto guiding setup capable of detecting star movements smaller than what your imaging system can see.
1.2.2. Real-World Example
Let’s say you’re using a Canon 6D with a 14mm lens and a sky tracker, resulting in a sampling rate of 80 arcseconds per pixel. If the periodic error of the tracker causes star movements of 30 arcseconds, these movements won’t be captured because they fall below the imaging sampling rate. However, if you switch to a 400mm lens with a sampling rate of 2.78 arcseconds per pixel, you’ll be able to see all of the periodic error of the sky tracker.
Understanding the sampling rate of both your imaging system and your auto guiding setup is crucial for achieving optimal results in astrophotography.
2. Exploring Guide Scopes vs. Off-Axis Guiders
When it comes to auto guiding, two primary methods exist: guide scopes and off-axis guiders (OAGs). Both offer unique advantages and disadvantages, catering to different astrophotography setups and goals.
2.1. What Is a Guide Scope?
A guide scope is a separate, dedicated telescope equipped with its own camera solely for guiding purposes. Typically mounted on top of or on a bracket attached to your main telescope, it provides an independent system for tracking star movements.
2.2. What Is an Off-Axis Guider?
An off-axis guider (OAG) is a device positioned within your imaging train, between the focuser and camera. It houses a small prism that picks off a small amount of light from the edge of your image circle and directs it to your guide camera. In essence, your main imaging scope becomes the guide scope, as you’re guiding with the same light.
3. Diving Deeper into Guide Scope Considerations
Choosing the right guide scope involves careful consideration of several factors.
3.1. Size and Mounting
Two critical factors to consider when selecting a guide scope are its size and how it will be mounted to your system. A larger guide scope offers a better sampling rate for detecting star movements, it can introduce flexure into your system.
3.1.1. Understanding Differential Flexure
Differential flexure refers to the slight bending or sagging of the guide scope relative to the imaging telescope. This occurs because gravity exerts different forces on the guide scope as it points in various directions throughout the night sky.
3.1.2. The Impact of Flexure
Imagine a heavy 80mm guide scope mounted on top of an imaging telescope. As the guide scope flexes, your auto guiding system will compensate for that flexure. While your auto guiding appears to be working well, the flexure movement is effectively transferred to your imaging scope, resulting in trailed stars.
3.1.3. Mitigating Flexure
To address flexure, you can either invest in a more rigid mounting system or opt for a smaller guide scope that flexes less. However, a smaller guide scope may not provide sufficient accuracy for longer focal length imaging scopes.
3.2. Upsides of Using a Guide Scope
Despite the challenges, guide scopes offer several advantages:
- Subpixel Accuracy: Auto guiding software can achieve subpixel accuracy on your guide camera, allowing you to achieve surprising results with a smaller guide scope.
- Ease of Setup: Guide scopes are relatively easy to set up and can be easily swapped between different telescopes.
- No Back Focus Constraints: Unlike OAGs, guide scopes don’t impose constraints on your imaging train back focus.
3.3. Recommended Guide Scope Setup
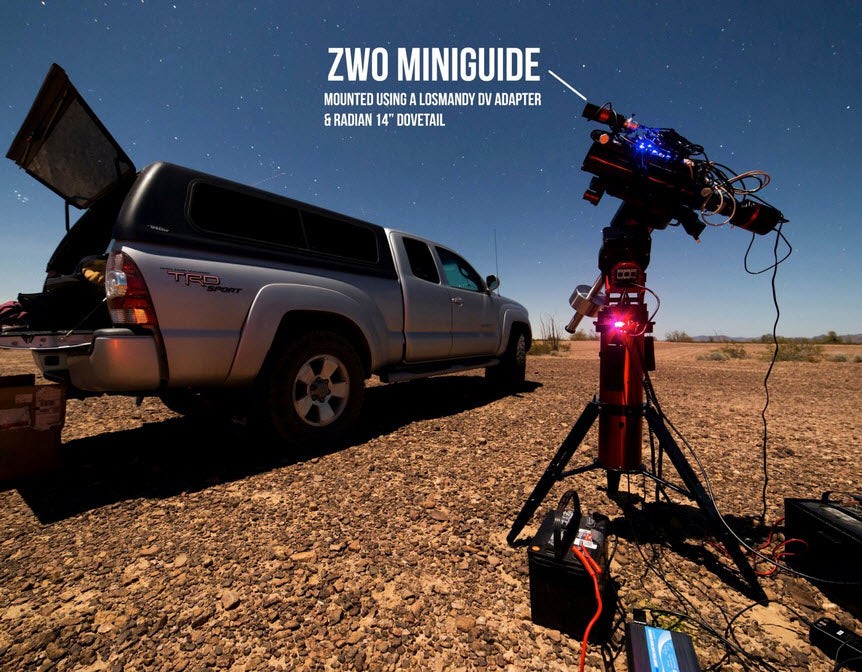
A popular choice among astrophotographers is the ZWO mini guide scope, paired with a QHY5L-II-M camera or a ZWO ASI290MM Mini for better sampling. Mounting this setup is straightforward with a Losmandy dovetail adapter and a Radian 14” Dovetail.
3.4. Mounting Considerations
Avoid mounting a guide scope to any built-in mounting point, such as a finder shoe, on a telescope, as this can lead to severe differential flexure. Instead, invest in a good set of tube rings and dovetail plates to ensure a rock-solid setup.
4. Unveiling Off-Axis Guider Considerations
Off-axis guiders (OAGs) often appear more complex than guide scopes, but once properly set up, they can be easier to use.
4.1. Challenges of Using an OAG
The main challenges with OAGs include:
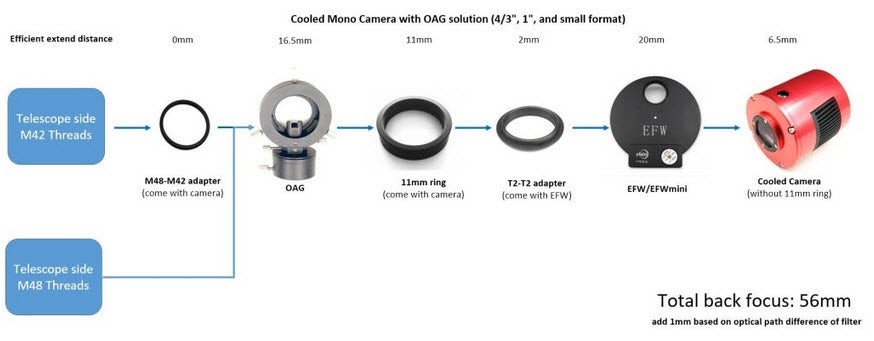
- Ensuring it fits within your imaging train’s back focus distance.
- Reaching the same point of focus as your main imaging camera.
- Choosing a size that doesn’t obscure your imaging sensor.
4.2. Choosing the Right OAG
For optimal results, purchase an OAG from the same brand as your imaging camera. Manufacturers often provide the necessary adapters to properly space out the OAG in your imaging train, ensuring compatibility with your sensor.
4.3. Setting Up Your OAG
Once the OAG is installed, focus your imaging telescope using your preferred method, then focus your auto guider. Once this is done, it typically doesn’t need to be repeated, as the OAG uses the same light as your imaging camera.
4.4. The Advantages of OAGs
OAGs offer several advantages:
- Set It and Forget It: Once focused, the OAG remains in focus, unlike guide scopes that require occasional refocusing.
- Essential for Long Focal Lengths: For focal lengths greater than 1500mm, an OAG may be the only feasible option for consistent results.
- Mirror Flop Correction: OAGs can guide out SCT mirror flop, a common issue with Schmidt-Cassegrain telescopes.
4.5. OAG and DSLR Astrophotography
DSLR astrophotographers may find that the camera body physically blocks an OAG, making them easier to use with dedicated astro cameras.
4.6. OAG: Accuracy and Reliability
OAGs provide a more accurate and reliable auto guiding solution compared to guide scopes. The increased setup difficulty is often worth the effort, especially for advanced setups.
4.7. Real-World Example
Consider a remote 16” Ritchey Chretien telescope with a focal length close to 4,000mm. The only way to effectively auto guide with this system is by using an OAG.
5. Pros and Cons: A Side-by-Side Comparison
To summarize, here’s a comparison of the pros and cons of guide scopes and OAGs:
| Feature | Guide Scope | OAG |
|---|---|---|
| Pros | – Easy to set up | – Very accurate |
| – Plenty of guide stars visible | – Allows auto guiding of any mirror flop | |
| – Easily interchangeable between scopes | – Will stay in focus with your imaging camera | |
| Cons | – Suffers from differential flexure | – Difficult to set up |
| – May not be sufficiently accurate at long focal lengths | – May lack sufficient guide stars at very long focal lengths | |
| – Cannot guide out SCT mirror flop | ||
| Setup Difficulty | Low | High |
| Focal Length | Best for shorter focal lengths | Best for longer focal lengths |
| Accuracy | Good | Excellent |


6. Making the Right Choice for Your Setup
If you’re using a short focal length refractor (250mm-600mm), a simple guide scope should suffice. For focal lengths near 1000mm, an OAG will provide more consistent results. Beyond 1500mm, an OAG becomes the most practical option.
7. Best Practices for Optimal Auto Guiding
To maximize your auto guiding success, consider these best practices:
- Precise Polar Alignment: Accurate polar alignment minimizes drift and reduces the workload on your auto guider.
- Proper Balance: Ensure your telescope is properly balanced in both axes to prevent motor strain and tracking errors.
- Accurate Focus: Precise focus of both your imaging scope and guide scope (or OAG) is essential for sharp images and accurate guiding.
- Calibration: Calibrate your auto guider regularly to account for any changes in your setup or environmental conditions.
- Software Settings: Optimize your auto guiding software settings, such as aggression and minimum movement, to match your specific setup and conditions.
- Regular Monitoring: Monitor your auto guiding performance throughout your imaging session and make adjustments as needed.
- Minimize Vibrations: Reduce any potential sources of vibration, such as wind or nearby traffic, as they can negatively impact guiding accuracy.
- Use a Stable Mount: A sturdy and stable mount is crucial for minimizing flexure and ensuring consistent tracking performance.
- Consider Atmospheric Conditions: Be aware of atmospheric conditions, such as seeing and transparency, as they can affect guiding performance.
- Experiment and Learn: Auto guiding is a complex process, so experiment with different settings and techniques to find what works best for your setup and imaging goals.
8. The Importance of Regular Maintenance
Maintaining your auto guiding equipment ensures its longevity and optimal performance.
8.1. Guide Scope Maintenance
- Cleaning: Regularly clean the lens of your guide scope with a microfiber cloth and lens cleaning solution.
- Collimation: Check and adjust the collimation of your guide scope periodically to ensure optimal image quality.
- Connections: Inspect and tighten all connections to prevent loosening or slippage.
8.2. OAG Maintenance
- Cleaning: Clean the prism of your OAG with a microfiber cloth and lens cleaning solution.
- Connections: Inspect and tighten all connections to ensure a secure fit.
- Alignment: Verify the alignment of the prism to ensure it’s properly positioned within the image circle.
8.3. General Maintenance
- Cables: Inspect all cables for wear and tear and replace them as needed.
- Mount: Regularly lubricate your mount according to the manufacturer’s instructions.
- Software Updates: Keep your auto guiding software up to date to benefit from the latest features and bug fixes.
9. Advanced Techniques for Auto Guiding
As you gain experience, you can explore advanced auto guiding techniques to further improve your results:
- Dithering: Dithering involves slightly shifting the telescope’s position between exposures to reduce noise and improve image quality.
- Multi-Star Guiding: This technique uses multiple guide stars to improve guiding accuracy and stability, especially in areas with poor seeing.
- Adaptive Optics: Adaptive optics systems correct for atmospheric turbulence in real-time, resulting in significantly sharper images.
10. Resources for Further Learning
To expand your knowledge of auto guiding, explore these resources:
- Online Forums: Join online forums dedicated to astrophotography to ask questions and learn from experienced users.
- Books and Articles: Read books and articles on astrophotography to deepen your understanding of auto guiding principles and techniques.
- Workshops and Seminars: Attend workshops and seminars led by experts in the field to gain hands-on experience and learn advanced techniques.
- Software Manuals: Consult the manuals for your auto guiding software for detailed information on its features and settings.
11. The Future of Auto Guiding
Auto guiding technology continues to evolve, with advancements in software, hardware, and techniques. Expect to see further improvements in accuracy, ease of use, and integration with other astrophotography equipment.
12. Common Auto Guiding Problems and Solutions
Even with the best equipment and techniques, you may encounter problems with auto guiding. Here are some common issues and their solutions:
- Poor Guiding Accuracy:
- Causes: Poor polar alignment, flexure, inaccurate focus, atmospheric turbulence.
- Solutions: Improve polar alignment, reduce flexure, refine focus, wait for better seeing conditions.
- Oscillations:
- Causes: Aggressive guiding settings, mount instability, backlash.
- Solutions: Reduce aggression, improve mount stability, adjust backlash settings.
- Lost Guide Star:
- Causes: Clouds, poor seeing, obstruction.
- Solutions: Wait for better weather, improve seeing conditions, move to a clearer location.
- Calibration Errors:
- Causes: Incorrect calibration steps, poor seeing, incorrect settings.
- Solutions: Recalibrate with correct settings, wait for better seeing conditions, ensure proper setup.
13. Frequently Asked Questions (FAQ)
- What Is A Guide Scope used for in astrophotography?
- A guide scope is a secondary telescope used to precisely track a star, correcting for any errors in the main telescope’s tracking during long exposures.
- How does a guide scope differ from an off-axis guider (OAG)?
- A guide scope is a separate telescope, while an OAG uses a prism to divert a portion of the main telescope’s light to a guide camera.
- What focal length guide scope should I use?
- A general rule of thumb is that the guide scope focal length should be at least one-third of the imaging scope focal length.
- What are the advantages of using an OAG over a guide scope?
- OAGs eliminate differential flexure and can guide out SCT mirror flop, providing more accurate guiding, especially at long focal lengths.
- Is a guide scope necessary for all astrophotography setups?
- No, a guide scope is not always necessary, especially for short focal length setups or when using a very accurate mount.
- How do I choose the right guide camera?
- Consider factors such as pixel size, sensitivity, and compatibility with your guide scope and software.
- What is differential flexure, and how does it affect auto guiding?
- Differential flexure is the bending or sagging of the guide scope relative to the imaging telescope, which can lead to inaccurate guiding and trailed stars.
- Can I use a guide scope with a DSLR camera?
- Yes, you can use a guide scope with a DSLR camera, but you may need to use a separate astro camera for guiding.
- What software is commonly used for auto guiding?
- Popular auto guiding software includes PHD2 Guiding, MetaGuide, and Maxim DL.
- How often should I calibrate my auto guider?
- Calibrate your auto guider regularly, especially after making changes to your setup or experiencing significant changes in environmental conditions.
14. Step-by-Step Guide to Setting Up a Guide Scope
Setting up a guide scope involves several steps to ensure proper functionality and accurate auto guiding:
- Mount the Guide Scope: Attach the guide scope to your primary telescope using a dovetail bar, tube rings, or a specialized mounting bracket. Ensure the guide scope is securely fastened to prevent movement or flexure.
- Connect the Guide Camera: Attach the guide camera to the guide scope’s focuser. Use any necessary adapters to achieve proper spacing and focus.
- Rough Focus: Perform a rough focus of the guide scope by adjusting the focuser until a star appears as a small, concentrated point of light on the guide camera’s screen.
- Connect to Computer: Connect the guide camera to your computer using a USB cable.
- Install Guiding Software: Install and configure your auto guiding software, such as PHD2 Guiding.
- Select Guide Star: In the guiding software, select a suitable guide star that is bright, isolated, and within the field of view of the guide camera.
- Calibrate Guider: Calibrate the guider by following the instructions in your guiding software. This process involves measuring the guider’s response to movements in the RA and DEC axes.
- Fine-Tune Focus: Once the guider is calibrated, fine-tune the focus of the guide scope to achieve the sharpest possible image of the guide star.
- Start Guiding: Begin the auto guiding process by activating the guiding function in your software. Monitor the guiding performance and make any necessary adjustments to the guiding parameters.
- Monitor Performance: Throughout your imaging session, monitor the guiding performance and make adjustments as needed to maintain accurate tracking.
15. Success Stories
Many astrophotographers have achieved remarkable results using guide scopes and OAGs. Here are a few examples:
- Alan: Achieved stunning images of distant galaxies using a guide scope and a mid-sized refractor telescope.
- Bob: Captured faint nebulae with impressive detail using an OAG and a large Schmidt-Cassegrain telescope.
- Charles: Overcame mirror flop issues with his SCT by implementing an OAG system, resulting in sharper, more defined images.
16. Conclusion
Choosing between a guide scope and an off-axis guider depends on your specific astrophotography setup, goals, and budget. Both offer unique advantages and disadvantages, but with careful consideration and proper setup, you can achieve excellent results with either method. Explore CONDUCT.EDU.VN for more in-depth guides and resources to help you master the art of astrophotography.
Are you struggling to find reliable guidelines for your specific situations? Do you feel overwhelmed by the abundance of conflicting information? Are you concerned about the legal and ethical implications of your actions? Visit CONDUCT.EDU.VN today for clear, easy-to-understand guidance and resources. Address: 100 Ethics Plaza, Guideline City, CA 90210, United States. Whatsapp: +1 (707) 555-1234. Website: conduct.edu.vn.