Guided Access passcode is an essential feature for device control, enabling you to restrict an iPhone, iPad, or iPod touch to a single app with restricted functionality. At CONDUCT.EDU.VN, we offer a comprehensive guide to help you understand, set up, and troubleshoot Guided Access passcodes, ensuring optimal device management and security. This guide also explores related security features, access restrictions, and parental controls to safeguard your device’s usage.
1. Understanding Guided Access and Its Passcode
Guided Access is an accessibility feature available on iOS devices, allowing users to lock the device into a single app. This is particularly useful in scenarios where you want to limit the user’s access to specific functionalities, such as when a child is using the device or when you need to prevent accidental navigation away from a particular app. The Guided Access passcode is crucial for controlling who can enable or disable this feature.
1.1. What Is Guided Access?
Guided Access is an accessibility feature that restricts an iOS device to a single application. It also allows you to disable specific hardware buttons and screen areas to prevent unintended actions. This mode is useful for:
- Parents: Limiting children’s access to educational apps or specific content.
- Educators: Ensuring students stay focused on learning apps during class.
- Businesses: Creating kiosk-style experiences or restricting device use to a single business-related application.
- Individuals: Minimizing distractions or preventing accidental exits from an app.
1.2. Purpose of Guided Access Passcode
The Guided Access passcode prevents unauthorized users from exiting Guided Access mode. It ensures that only authorized individuals can unlock the device from the restricted app, maintaining the intended focus and security. Without the passcode, anyone could disable Guided Access, defeating its purpose.
1.3. Security and Accessibility
Guided Access balances security and accessibility by allowing device owners to customize the feature to their specific needs. It provides a secure way to restrict access while still allowing authorized users to easily manage the device settings. It’s designed to enhance usability without compromising security.
 An iPhone screen displaying the Guided Access settings within the Accessibility menu
2. Setting Up Guided Access Passcode
Setting up Guided Access and its passcode involves a few straightforward steps. This process ensures that you can effectively control the device’s usage and prevent unauthorized access.
2.1. Step-by-Step Guide to Enable Guided Access
- Open Settings: Navigate to the Settings app on your iOS device.
- Go to Accessibility: Scroll down and tap on “Accessibility”.
- Find Guided Access: Scroll to the “General” section and tap “Guided Access”.
- Enable Guided Access: Toggle the switch to turn on Guided Access.
2.2. Configuring Passcode Settings
- Tap Passcode Settings: Within the Guided Access settings, tap on “Passcode Settings”.
- Set Guided Access Passcode: Tap “Set Guided Access Passcode”.
- Enter a Passcode: Enter a new passcode. This should be a unique code that you can remember but is difficult for others to guess.
- Re-enter Passcode: Re-enter the passcode to confirm it.
2.3. Using Touch ID or Face ID
You can also enable Touch ID or Face ID for added security:
- Toggle Touch ID/Face ID: In the Passcode Settings, toggle the switch to enable “Touch ID” or “Face ID” to allow biometric authentication as an alternative to the passcode.
- Authentication: Now, you can use your fingerprint or facial recognition to end a Guided Access session, providing a convenient and secure method.
3. Starting and Ending a Guided Access Session
Starting and ending a Guided Access session is simple and quick. Once configured, you can easily manage the device’s restricted mode.
3.1. Initiating Guided Access
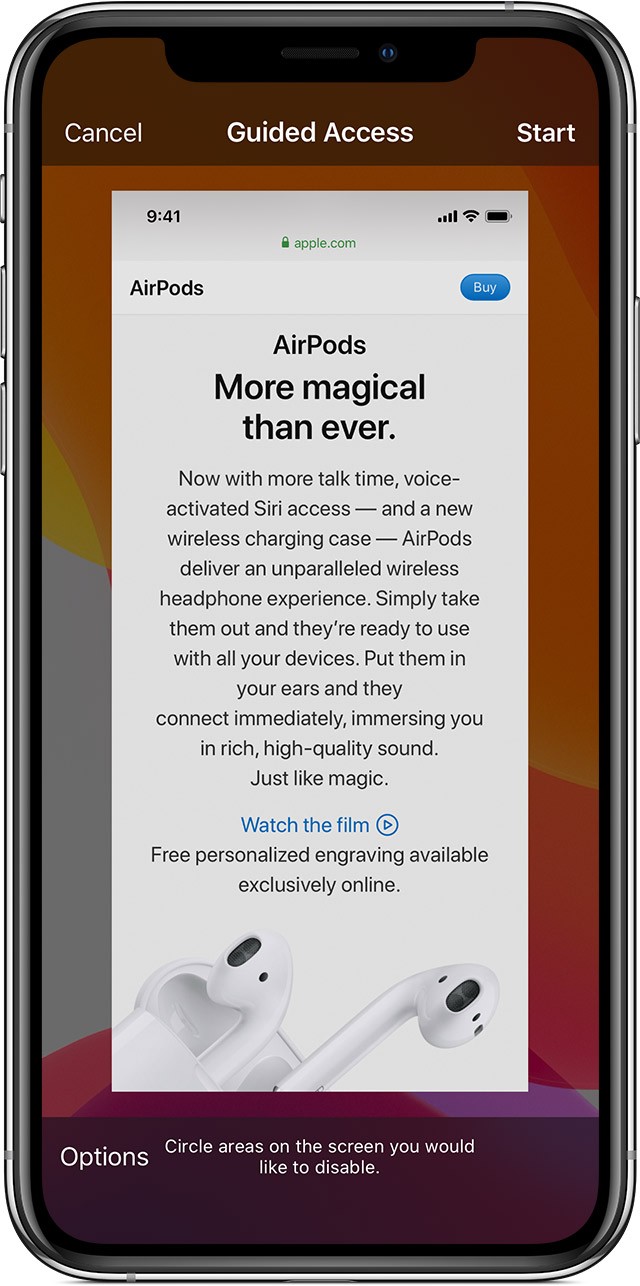
- Open the App: Launch the app you want to lock the device into.
- Triple-Click:
- On iPhone X and later: Triple-click the side button.
- On iPhone 8 and earlier: Triple-click the Home button.
- Guided Access Menu: The Guided Access options menu will appear.
- Configure Options: (Optional) Circle any areas of the screen you want to disable or tap “Options” to customize additional settings.
- Start Guided Access: Tap “Start” to begin the session.
3.2. Customizing Options During a Session
During a Guided Access session, you can customize the following options:
- Disable Hardware Buttons: Turn off the Sleep/Wake button or Volume buttons.
- Disable Motion: Limit the device’s response to motion (e.g., prevent screen rotation).
- Disable Keyboards: Prevent the keyboard from appearing.
- Disable Touch: Ignore all screen touches.
- Set Time Limit: Choose a time limit for the session.
3.3. Ending Guided Access
- Triple-Click: Triple-click the side or Home button.
- Enter Passcode: Enter your Guided Access passcode.
- Tap End: Tap “End” in the lower-left corner of the screen.
- Biometric Authentication: If enabled, use Touch ID or Face ID to end the session.
4. Troubleshooting Guided Access Passcode Issues
Sometimes, you may encounter issues with the Guided Access passcode. Here are some common problems and solutions.
4.1. Forgetting the Guided Access Passcode
If you forget the Guided Access passcode, there are a few methods to recover or reset it:
-
Using iTunes or Finder:
- Connect your iOS device to a computer that you have previously synced with.
- Open iTunes (or Finder on macOS Catalina and later).
- If prompted, enter your device passcode or “Trust This Computer”.
- Select your device when it appears in iTunes or Finder.
- Restore your device to factory settings. Note that this will erase all data on your device unless you have a backup.
- After the restore, you can set up your device as new and create a new Guided Access passcode.
-
Using Recovery Mode:
- Disconnect your device from the computer and turn it off.
- Put your device into recovery mode:
- iPhone 8 or later: Press and quickly release the Volume Up button, press and quickly release the Volume Down button, then press and hold the Side button until you see the recovery mode screen.
- iPhone 7, iPhone 7 Plus, and iPod touch (7th generation): Press and hold both the Side (or Top) button and the Volume Down button until you see the recovery mode screen.
- iPhone 6s and earlier, iPad, or iPod touch (6th generation or earlier): Press and hold both the Home button and the Side (or Top) button until you see the recovery mode screen.
- Connect your device to your computer while holding the appropriate button.
- In iTunes or Finder, you will see an option to Restore or Update. Choose Restore.
- iTunes or Finder will download the software for your device. If it takes more than 15 minutes, your device will exit recovery mode, and you’ll need to repeat these steps.
- After the restore, you can set up your device as new and create a new Guided Access passcode.
4.2. Guided Access Not Working
If Guided Access is not functioning as expected, consider the following:
- Ensure Guided Access Is Enabled: Double-check that Guided Access is enabled in the Accessibility settings.
- Restart Your Device: Sometimes, a simple restart can resolve minor software glitches.
- Update iOS: Make sure your device is running the latest version of iOS. Outdated software can cause compatibility issues.
- Check App Compatibility: Verify that the app you are trying to use with Guided Access is compatible. Some apps may have restrictions that prevent Guided Access from working correctly.
4.3. Screen Unresponsive During Guided Access
If the screen becomes unresponsive during a Guided Access session:
- Check Hardware Button Restrictions: Ensure that you haven’t accidentally disabled touch input in the Guided Access options.
- Restart the Session: End the current session (if possible) and start a new one, making sure the touch input is enabled.
- Force Restart: If the screen is completely unresponsive, force restart your device:
- iPhone 8 or later: Press and quickly release the Volume Up button, press and quickly release the Volume Down button, then press and hold the Side button until the Apple logo appears.
- iPhone 7 and iPhone 7 Plus: Press and hold both the Side button and the Volume Down button until the Apple logo appears.
- iPhone 6s and earlier, iPad, or iPod touch: Press and hold both the Home button and the Side (or Top) button until you see the Apple logo.
5. Advanced Uses of Guided Access
Guided Access can be used in various innovative ways beyond basic parental controls.
5.1. Guided Access in Education
In educational settings, Guided Access can ensure that students remain focused on specific learning apps. Teachers can disable access to games, social media, and other distracting content during class time.
- Classroom Management: Implement Guided Access to keep students on task.
- Testing Environments: Use Guided Access to prevent cheating during exams by restricting access to other apps and online resources.
- Special Needs: Adapt device usage for students with special needs by simplifying interfaces and limiting distractions.
5.2. Guided Access for Individuals with Cognitive Disabilities
Guided Access can simplify device usage for individuals with cognitive disabilities. By locking the device into a single app with a simplified interface, it reduces confusion and frustration.
- Simplified Interfaces: Create a streamlined experience by limiting access to essential apps.
- Reduced Distractions: Minimize potential distractions and sensory overload.
- Task Completion: Help individuals focus on completing specific tasks without getting sidetracked.
5.3. Guided Access in Business Settings
Businesses can use Guided Access to create kiosk-style experiences or restrict device usage to specific business-related applications.
- Kiosk Mode: Set up iPads as interactive kiosks for product demos, surveys, or information displays.
- Employee Devices: Restrict employee devices to essential work apps, enhancing productivity and security.
- Data Security: Prevent unauthorized access to sensitive business data by limiting app usage.
6. Guided Access vs. Other Accessibility Features
While Guided Access is a powerful tool, it’s important to understand how it compares to other accessibility features available on iOS devices.
6.1. VoiceOver
VoiceOver is a screen reader that provides auditory descriptions of what’s on the screen. It’s designed for users who are blind or have low vision. Unlike Guided Access, which restricts access to a single app, VoiceOver enhances usability across the entire device.
- Purpose: VoiceOver provides auditory feedback, while Guided Access restricts app usage.
- Target Users: VoiceOver is for visually impaired users, whereas Guided Access is for anyone needing restricted device access.
6.2. Zoom
Zoom magnifies the screen, making it easier for users with low vision to see content. Like VoiceOver, Zoom enhances usability across the device rather than restricting it.
- Purpose: Zoom magnifies the screen, while Guided Access restricts app usage.
- Target Users: Zoom is for visually impaired users, whereas Guided Access is for anyone needing restricted device access.
6.3. Switch Control
Switch Control allows users to interact with their devices using one or more physical switches. It’s designed for users with limited mobility. Unlike Guided Access, Switch Control provides alternative input methods.
- Purpose: Switch Control provides alternative input methods, while Guided Access restricts app usage.
- Target Users: Switch Control is for users with limited mobility, whereas Guided Access is for anyone needing restricted device access.
7. Maintaining Device Security with Guided Access
Guided Access is a valuable tool for maintaining device security, but it should be part of a comprehensive security strategy.
7.1. Importance of a Strong Passcode
A strong passcode is essential for protecting your device and the Guided Access settings. Avoid using easily guessable passcodes, such as birthdays or common number sequences.
- Complexity: Use a combination of letters, numbers, and symbols.
- Uniqueness: Don’t reuse passcodes from other accounts or devices.
- Regular Updates: Change your passcode periodically to minimize the risk of unauthorized access.
7.2. Enabling Two-Factor Authentication
Two-factor authentication adds an extra layer of security to your Apple ID. Even if someone knows your password, they will need a verification code sent to your trusted device to access your account.
- Setup: Enable two-factor authentication in your Apple ID settings.
- Verification: Ensure your trusted devices are secure.
- Recovery: Set up recovery options in case you lose access to your trusted devices.
7.3. Keeping Software Updated
Regularly updating your device’s software is crucial for maintaining security. Software updates often include security patches that address known vulnerabilities.
- Automatic Updates: Enable automatic software updates in your device settings.
- Timely Installation: Install updates as soon as they become available.
- Backup: Back up your device before installing updates to prevent data loss.
8. Parental Controls and Guided Access
Guided Access is a powerful tool for parental controls, but it works best when combined with other features designed to protect children.
8.1. Screen Time
Screen Time allows parents to monitor and limit their children’s device usage. It provides insights into how much time children spend on their devices and which apps they use most often.
- Usage Monitoring: Track how much time your child spends on their device.
- App Limits: Set time limits for specific apps or categories of apps.
- Downtime Scheduling: Schedule periods of downtime when the device is unavailable.
8.2. Content Restrictions
Content Restrictions allow parents to block access to inappropriate content, such as explicit websites, movies, or apps.
- Web Filtering: Block access to adult websites or create a whitelist of allowed websites.
- Content Ratings: Restrict access to content based on age ratings.
- App Restrictions: Prevent the installation of certain apps.
8.3. Communication Limits
Communication Limits allow parents to control who their children can communicate with on their devices.
- Contact Management: Approve or block specific contacts.
- Communication During Downtime: Set restrictions on who can contact your child during downtime.
- Group FaceTime: Limit participation in group FaceTime calls.
9. Ethical Considerations for Using Guided Access
While Guided Access is a technical tool, it’s essential to consider the ethical implications of how it’s used, particularly in scenarios involving children, students, or employees.
9.1. Transparency and Consent
When using Guided Access to restrict someone’s device usage, it’s important to be transparent about why you’re doing it and, where appropriate, obtain their consent.
- Explain the Purpose: Clearly explain why you’re using Guided Access and what restrictions it entails.
- Seek Agreement: Involve the individual in the decision-making process whenever possible.
- Respect Autonomy: Recognize the individual’s right to make their own choices, especially as they get older.
9.2. Balancing Security and Freedom
It’s important to strike a balance between protecting individuals and respecting their freedom to explore and learn. Overly restrictive measures can stifle creativity and independence.
- Age-Appropriate Restrictions: Tailor the restrictions to the individual’s age and maturity level.
- Gradual Relaxation: As the individual demonstrates responsible behavior, gradually relax the restrictions.
- Open Communication: Encourage open communication about concerns and challenges related to device usage.
9.3. Avoiding Surveillance and Control
Guided Access should not be used as a tool for constant surveillance or control. It’s important to respect the individual’s privacy and autonomy.
- Limited Monitoring: Avoid constantly monitoring the individual’s device usage.
- Respect Privacy: Refrain from accessing personal information or communications without consent.
- Trust and Empowerment: Foster a relationship of trust and empower the individual to make responsible choices.
10. The Future of Guided Access and Accessibility Features
As technology evolves, accessibility features like Guided Access are likely to become even more sophisticated and integrated into our devices.
10.1. AI and Machine Learning
AI and machine learning can personalize accessibility features to meet individual needs. For example, AI could automatically adjust screen settings based on ambient lighting conditions or usage patterns.
- Adaptive Interfaces: AI could create adaptive interfaces that simplify complex tasks.
- Predictive Assistance: AI could predict the user’s needs and provide proactive assistance.
- Voice Control Enhancements: AI could improve the accuracy and responsiveness of voice control systems.
10.2. Integration with Augmented Reality
Augmented reality (AR) can overlay digital information onto the real world, creating new possibilities for accessibility. For example, AR could provide real-time translations of text or visual cues to help navigate unfamiliar environments.
- Visual Aids: AR could provide visual aids for people with low vision.
- Navigation Assistance: AR could help people with mobility impairments navigate complex spaces.
- Communication Tools: AR could facilitate communication for people with hearing impairments.
10.3. Enhanced Security Measures
Future versions of Guided Access may incorporate more advanced security measures, such as biometric authentication and tamper-detection mechanisms.
- Multi-Factor Authentication: Enhanced security could require multiple forms of authentication to disable Guided Access.
- Remote Management: IT administrators could remotely manage Guided Access settings on multiple devices.
- Real-Time Monitoring: Enhanced security could provide real-time monitoring of device usage and security events.
By understanding the purpose, setup, and troubleshooting of Guided Access passcodes, you can effectively manage device access and ensure a secure and focused user experience. For more detailed information and guidance, visit conduct.edu.vn, where you can find a wealth of resources on digital ethics, conduct guidelines, and device security. Contact us at 100 Ethics Plaza, Guideline City, CA 90210, United States, or via WhatsApp at +1 (707) 555-1234.
FAQ Section
1. What is the main purpose of Guided Access?
Guided Access restricts an iOS device to a single app, limiting features to maintain focus or security.
2. How do I enable Guided Access on my iPhone?
Go to Settings > Accessibility > Guided Access and toggle the switch to turn it on.
3. Can I use Face ID instead of a passcode for Guided Access?
Yes, you can enable Face ID or Touch ID in the Passcode Settings within Guided Access.
4. What should I do if I forget my Guided Access passcode?
You can restore your device to factory settings using iTunes or Finder, but this will erase all data unless you have a backup.
5. How can Guided Access be used in education?
Teachers can use it to keep students focused on learning apps by disabling access to distracting content.
6. Is it possible to disable hardware buttons during a Guided Access session?
Yes, you can turn off the Sleep/Wake button or Volume buttons in the Guided Access options.
7. Can I set a time limit for a Guided Access session?
Yes, you can choose a time limit within the Guided Access options.
8. What other accessibility features are available on iOS devices?
Other features include VoiceOver, Zoom, and Switch Control, each serving different accessibility needs.
9. How does Screen Time differ from Guided Access?
Screen Time monitors and limits overall device usage, while Guided Access restricts the device to a single app.
10. What ethical considerations should I keep in mind when using Guided Access?
Transparency, consent, and balancing security with freedom are crucial when using Guided Access, especially with children or students.