Guided Access is a powerful accessibility feature available on iPhones, iPads, and iPod Touches. It allows you to lock your device into a single app and control which features are available, providing a focused and secure user experience. But what is Guided Access primarily used for, and how can you leverage it to its full potential? This guide explores the various applications of Guided Access and how to set it up and customize it for your specific needs.
Understanding the Core Functionality
At its heart, Guided Access restricts device usage to a single application. This means users can’t navigate away from the designated app without entering a passcode or using biometric authentication (Face ID or Touch ID). Beyond simply locking the device to one app, Guided Access also offers granular control over features, allowing you to disable hardware buttons, touch input in specific areas of the screen, and even keyboard access.
Primary Uses of Guided Access
So, What Is Guided Access Used For in practical scenarios? Here are some of the most common applications:
-
Parental Control: One of the most popular uses is to limit a child’s access to a single educational app or game. This prevents them from accidentally accessing other apps, making unauthorized purchases, or changing device settings. You can also disable touch input in certain areas to prevent accidental clicks or navigation.
-
Focus and Productivity: For individuals who are easily distracted, Guided Access can help maintain focus on a specific task. By locking the device into a single app related to work or study, distractions from notifications, social media, and other apps are minimized.
-
Accessibility for Users with Cognitive Impairments: Guided Access provides a simplified and controlled environment for users with cognitive disabilities or those who are unfamiliar with technology. By restricting access to a single app with specific features enabled, it reduces confusion and frustration.
-
Kiosk Mode: Guided Access can effectively turn an iOS device into a kiosk. This is useful for displaying information, collecting data, or providing a specific service in public settings, such as museums, trade shows, or retail stores. Features like disabling the volume buttons or the Sleep/Wake button prevent unwanted manipulation.
-
Preventing Accidental Interactions: In situations where accidental gestures might disrupt the user experience, such as during a presentation or when using an app that requires precise input, Guided Access can be used to disable touch input in specific areas of the screen.
Setting Up and Customizing Guided Access
Here’s how to set up and configure Guided Access on your iOS device:
-
Enable Guided Access: Navigate to Settings > Accessibility > Guided Access and toggle the switch to turn it on.
-
Set a Passcode: Tap Passcode Settings and then Set Guided Access Passcode. Enter a passcode and re-enter it to confirm. You can also enable Face ID or Touch ID to end Guided Access sessions.
-
Start a Session: Open the app you want to use. Triple-click the Side button (on iPhone X or later) or the Home button (on iPhone 8 or earlier).
-
Customize Options: Before starting, you can circle areas of the screen you want to disable. Tap Options at the bottom to access additional settings:
-
Sleep/Wake Button: Disables the Sleep/Wake button.
-
Volume Buttons: Disables the volume buttons.
-
Motion: Limits device response to motion (e.g., prevents screen rotation).
-
Keyboards: Disables the keyboard.
-
Touch: Disables all touch input on the screen.
-
Dictionary Lookup: Enables or disables the Look Up feature.
-
Time Limit: Sets a time limit for the Guided Access session.
-
-
Start Guided Access: Tap Start in the top right corner.
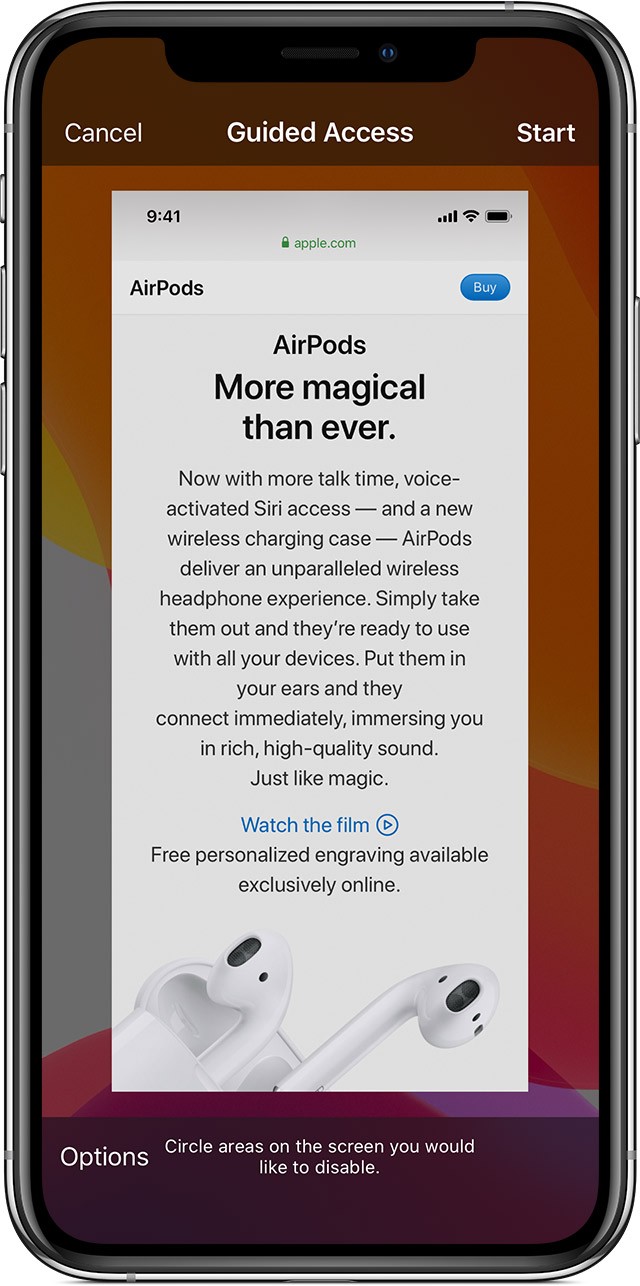 Guided Access enabled in Safari settings
Ending a Guided Access Session
To end a Guided Access session, triple-click the Side or Home button, enter your passcode, and tap End. If you enabled Face ID or Touch ID, you can use those instead.
Tips for Effective Use
- Plan Ahead: Before starting a Guided Access session, consider which features you need to disable and adjust the settings accordingly.
- Clear Instructions: If using Guided Access with someone else, provide clear instructions on how to use the app and what limitations are in place.
- Regular Review: Periodically review your Guided Access settings to ensure they still meet your needs and make adjustments as necessary.
- Explore Accessibility Options: Guided Access is just one of many accessibility features available on iOS. Explore other options, such as VoiceOver, Zoom, and Switch Control, to further customize the user experience.
Conclusion
Guided Access is a versatile tool with a wide range of applications, from parental control and focus enhancement to accessibility and kiosk mode implementations. Understanding “what is Guided Access used for” and how to configure it empowers you to create a more controlled, secure, and focused experience on your iPhone, iPad, or iPod Touch. By leveraging its granular control over features and device access, you can tailor the user experience to meet specific needs and maximize productivity.