Smart Guides in PowerPoint are an invaluable tool for creating visually appealing and precisely aligned presentations, enhancing visual balance. CONDUCT.EDU.VN provides comprehensive insights into utilizing Smart Guides effectively. Learn about PowerPoint alignment features, dynamic alignment assistance, and precision placement techniques to elevate your presentation skills.
1. Understanding Smart Guides in PowerPoint
Smart Guides are visual aids in PowerPoint that dynamically appear as you move objects, such as shapes, text boxes, or images, around a slide. These guides help you align objects relative to each other or to the slide itself. When an object’s edge, center, or corner gets close to another object or a specific point on the slide, Smart Guides appear as temporary lines, indicating alignment.
These guides are designed to make the process of aligning objects simpler and more precise, ensuring a professional and polished look for your presentations. Smart Guides are enabled by default in PowerPoint, but you can toggle them on or off based on your preferences.
1.1. Definition of Smart Guides
Smart Guides in PowerPoint are temporary visual cues that appear when you move or resize objects on a slide. They are designed to assist you in aligning these objects with other elements on the slide, such as shapes, text boxes, or the edges of the slide itself. These guides dynamically adjust as you move objects, providing real-time feedback on alignment.
1.2. Purpose of Smart Guides
The primary purpose of Smart Guides is to help you create visually balanced and professionally aligned slides. By using Smart Guides, you can ensure that objects are:
- Aligned with each other, either by their edges or centers.
- Equidistant from each other.
- Aligned with the edges or center of the slide.
This level of precision can significantly improve the overall look and feel of your presentations, making them more engaging and easier to follow.
1.3. How Smart Guides Enhance Presentation Design
Smart Guides play a crucial role in enhancing presentation design by:
- Ensuring Alignment: They help align objects, preventing a haphazard or unprofessional appearance.
- Promoting Symmetry: Smart Guides make it easier to create symmetrical layouts, which are visually pleasing.
- Saving Time: They reduce the need for manual adjustments, speeding up the design process.
- Improving Visual Hierarchy: Aligned elements contribute to a clear visual hierarchy, guiding the audience’s eye through the content.
1.4. Smart Guides vs. Gridlines and Guides
While Smart Guides, gridlines, and guides all assist in object alignment, they function differently:
| Feature | Description | Dynamic/Static |
|---|---|---|
| Smart Guides | Temporary guides that appear dynamically as you move objects, showing alignment relationships. | Dynamic |
| Gridlines | A static grid of lines that covers the entire slide, useful for consistent spacing. | Static |
| Guides | Customizable lines that you can position anywhere on the slide, useful for consistent layout. | Static |


- Smart Guides are dynamic and context-sensitive, appearing only when needed.
- Gridlines provide a consistent, static grid for general alignment.
- Guides are static lines that you can customize for specific layout requirements.
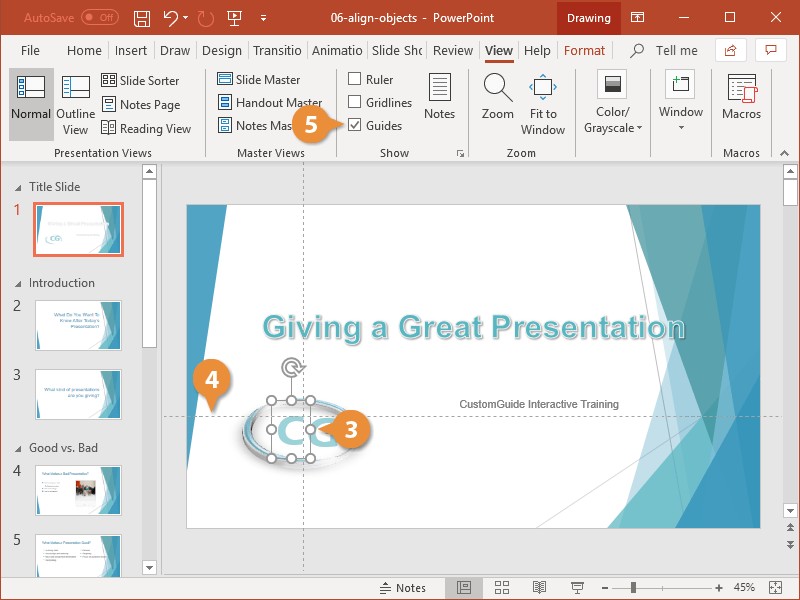
2. Enabling and Disabling Smart Guides
Smart Guides are typically enabled by default in PowerPoint. However, if they are not visible or if you prefer to work without them, you can easily toggle them on or off through the PowerPoint settings.
2.1. Locating the Smart Guides Setting
To enable or disable Smart Guides, follow these steps:
- Click on the View tab in the PowerPoint ribbon.
- In the Show group, look for the Smart Guides checkbox.
2.2. Toggling Smart Guides On and Off
- To enable Smart Guides, check the Smart Guides checkbox.
- To disable Smart Guides, uncheck the Smart Guides checkbox.
When enabled, Smart Guides will appear automatically as you move objects on your slides. When disabled, they will not appear, giving you more freedom to position objects without alignment assistance.
2.3. When to Enable Smart Guides
Enable Smart Guides when:
- You need precise alignment of objects.
- You want to create a symmetrical or balanced layout.
- You are working with multiple objects that need to be evenly spaced.
- You want to quickly align objects to the center or edges of the slide.
2.4. When to Disable Smart Guides
Disable Smart Guides when:
- You need to position objects freely without any alignment constraints.
- Smart Guides are interfering with your workflow.
- You prefer to use other alignment tools, such as gridlines or guides.
3. Working with Smart Guides: A Step-by-Step Guide
Using Smart Guides is intuitive. Here’s how to effectively work with them to achieve precise alignment in your PowerPoint presentations.
3.1. Selecting and Moving Objects
- Select the Object: Click on the object you want to move or align. You can select multiple objects by holding down the Shift key while clicking on each object.
- Start Moving the Object: Click and drag the selected object to move it around the slide.
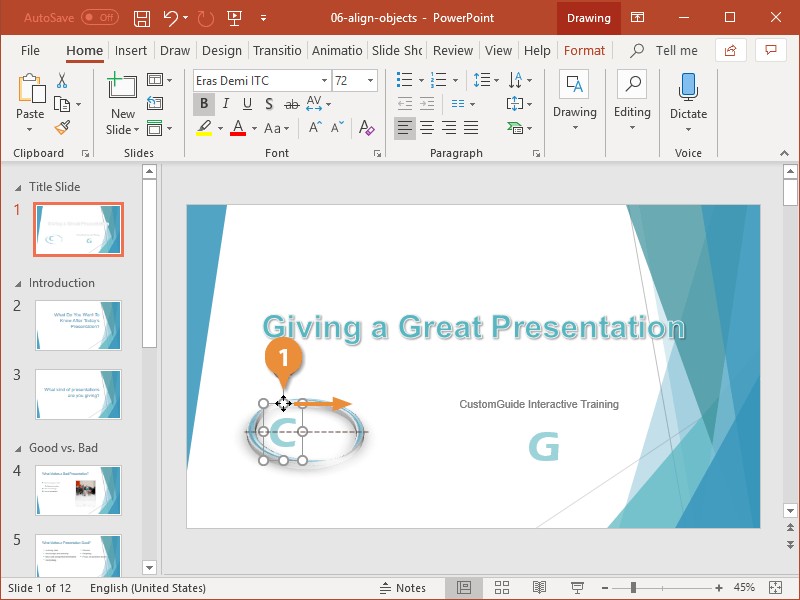
3.2. Identifying Smart Guide Indicators
As you move the object, keep an eye out for the Smart Guide indicators. These appear as temporary lines that show alignment relationships between the object and other elements on the slide.
Common Smart Guide indicators include:
- Center Alignment: A dotted line appears when the center of the object aligns with the center of another object or the slide.
- Edge Alignment: Dotted lines appear when the edges of the object align with the edges of another object or the slide.
- Equal Spacing: Dotted lines and arrows appear when the object is equidistant from other objects.
3.3. Aligning Objects Using Smart Guides
- Move the Object Slowly: As you move the object, do so slowly to allow the Smart Guides to appear.
- Observe the Smart Guides: Pay attention to the Smart Guide indicators that appear as you move the object close to other elements.
- Align the Object: When the desired Smart Guides appear, release the mouse button to position the object in alignment.
3.4. Tips for Precise Alignment
- Zoom In: Zoom in on the slide for more precise control over object placement.
- Use Keyboard Arrows: Use the arrow keys to nudge objects into precise alignment after using Smart Guides.
- Combine with Other Tools: Use Smart Guides in conjunction with gridlines and guides for even greater precision.
4. Practical Applications of Smart Guides
Smart Guides are versatile tools that can be used in a variety of scenarios to improve the design and layout of your presentations.
4.1. Aligning Shapes and Images
Smart Guides are particularly useful for aligning shapes and images on a slide. You can use them to:
- Align shapes horizontally or vertically.
- Ensure images are aligned with text boxes.
- Create a grid of evenly spaced images.
4.2. Creating Symmetrical Layouts
Symmetrical layouts are visually appealing and can create a sense of balance in your presentations. Smart Guides make it easier to create symmetrical layouts by helping you:
- Align objects to the center of the slide.
- Position objects equidistant from the center.
- Mirror objects on either side of the center.
4.3. Ensuring Consistent Spacing
Consistent spacing between objects is crucial for creating a clean and professional look. Smart Guides help you achieve consistent spacing by:
- Showing when objects are equidistant from each other.
- Allowing you to distribute objects evenly across the slide.
4.4. Aligning Text Boxes
Smart Guides can also be used to align text boxes with each other or with other objects on the slide. This can help you:
- Create a clear visual hierarchy.
- Ensure text is aligned with images or shapes.
- Improve the readability of your slides.
5. Advanced Techniques with Smart Guides
Beyond basic alignment, Smart Guides can be used for more advanced design techniques to create sophisticated and visually appealing presentations.
5.1. Using Smart Guides with Grouped Objects
When working with grouped objects, Smart Guides can help you align the entire group with other elements on the slide. To do this:
- Group the Objects: Select the objects you want to group and press Ctrl+G (or right-click and select Group).
- Move the Grouped Object: Click and drag the grouped object to move it around the slide.
- Observe the Smart Guides: Pay attention to the Smart Guide indicators that appear as you move the group close to other elements.
- Align the Group: When the desired Smart Guides appear, release the mouse button to position the group in alignment.
5.2. Creating Custom Guides with Smart Guides
You can use Smart Guides to create custom guides for your slides. This involves using Smart Guides to position objects at specific points on the slide and then using these objects as reference points for aligning other elements.
- Position the Reference Object: Use Smart Guides to position an object at a specific point on the slide.
- Use as a Reference: Use the reference object to align other elements on the slide using Smart Guides.
- Remove the Reference Object: Once you have aligned the other elements, you can remove the reference object.
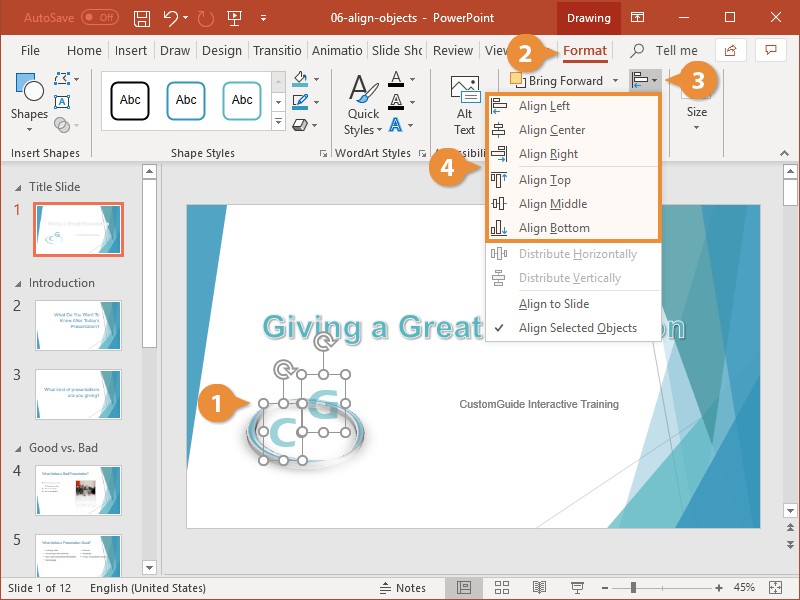
5.3. Combining Smart Guides with the Align Tool
The Align Tool in PowerPoint provides a range of options for aligning objects, such as aligning to the left, right, top, or bottom. You can combine Smart Guides with the Align Tool for even greater precision.
- Select the Objects: Select the objects you want to align.
- Open the Align Tool: Click on the Format tab and then click on the Align button.
- Choose an Alignment Option: Select an alignment option from the dropdown menu.
- Use Smart Guides for Fine-Tuning: Use Smart Guides to fine-tune the alignment of the objects.
5.4. Using Smart Guides for Equal Distribution
Smart Guides can assist in distributing multiple objects evenly across a slide. This is particularly useful when creating lists or arranging images in a grid.
- Select the Objects: Select the objects you want to distribute.
- Arrange the End Objects: Position the objects at either end of the distribution area.
- Distribute Evenly: Use Smart Guides to position the remaining objects equidistant from each other.
6. Troubleshooting Common Smart Guide Issues
While Smart Guides are generally reliable, you may encounter some issues when working with them. Here are some common problems and how to troubleshoot them.
6.1. Smart Guides Not Appearing
If Smart Guides are not appearing when you move objects, make sure that they are enabled in the PowerPoint settings. Follow the steps in Section 2 to enable Smart Guides.
6.2. Smart Guides Interfering with Workflow
If Smart Guides are interfering with your workflow, you can temporarily disable them by unchecking the Smart Guides checkbox in the View tab. Alternatively, you can use the Ctrl key to temporarily override Smart Guides while moving objects.
6.3. Smart Guides Not Aligning Correctly
If Smart Guides are not aligning objects correctly, make sure that you are moving the objects slowly and paying attention to the Smart Guide indicators. You may also need to zoom in on the slide for more precise control.
6.4. Smart Guides Snapping to the Wrong Objects
Sometimes, Smart Guides may snap to the wrong objects, especially when there are many elements on the slide. In this case, try moving the object from a different angle or temporarily hiding some of the other elements on the slide.
7. Comparing Smart Guides with Other Alignment Tools
PowerPoint offers several alignment tools, each with its strengths and weaknesses. Understanding how Smart Guides compare to these tools can help you choose the right tool for the job.
7.1. Smart Guides vs. Align Objects Tool
The Align Objects tool provides options to align objects to the left, center, right, top, middle, or bottom. While this tool provides precise alignment, it lacks the dynamic feedback of Smart Guides.
| Feature | Smart Guides | Align Objects Tool |
|---|---|---|
| Alignment Type | Dynamic, context-sensitive | Static, predefined |
| Real-Time | Yes | No |
| Use Case | Fine-tuning object placement, creating symmetrical layouts | Aligning multiple objects to a common edge or center |
7.2. Smart Guides vs. Gridlines
Gridlines provide a static grid of lines that cover the entire slide. While useful for consistent spacing, gridlines lack the dynamic alignment assistance of Smart Guides.
| Feature | Smart Guides | Gridlines |
|---|---|---|
| Guidance | Dynamic, object-sensitive | Static, slide-wide |
| Customization | Limited | None |
| Use Case | Aligning objects relative to each other, real-time adjustments | Creating a consistent layout, general alignment assistance |
7.3. Smart Guides vs. Guides (Customizable)
Guides are customizable lines that you can position anywhere on the slide. While useful for creating a consistent layout, guides lack the dynamic alignment assistance of Smart Guides.
| Feature | Smart Guides | Guides (Customizable) |
|---|---|---|
| Guidance | Dynamic, object-sensitive | Static, user-defined |
| Customization | Limited | High |
| Use Case | Aligning objects relative to each other, real-time adjustments | Creating a specific layout, consistent element placement |
7.4. Choosing the Right Tool
The best tool for the job depends on the specific task at hand. Use Smart Guides for dynamic alignment and fine-tuning, the Align Objects tool for precise alignment to a common edge or center, gridlines for general alignment assistance, and guides for creating a consistent layout.
8. Tips and Tricks for Mastering Smart Guides
Mastering Smart Guides can significantly improve your PowerPoint design skills. Here are some tips and tricks to help you get the most out of this powerful tool.
8.1. Use Keyboard Shortcuts
Using keyboard shortcuts can speed up your workflow and make it easier to align objects with Smart Guides. Some useful shortcuts include:
- Ctrl+G: Group selected objects.
- Ctrl+Shift+G: Ungroup selected objects.
- Arrow Keys: Nudge selected objects into precise alignment.
8.2. Zoom In for Precision
Zooming in on the slide can give you more precise control over object placement and make it easier to see the Smart Guide indicators. Use the zoom slider in the bottom right corner of the PowerPoint window or the Ctrl key and the mouse wheel to zoom in and out.
8.3. Combine Smart Guides with Other Tools
As mentioned earlier, combining Smart Guides with other alignment tools can give you even greater precision. Experiment with using Smart Guides in conjunction with the Align Objects tool, gridlines, and guides.
8.4. Practice Regularly
The best way to master Smart Guides is to practice regularly. Experiment with different layouts and designs, and pay attention to how Smart Guides can help you achieve your desired results.
9. Case Studies: Smart Guides in Action
To illustrate the power and versatility of Smart Guides, here are a few case studies showcasing how they can be used in real-world scenarios.
9.1. Redesigning a Cluttered Slide
A presenter had a slide with several text boxes and images that were not aligned properly. The slide looked cluttered and unprofessional.
Solution:
- Enabled Smart Guides.
- Used Smart Guides to align the text boxes and images with each other and with the edges of the slide.
- Used Smart Guides to distribute the objects evenly across the slide.
Result: The slide looked much cleaner and more professional, with a clear visual hierarchy.
9.2. Creating a Symmetrical Title Slide
A designer wanted to create a symmetrical title slide for a presentation.
Solution:
- Enabled Smart Guides.
- Used Smart Guides to align the title and subtitle to the center of the slide.
- Used Smart Guides to position an image equidistant from the center of the slide.
Result: The title slide looked balanced and visually appealing, with a strong sense of symmetry.
9.3. Aligning Elements in an Infographic
An infographic designer needed to align several icons and text boxes in an infographic.
Solution:
- Enabled Smart Guides.
- Used Smart Guides to align the icons and text boxes with each other and with the gridlines.
- Used Smart Guides to ensure consistent spacing between the elements.
Result: The infographic looked clean and professional, with a clear visual structure.
10. The Future of Alignment Tools in PowerPoint
As technology evolves, alignment tools in PowerPoint are likely to become even more sophisticated and user-friendly. Here are some potential future developments.
10.1. AI-Powered Alignment Assistance
Future versions of PowerPoint may incorporate AI-powered alignment assistance that automatically suggests optimal object placement based on design principles and user preferences.
10.2. Enhanced Smart Guides with More Indicators
Smart Guides could be enhanced with more indicators that provide additional alignment information, such as relative object sizes and color contrast.
10.3. Integration with Other Design Tools
PowerPoint may become more tightly integrated with other design tools, allowing users to import designs and layouts from other applications and easily align them using Smart Guides.
10.4. Improved Touchscreen Support
As touchscreen devices become more popular, PowerPoint may improve its touchscreen support, making it easier to align objects using touch gestures and Smart Guides.
11. Best Practices for Presentation Design with Smart Guides
Creating effective presentations requires more than just aligning objects. Here are some best practices for presentation design that incorporate the use of Smart Guides.
11.1. Maintain Visual Consistency
Use Smart Guides to maintain visual consistency throughout your presentation. Align titles, text boxes, and images in the same way on each slide to create a cohesive look and feel.
11.2. Create a Clear Visual Hierarchy
Use Smart Guides to create a clear visual hierarchy that guides the audience’s eye through the content. Align the most important elements on the slide to the center or top, and use consistent spacing to separate different sections of content.
11.3. Use White Space Effectively
Use Smart Guides to create white space around your objects, giving them room to breathe and making the slide easier to read. Avoid cluttering the slide with too many elements, and use consistent margins and padding.
11.4. Choose the Right Colors and Fonts
Choose colors and fonts that are visually appealing and easy to read. Use Smart Guides to align text boxes and images with the colors and fonts to create a cohesive design.
12. Common Mistakes to Avoid When Using Smart Guides
While Smart Guides are a powerful tool, it’s easy to make mistakes if you’re not careful. Here are some common mistakes to avoid.
12.1. Over-Reliance on Smart Guides
Don’t rely too heavily on Smart Guides. Use them as a tool to assist you in aligning objects, but don’t let them dictate your design choices. Always use your own judgment and creativity to create visually appealing and effective presentations.
12.2. Ignoring Visual Balance
Even if all your objects are perfectly aligned, the slide may still look unbalanced. Pay attention to the overall visual balance of the slide, and adjust the position of objects as needed to create a harmonious design.
12.3. Cluttering the Slide
Avoid cluttering the slide with too many objects. Even if all the objects are perfectly aligned, the slide may still look overwhelming and difficult to read. Use white space effectively and prioritize the most important elements.
12.4. Neglecting Accessibility
Make sure your presentations are accessible to people with disabilities. Use sufficient color contrast, provide alternative text for images, and use clear and concise language. Smart Guides can help you align elements in a way that is visually appealing and accessible to everyone.
13. Advanced PowerPoint Features That Complement Smart Guides
To further enhance your presentation design skills, explore these advanced PowerPoint features that work well with Smart Guides.
13.1. Layout Masters
Layout Masters allow you to create consistent slide layouts that can be reused throughout your presentation. Use Smart Guides to align elements within the Layout Masters, ensuring that they are consistently positioned on each slide.
13.2. Section Headers
Section headers help you organize your presentation into logical sections. Use Smart Guides to align the section headers with the content on each slide, creating a clear visual structure.
13.3. Animation and Transitions
Animation and transitions can add visual interest to your presentation. Use Smart Guides to align animated objects with other elements on the slide, creating a seamless and engaging experience.
13.4. 3D Models
PowerPoint supports the insertion of 3D models, which can add depth and realism to your presentations. Use Smart Guides to align 3D models with other elements on the slide, creating a visually stunning design.
14. Resources for Learning More About PowerPoint Design
To continue improving your PowerPoint design skills, explore these resources for learning more about presentation design principles and techniques.
14.1. Online Courses and Tutorials
There are many online courses and tutorials that can teach you the basics of PowerPoint design, as well as more advanced techniques. Some popular platforms include Coursera, Udemy, and LinkedIn Learning.
14.2. Design Books and Articles
There are many books and articles that cover the principles of presentation design. Some recommended titles include “Presentation Zen” by Garr Reynolds and “Slide:ology” by Nancy Duarte.
14.3. Design Blogs and Websites
There are many design blogs and websites that offer tips and inspiration for creating effective presentations. Some popular sites include Creative Bloq, Smashing Magazine, and Dribbble.
14.4. PowerPoint Templates and Examples
Studying PowerPoint templates and examples can give you ideas for your own presentations. Microsoft offers a wide variety of templates that you can download and customize, and there are also many websites that offer free and premium templates.
15. The Importance of Accessibility in Presentations
Creating accessible presentations is essential to ensure that everyone can understand and benefit from your content. Here are some key considerations for creating accessible presentations.
15.1. Color Contrast
Use sufficient color contrast between text and background to ensure that the text is easy to read. Aim for a contrast ratio of at least 4.5:1 for normal text and 3:1 for large text.
15.2. Alternative Text for Images
Provide alternative text for all images, so that people who are blind or visually impaired can understand the content of the images. The alternative text should be a brief description of the image that conveys its meaning.
15.3. Clear and Concise Language
Use clear and concise language that is easy to understand. Avoid jargon and complex sentence structures, and use headings and lists to break up the content.
15.4. Keyboard Navigation
Ensure that your presentation can be navigated using the keyboard. Use a logical tab order and provide clear instructions for using the keyboard to navigate the presentation.
16. Ethical Considerations in Presentation Design
Ethical considerations are also important in presentation design. Here are some guidelines for creating ethical and responsible presentations.
16.1. Accuracy and Honesty
Ensure that all the information in your presentation is accurate and honest. Avoid making false or misleading claims, and cite your sources properly.
16.2. Respect for Intellectual Property
Respect the intellectual property of others. Obtain permission before using copyrighted material, and give credit to the original creators.
16.3. Avoid Bias and Discrimination
Avoid bias and discrimination in your presentation. Use inclusive language and imagery, and be sensitive to cultural differences.
16.4. Transparency and Disclosure
Be transparent and disclose any conflicts of interest. If you are being paid to promote a product or service, disclose this to your audience.
17. How to Keep Up with PowerPoint Updates and New Features
PowerPoint is constantly evolving, with new features and updates being released regularly. Here are some tips for staying up-to-date with the latest developments.
17.1. Follow the Microsoft Office Blog
The Microsoft Office Blog is a great resource for learning about new features and updates in PowerPoint. Subscribe to the blog to receive regular updates.
17.2. Attend Microsoft Conferences and Events
Microsoft hosts conferences and events throughout the year where they announce new features and updates. Attending these events can give you a sneak peek at what’s coming in future versions of PowerPoint.
17.3. Join Online Communities and Forums
There are many online communities and forums where you can discuss PowerPoint design and learn from other users. Some popular communities include the Microsoft Community and the PowerPoint subreddit.
17.4. Experiment with New Features
The best way to learn about new features in PowerPoint is to experiment with them yourself. When a new feature is released, take some time to try it out and see how it can improve your presentations.
18. The Role of CONDUCT.EDU.VN in Promoting Ethical Conduct
CONDUCT.EDU.VN plays a crucial role in promoting ethical conduct by providing resources and information on ethical principles and best practices. The website offers guidance on a variety of topics, including workplace ethics, academic integrity, and social responsibility.
18.1. Resources for Ethical Decision-Making
CONDUCT.EDU.VN provides resources for ethical decision-making, helping individuals and organizations make informed choices that align with ethical principles.
18.2. Case Studies and Examples
The website features case studies and examples that illustrate ethical dilemmas and provide guidance on how to resolve them.
18.3. Training and Workshops
CONDUCT.EDU.VN offers training and workshops on ethical conduct, helping individuals and organizations develop the skills and knowledge they need to make ethical decisions.
18.4. Promoting a Culture of Ethics
CONDUCT.EDU.VN promotes a culture of ethics by encouraging individuals and organizations to prioritize ethical conduct in all their activities.
19. Frequently Asked Questions (FAQ) About Smart Guides in PowerPoint
Here are some frequently asked questions about Smart Guides in PowerPoint.
Q1: What are Smart Guides in PowerPoint?
Smart Guides are temporary visual cues that appear when you move or resize objects on a slide, helping you align these objects with other elements on the slide or the slide itself.
Q2: How do I enable or disable Smart Guides?
To enable or disable Smart Guides, go to the View tab in the PowerPoint ribbon and check or uncheck the Smart Guides checkbox.
Q3: Are Smart Guides the same as gridlines?
No, Smart Guides are dynamic and appear only when needed, while gridlines are static and cover the entire slide.
Q4: Can I customize Smart Guides?
No, Smart Guides cannot be customized. They function automatically based on the position of objects on the slide.
Q5: How do I use Smart Guides to align objects?
To use Smart Guides, select an object and move it around the slide. Pay attention to the Smart Guide indicators that appear and release the mouse button when the desired alignment is achieved.
Q6: What if Smart Guides are not appearing?
Make sure that Smart Guides are enabled in the PowerPoint settings. If they are enabled and still not appearing, try restarting PowerPoint.
Q7: Can Smart Guides help with equal spacing?
Yes, Smart Guides can help you distribute objects evenly across the slide by showing when objects are equidistant from each other.
Q8: How do I combine Smart Guides with other alignment tools?
You can combine Smart Guides with the Align Objects tool, gridlines, and guides for even greater precision. Use Smart Guides to fine-tune the alignment of objects after using these other tools.
Q9: Are there keyboard shortcuts for using Smart Guides?
While there are no specific keyboard shortcuts for Smart Guides, you can use the arrow keys to nudge selected objects into precise alignment.
Q10: Where can I learn more about PowerPoint design principles?
There are many online courses, books, and websites that can teach you the basics of PowerPoint design, as well as more advanced techniques.
20. Conclusion: Mastering Smart Guides for Professional Presentations
Mastering Smart Guides in PowerPoint is essential for creating professional, visually appealing, and ethically sound presentations. By understanding how to use Smart Guides effectively, you can ensure that your objects are aligned properly, your layouts are balanced, and your presentations are easy to read and understand. Always remember to consider ethical conduct in your presentation design, ensuring accuracy, respect for intellectual property, and avoiding bias and discrimination. For more information on ethical guidelines and resources, visit conduct.edu.vn at 100 Ethics Plaza, Guideline City, CA 90210, United States, or contact us via WhatsApp at +1 (707) 555-1234.
Remember, effective use of smart guides along with a commitment to ethical practices can elevate your presentations from ordinary to outstanding. Embrace these tools and principles to enhance your communication and create a positive impact with your audience.